Versioned migrations on Kubernetes with the Atlas Operator

You can now use the Atlas Kubernetes Operator to run versioned migrations natively from your Kubernetes cluster.
Introduction
The Atlas Kubernetes Operator is a Kubernetes operator that enables you to manage your database schemas natively from your Kubernetes cluster. By exposing custom resource definitions (CRD) the operator extends the Kubernetes API to support database schema management.
In a previous blog post we demonstrated how to use the Atlas Operator for the declarative (state-based) workflow in which you define the desired state of your database schema in a Kubernetes manifest and the operator takes care of the rest.
State vs. versioned based migrations is a common and unresolved debate in the database schema management world, and we built Atlas to support both from the get-go.
Today, we are happy to announce v0.2.0 of the Atlas Kubernetes Operator which adds support support for the versioned migration workflow.
In this blog post we will demonstrate how to use the Atlas Operator this new workflow.
How it works
The Atlas Kubernetes Operator supports versioned migrations.
In versioned migrations, the database schema is defined by a series of SQL scripts ("migrations") that are applied
in order. The user can specify the version and migration directory to run, which can be located
on the Atlas Cloud or stored as a ConfigMap in your Kubernetes
cluster.
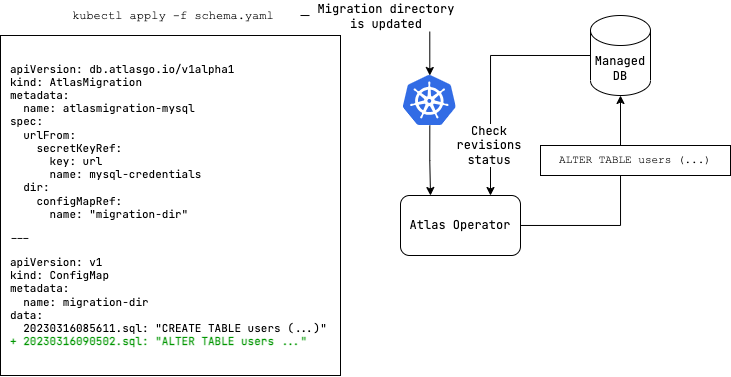
In this workflow, after installing the Atlas Kubernetes Operator, the user defines the desired state of the database
as an AtlasMigration resource which connects between a target database and a migration directory. The migration directory
may be configured as a remote directory in Atlas Cloud or as a ConfigMap in your Kubernetes
cluster.
The operator then reconciles the desired state with the actual state of the database by applying any pending migrations on the target database.
Demo time
In this demo we will use the Atlas Kubernetes Operator to run versioned migrations on a MySQL database.
Prerequisites
- A Kubernetes cluster - you can use Minikube to quickly spin up a local cluster.
- kubectl configured to connect to your cluster.
- Helm, the Kubernetes package manager, locally installed.
- The Atlas CLI tool, locally installed.
1. Install the Atlas Kubernetes Operator
The Atlas Kubernetes Operator is available as a Helm Chart. To install the chart with the release
name atlas-operator:
helm install atlas-operator oci://ghcr.io/ariga/charts/atlas-operator
2. Install a database
Create a MySQL database and a secret with an Atlas URL to the database:
kubectl apply -f https://raw.githubusercontent.com/ariga/atlas-operator/65dce84761354d1766041c7f286b35cc24ffdddb/config/integration/databases/mysql.yaml
Result:
deployment.apps/mysql created
service/mysql created
secret/mysql-credentials created
In this example, we are using a plain MySQL pod as a database. In a real-world scenario, you would probably use a managed database service such as Amazon RDS or Google Cloud SQL.
3. Set up a migration directory
With the operator and the database running, let's set up the migration directory which we will use to manage our database schema.
You can use the directory from an existing project, but for the sake of this demo we will use the Atlas template repo which contains a simple migration directory.
git clone git@github.com:ariga/atlas-template.git versioned-demo
Observe this directory contains a migrations directory with a couple of
migration scripts:
cd versioned-demo
tree migrations
 tree migrations
migrations
├── 20230316085611.sql
├── 20230316090502.sql
└── atlas.sum
4. Create a ConfigMap with the migration directory
The operator supports two ways to manage your migration directory:
- Atlas Cloud - a cloud-based directory that is managed by Atlas.
ConfigMap- a Kubernetes resource that contains the migration directory files as key-value pairs.
In this demo we will use a ConfigMap to manage our migration directory. To create a ConfigMap
with the migration directory files:
kubectl create configmap migrations --from-file=migrations -o yaml --dry-run=client --save-config > migrations.yaml
The above command creates a YAML named migrations.yaml file with the migration directory files. It should look something like this:
apiVersion: v1
data:
  20230316085611.sql: |
    -- Create "users" table
    CREATE TABLE `users` (
      `id` int NOT NULL,
      `user_name` varchar(255) NOT NULL,
      `email` varchar(255) NOT NULL,
      PRIMARY KEY (`id`)
    ) CHARSET utf8mb4 COLLATE utf8mb4_0900_ai_ci;
  20230316090502.sql: |
    -- Create "posts" table
    CREATE TABLE `posts` (
      `id` int NOT NULL,
      `user_id` int NOT NULL,
      `title` varchar(255) NOT NULL,
      `body` text NOT NULL,
      PRIMARY KEY (`id`),
      INDEX `user_id` (`user_id`),
      CONSTRAINT `posts_ibfk_1` FOREIGN KEY (`user_id`) REFERENCES `users` (`id`) ON UPDATE NO ACTION ON DELETE CASCADE
    ) CHARSET utf8mb4 COLLATE utf8mb4_0900_ai_ci;
  atlas.sum: |
    h1:XBXbh+rzLis8gknjlIqnxXLBkOZ+sN2v2p7KjyVFYYM=
    20230316085611.sql h1:br6W6LPEnnsejlz/7hRm9zthwStCzjN2vZkqVPxlmvo=
    20230316090502.sql h1:GfeRjkSeoCt3JVRtLQNa/r50lRfpAPXS7AqTU2ZNFgY=
kind: ConfigMap
metadata:
  annotations:
    kubectl.kubernetes.io/last-applied-configuration: |
      {"kind":"ConfigMap","apiVersion":"v1","metadata":{"name":"migrations","creationTimestamp":null},"data":{"20230316085611.sql":"-- Create \"users\" table\nCREATE TABLE `users` (\n  `id` int NOT NULL,\n  `user_name` varchar(255) NOT NULL,\n  `email` varchar(255) NOT NULL,\n  PRIMARY KEY (`id`)\n) CHARSET utf8mb4 COLLATE utf8mb4_0900_ai_ci;\n","20230316090502.sql":"-- Create \"posts\" table\nCREATE TABLE `posts` (\n  `id` int NOT NULL,\n  `user_id` int NOT NULL,\n  `title` varchar(255) NOT NULL,\n  `body` text NOT NULL,\n  PRIMARY KEY (`id`),\n  INDEX `user_id` (`user_id`),\n  CONSTRAINT `posts_ibfk_1` FOREIGN KEY (`user_id`) REFERENCES `users` (`id`) ON UPDATE NO ACTION ON DELETE CASCADE\n) CHARSET utf8mb4 COLLATE utf8mb4_0900_ai_ci;\n","atlas.sum":"h1:XBXbh+rzLis8gknjlIqnxXLBkOZ+sN2v2p7KjyVFYYM=\n20230316085611.sql h1:br6W6LPEnnsejlz/7hRm9zthwStCzjN2vZkqVPxlmvo=\n20230316090502.sql h1:GfeRjkSeoCt3JVRtLQNa/r50lRfpAPXS7AqTU2ZNFgY=\n"}}
  name: migrations
Apply the ConfigMap to your cluster:
kubectl apply -f migrations.yaml
Kubernetes will create a ConfigMap named migrations with the migration directory files:
configmap/migrations created
5. Create an AtlasMigration resource
Now that we have a database and a migration directory, we can create an AtlasMigration resource
to manage our database schema. The AtlasMigration resource is a custom resource that you use
to define the desired state of your database schema. The operator will then reconcile the actual
state of your database schema with the desired state.
To create an AtlasMigration resource, create a YAML file named atlas-migration.yaml with the
following content:
apiVersion: db.atlasgo.io/v1alpha1
kind: AtlasMigration
metadata:
  name: atlas-migration
spec:
  urlFrom:
    secretKeyRef:
      key: url
      name: mysql-credentials
  dir:
    configMapRef:
      name: "migrations"
After you create the atlas-migration.yaml file, apply it to your cluster:
kubectl apply -f atlas-migration.yaml
Next, let's wait for the resource to enter a "Ready" state:
kubectl wait --for=condition=Ready atlasmigration/atlas-migration
When the operator finishes reconciling the AtlasMigration resource, the AtlasMigration
resource will be ready:
atlasmigration.db.atlasgo.io/atlas-migration condition met
6. Verify the migrations were applied
Finally, to verify the migrations were applied, connect to the database and check to see
if the users table was created:
kubectl exec -it $(kubectl get pods -l app=mysql -o jsonpath='{.items[0].metadata.name}') -- mysql -uroot -ppass -e "describe myapp.users"
You should see the following output:
+-----------+--------------+------+-----+---------+-------+
| Field     | Type         | Null | Key | Default | Extra |
+-----------+--------------+------+-----+---------+-------+
| id        | int          | NO   | PRI | NULL    |       |
| user_name | varchar(255) | NO   |     | NULL    |       |
| email     | varchar(255) | NO   |     | NULL    |       |
+-----------+--------------+------+-----+---------+-------+
Check that the posts table was created as well:
kubectl exec -it $(kubectl get pods -l app=mysql -o jsonpath='{.items[0].metadata.name}') -- mysql -uroot -ppass -e "describe myapp.posts"
You should see the following output:
+---------+--------------+------+-----+---------+-------+
| Field   | Type         | Null | Key | Default | Extra |
+---------+--------------+------+-----+---------+-------+
| id      | int          | NO   | PRI | NULL    |       |
| user_id | int          | NO   | MUL | NULL    |       |
| title   | varchar(255) | NO   |     | NULL    |       |
| body    | text         | NO   |     | NULL    |       |
+---------+--------------+------+-----+---------+-------+
And that's it! You've successfully deployed the Atlas Operator and applied migrations to your database.
Conclusion
In this blog post, we showed you how to use the Atlas Operator to manage your database schema in Kubernetes using a versioned migrations workflow. To learn more about the Atlas Operator, check out the Atlas Operator GitHub repository as well as the documentation on the Atlas website.
How can we make Atlas better?
We would love to hear from you on our Discord server ❤️.