Automatic migrations for Microsoft SQL Server

In this guide we will demonstrate how to use Atlas to automatically generate migrations for Microsoft SQL Server databases.
To skip the intro and go straight to the demo, click here.
Introduction
As your application's data model evolves, you will need to make changes to your database schema. In today's world, where teams are expected to own their infrastructure and ship code faster than ever, it is important to have a reliable and repeatable process for managing database schema changes.
Atlas lets you manage your database schema as code. It is a modern schema management tool that applies concepts from modern DevOps tools to database schema management. Using Atlas, teams can automatically plan, verify, deploy and monitor database schema changes.
Microsoft SQL Server, one of the longest-standing database engines in our business, was first released by Microsoft in 1989. MS-SQL is the go-to database for Windows environments in many industries.
In this guide, we will demonstrate how to use Atlas to automatically generate migrations for your Microsoft SQL Server databases.
Setting up
SQL Server is no longer in beta and is available automatically to all Atlas Pro users. To use the SQL driver, simply run atlas login.
-
Start by installing the Atlas CLI, if you haven't already. On macOS and Linux simply run:
curl -sSf https://atlasgo.sh | shFor other platforms, see the installation instructions.
-
The SQL Server driver is currently available to users of Atlas Cloud Beta Program. To join the program (for free), first sign up for an Atlas Cloud account.
-
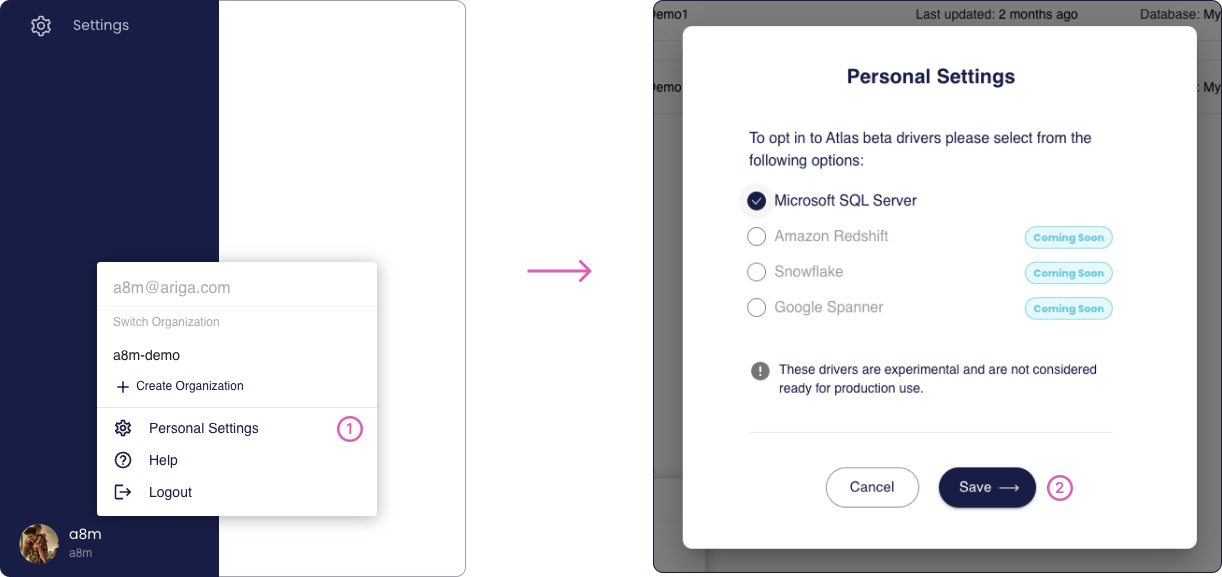
Once your inside your Atlas account, go to the account settings by clicking your avatar. Then, select the "Microsoft SQL Server" and click the "Save" button.
-
After you have opted-in to the Beta Program, log in to your Atlas account using the CLI:
$ atlas login
You are now connected to "a8m" on Atlas Cloud.
Demo time!
In this guide, we will demonstrate some of the basic capabilities of Atlas by working against a local Microsoft SQL Server database.
To spin up a local SQL Server instance using docker run:
docker run --rm -e 'ACCEPT_EULA=Y' -e 'MSSQL_SA_PASSWORD=P@ssw0rd0995' -p 1433:1433 -d mcr.microsoft.com/mssql/server:latest
Notice that by passing the ACCEPT_EULA environment variable, we are accepting the terms of Microsoft's
EULA.
Managing your database schema as code
Atlas supports a workflow called declarative schema migrations. In this workflow, you first define the desired state of your database schema (in one of many supported formats and languages) and then let Atlas calculate the diff between the desired state and the actual state of your database. Atlas then generates the needed SQL commands that will bring your database to the desired state.
Let's see this in action. First, create a new file name schema.sql. This file will contain the desired
state of our database in plain SQL.
-- Create the users table
CREATE TABLE users (
    id INT PRIMARY KEY,
    email NVARCHAR(255) UNIQUE,
    display_name NVARCHAR(255)
);

-- Create the posts table with a custom name for the FK constraint
CREATE TABLE posts (
    id INT PRIMARY KEY,
    title NVARCHAR(255),
    body TEXT,
    author_id INT,
    CONSTRAINT author_fk FOREIGN KEY (author_id) REFERENCES users(id)
);
Applying our schema
Next, let's apply this schema to our database. To do so, we will use the atlas schema apply command.
atlas schema apply -u "sqlserver://sa:P@ssw0rd0995@localhost:1433?database=master" \
  --to file://schema.sql \
  --dev-url "docker://sqlserver"
Atlas will connect to our target database to inspect it's current state. Next, it will use the dev-database to normalize our schema and finally, it will generate the SQL commands that will bring our database to the desired state:
-- Planned Changes:
-- Create "users" table
CREATE TABLE [users] ([id] int NOT NULL, [email] nvarchar(255) COLLATE SQL_Latin1_General_CP1_CI_AS NULL, [display_name] nvarchar(255) COLLATE SQL_Latin1_General_CP1_CI_AS NULL, CONSTRAINT [PK_users] PRIMARY KEY CLUSTERED ([id] ASC));
-- Create index "UQ__users__AB6E61643C9DEB30" to table: "users"
CREATE UNIQUE NONCLUSTERED INDEX [UQ__users__AB6E61643C9DEB30] ON [users] ([email] ASC);
-- Create "posts" table
CREATE TABLE [posts] ([id] int NOT NULL, [title] nvarchar(255) COLLATE SQL_Latin1_General_CP1_CI_AS NULL, [body] text COLLATE SQL_Latin1_General_CP1_CI_AS NULL, [author_id] int NULL, CONSTRAINT [PK_posts] PRIMARY KEY CLUSTERED ([id] ASC), CONSTRAINT [post_author_fk] FOREIGN KEY ([author_id]) REFERENCES [users] ([id]) ON UPDATE NO ACTION ON DELETE NO ACTION);
Atlas prompts us to approve the changes before applying them to the database:
Use the arrow keys to navigate: ↓ ↑ → ←
? Are you sure?:
  ▸ Apply
    Abort
After applying the schema, Atlas confirms that the changes were applied:
✔ Apply
Next, let's re-run the atlas schema apply command. This time, Atlas will detect that the database is
already in the desired state and will not generate any changes:
Schema is synced, no changes to be made.
Altering our schema
Now, let's make some changes to our schema. Open the schema.sql file and add a new column to the users table:
CREATE TABLE users (
    id INT PRIMARY KEY,
    email NVARCHAR(255) UNIQUE,
    display_name NVARCHAR(255),
+    bio text
);
Next, let's re-run the atlas schema apply command. This time, Atlas will detect that the schema has changed
and will generate the needed SQL commands to bring the database to the desired state:
-- Planned Changes:
-- Modify "users" table
ALTER TABLE [users] ADD [bio] text COLLATE SQL_Latin1_General_CP1_CI_AS NULL;
After applying the changes, Atlas confirms once again that the changes were applied:
✔ Apply
Visualizing our schema
One of the most useful features of Atlas is the ability to visualize your database schema. To do so, run the
atlas schema inspect command with the -w (web) flag:
atlas schema inspect -u "sqlserver://sa:P@ssw0rd0995@localhost:1433?database=master" -w
Atlas will ask whether you would like to create your visualization publicly (in a publicly accessible URL) or privately (in your Atlas Cloud account):
Use the arrow keys to navigate: ↓ ↑ → ←
? Where would you like to share your schema visualization?:
  ▸ Publicly (gh.atlasgo.cloud)
    Privately (rotemtam85.atlasgo.cloud)
For this demo, let's choose the public option. Atlas will create the visualization and open it in your default browser:

See it for yourself at: https://gh.atlasgo.cloud/explore/5e15289a
Wrapping up
In this guide we have demonstrated how to set up Atlas to manage your Microsoft SQL Server database schema. We have also demonstrated some of the basic capabilities of Atlas, such as declarative schema migrations, and schema visualization. These two features are just the tip of the iceberg. Atlas has many more features that can help you better manage your database! To learn more, check out the Atlas documentation.
As always, we would love to hear your feedback and suggestions on our Discord server.