Atlas v0.36: Snowflake Beta, PostgreSQL Partitions, Azure DevOps, and More

Hey everyone!
We're excited to announce the release of Atlas v0.36 with a comprehensive set of new features and improvements that further strengthen Atlas as your go-to database schema management tool:
- Snowflake Driver Beta - Atlas now supports Snowflake databases in beta, expanding our data warehouse schema management capabilities.
- PostgreSQL Partitions - Declarative management of PostgreSQL partitions has long been a top community request, and we are excited to say it's now available!
- Azure DevOps Integration - Seamless CI/CD integration with Azure DevOps pipelines for database schema management.
- Google Spanner Beta - Beta support for Google Cloud Spanner, bringing Atlas to Google's horizontally scalable and globally distributed database.
- Datadog SIEM Support - Enhanced security monitoring with Datadog integration for audit logs and schema monitoring.
- ORM Schema Linting - Advanced schema validation and policy enforcement for all supported ORM integrations.
- Explain Pipelines Errors - New AI-powered error explanations to help you quickly understand and resolve deployment errors with Atlas Pipelines.
Snowflake Driver Beta
The Snowflake Driver is currently in beta and supports core table and column operations. Advanced features are being added incrementally.
We're thrilled to announce beta support for Snowflake, one of the most popular cloud-based data warehouses. This addition expands Atlas's multi-cloud capabilities, enabling teams to manage schemas across traditional databases and modern data platforms.
Snowflake support is an Atlas Pro feature and is currently in beta.
- macOS + Linux
- Docker
- Windows
To download and install the custom release of the Atlas CLI, simply run the following in your terminal:
curl -sSf https://atlasgo.sh | ATLAS_FLAVOR="snowflake" sh
To pull the Atlas image and run it as a Docker container:
docker pull arigaio/atlas:latest-extended
docker run --rm arigaio/atlas:latest-extended --help
If the container needs access to the host network or a local directory, use the --net=host flag and mount the desired
directory:
docker run --rm --net=host \
  -v $(pwd)/migrations:/migrations \
  arigaio/atlas:latest-extended migrate apply \
  --url "oracle://PDBADMIN:Pssw0rd0995@localhost:1521/FREEPDB1"
Download the custom release and move the atlas binary to a file location on your system PATH.
Getting Started with Snowflake
This quick guide will help you connect Atlas to your Snowflake account and inspect your schema in just a few steps.
For a more detailed walkthrough, check out our Snowflake Portal.
Snowflake support is an Atlas Pro feature. You can try out Atlas Pro for free by signing up or running:
atlas login
Open the Snowflake Worksheet and run:
--- Create a test database
CREATE DATABASE IF NOT EXISTS TESTDB;

-- Create a table
CREATE OR REPLACE TABLE TESTDB.PUBLIC.ORDERS (
    ORDER_ID         NUMBER,
    CUSTOMER_ID      NUMBER,
    ORDER_DATE       DATE,
    AMOUNT           NUMBER(10, 2),
    STATUS           STRING
);

-- Create a view
CREATE OR REPLACE VIEW RECENT_ORDERS AS
SELECT *
FROM TESTDB.PUBLIC.ORDERS
WHERE ORDER_DATE >= DATEADD(DAY, -30, CURRENT_DATE());
Run this in Snowflake Worksheet to generate your Atlas URL:
SELECT
  'snowflake://' || CURRENT_USER() || ':' || '$SNOWFLAKE_PASSWORD' || '@' ||
  CURRENT_ORGANIZATION_NAME() || '-' || CURRENT_ACCOUNT_NAME() ||
  '/TESTDB?warehouse=' || CURRENT_WAREHOUSE() AS connection_string;
You’ll get something like:
snowflake://***:$PASSWORD@***/TESTDB?warehouse=***
Next, set your Snowflake password as an environment variable:
export SNOWFLAKE_PASSWORD="your_snowflake_password"
If you prefer to use PROGRAMMATIC_ACCESS_TOKEN for authentication, you can use it as the password.
After everything is set up, inspect your database schema with Atlas:
atlas schema inspect -u "snowflake://user:$SNOWFLAKE_PASSWORD@ABC-123/TESTDB?warehouse=DEFAULT-WAREHOUSE"
This will print your schema in the terminal:
schema "PUBLIC" {
  retention_time = 1
}
table "ORDERS" {
  schema         = schema.PUBLIC
  retention_time = 1
  column "ORDER_ID" {
    null = true
    type = NUMBER(38)
  }
  column "CUSTOMER_ID" {
    null = true
    type = NUMBER(38)
  }
  column "ORDER_DATE" {
    null = true
    type = DATE
  }
  column "AMOUNT" {
    null = true
    type = NUMBER(10,2)
  }
  column "STATUS" {
    null = true
    type = VARCHAR(16777216)
  }
}
view "RECENT_ORDERS" {
  schema = schema.PUBLIC
  column "ORDER_ID" {
    null = true
    type = NUMBER(38)
  }
  column "CUSTOMER_ID" {
    null = true
    type = NUMBER(38)
  }
  column "ORDER_DATE" {
    null = true
    type = DATE
  }
  column "AMOUNT" {
    null = true
    type = NUMBER(10,2)
  }
  column "STATUS" {
    null = true
    type = VARCHAR(16777216)
  }
  as = <<-SQL
  SELECT *
  FROM TESTDB.PUBLIC.orders
  WHERE order_date >= DATEADD(DAY, -30, CURRENT_DATE());
  SQL
}
As with our other beta programs, we're looking for feedback from early adopters. If you're interested in participating:
Snowflake Beta Feedback Program
PostgreSQL Partitions
PostgreSQL table partitioning is a powerful feature for managing large datasets by splitting tables into smaller, more manageable pieces. Atlas now provides full support for PostgreSQL partitions, including declarative management and automatic migration planning.
With Atlas's Schema-as-Code approach, you can automate partition management for frequently-changing setups, like daily partitions. Both HCL and SQL syntax are supported. Here's how it looks:
- HCL
- SQL
This example defines a logs table partitioned by log_time, and uses for_each to generate daily range partitions
for the next 7 days starting from today.
table "logs" {
  schema = schema.public
  column "log_time" {
    null = false
    type = timestamptz
  }
  // ...
  partition {
    type    = RANGE
    columns = [column.log_time]
  }
}
locals {
  now             = timestamp()
  days_ahead      = [0, 1, 2, 3, 4, 5, 6, 7]
  partition_dates = [for d in local.days_ahead : formatdate("YYYY-MM-DD", timeadd(local.now, "${d * 24}h"))]
}
partition {
  for_each = [
    for i in range(0, length(local.partition_dates) - 1) : {
      name = format("logs_%s", replace(local.partition_dates[i], "-", ""))
      from = local.partition_dates[i]
      to   = local.partition_dates[i + 1]
    }
  ]
  name = each.value.name // logs_20250720, ..., logs_20250726.
  schema = schema.public
  of     = table.logs
  range {
    from = ["'${each.value.from}'"]
    to   = ["'${each.value.to}'"]
  }
}
Given the following atlas.hcl, Atlas computes a list of partition ranges based on the current timestamp.
These values are passed into a SQL template to create a partitioned logs table with daily partitions:
locals {
  now             = timestamp()
  days_ahead      = [0, 1, 2, 3, 4, 5, 6, 7]
  partition_dates = [for d in local.days_ahead : formatdate("YYYY-MM-DD", timeadd(local.now, "${d * 24}h"))]
}

data "template_dir" "app" {
  path = "schema"
  vars = {
    Partitions = jsonencode([
      for i in range(0, length(local.partition_dates) - 1) : {
        Name = format("logs_%s", replace(local.partition_dates[i], "-", ""))
        From = local.partition_dates[i]
        To   = local.partition_dates[i + 1]
      }
    ])
  }
}
CREATE TABLE "logs" (
  "id" bigserial NOT NULL,
  "log_time" timestamptz NOT NULL,
  "message" text NOT NULL,
  "source" text NULL,
  PRIMARY KEY ("id", "log_time")
) PARTITION BY RANGE ("log_time");

{{ range $p := jsondecode $.Partitions }}
  CREATE TABLE {{ $p.Name }} PARTITION OF logs
    FOR VALUES FROM ('{{ $p.From }}') TO ('{{ $p.To }}');
{{ end }}
Running atlas schema apply with the schema definition above will generate the following plan:
Planning migration statements (8 in total):

  -- create "logs" table:
    -> CREATE TABLE "logs" (
         "id" bigserial NOT NULL,
         "log_time" timestamptz NOT NULL,
         "message" text NOT NULL,
         "source" text NULL,
         PRIMARY KEY ("id", "log_time")
       ) PARTITION BY RANGE ("log_time");
  -- create "logs_20250720" partition:
    -> CREATE TABLE "logs_20250720" PARTITION OF "logs" FOR VALUES FROM ('2025-07-20 00:00:00+00') TO ('2025-07-21 00:00:00+00');
  -- create "logs_20250721" partition:
    -> CREATE TABLE "logs_20250721" PARTITION OF "logs" FOR VALUES FROM ('2025-07-21 00:00:00+00') TO ('2025-07-22 00:00:00+00');
  -- create "logs_20250722" partition:
    -> CREATE TABLE "logs_20250722" PARTITION OF "logs" FOR VALUES FROM ('2025-07-22 00:00:00+00') TO ('2025-07-23 00:00:00+00');
  -- create "logs_20250723" partition:
    -> CREATE TABLE "logs_20250723" PARTITION OF "logs" FOR VALUES FROM ('2025-07-23 00:00:00+00') TO ('2025-07-24 00:00:00+00');
  -- create "logs_20250724" partition:
    -> CREATE TABLE "logs_20250724" PARTITION OF "logs" FOR VALUES FROM ('2025-07-24 00:00:00+00') TO ('2025-07-25 00:00:00+00');
  -- create "logs_20250725" partition:
    -> CREATE TABLE "logs_20250725" PARTITION OF "logs" FOR VALUES FROM ('2025-07-25 00:00:00+00') TO ('2025-07-26 00:00:00+00');
  -- create "logs_20250726" partition:
    -> CREATE TABLE "logs_20250726" PARTITION OF "logs" FOR VALUES FROM ('2025-07-26 00:00:00+00') TO ('2025-07-27 00:00:00+00');
...
Azure DevOps Integration
Atlas now provides comprehensive integration with Azure DevOps, making it easy to incorporate database schema management into your existing Azure-based CI/CD pipelines.
Using this integration, Azure DevOps users can create, apply, plan, lint, and roll back migrations (and more) automatically
by including their corresponding Atlas tasks in an azure-pipelines.yml file. The results of these tasks are logged
in Azure Pipelines and can be pushed to your Atlas account to visualize the changes that have been made to your schema.
To start using Atlas tasks in your azure-pipelines.yml file, add the following contents, making sure to include your
Atlas Token to authenticate with Atlas Cloud:
trigger:
- master
pool:
  vmImage: ubuntu-latest
steps:
- script: curl -sSf https://atlasgo.sh | sh
  displayName: Install Atlas
- script: atlas login --token $(ATLAS_TOKEN)
  displayName: Atlas Login
// tasks begin here
You can find the full list of Atlas tasks to follow these steps with in our Azure DevOps documentation.
For a full demonstration, check out our recent video showing an example of using Azure Pipelines with a GitHub
connection to execute migrate lint, migrate diff, and migrate push tasks to perform versioned migrations
and deploy to Atlas Cloud.
Google Spanner Beta
Google Spanner support is currently in beta and focuses on core table and index operations. Advanced Cloud Spanner features are being added progressively.
Google Cloud Spanner support brings globally distributed database capabilities to Atlas. As a NewSQL database that combines the consistency of traditional relational databases with the scale of NoSQL systems, Spanner requires specialized schema management approaches.
Spanner-Specific Features
Atlas recognizes and supports Spanner's unique characteristics:
- Interleaved Tables - Parent-child table relationships for data locality
- Global Indexes - Indexes that span multiple regions
- Commit Timestamps - Automatic timestamp columns for versioning
Example Schema
CREATE TABLE Customers (
  CustomerId   STRING(36) NOT NULL,
  Name         STRING(MAX) NOT NULL,
  CreatedAt    TIMESTAMP NOT NULL OPTIONS (allow_commit_timestamp = TRUE)
) PRIMARY KEY (CustomerId);

CREATE TABLE Orders (
  CustomerId   STRING(36) NOT NULL,
  OrderId      INT64 NOT NULL,
  OrderDate    TIMESTAMP NOT NULL OPTIONS (allow_commit_timestamp = TRUE),
  Amount       NUMERIC NOT NULL
) PRIMARY KEY (CustomerId, OrderId),
  INTERLEAVE IN PARENT Customers ON DELETE CASCADE;
Migration Planning for Spanner
Atlas understands Spanner's schema change limitations and plans migrations accordingly:
atlas schema apply -u "spanner://projects/my-project/instances/my-instance/databases/my-db" \
  --to file://spanner-schema.sql \
  --dev-url "docker://spanner/latest" \
  --tx-mode=none
Atlas will connect to our Spanner database to inspect its current state. Next, it will use the dev-database to normalize our schema and generate the SQL commands that will bring our database to the desired state:
Planning migration statements (2 in total):

  -- create "customers" table:
    -> CREATE TABLE `Customers` (
         `CustomerId` STRING(36) NOT NULL,
         `Name` STRING(2621440) NOT NULL,
         `CreatedAt` TIMESTAMP NOT NULL OPTIONS (allow_commit_timestamp = true)
       ) PRIMARY KEY (`CustomerId`)
  -- create "orders" table:
    -> CREATE TABLE `Orders` (
         `CustomerId` STRING(36) NOT NULL,
         `OrderId` INT64 NOT NULL,
         `OrderDate` TIMESTAMP NOT NULL OPTIONS (allow_commit_timestamp = true),
         `Amount` NUMERIC NOT NULL
       ) PRIMARY KEY (`CustomerId`, `OrderId`),
       INTERLEAVE IN PARENT `Customers` ON DELETE CASCADE

-------------------------------------------

Analyzing planned statements (2 in total):

  -- no diagnostics found

  -------------------------
  -- 333.193167ms
  -- 2 schema changes

-------------------------------------------

? Approve or abort the plan:
  ▸ Approve and apply
    Abort
After applying the schema, Atlas confirms that the changes were applied:
Applying approved migration (2 statements in total):

  -- create "customers" table
    -> CREATE TABLE `Customers` (
         `CustomerId` STRING(36) NOT NULL,
         `Name` STRING(2621440) NOT NULL,
         `CreatedAt` TIMESTAMP NOT NULL OPTIONS (allow_commit_timestamp = true)
       ) PRIMARY KEY (`CustomerId`)
  -- ok (12.573118834s)

  -- create "orders" table
    -> CREATE TABLE `Orders` (
         `CustomerId` STRING(36) NOT NULL,
         `OrderId` INT64 NOT NULL,
         `OrderDate` TIMESTAMP NOT NULL OPTIONS (allow_commit_timestamp = true),
         `Amount` NUMERIC NOT NULL
       ) PRIMARY KEY (`CustomerId`, `OrderId`),
       INTERLEAVE IN PARENT `Customers` ON DELETE CASCADE
  -- ok (6.475747s)

  -------------------------
  -- 19.049065s
  -- 1 migration
  -- 2 sql statements
Next, let's re-run the atlas schema apply command. This time, Atlas will detect that the database is
already in the desired state and will not generate any changes:
Schema is synced, no changes to be made
Join our beta program to help shape Spanner support:
Google Spanner Beta Feedback Program
Datadog SIEM Support
Many companies often require that third-party tools, such as Atlas, be integrated with their security information and event management (SIEM) systems.
Atlas's Enterprise Plan supports Audit Logs, which keep track of important security events and setting changes in your Atlas account. Today, we are excited to announce that Atlas now supports sending these Audit Logs to Datadog SIEM, enabling you to monitor and analyze your Atlas events alongside your other security data.
To send audit logs and metrics from Atlas Cloud to Datadog, follow these steps:
1. Navigate to Settings > Integrations in the Atlas Cloud dashboard.
2. In the Datadog integration section, enter your Datadog API Key and select the appropriate Datadog Site (e.g., datadoghq.com, datadoghq.eu).
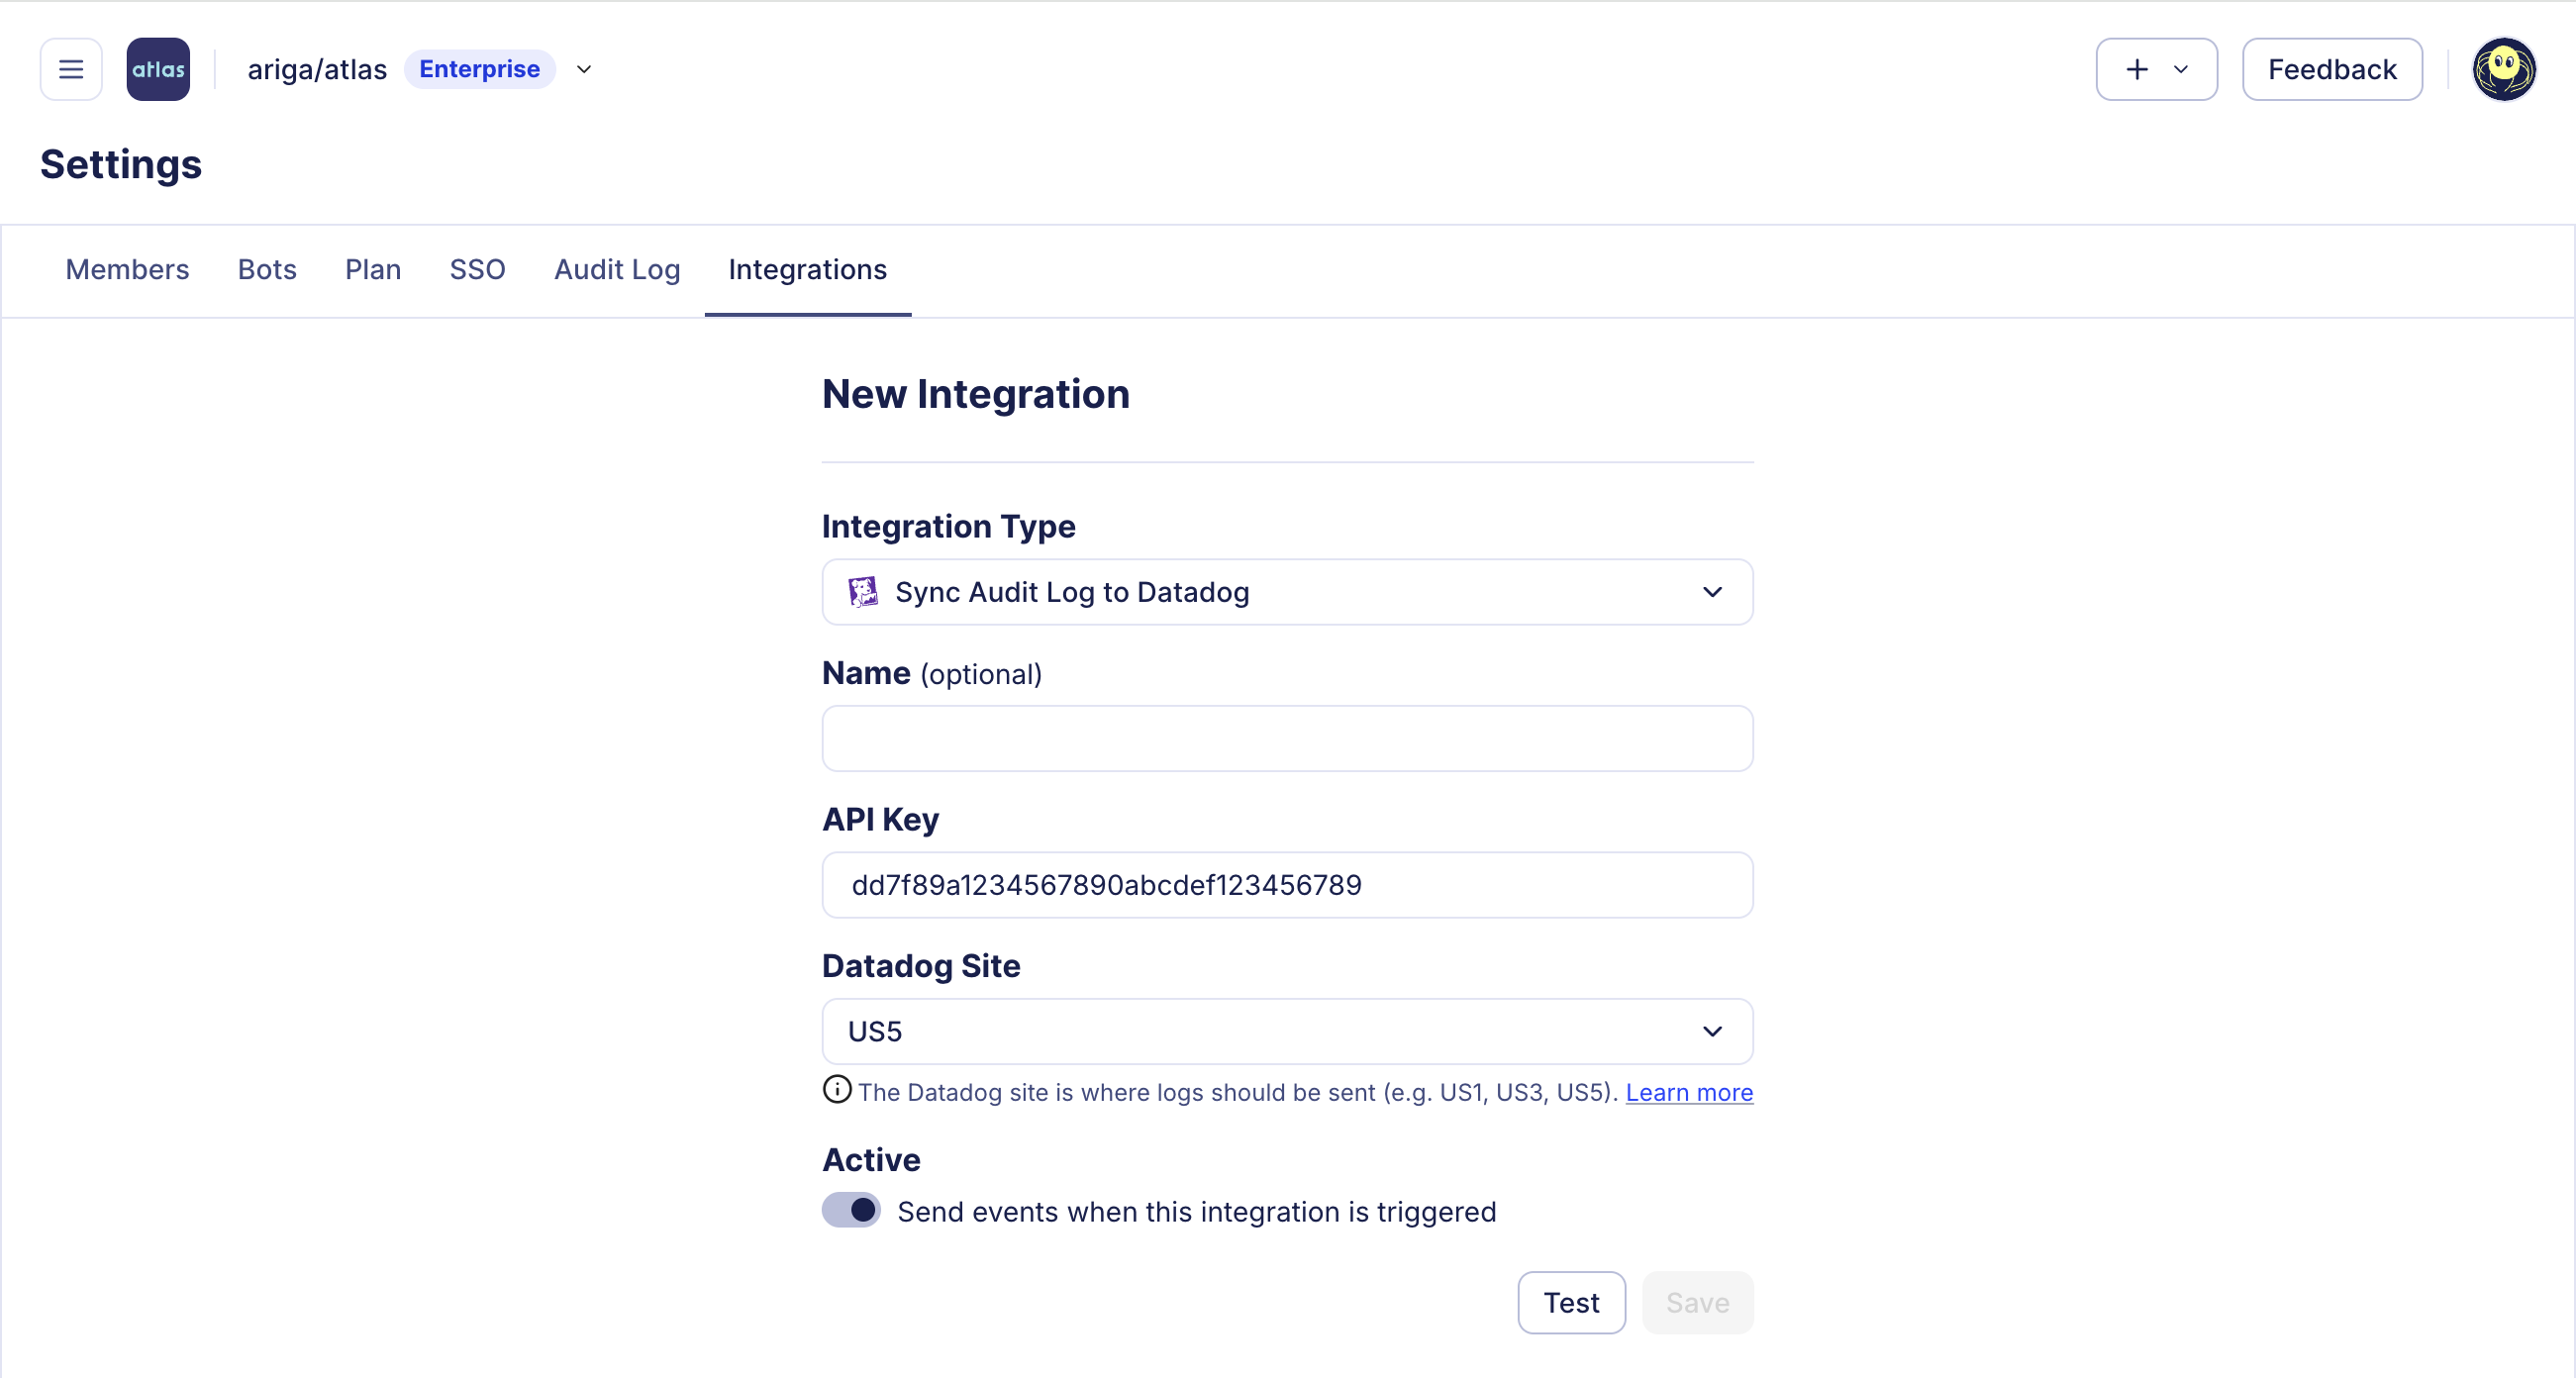
Create Datadog Integration
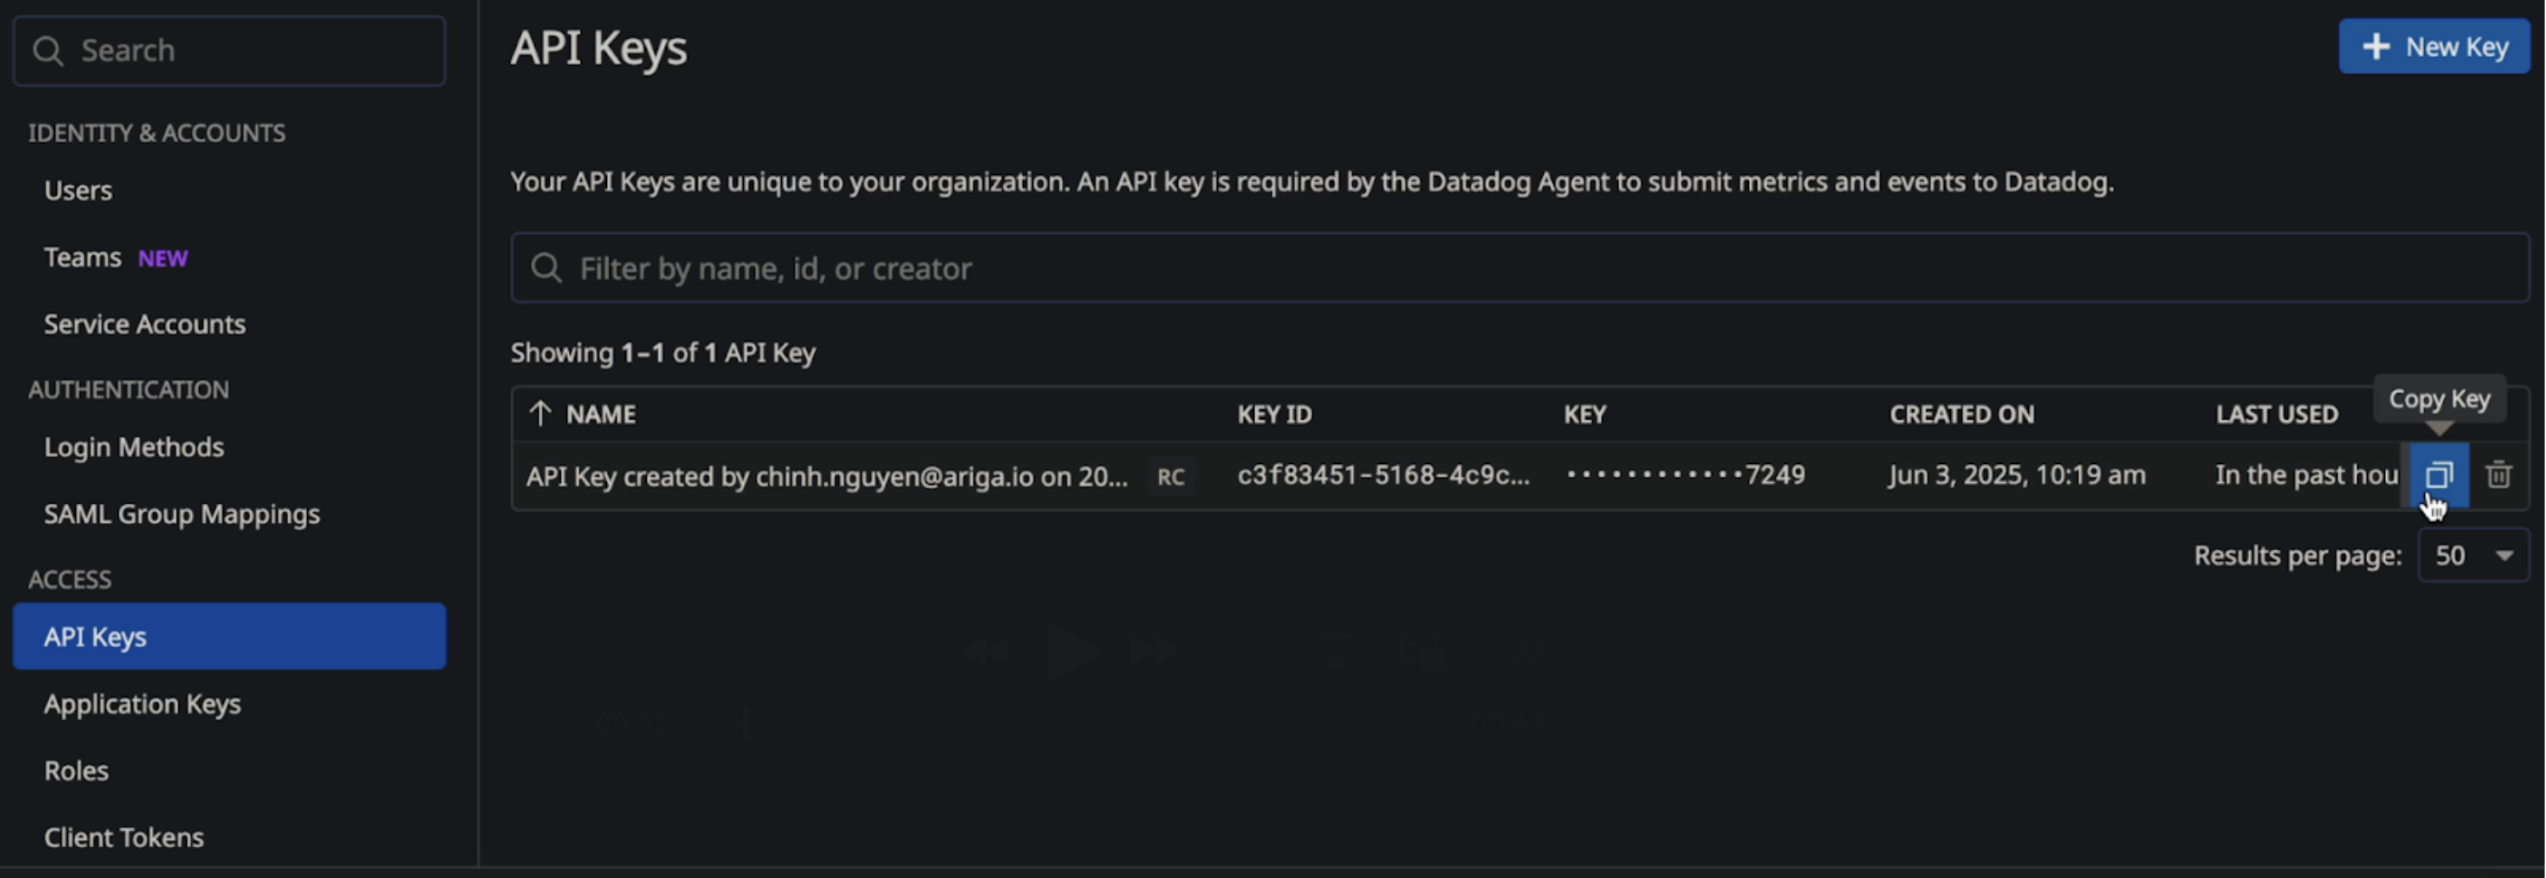
Datadog API Key Configuration
3. Click Test to validate the connection. If the test succeeds, the Save button will become active.
4. Click Save to finalize the integration.
Once connected, Atlas will forward relevant logs and metrics to your Datadog account for centralized monitoring and alerting.
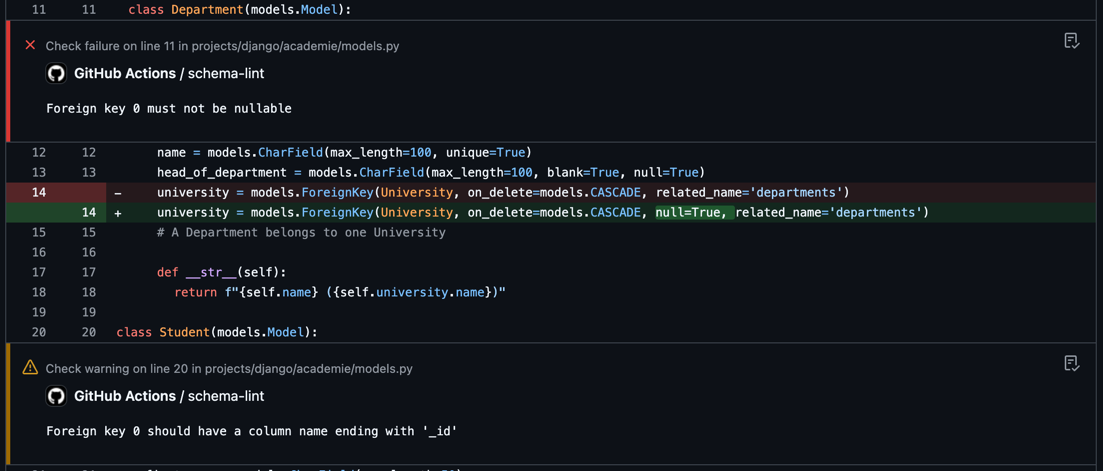
ORM Schema Linting
With the latest release, Atlas schema linting supports reviewing ORM-based schema definitions, letting you define policies across all your database schemas, no matter what language or framework they're written in. Whether you're using Django, SQLAlchemy, GORM, TypeORM, or another supported ORM, Atlas can analyze your schema definitions, flag issues with exact locations, and post them as GitHub comments or inline code annotations.
Explain Pipelines Errors with AI
Most of the time, migrations with Atlas work smoothly, especially if you use Atlas to verify them during code review. But every once in a while, something fails. If you use Atlas Pipelines and deploy your migrations from the Atlas schema registry, Atlas will report the migration logs to your account.
Just having the visibility of what went down is useful in itself, but we have just made this even better! Starting today, you can ask Atlas Copilot to explain the error for you, making it even easier to triage and fix. See this in action:

Wrapping Up
Atlas v0.36 represents a significant expansion of our database ecosystem support and enterprise integration capabilities. From cloud data warehouses like Snowflake and globally distributed databases like Google Spanner, to comprehensive PostgreSQL partitioning and Azure DevOps integration, this release strengthens Atlas as a universal database schema management solution.
The addition of Datadog SIEM support and enhanced ORM linting capabilities ensures that Atlas continues to meet the security and quality requirements of enterprise teams while maintaining the developer-friendly experience that makes database schema management approachable.
We hope you enjoy these new features and improvements. As always, we would love to hear your feedback and suggestions on our Discord server.