Announcing v0.15: Interactive Declarative Schema Migrations, Functions, Procedures and Domains

Hi everyone!
It's been a few weeks since our last version announcement and today I'm happy to share with you
v0.15, which includes some
very exciting improvements for Atlas:
- Interactive Declarative Migrations - Atlas supports a Terraform-like workflow for managing your database schema
using the
schema applycommand. In this release we have added a new "Lint and Edit" mode to this command, which will analyze your schema changes for issues and will allow you to edit them interactively before applying them to your database. - Functions and Stored Procedures - Atlas now supports creating and managing functions and stored procedures in your database schema.
- Postgres Domains - In addition, Atlas now supports Postgres Domains . A domain is essentially a data type with optional constraints (restrictions on the allowed set of values).
- TypeORM Integration - TypeORM is a popular ORM for Node.js. In this release, we are happy to announce the TypeORM integration, which allows you to automatically generate your database schema from your TypeORM entities, create visualizations and more.
Let's dive right in!
Interactive Declarative Migrations
Atlas supports a Terraform-like workflow for managing your database schema using the schema apply command.
This workflow, which we call "Declarative Migrations", is a modern alternative to the traditional "versioned migrations"
workflow. In declarative migrations, you define your desired schema in one of the formats supported by Atlas and supply
a connection string to your database. Atlas compares the current and desired schema of your database and generates a
plan to migrate your database to the desired state.
Similar to Terraform, until today, Atlas would prompt you to confirm the migration plan before applying it to your database. This is a great way to ensure that you don't accidentally apply a migration that you didn't intend to. However, this flow suffers from a few drawbacks:
- Ensuring Safety - you can count on Atlas to generate a correct migration plan to your desired state,
but it's still possible that this migration will have unintended side effects. For example, adding a
UNIQUEconstraint to a column might fail if there are duplicate values in the column. - Editing - users often want to make changes to their migration plan before applying it. In the current flow, this
requires running
schema applywith the--dry-runflag, saving the output to a file, editing it, and then manually applying the edited migration plan to the database.
Enter: Interactive Declarative Migrations
In this release, we are introducing a new "Lint and Edit" mode to the schema apply command. This mode is
available to logged-in users only, as it uses Atlas Cloud to provide a neat UI and rich analysis capabilities.
Let's see it in action.
Start by downloading the latest version of Atlas:
curl -sSf https://atlasgo.sh | sh
For installation instructions on other platforms, see the installation guide.
After installing Atlas, make sure to log in using the atlas login command:
atlas login
Next, create a new file named schema.hcl that will contain your desired schema:
schema "main" {
}

table "hello" {
  schema = schema.main
  column "name" {
    type = varchar(100)
    default = "Anonymous"
  }
}
Now, let's apply this schema to a local SQLite database named "sqlite.db":
atlas schema apply -u sqlite://sqlite.db --dev-url sqlite://?mode=memory -f schema.hcl
Atlas will calculate the diff between the current (empty) state of the database and our desired state and prompt us to confirm the migration plan:
-- Planned Changes:
-- Create "hello" table
CREATE TABLE `hello` (`name` varchar NOT NULL DEFAULT 'Anonymous');
Use the arrow keys to navigate: ↓ ↑ → ←
? Are you sure?:
    Apply
  ▸ Lint and edit # <-- Brand new!
    Abort
Notice the new "Lint and edit" option. Select it and press Enter. Atlas will now analyze the migration plan and open your browser in the new, interactive migration plan screen. The screen contains three important sections:
- Migration Plan - the migration plan generated by Atlas. You can click the "Edit" button to make changes to it.
- Checks - a summary of the checks that Atlas ran against the generated plan. In this case, our plan is completely safe, so all checks passed.
- ERD - A visual representation of the change we are planning.
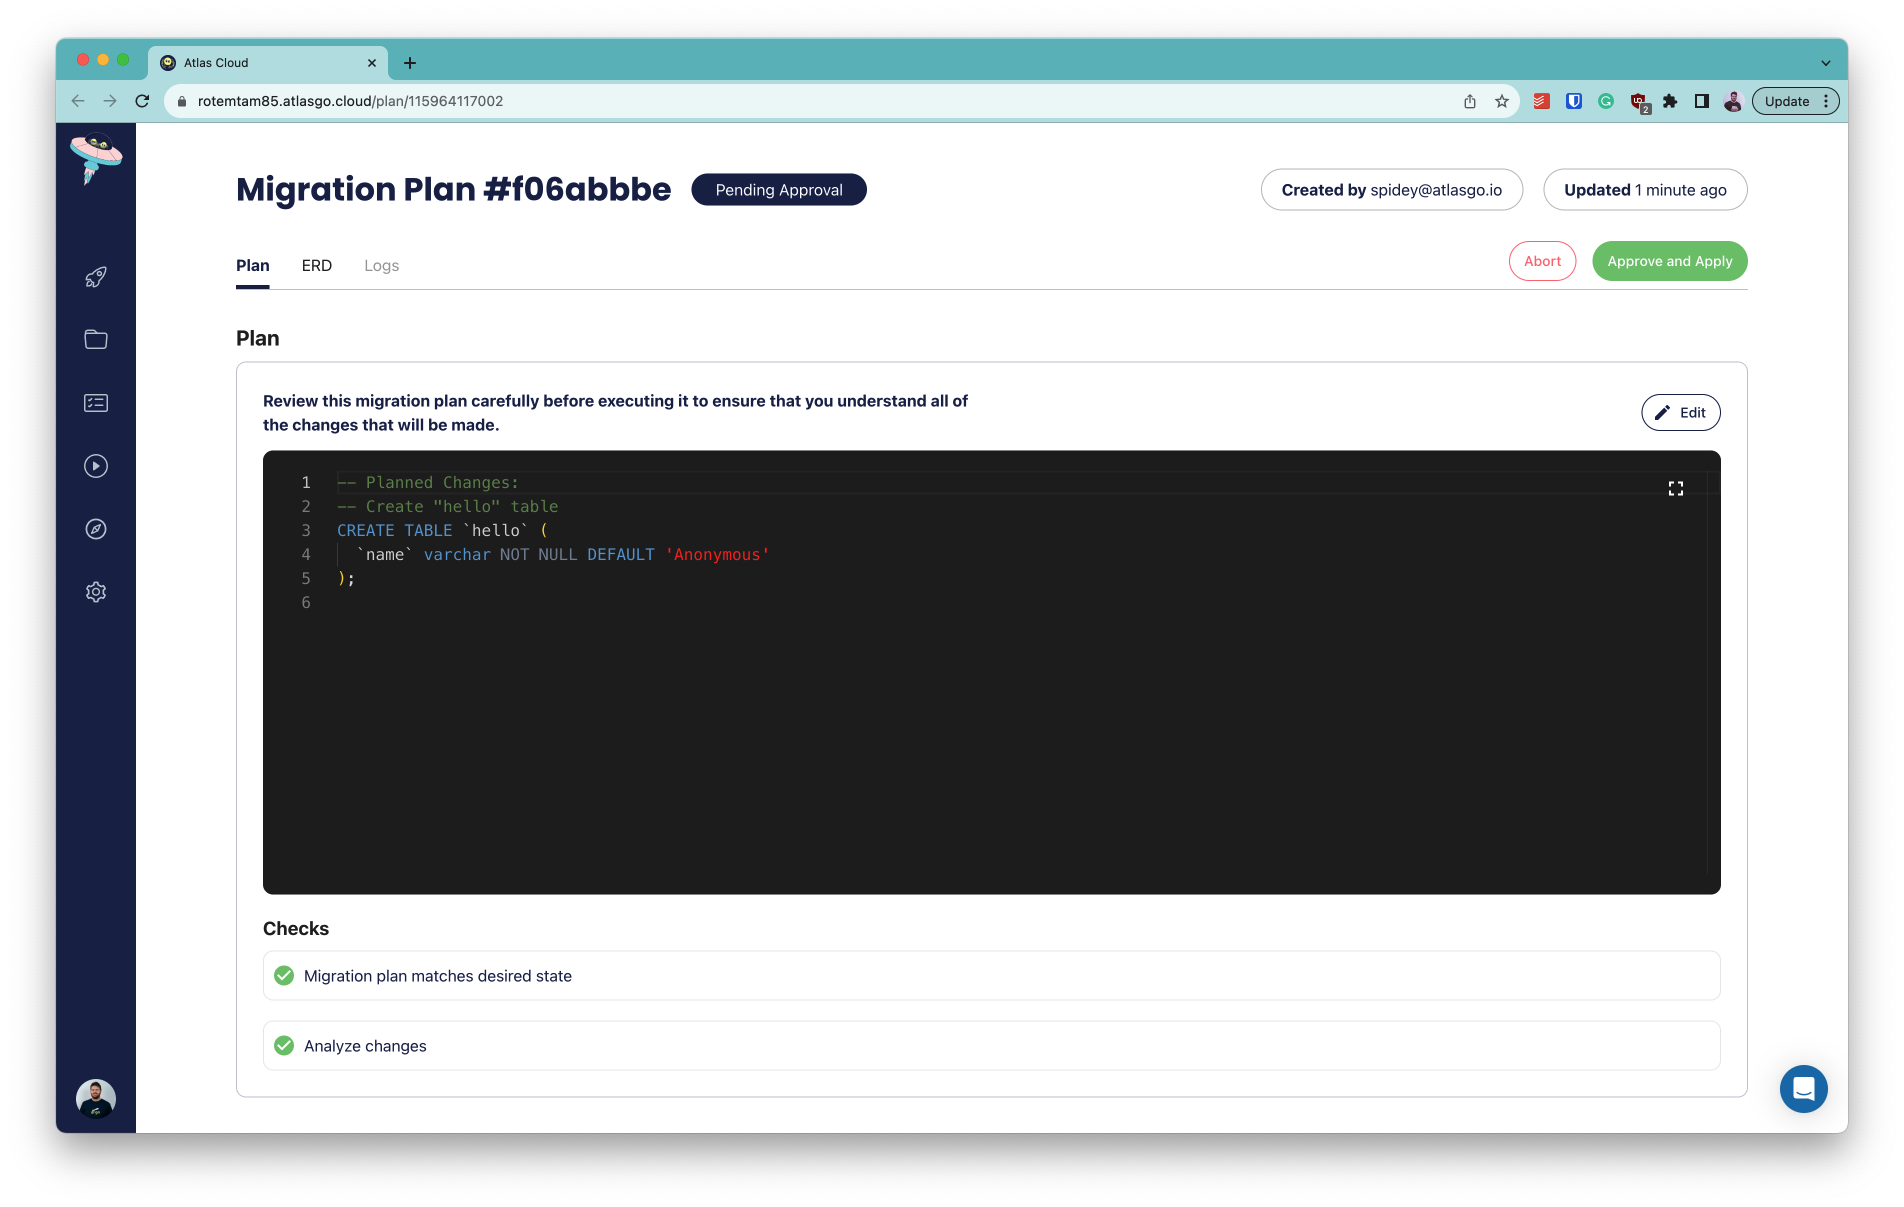
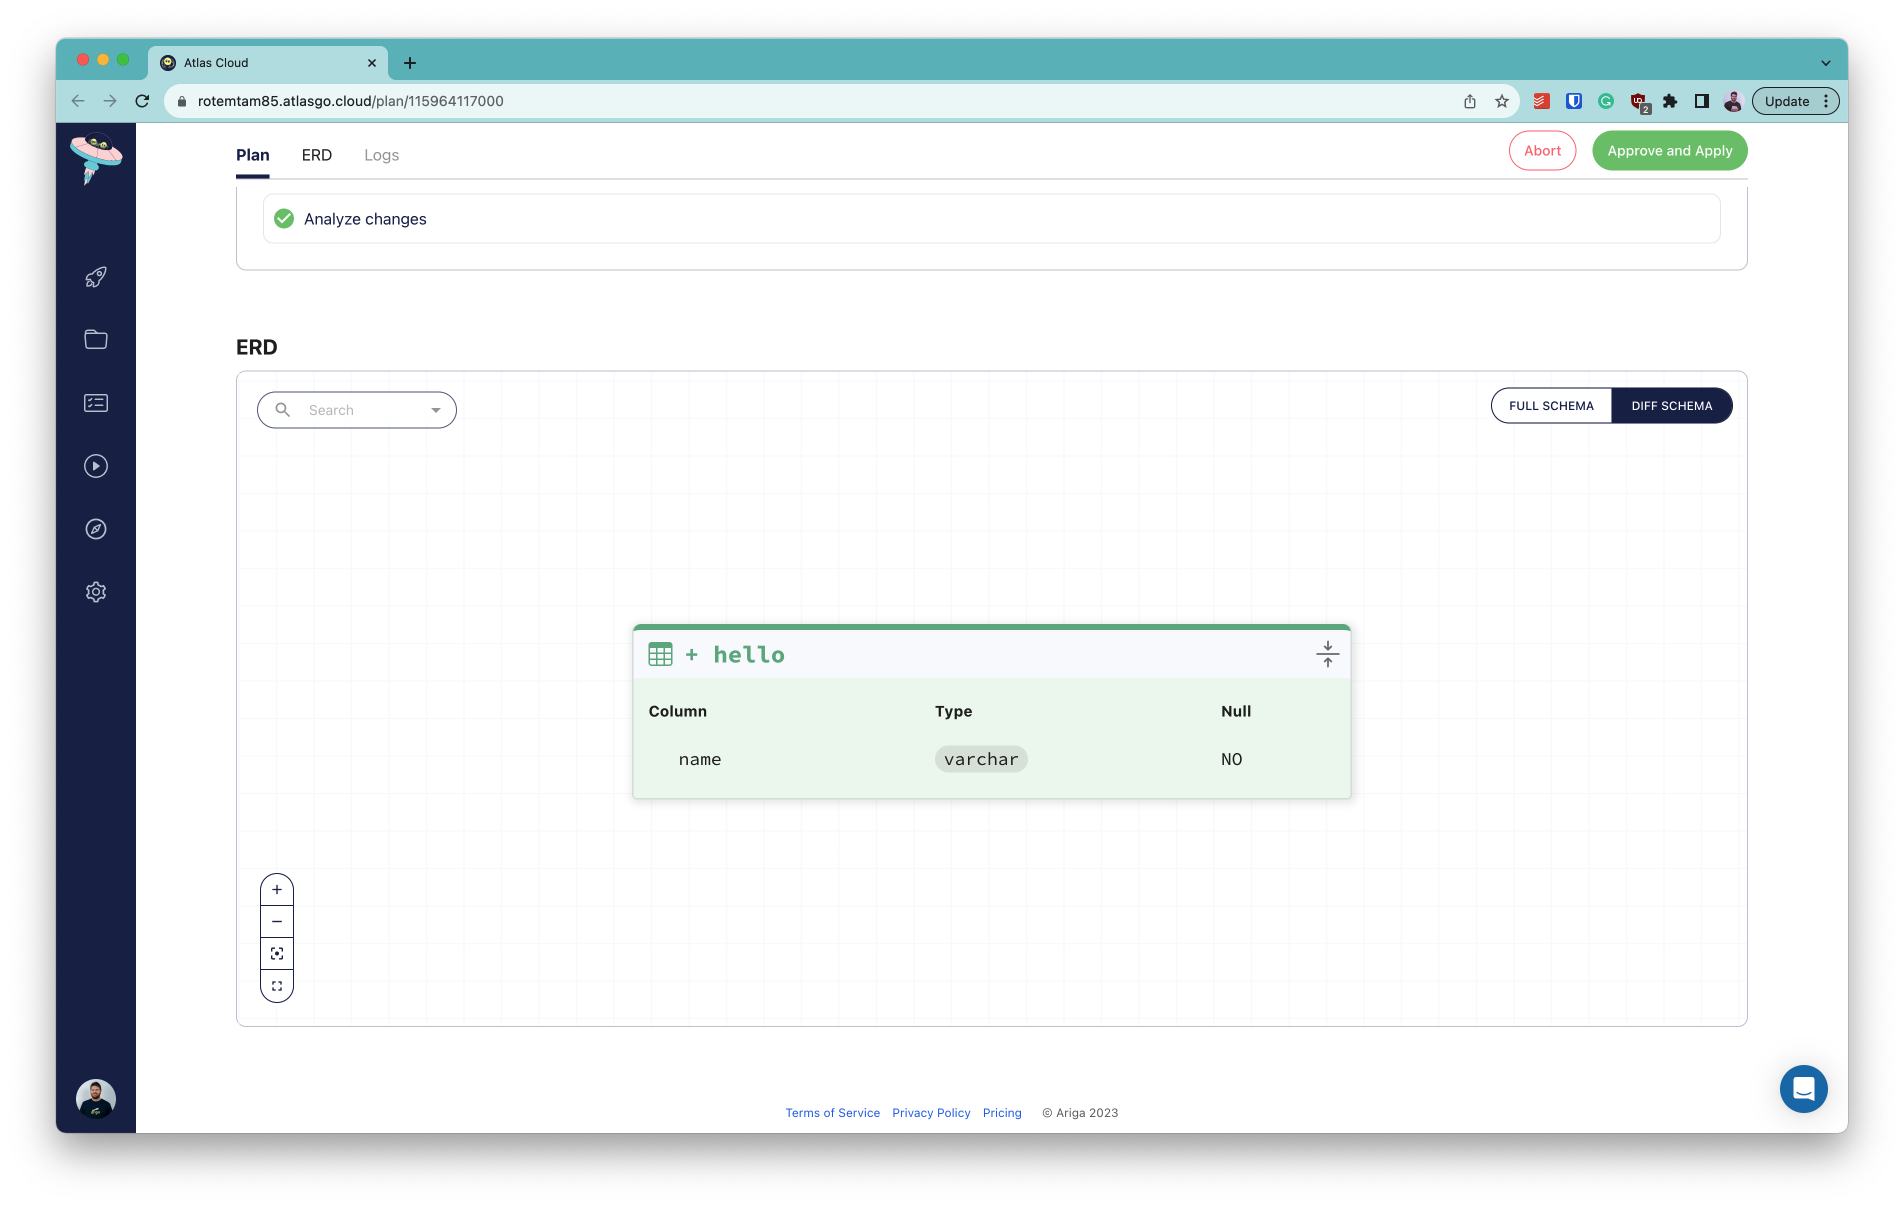
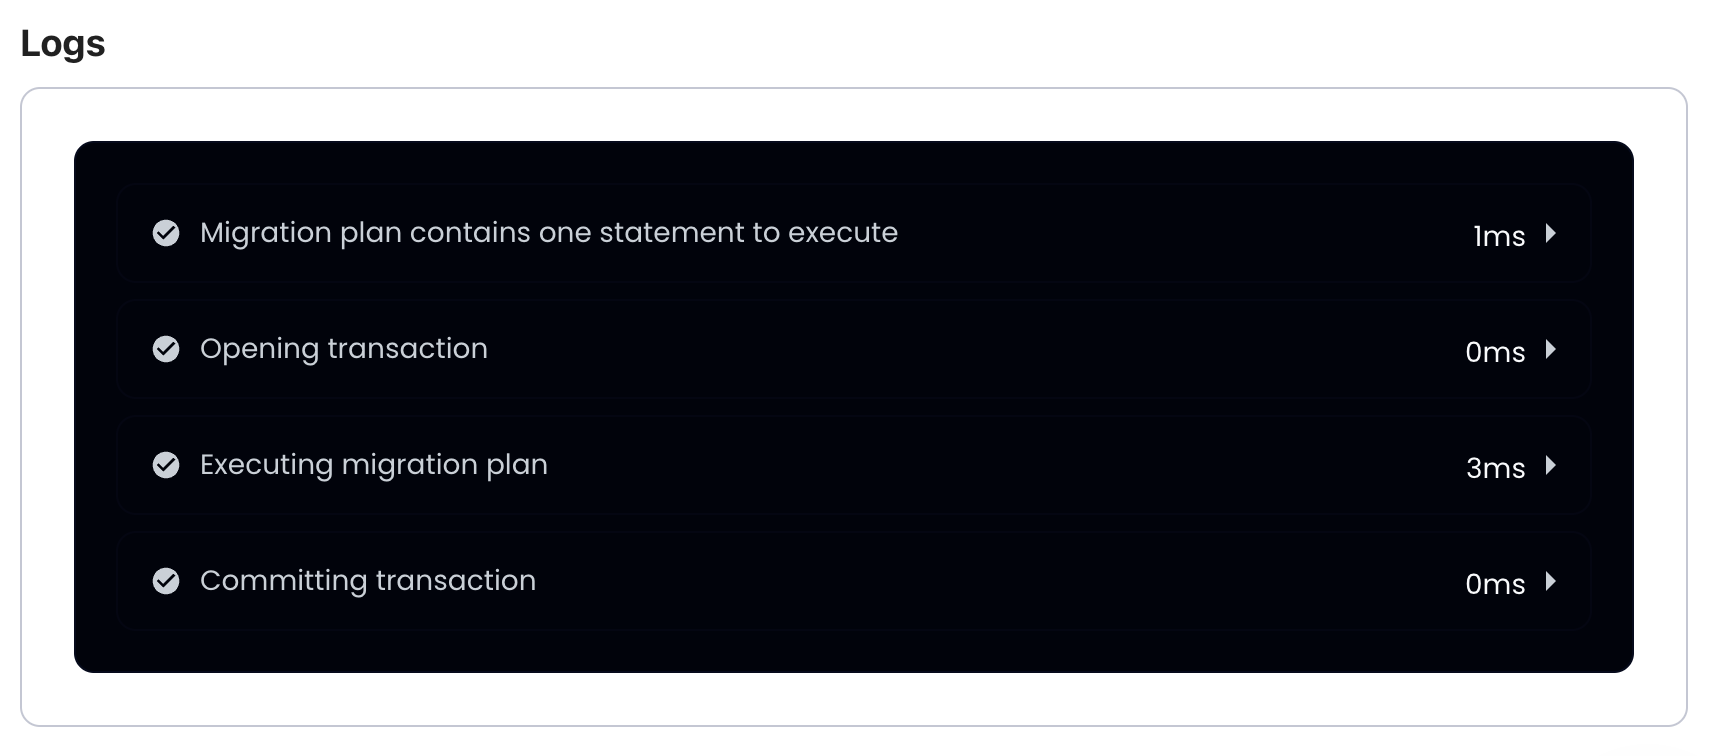
Once we are content with the migration plan, let's go ahead and click the "Approve and Apply" button. Atlas will apply the migration plan to the database and scroll down to the execution logs section:
Let's edit our desired state a bit to delete the hello table and add a new users table:
schema "main" {
}
-table "hello" {
-  schema = schema.main
-  column "name" {
-    type = varchar(100)
-    default = "Anonymous"
-  }
-}
+table "users" {
+  schema = schema.main
+  column "id" {
+    type = int
+  }
+  column "email" {
+    type = text
+  }
+  primary_key {
+    columns = [column.id]
+  }
+  index "unique_email" {
+    columns = [
+      column.email
+    ]
+    unique = true
+  }
+}
Once again, let's run atlas schema apply to apply the changes to the database and select the "Lint and Edit" option.
This time, Atlas will warn us that the migration plan is not safe:
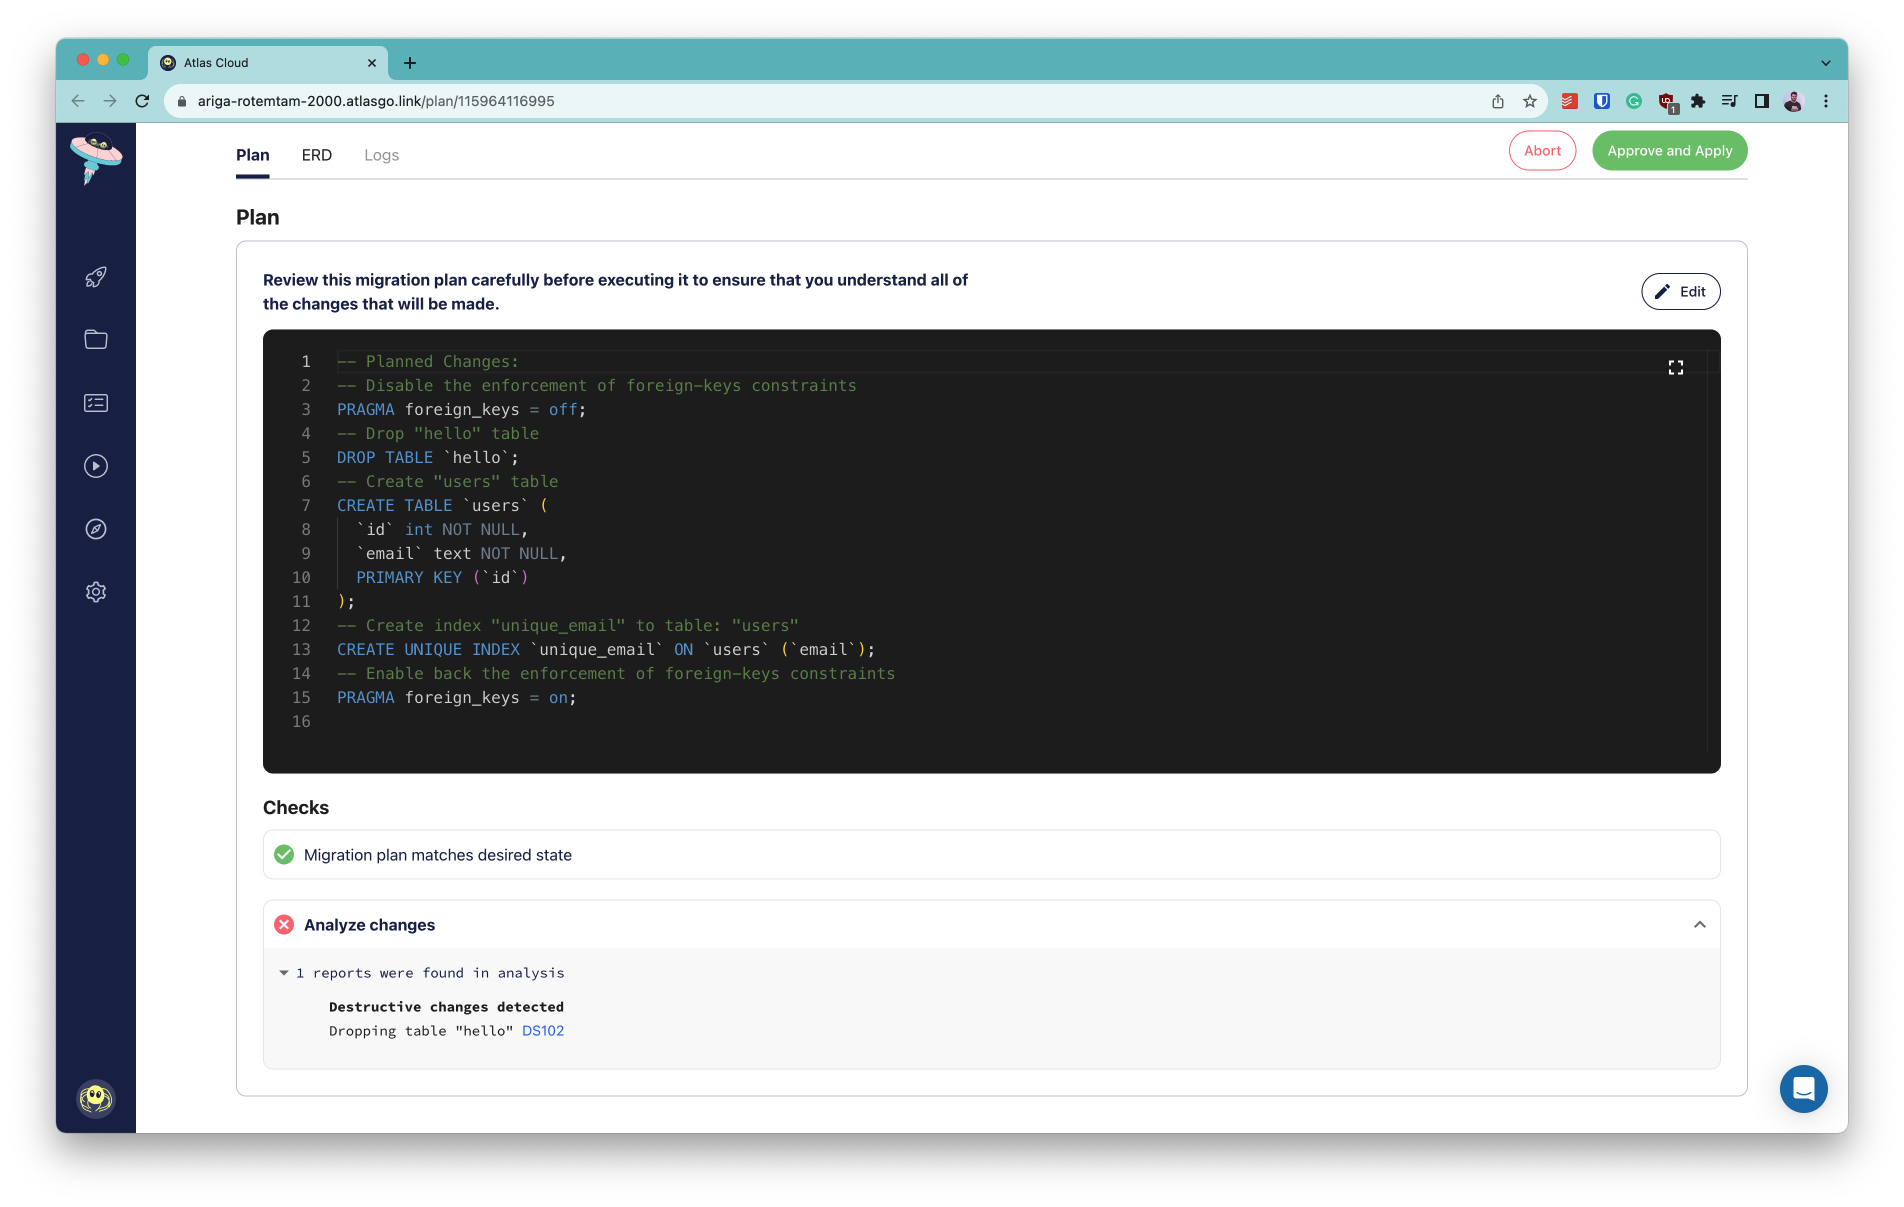
In this case, we decide to abort the migration in order to not lose the precious data on the
hello table. Good thing we have automatic migration linting on our side!
Functions and Stored Procedures
Functions and stored procedures are currently in beta and available to logged-in users only. To use this feature run:
atlas login
Over the past few months, we have received numerous requests to support management of functions and stored procedures in popular databases such as PostgreSQL and MySQL. Functions and stored procedures are a way to encapsulate reusable logic in your database and are often used to improve performance by reducing the number of round-trips to the database.
Atlas now supports creating and managing functions and stored procedures in your database schema.
Let's see how we can use this feature to create a simple function. In our example, we will implement the leet_speak
function for PostgreSQL, which transforms a regular string into its Leet equivalent!
We can define the desired state of our database in either HCL or SQL:
- HCL
- SQL
function "leet_speak" {
  schema = schema.public
  lang   = PLpgSQL
  arg "input_text" {
    type = character_varying
  }
  return = character_varying
  as     = <<-SQL
  DECLARE
      output_text VARCHAR := '';
      i INT := 1;
  BEGIN
      WHILE i <= LENGTH(input_text) LOOP
          output_text := output_text ||
              CASE SUBSTRING(input_text, i, 1)
                  WHEN 'a' THEN '4'
                  WHEN 'e' THEN '3'
                  WHEN 'i' THEN '1'
                  WHEN 'o' THEN '0'
                  WHEN 's' THEN '5'
                  WHEN 't' THEN '7'
                  ELSE SUBSTRING(input_text, i, 1)
              END;
          i := i + 1;
      END LOOP;

      RETURN output_text;
  END;
  SQL
}
schema "public" {
  comment = "standard public schema"
}
CREATE OR REPLACE FUNCTION leet_speak(input_text VARCHAR)
RETURNS VARCHAR
LANGUAGE plpgsql
AS $$
DECLARE
    output_text VARCHAR := '';
    i INT := 1;
BEGIN
    WHILE i <= LENGTH(input_text) LOOP
        output_text := output_text ||
            CASE SUBSTRING(input_text, i, 1)
                WHEN 'a' THEN '4'
                WHEN 'e' THEN '3'
                WHEN 'i' THEN '1'
                WHEN 'o' THEN '0'
                WHEN 's' THEN '5'
                WHEN 't' THEN '7'
                ELSE SUBSTRING(input_text, i, 1)
            END;
        i := i + 1;
    END LOOP;

    RETURN output_text;
END;
$$;
For the purpose of this demo, we will run a local MySQL Docker container:
docker run --name db -e POSTGRES_PASSWORD=pass -d -p 5432:5432 postgres:16
Now, let's apply our schema to the database:
atlas schema apply -u 'postgres://postgres:pass@localhost:5432/postgres?sslmode=disable&search_path=public' --to file://schema.hcl
Atlas will calculate the diff between the current (empty) state of the database and our desired state and prompt us to confirm the migration plan:
-- Planned Changes:
-- Create "leet_speak" function
CREATE FUNCTION "leet_speak" ("input_text" character varying) RETURNS character varying LANGUAGE PLpgSQL AS $$
DECLARE
    output_text VARCHAR := '';
    i INT := 1;
BEGIN
    WHILE i <= LENGTH(input_text) LOOP
        output_text := output_text ||
            CASE SUBSTRING(input_text, i, 1)
                WHEN 'a' THEN '4'
                WHEN 'e' THEN '3'
                WHEN 'i' THEN '1'
                WHEN 'o' THEN '0'
                WHEN 's' THEN '5'
                WHEN 't' THEN '7'
                ELSE SUBSTRING(input_text, i, 1)
            END;
        i := i + 1;
    END LOOP;

    RETURN output_text;
END;
$$;
Use the arrow keys to navigate: ↓ ↑ → ←
? Are you sure?:
  ▸ Apply
    Abort
Let's go ahead and select the "Apply" option. Atlas will apply the migration plan to the database and print the following output:
✔ Apply
We can now verify that the function was created successfully by running:
docker exec -it db psql -U postgres -c "SELECT leet_speak('hello leet world')"
And the result indeed is:
    leet_speak
------------------
 h3ll0 l337 w0rld
(1 row)
To learn more about functions and stored procedures in Atlas, check out the documentation.
Postgres Domains
Support for domains is currently in beta and available to logged-in users only. To use this feature run:
atlas login
Another highly requested feature was support for Postgres Domains.
A domain is essentially a data type with optional constraints (restrictions on the allowed set of values). For example,
you might want to define an email_address domain which would be a varchar column with a CHECK constraint to ensure
that the value is a valid email address.
Starting with v0.15, Atlas can now manage domains in your database schema, as well as use them as types for table columns. Let's see an example schema that uses domains:
domain "us_postal_code" {
  schema = schema.public
  type   = text
  null   = true
  check "us_postal_code_check" {
    expr = "((VALUE ~ '^\\d{5}$'::text) OR (VALUE ~ '^\\d{5}-\\d{4}$'::text))"
  }
}

domain "username" {
  schema = schema.public
  type    = text
  null    = false
  default = "anonymous"
  check "username_length" {
    expr = "(length(VALUE) > 3)"
  }
}

table "users" {
  schema = schema.public
  column "name" {
    type = domain.username
  }
  column "zip" {
    type = domain.us_postal_code
  }
}

schema "public" {
  comment = "standard public schema"
}
The above schema defines two domains: us_postal_code and username. The us_postal_code domain is a text column
with a CHECK constraint to ensure that the value is a valid US postal code. The username domain is a text column
with a CHECK constraint to ensure that the value is at least 4 characters long. We then define a users table that
uses these domains for its columns.
Let's see what happens when we apply this schema to a local Postgres database:
atlas schema apply -u 'postgres://postgres:pass@localhost:5432/postgres?sslmode=disable' -f schema.hcl
Atlas calculates the diff between the current (empty) state of the database and our desired state and prompts us to confirm the migration plan:
-- Planned Changes:
-- Create domain type "us_postal_code"
CREATE DOMAIN "public"."us_postal_code" AS text CONSTRAINT "us_postal_code_check" CHECK ((VALUE ~ '^\d{5}$'::text) OR (VALUE ~ '^\d{5}-\d{4}$'::text));
-- Create domain type "username"
CREATE DOMAIN "public"."username" AS text DEFAULT 'anonymous' NOT NULL CONSTRAINT "username_length" CHECK (length(VALUE) > 3);
-- Create "users" table
CREATE TABLE "public"."users" ("name" "public"."username" NOT NULL, "zip" "public"."us_postal_code" NOT NULL);
Use the arrow keys to navigate: ↓ ↑ → ←
? Are you sure?:
  ▸ Apply
    Abort
After applying, let's re-run the schema apply command to make sure that the schema is up-to-date:
atlas schema apply -u 'postgres://postgres:pass@localhost:5432/postgres?sslmode=disable' --to file://schema.hcl
Indeed, Atlas reports that the schema is up-to-date:
Schema is synced, no changes to be made
Support for TypeORM
TypeORM is a popular ORM for Node.js. In this release, we are happy to announce the TypeORM integration, which allows you to automatically generate your database schema from your TypeORM entities, create visualizations, and more.
The TypeORM Atlas Provider is a Node.js module that can extract the desired schema of your database directly from your TypeORM entities. To use it, first install:
npm i @ariga/atlas-provider-typeorm
Next, add the TypeORM schema as a data source in your atlas.hcl file:
data "external_schema" "typeorm" {
  program = [
    "npx",
    "@ariga/atlas-provider-typeorm",
    "load",
    "--path", "./path/to/entities",
    "--dialect", "mysql", // mariadb | postgres | sqlite | mssql
  ]
}

env "typeorm" {
  src = data.external_schema.typeorm.url
  dev = "docker://mysql/8/dev"
  migration {
    dir = "file://migrations"
  }
  format {
    migrate {
      diff = "{{ sql . \"  \" }}"
    }
  }
}
Finally, run atlas schema apply to apply the schema to your database:
atlas schema apply -u mysql://<db credentials> --env typeorm
To learn more about the TypeORM integration, check out the documentation.
Wrapping up
That's it! I hope you try out (and enjoy) all of these new features and find them useful. As always, we would love to hear your feedback and suggestions on our Discord server.