GitOps for Databases, Part 1: CI/CD

This is the first post in a two-part tutorial, which demonstrates how to use the Atlas Operator in tandem with Atlas Cloud and ArgoCD to create a slick, modern GitOps workflow for managing your database migrations natively in Kubernetes.
GitOps is a software development and deployment methodology that uses Git as the central repository for both code and infrastructure configuration, enabling automated and auditable deployments.
ArgoCD is a Kubernetes-native continuous delivery tool that implements GitOps principles. It uses a declarative approach to deploy applications to Kubernetes, ensuring that the desired state of the application is always maintained.
Kubernetes Operators are software extensions to Kubernetes that enable the automation and management of complex, application-specific, operational tasks with domain-specific knowledge within a Kubernetes cluster.
In this tutorial, we will use the Atlas Operator in tandem with Atlas Cloud and ArgoCD to create a slick, modern GitOps workflow for managing your database migrations natively in Kubernetes.
For the sake of brevity, we are going to split this guide into two parts:
- In part one, we will show how to initialize an Atlas project, and create a CI/CD pipeline that will automatically plan, verify and store your database migrations in Atlas Cloud using GitHub Actions.
- In part two, we will show how to deploy these migrations using the Atlas Operator and ArgoCD to demonstrate a complete GitOps workflow for database migrations.
Modern CI/CD for Database Migrations
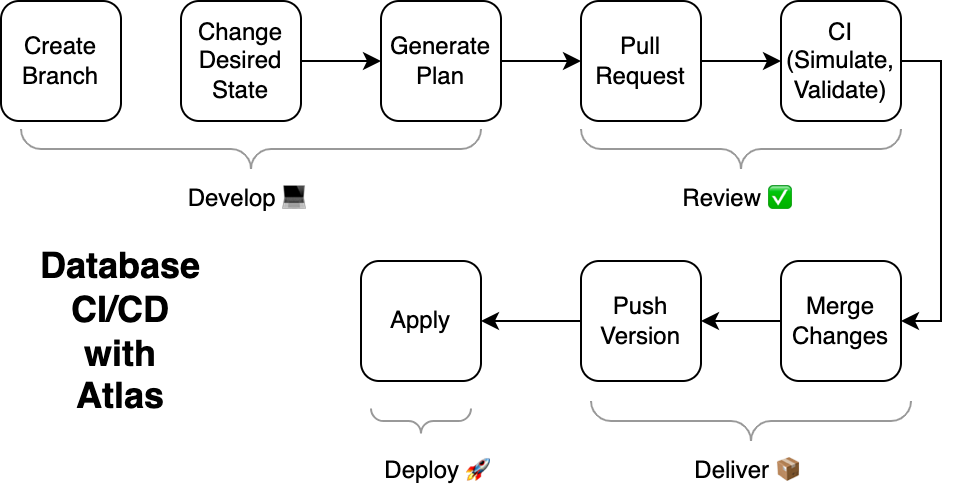
Atlas was built to support a modern CI/CD workflow for database migrations based on the following principles:
- Changes to the database are planned automatically. Given the desired state of the database, the system should automatically generate a plan for how to get from the current state to the desired state.
- Changes to the database schema are stored in a versioned migration directory. All planned changes to the database are checked in to a versioned migration directory. This directory contains SQL scripts, which are executed in lexicographic order to apply the changes to the database.
- Changes to the database are validated during CI. All changes to the database are tested and evaluated against a set of governing policies.
- Changes to the database are deployed via automation. No manual steps are required to deploy changes to the database. All changes are deployed via a CI/CD pipeline.
To learn more about these principles, check out our guide to modern CI/CD for database migrations.
In this tutorial, we will show to apply the fourth principle to your database migrations using the Atlas Operator and ArgoCD.
Local Setup
With the principles of modern CI/CD for database migrations in mind, let's see how we can apply them to a simple application that uses a PostgreSQL database.
Prerequisites (for part one)
-
A GitHub Account - we are going to be setting up some GitHub Actions workflows, so you will need a GitHub account.
-
The most recent version of Atlas. To get Atlas on Linux or macOS run:
curl -sSf https://atlasgo.sh | sh
For more installation options, see the docs 3. Docker. To install Docker, follow the instructions here.
- The GitHub CLI,
gh. To installgh:brew install gh
Follow instructions for other platforms here.
Step 1: Define our desired state
Atlas advocates for the declarative approach in which users start their work by defining the desired state of their database and let the system figure out the implementation details. Atlas supports many different ways to define the desired state of your database, called "schema loaders". In this tutorial, we will use a simple SQL file to define our desired state.
In a fresh Git repo, create a file named schema.sql with the following contents:
create table users (
    id int primary key,
    name varchar(255) not null unique
);
In this project, whenever we want to change the database schema, we will update this file to reflect the desired state of the database.
Step 2: Plan the initial migration
Now that we have defined our desired state, we can use the Atlas CLI to plan the initial migration.
Create the following file named atlas.hcl:
env "local" {
  src = "file://schema.sql"
  dev = "docker://postgres/15/dev"
  migration {
    dir = "file://migrations"
  }
  format {
    migrate {
      diff = "{{ sql . \"  \" }}"
    }
  }
}
Next, run the following command to plan the initial migration:
atlas migrate diff --env local
Observe two new files that were created in the migrations directory:
.
├── atlas.hcl
├── migrations
│   ├── 20231204121249.sql
│   └── atlas.sum
└── schema.sql
Step 3: Push our migration directory to Atlas Cloud
Atlas Cloud is a hosted service that can serve as a central repository for your database migrations. Similarly to how DockerHub is used to store and distribute Docker images, Atlas Cloud can be used to store and distribute database migration directories. Atlas Cloud has a free tier that is suitable for small teams and personal projects which you can use to follow along with this tutorial.
The free tier mentioned in this post is no longer available. Atlas now offers a 30-day free trial of Atlas Pro. For current pricing information, please visit the Atlas Pricing page.
Log in to Atlas Cloud using the following command:
atlas login
If you do not have an existing Atlas Cloud account, you will be prompted to create one.
Next, push your migration directory to Atlas Cloud using the following command:
atlas migrate push --env local atlasdemo
This will create a new project named atlasdemo on Atlas Cloud and push your migration directory to it.
Atlas will print a URL to the project page on Atlas Cloud similar to the following:
https://rotemtam85.atlasgo.cloud/dirs/4294967359
Setup GitHub Actions
In this section, we will set up a GitHub Actions workflow that will add Atlas to your CI/CD pipeline.
Create a Bot Token
To write data to your Atlas Cloud account, you will need to supply your CI/CD pipelines with an API key that has write access to your Atlas Cloud account. To learn how to create a bot token, check out our guide on the topic. Use the instructions in this guide to create a token, and make a note of it. We will use it in the next steps.
Install the Atlas Extension
To streamline this process, we have created a gh command that will create the workflow for you.
To install the latest version, run:
gh extension install ariga/gh-atlas
Ensure your gh CLI has sufficient permissions
Make sure you have the necessary permissions to configure your action:
gh auth refresh -s write:packages,workflow
Create a GitHub Actions Workflow
Once installed, let's use this extension to generate our GitHub Actions workflow. Run the following command:
gh atlas init-action --token <your-bot-token> --dir-name="atlasdemo" --driver=postgres
Atlas will scan your repository (locally) for directories containing Atlas migrations and ask you which one you would like to use for CI. Select the desired directory and press "Enter":
Use the arrow keys to navigate: �↓ ↑ → ←
? choose migration directory:
▸ migrations
Atlas will then ask you which database driver this directory contains migrations for. Select the desired driver and press "Enter".
Next, the GitHub extension will save your bot token to a GitHub secret and create a pull request with the necessary configuration for the GitHub Action.
Screenshot Example
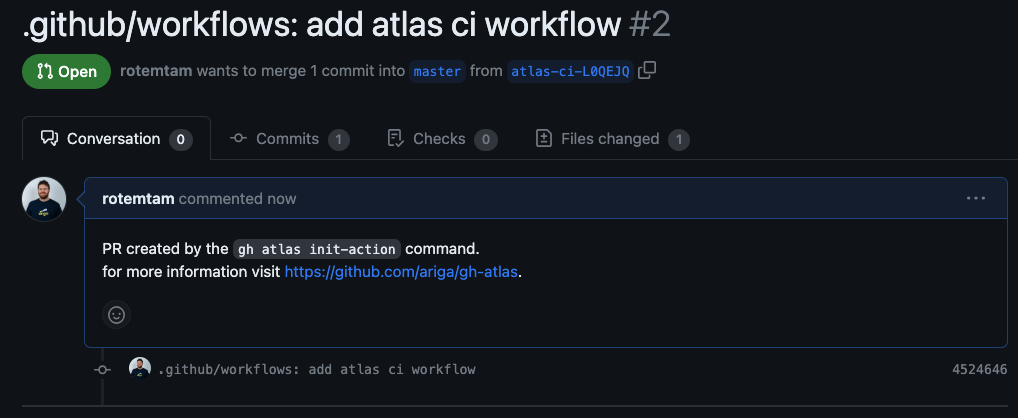
The PR contains a GitHub Actions workflow similar to this:
Code Example
name: Atlas
on:
  push:
    branches:
      - master
    paths:
      - .github/workflows/ci-atlas.yaml
      - 'migrations/*'
  pull_request:
    paths:
      - 'migrations/*'
# Permissions to write comments on the pull request.
permissions:
  contents: read
  pull-requests: write
jobs:
  atlas:
    services:
      # Spin up a postgres:15 container to be used as the dev-database for analysis.
      postgres:
        image: postgres:15
        env:
          POSTGRES_DB: dev
          POSTGRES_PASSWORD: pass
        ports:
          - 5432:5432
        options: >-
          --health-cmd pg_isready
          --health-interval 10s
          --health-start-period 10s
          --health-timeout 5s
          --health-retries 5
    runs-on: ubuntu-latest
    steps:
      - uses: actions/checkout@v3
        with:
          fetch-depth: 0
      - uses: ariga/setup-atlas@v0
        with:
          cloud-token: ${{ secrets.ATLAS_CLOUD_TOKEN_K6MJMK }}
      - uses: ariga/atlas-action/migrate/lint@v1
        with:
          dir: 'file://migrations'
          dir-name: 'atlasdemo'
          dev-url: 'postgres://postgres:pass@localhost:5432/dev?search_path=public&sslmode=disable'
        env:
          GITHUB_TOKEN: ${{ github.token }}
      - uses: ariga/atlas-action/migrate/push@v1
        if: github.ref == 'refs/heads/master'
        with:
            dir: 'file://migrations'
            dir-name: 'atlasdemo'
            dev-url: 'postgres://postgres:pass@localhost:5432/dev?search_path=public&sslmode=disable'
After reviewing the changes, merge the pull request to enable the GitHub Action.
Testing our Pipeline
Now that we have set everything up, let's test our pipeline end-to-end. To do so, we will first plan a new change to our database schema.
Edit the Desired Database Schema
Edit the schema.sql file to add a new column to the users table:
create table users (
    id int primary key,
    name varchar(255) not null unique,
    email varchar(255) not null unique
);
Generate a New Migration
Next, run the following command to automatically generate a new migration:
atlas migrate diff --env local add_email_column
This will create a new file in the migrations directory:
.
├── atlas.hcl
├── migrations
│   ├── 20231204121249.sql
│   ├── 20231206075118_add_email_column.sql
│   └── atlas.sum
└── schema.sql
Create a new Pull Request
Next, create a branch and push the changes to GitHub:
git checkout -b add-email-column
git add .
git commit -m "Add email column"
git push --set-upstream origin add-email
Next, use the gh CLI to create a new pull request:
gh pr create --title "migrations: add email column" --body "adding email column to users table"
Atlas Reviews the Pull Request
Based on the configuration in the GitHub Actions workflow we created, Atlas will automatically review your migration directory whenever a new pull request that affects it is opened. When Atlas is done running, it will comment on your PR with the results of the review:
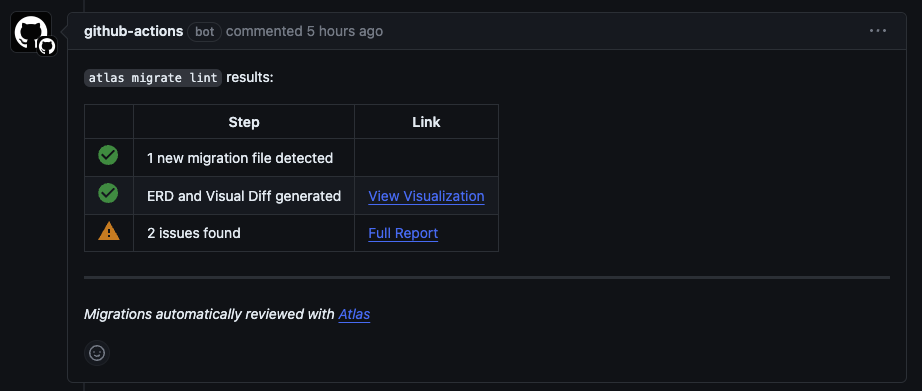
Interesting! Atlas found some issues with our migration. Let's click on the report to see what they are:
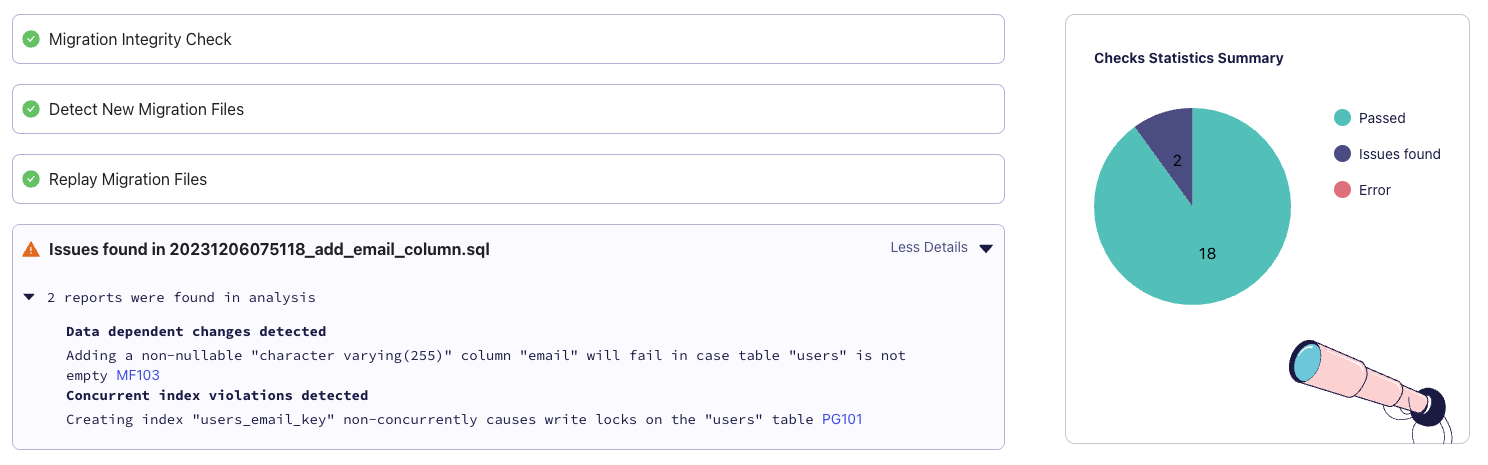
Atlas warns us about two issues. The first is that adding a non-nullable varchar column "email" will fail in case the "users" table is not empty. The second is that creating an index non-concurrently causes write locks on the "users" table. Since we are in the early stages of development, we can safely ignore these issues for now. Let's merge the pull request and see what happens.
gh pr merge --squash
Atlas Pushes the Migrations to Atlas Cloud
Once GitHub Actions detects that a new push to the master branch has been merged, per our configuration,
it will run the atlas migrate push command to push the migrations to Atlas Cloud. Once the push is complete,
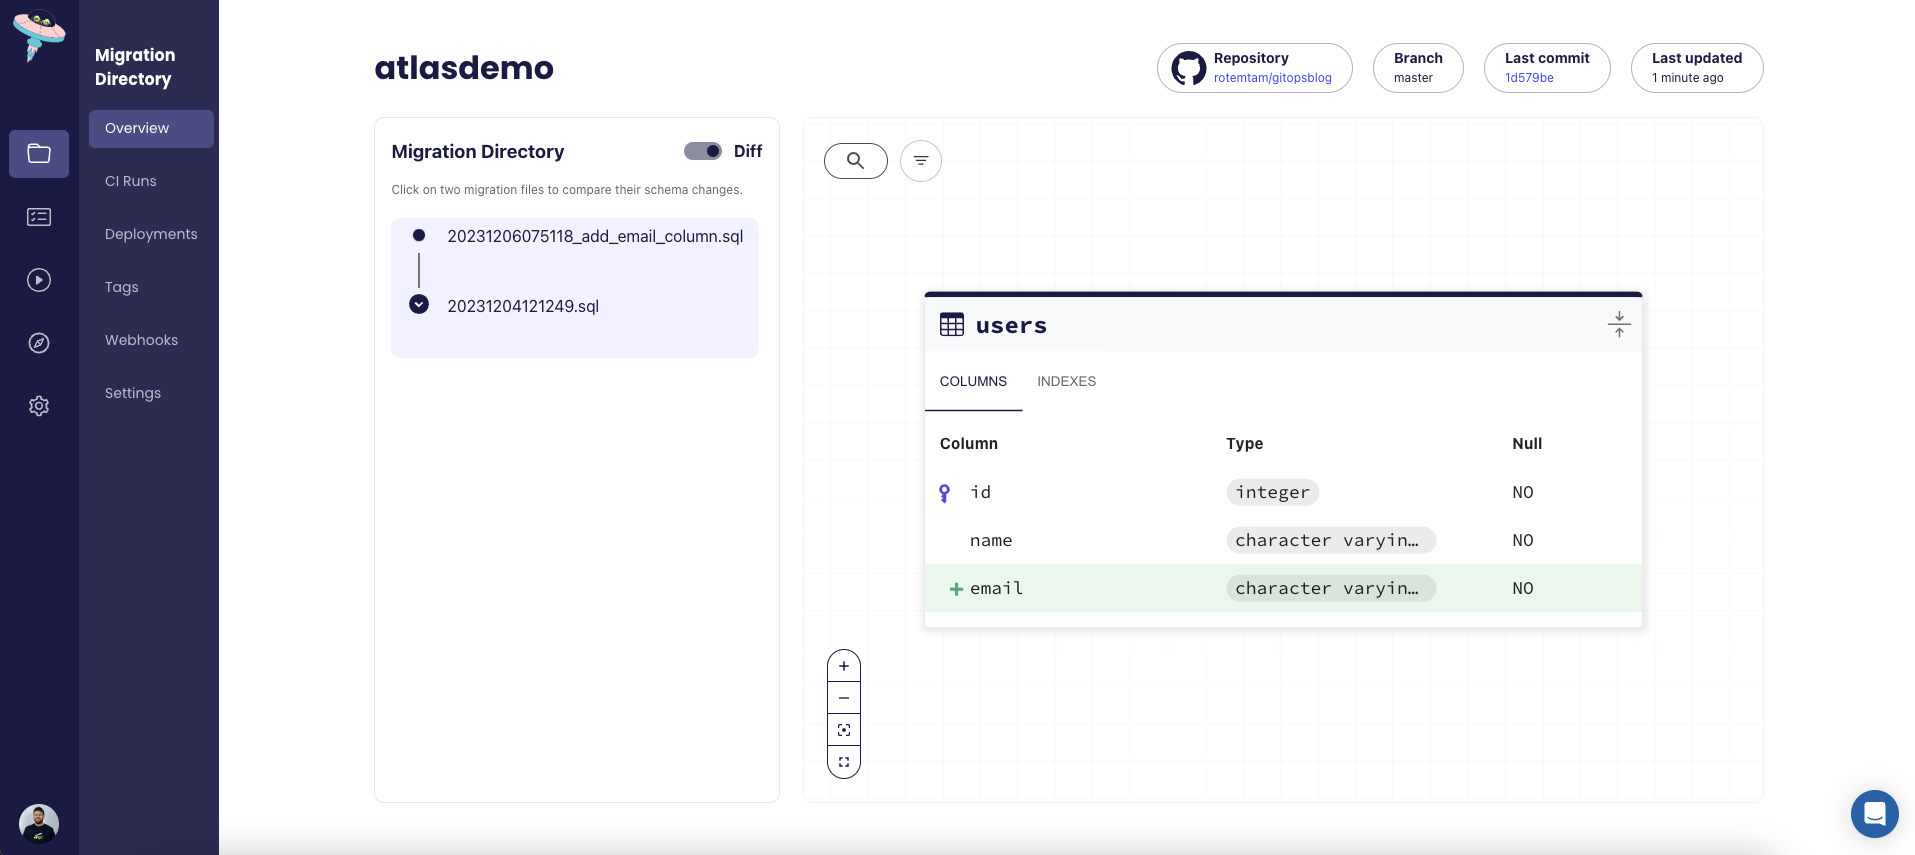
our schema will be updated in the Atlas Cloud schema viewer screen:
Wrapping Up Part One
That's it for part one! In this tutorial, we have shown how to use Atlas Cloud and GitHub Actions to create a slick, modern CI/CD pipeline for your database migrations. In part two, we will show how to deploy these migrations using the Atlas Operator and ArgoCD to demonstrate a complete GitOps workflow for database migrations.
As always, we would love to hear your feedback and suggestions on our Discord server.