Modern Database CI/CD with Atlas
Continuous integration and continuous delivery (CI/CD) are tenets of modern software development. CI/CD enables teams to deliver software faster, with higher quality, and with less risk. However, CI/CD is not just for application code. Teams can also apply these principles to their databases, to extend their benefits to one of the most critical components of their stack.
This document describes the recommended workflow for teams using Atlas to achieve continuous integration and continuous delivery for their databases.
Principles
- Changes to the database are planned automatically. Given the desired state of the database, the system should automatically generate a plan for how to get from the current state to the desired state.
- Changes to the database schema are stored in a versioned migration directory. All planned changes to the database are checked in to a versioned migration directory. This directory contains SQL scripts, which are executed in lexicographic order to apply the changes to the database.
- Changes to the database are validated during CI. All changes to the database are tested and evaluated against a set of governing policies.
- Changes to the database are deployed via automation. No manual steps are required to deploy changes to the database. All changes are deployed via a CI/CD pipeline.
Workflow
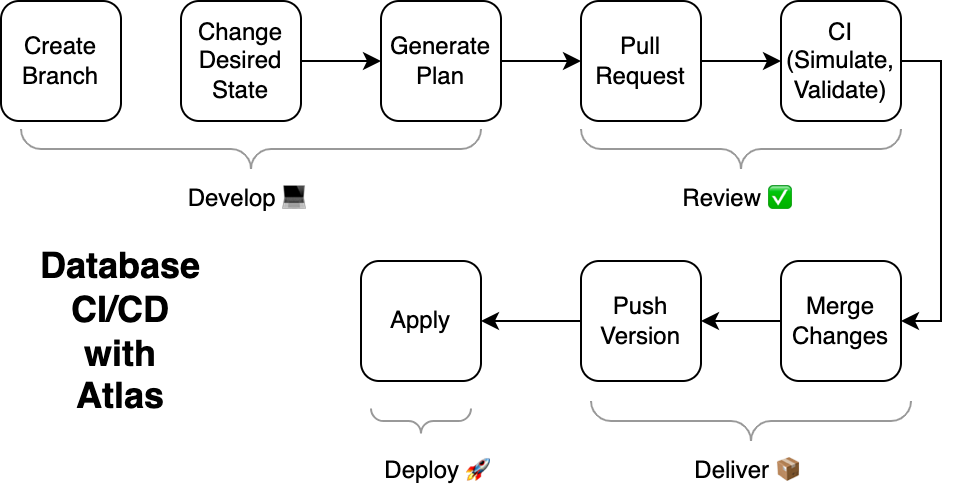
This section follows a single change to your database schema from the time it is planned to the time it is deployed. The purpose of this section is not to provide extensive instructions for how to configure your CI/CD pipeline, but rather to provide a high-level overview of the recommended workflow.
1. Create a new branch
Create a new branch to track a change to the database.
Example:
git checkout -b add-new-index
2. Change the desired state of the database
Similar to modern Infrastructure-as-Code tools, Atlas uses a declarative approach to database management. This means that you do not need to write SQL scripts to apply changes to the database. Instead, you simply declare the desired state of the database, and Atlas will automatically generate the SQL scripts required to apply the change.
In Atlas, the desired state of the database can be provided in many forms. For example, you can provide it as a plain SQL file, using Atlas HCL, as a reference to your ORM, or even as a connection to an existing database. For the purposes of this example, we will use a plain SQL file.
Example:
CREATE TABLE users (
  id INT AUTO_INCREMENT PRIMARY KEY,
  name VARCHAR(255) NOT NULL,
  email VARCHAR(255) NOT NULL,
  created_at TIMESTAMP NOT NULL DEFAULT CURRENT_TIMESTAMP,
+  INDEX idx_users_email (email)
);
Atlas supports many ways of declaring the desired state of the database. Here is a list of resources for you to learn more about them:
- SQL Schemas - Define the desired state as plain
.sqlfiles or using templates. - Atlas HCL - Define the desired state using a declarative language that is designed specifically for database schemas.
- External Schemas - Define the desired state using a reference to your ORM or other external schema definition. For example, using GORM (Go), Sequelize (Node.js), or Beego (Go).
3. Automatically plan the change
Use the Atlas CLI to plan the change. This will generate a plan for how to get from the current state of the database to the desired state of the database.
Example:
atlas migrate diff --env local add_email_index
Atlas will create a new SQL file in the migration directory, which contains the SQL statements required to apply the change to the database.
ALTER TABLE `users` ADD INDEX `idx_users_email` (`email`);
Atlas automates the planning process by generating SQL scripts that apply the desired changes to the database. To learn more about this process, review the Automatic Migration Planning documentation.
4. Push your changes to trigger CI
Once you are satisfied with your change and the plan, push your changes to trigger CI:
git add -A .
git commit -m "Add email index"
git push origin add-email-index
Your CI pipeline should be configured to run the following steps whenever a new commit is pushed to the branch. Teams commonly configure these steps to run only when a change is made to the desired state of the database or to the migration directory.
# login to Atlas to report migration analysis report
atlas login --token $ATLAS_TOKEN

# populate a JSON object with metadata about the Git repo, branch, commit and URL (usually the PR URL)
ATLAS_CONTEXT=$(cat <<EOF
{
    "repo": "$CI_PROJECT_PATH",
    "branch": "$CI_COMMIT_REF_NAME",
    "commit": "$CI_COMMIT_SHA",
    "url": "$URL"
}
EOF
)

# Run analysis against the latest revision of the database.
atlas migrate lint --base atlas://dir-name --context $ATLAS_CONTEXT
This way, whenever a change is made to the desired state of the database, the CI pipeline will automatically simulate and analyze the changes, and verify that they are valid and safe. Atlas will generate a detailed analysis report, an example of which you can see here.
It is possible to push your changes to Atlas Cloud directly with the CLI to your CI pipeline, but official integrations are also available. See the Integrations page for more information.
5. Merge your changes to push the latest revision of the database
Once CI is green and the change is approved, the changes should be merged into the main branch. This merge should trigger another workflow, which will push the most recent version of the migration directory to Atlas Cloud. You can think of this step as similar to pushing a Docker image to a container registry when code updates are merged into the main branch.
This is typically done by running the following steps in your workflow:
# login to Atlas to push the migration directory
atlas login --token $ATLAS_TOKEN

# push the migration directory to Atlas Cloud
atlas migrate push dir-name:$GIT_COMMIT
atlas migrate push dir-name:latest
Once the migration directory is pushed to Atlas Cloud, you can view a visual representation of the database schema and its revision history in the Atlas Cloud UI. You can see an example of this here.
It is possible to use the Atlas CLI directly in your CI pipeline, but official integrations are also available:
- The
atlas-sync-actionGitHub Action - The GitLab CI guide, includes instructions for running
migrate pushin pipelines.
6. Deploy the latest revision of the database
Once the latest revision of the database is pushed to Atlas Cloud, it can be deployed to any environment. This is typically done by running the following steps in your workflow:
# login to Atlas to deploy the latest revision of the database
atlas login --token $ATLAS_TOKEN

# deploy the latest revision of the database to the staging environment
atlas migrate apply --url mysql://user:pass@host:port/dbname --dir atlas://dir-name
When you run the atlas migrate apply command, Atlas will connect to the target database,
and apply any pending migrations. If there are no pending migrations, Atlas will do nothing.
When Atlas finishes running, it will send a report to your Atlas Cloud account, with a summary
of the changes that were applied, and any errors that occurred. You can view an example of this
report here.
Atlas offers integrations with many modern deployment tools. Here are some popular alternatives:
- Atlas CLI
- GitHub Actions
- Terraform Provider
- Kubernetes Operator
- And many more such as Argo CD, Flux CD, ECS Fargate, Helm, and more!
Conclusion
This document described the recommended workflow for teams using Atlas to achieve continuous integration and continuous delivery (CI/CD) for their databases. As we've demonstrated, this process can generally be broken down into four phases:
- Develop - Create a new branch, change the desired state and plan the change.
- Review - Create a pull request, let Atlas analyze the change and report back.
- Deliver - Merge the change, push the latest revision of the database to Atlas Cloud.
- Deploy - Deploy the latest revision of the database to any environment.
By implementing this workflow, teams can achieve the following benefits:
- Faster development - Developers can focus on writing application code, and let Atlas be responsible for planning schema changes.
- Lower defect rate - By simulating and validating changes to the database during CI, teams can catch errors before they are deployed to production.
- Automation - By integrating with your team's existing deployment tools, Atlas obviates the need for manual steps to deploy changes to the database, making your system more reliable and less error-prone.