GitOps for Database Schema Management with Argo CD and Atlas Kubernetes Operator (Versioned)
GitOps is a software development and deployment methodology that uses Git as the central repository for both code and infrastructure configurations, enabling automated and auditable deployments.
Argo CD is a Kubernetes-native continuous delivery tool that implements GitOps principles. It uses a declarative approach to deploy applications to Kubernetes, ensuring that the desired state of the application is always maintained.
Kubernetes Operators are software extensions to Kubernetes that enable the automation and management of complex, application-specific operational tasks and domain-specific knowledge within a Kubernetes cluster.
In this guide, we will demonstrate how to use the Atlas Kubernetes Operator and Argo CD to achieve a GitOps-based deployment workflow for your database schema.
This guide demonstrates the versioned migration workflow using Atlas. If you prefer a declarative approach, check out the declarative workflow guide.
Pre-requisites
- An Atlas Cloud migration directory setup connected to your CI. If you don't have one yet, follow the versioned migrations guide to create a migration directory and the CI setup guide to connect it to your CI pipeline.
- An Atlas Cloud Bot Token (see Creating a Bot Token)
- A running Kubernetes cluster - For learning purposes, you can use Minikube, which is a tool that runs a single-node Kubernetes cluster inside a VM on your laptop.
- kubectl - a command-line tool for interacting with Kubernetes clusters.
- Helm - a package manager for Kubernetes.
High-level architecture
Before we dive into the details of the deployment flow, let's take a look at the high-level architecture of our application.
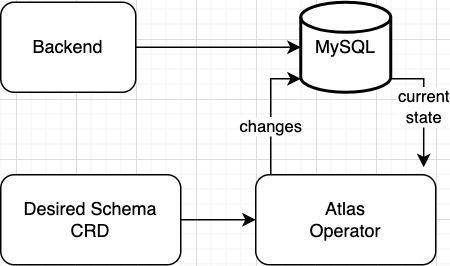
On a high level, our application consists of the following components:
- A backend application - in our example we will use a plain NGINX server as a placeholder for a real backend application.
- A database - in our example we will use a MySQL pod for the database. In a more realistic scenario, you might want to use a managed database service like AWS RDS or GCP Cloud SQL.
- An
AtlasMigrationCustom Resource that defines the migration directory with the state of the database schema (managed by the Atlas Operator.)
In our application architecture, we have a database that is connected to our application and managed using an Atlas CR (Custom Resource). The database plays a crucial role in storing and retrieving data for the application, while the Atlas CR provides seamless integration and management of the database schema within our Kubernetes environment.
How should you run schema changes in an Argo CD deployment?
Integrating GitOps practices with a database in our application stack poses a unique challenge.
Argo CD provides a declarative approach to GitOps, allowing us to define an Argo CD application and seamlessly handle the synchronization process. By pushing changes to the database schema or application code to the Git repository, Argo CD automatically syncs those changes to the Kubernetes cluster.
However, as we discussed in the introduction, ensuring the proper order of deployments is critical. In our scenario, the database deployment must succeed before rolling out the application to ensure its functionality. If the database deployment encounters an issue, it is essential to address it before proceeding with the application deployment.
Argo CD provides Sync Waves and Sync Hooks as features that help to control the order in which manifests are applied within an application. Users may add an annotation to each resource to specify in which "wave" it should be applied. Argo CD will then apply the resources in the order of the waves.
By using annotations with specific order numbers, you can determine the sequence of manifest applications. Lower numbers indicate the earlier application and negative numbers are also allowed.
To ensure that database resources are created and applied before our application, we will utilize Argo CD Sync Waves. The diagram shows our application deployment order:
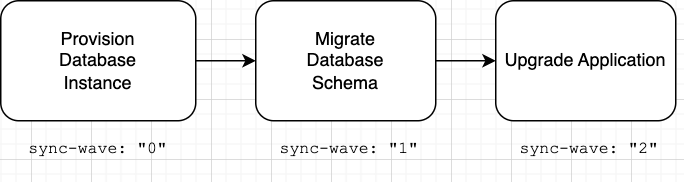
To achieve the above order, we'll annotate each resource with a sync wave annotation order number:
metadata:
  annotations:
    argocd.argoproj.io/sync-wave: "<order-number>"
For more information refer to the official documentation.
With the theoretical background out of the way, let’s take a look at a practical example of how to deploy an application with Argo CD and the Atlas Operator.
Installation
1. Install Argo CD
To install Argo CD run the following commands:
kubectl create namespace argocd
kubectl apply -n argocd -f https://raw.githubusercontent.com/argoproj/argo-cd/stable/manifests/install.yaml
Wait until all the pods in the argocd namespace are running:
kubectl wait --for=condition=ready pod --all -n argocd
For more information or if you run into some error refer to the Argo CD Documentation.
2. Install the Atlas Operator
helm install atlas-operator oci://ghcr.io/ariga/charts/atlas-operator
Helm will print something like this:
Pulled: ghcr.io/ariga/charts/atlas-operator:0.1.9
Digest: sha256:4dfed310f0197827b330d2961794e7fc221aa1da1d1b95736dde65c090e6c714
NAME: atlas-operator
LAST DEPLOYED: Tue Jun 27 16:58:30 2023
NAMESPACE: default
STATUS: deployed
REVISION: 1
TEST SUITE: None
Wait until the atlas-operator pod is running:
kubectl wait --for=condition=ready pod -l app.kubernetes.io/name=atlas-operator -n default
kubectl will print something like this:
pod/atlas-operator-866dfbc56d-qkkkn condition met
For more information on the installation process, refer to the Atlas Operator Documentation.
Define the application manifests
1. Set up a Git repo
Argo CD works by tracking changes to a Git repository and applying them to the cluster, so let's set up a Git repository to serve as the central storage for all your application configuration.
2. Create Atlas Cloud token secret
Create a Kubernetes secret to store your Atlas Cloud API token.
kubectl create secret generic atlas-credentials --from-literal=token=<your atlas cloud token>
3. Define the database resources
Recall that in our first sync-wave, we want to deploy the database resources to our cluster. For the purposes of this example we're deploying a simple MySQL pod to our cluster, but in a realistic scenario, you will probably want to use a managed database service such as AWS RDS, GCP Cloud SQL, or one of the available database operators for Kubernetes.
In your repository, create a new directory named manifests and under it create a new file named db.yaml:
apiVersion: v1
kind: Service
metadata:
   annotations:
      argocd.argoproj.io/sync-wave: "0"
   name: mysql
spec:
   ports:
      - port: 3306
   selector:
      app: mysql
   clusterIP: None
---
apiVersion: apps/v1
kind: Deployment
metadata:
   annotations:
      argocd.argoproj.io/sync-wave: "0"
   name: mysql
spec:
   selector:
      matchLabels:
         app: mysql
   template:
      metadata:
         labels:
            app: mysql
      spec:
         containers:
            - image: mysql:8
              name: mysql
              env:
                 - name: MYSQL_ROOT_PASSWORD
                   value: pass
                 - name: MYSQL_DATABASE
                   value: example
              readinessProbe:
                 tcpSocket:
                    port: 3306
                 initialDelaySeconds: 10
                 periodSeconds: 10
              livenessProbe:
                 tcpSocket:
                    port: 3306
                 initialDelaySeconds: 15
                 periodSeconds: 15
              ports:
                 - containerPort: 3306
                   name: mysql
4. Create the AtlasMigration Custom Resource
Create the AtlasMigration custom resource to define the desired schema for your database, refer to the Atlas Operator documentation, and determine the specifications, such as the desired database schema, configuration options, and additional parameters
Update the name and tag fields in the dir.remote section to match your migration directory name and the desired version tag in the Atlas Schema Registry.
apiVersion: db.atlasgo.io/v1alpha1
kind: AtlasMigration
metadata:
  annotations:
    argocd.argoproj.io/sync-wave: "1"
  name: myapp
spec:
  url: mysql://root:pass@mysql:3306/example # Replace with your database connection string
  cloud:
    tokenFrom:
      secretKeyRef:
        key: token
        name: atlas-credentials
  dir:
    remote:
      name: "my-app" # The name of the migration directory in Atlas Cloud
      tag: "commit-id" # When tag is not specified, the latest tag will be used
5. Create your backend application deployment
For the purpose of this guide, we will deploy a simple NGINX server to act as a placeholder for a real backend server. Notice that we annotate the backend deployment with a sync wave order number of 2. This informs Argo CD to deploy the backend application after the Atlas CR is deployed and confirmed to be in healthy.
apiVersion: apps/v1
kind: Deployment
metadata:
  annotations:
    argocd.argoproj.io/sync-wave: "2"
  name: nginx
spec:
  selector:
    matchLabels:
      app: nginx
  replicas: 2
  template:
    metadata:
      labels:
        app: nginx
    spec:
      containers:
      - name: nginx
        image: nginx
        ports:
        - containerPort: 80
6. Create a custom health check for Atlas objects
To decide whether a SyncWave is complete and the next SyncWave can be started, Argo CD performs a health check on the resources in the current SyncWave. If the health check fails, Argo CD will not proceed with the next SyncWave.
Argo CD has built-in health assessment for standard Kubernetes types, such as Deployment and ReplicaSet,
but it does not have a built-in health check for custom resources such as AtlasMigration.
To bridge this gap, Argo CD supports custom health checks written in Lua, allowing us to define our custom health assessment logic for the Atlas custom resource.
To define the custom logic for the Atlas object in Argo CD, we can add the custom health check configuration to the argocd-cm ConfigMap. This ConfigMap is a global configuration for Argo CD that should be placed in the same namespace as the rest of the Argo CD resources. Below is a custom health check for the Atlas object:
apiVersion: v1
kind: ConfigMap
metadata:
  name: argocd-cm
  namespace: argocd
  labels:
    app.kubernetes.io/name: argocd-cm
    app.kubernetes.io/part-of: argocd
data:
  resource.customizations: |
    db.atlasgo.io/AtlasMigration:
      health.lua: |
        hs = {}
        if obj.status ~= nil then
          if obj.status.conditions ~= nil then
            for i, condition in ipairs(obj.status.conditions) do
              if condition.type == "Ready" and condition.status == "False" then
                hs.status = "Degraded"
                hs.message = condition.message
                return hs
              end
              if condition.type == "Ready" and condition.status == "True" then
                hs.status = "Healthy"
                hs.message = condition.message
                return hs
              end
            end
          end
        end

        hs.status = "Progressing"
        hs.message = "Waiting for reconciliation"
        return hs
7. Create the Argo CD Application manifest
Finally, create an Argo CD application.yaml file which defines our Argo application:
apiVersion: argoproj.io/v1alpha1
kind: Application
metadata:
  name: atlas-argocd-demo
  namespace: argocd
spec:
  source:
    path: manifests
    repoURL: 'https://github.com/<YOUR_ORG>/<YOUR_REPO>' # <-- replace with your repo URL
    targetRevision: master # <-- replace with your mainline
  destination:
    namespace: default
    server: 'https://kubernetes.default.svc'
  project: default
  syncPolicy:
    automated:
      prune: true
      selfHeal: true
    retry:
      limit: 5
      backoff:
        duration: 5s
        maxDuration: 3m0s
        factor: 2
    syncOptions:
      - CreateNamespace=true
Deploying
Make sure all of these files are pushed to your Git repository. If you want to follow along, you can use the example repository for this guide.
1. Apply the custom health check
Before deploying our application, we need to apply the custom health check configuration to the Argo CD ConfigMap.
kubectl apply -f argocd-cm.yaml -n argocd
2. Deploy our application
With the custom health check in place, we can now deploy our application.
kubectl apply -f application.yaml
Once you create an Argo CD application, Argo automatically pulls the configuration files from your Git repository and applies them to your Kubernetes cluster. As a result, the corresponding resources are created based on the manifests. This streamlined process ensures that the desired state of your application is synchronized with the actual state in the cluster.
To verify the application is successfully deployed and the resources are healthy:
kubectl get -n argocd applications.argoproj.io atlas-argocd-demo -o=jsonpath='{range .status.resources[*]}{"\n"}{.kind}: {"\t"} {.name} {"\t"} ({.status}) {"\t"} ({.health}){end}'
kubectl will print something like this:
Service:          mysql   (Synced)    ({"status":"Healthy"})
Deployment:       mysql   (Synced)    ({"status":"Healthy"})
Deployment:       nginx   (Synced)    ({"status":"Healthy"})
AtlasMigration:   myapp   (Synced)    ({"message":"The schema has been applied successfully. Apply response: {\"Changes\":{}}","status":"Healthy"})%
3. Access the Argo CD UI
To view your application in the Argo CD UI, you first need to access it.
First, expose the Argo CD server using port-forwarding:
kubectl port-forward svc/argocd-server -n argocd 8080:443
Next, retrieve the initial admin password:
kubectl -n argocd get secret argocd-initial-admin-secret -o jsonpath="{.data.password}" | base64 -d
Now you can access the Argo CD UI by navigating to https://localhost:8080 in your browser. Login with:
- Username:
admin - Password: (the password you retrieved from the previous command)
You may need to accept the self-signed certificate warning in your browser.
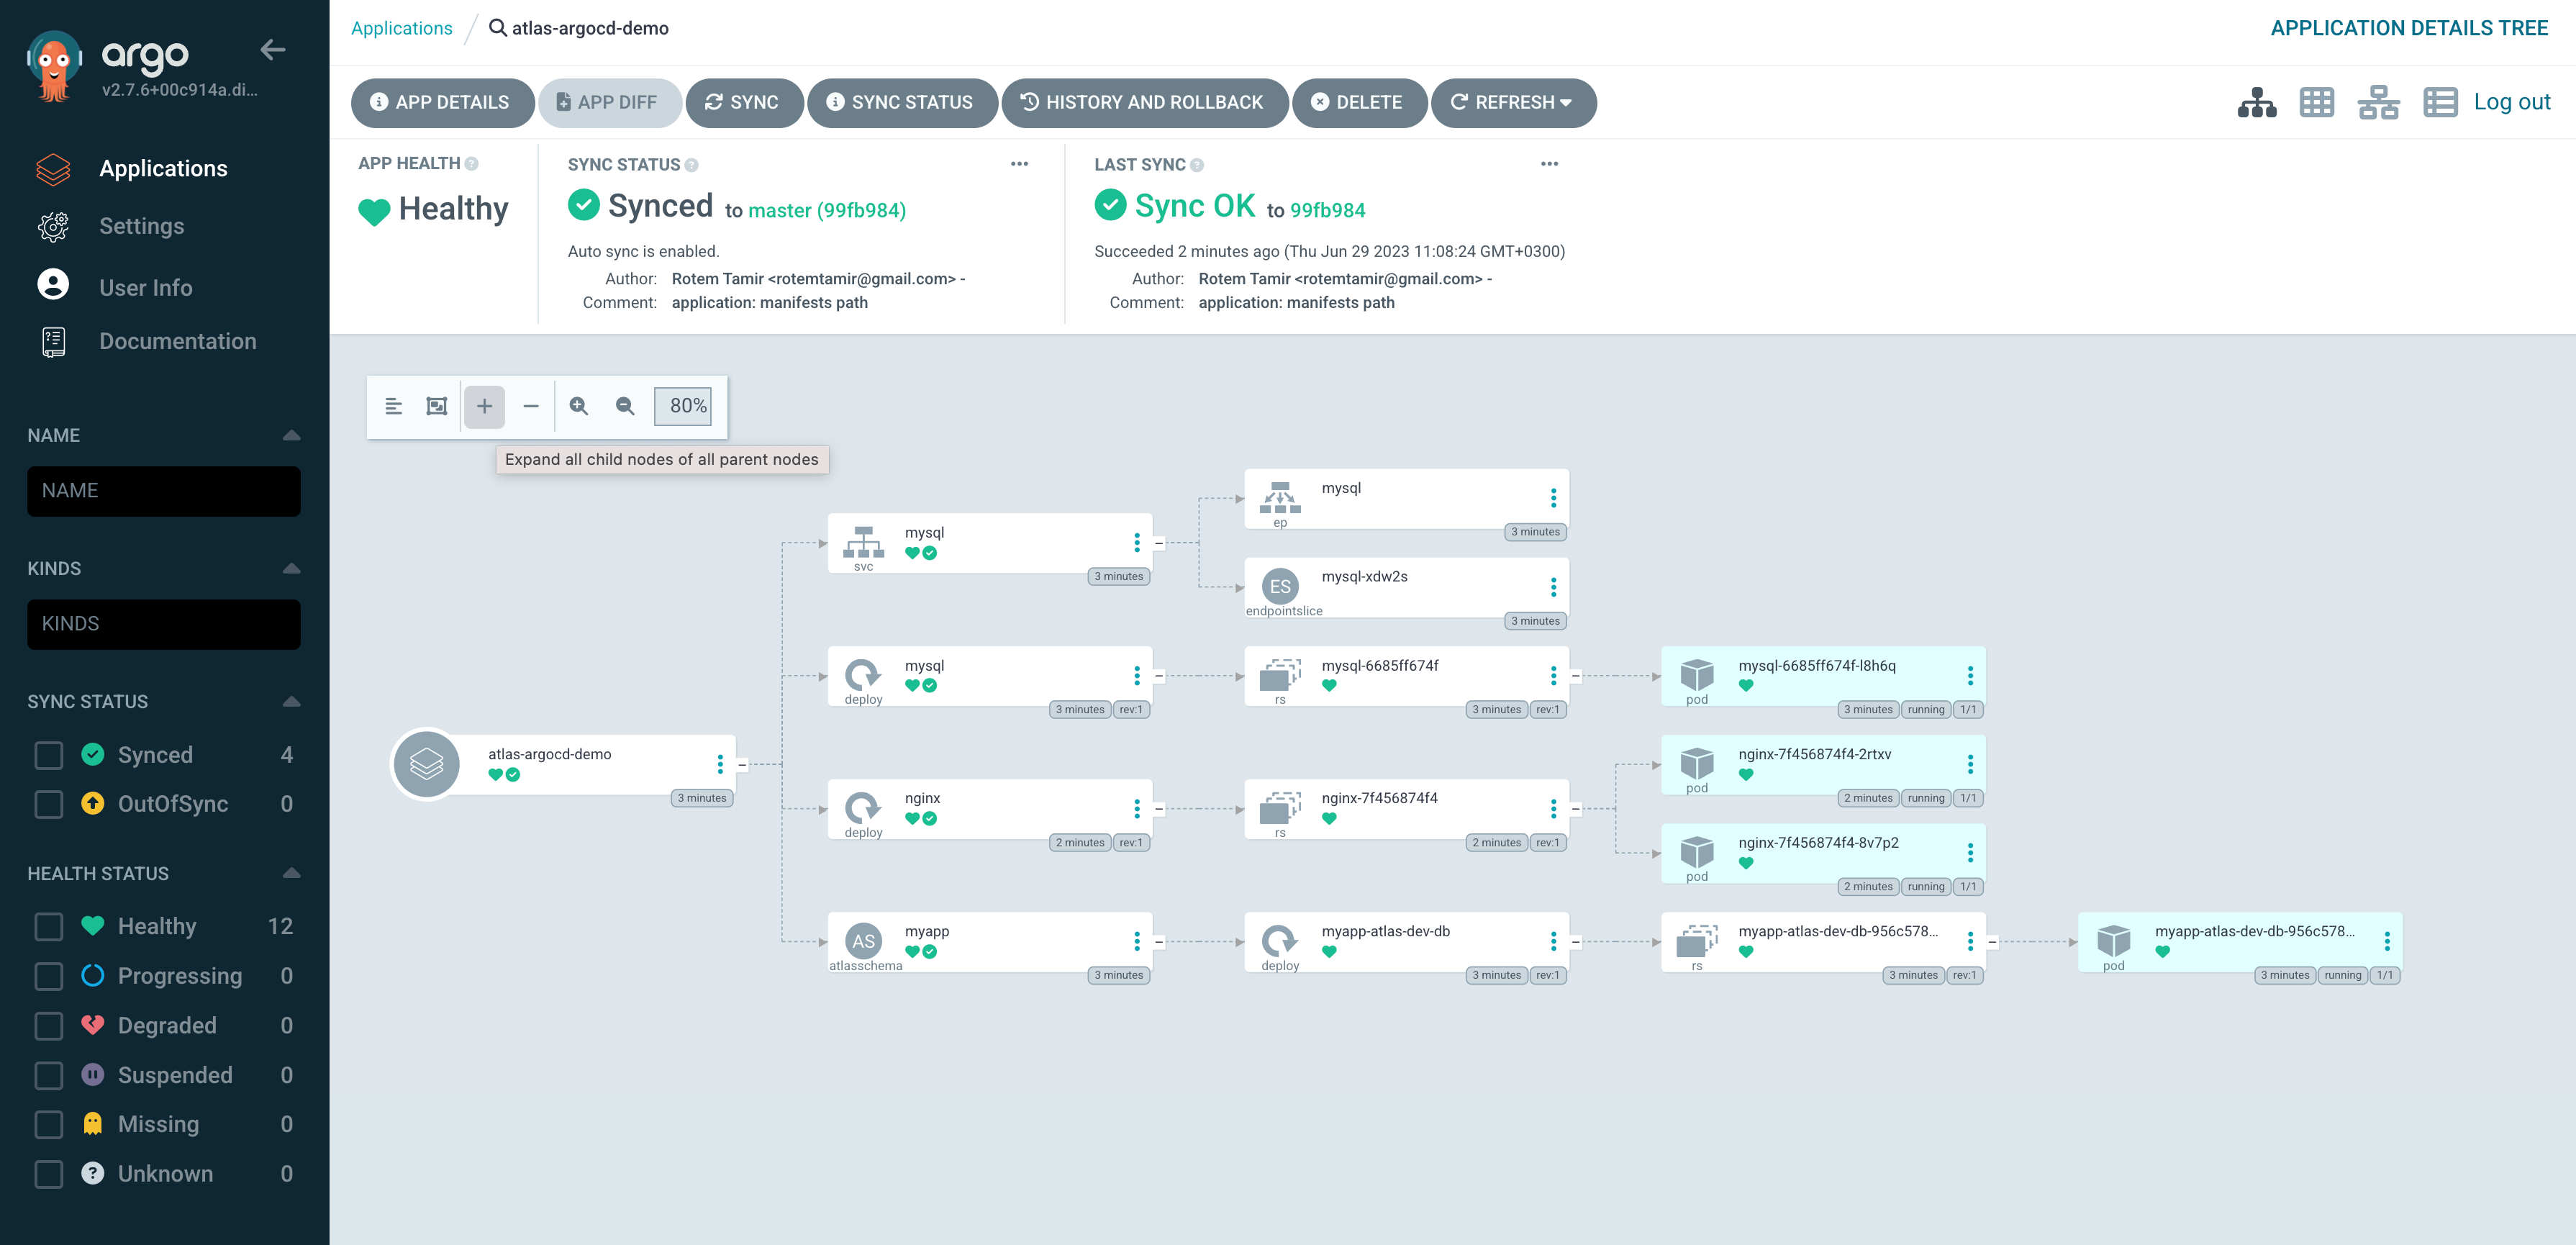
Finally, we can view the health, dependency, status of all the resources on the Argo CD UI:
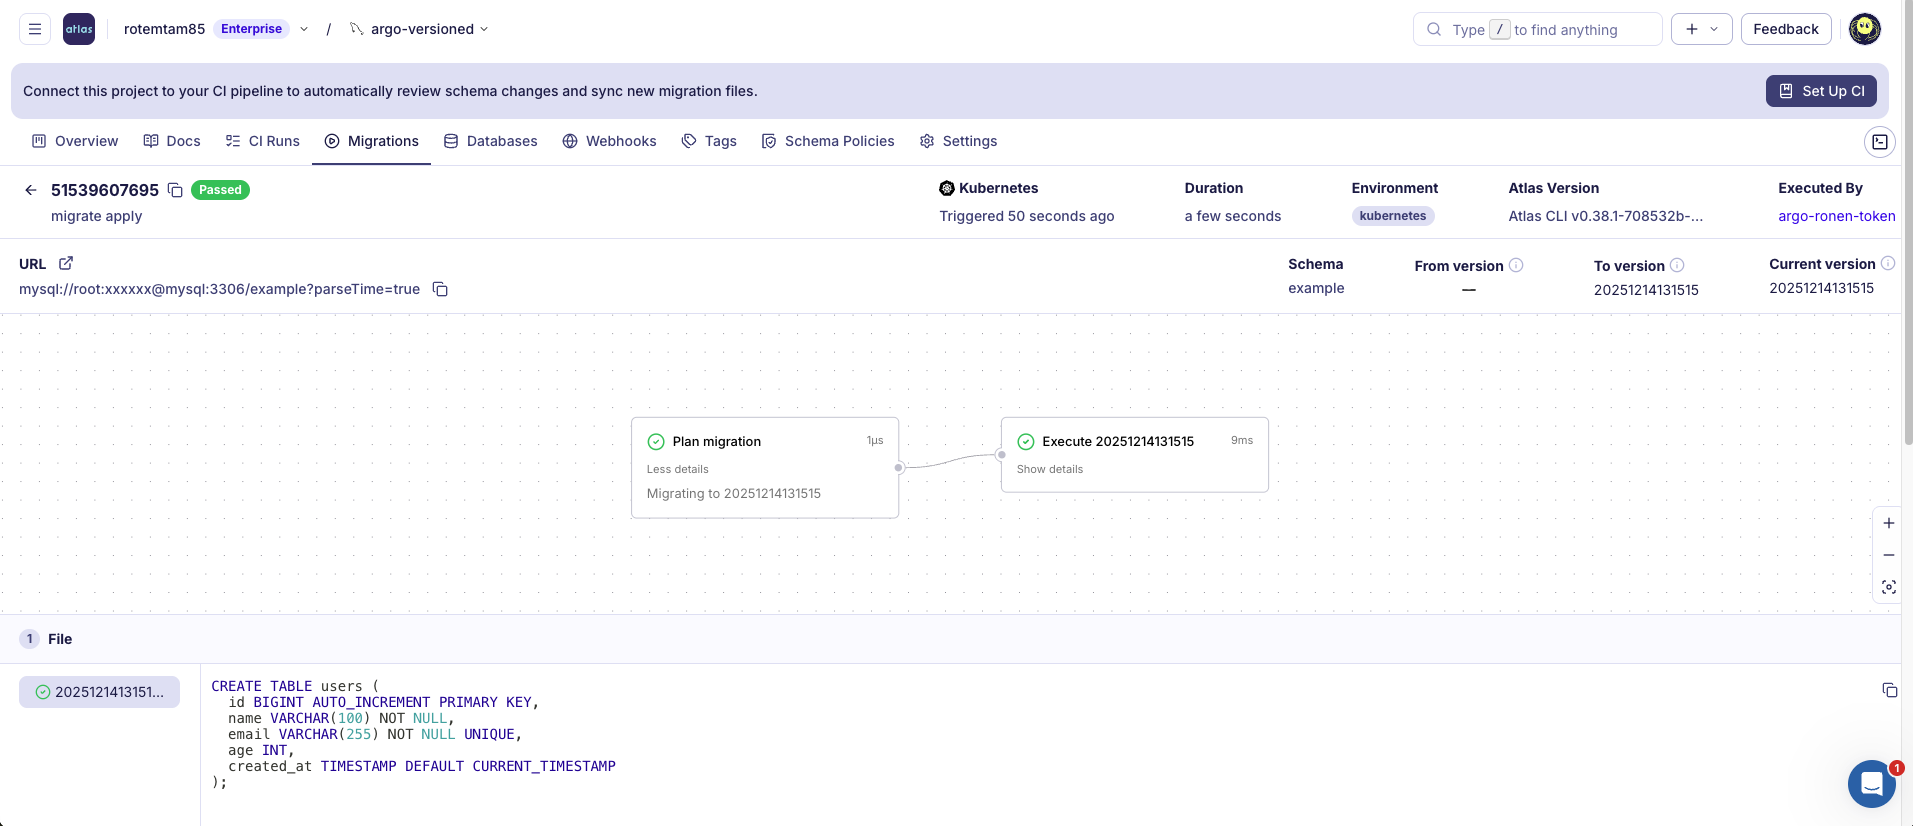
And on Atlas Cloud, you should see that the migrations were applied successfully:
Connect CI to CD
To complete the GitOps workflow, you need to connect your CI pipeline to your Git repository. This way, whenever you push changes to your migration directory, your CI pipeline will automatically update the migration directory in the Atlas Schema Registry and commit the updated tag reference to your Git repository.
After atlas migrate push runs in your CI pipeline, add a step that commits and pushes the updated tag in your migration.yaml manifest back to your Git repository. This ensures that Argo CD will detect the change and deploy the new migration version.
- uses: ariga/atlas-action/migrate/push@v1
  if: github.ref == 'refs/heads/main'
  with:
    dir: 'file://migrations'
    dir-name: 'my-app'

- name: Update tag in migration.yaml
  run: |
    SHA="${GITHUB_SHA}"
    sed -i "s|tag: \".*\"|tag: \"${SHA}\"|" manifests/migration.yaml

- name: Commit and push changes
  run: |
    git config user.name "github-actions[bot]"
    git config user.email "github-actions[bot]@users.noreply.github.com"
    git add manifests/migration.yaml
    git commit -m "chore: update Atlas migration tag to ${GITHUB_SHA}" || exit 0
    git push
This workflow ensures that:
- The migration directory is pushed to the Atlas Schema Registry.
- The
migration.yamlmanifest in your Git repository is updated with the new tag. - Argo CD detects the change in the Git repository and deploys the new migration version to your Kubernetes cluster.
Videos
Database CI/CD Pipelines with ArgoCD and Atlas
Octopus Deploy Webinar
Conclusion
In this guide, we demonstrated how to use Argo CD to deploy an application that uses the Atlas Operator to manage the lifecycle of the database schema. We also showed how to use Argo CD's custom health check to ensure that the schema changes were successfully applied before deploying the backend application.
Using the techniques described in this guide, you can now integrate schema management into your CI/CD pipeline and ensure that your database schema is always in sync with your application code.