5 posts tagged with "gitops"

View All Tags

Case Study: How Unico's Platform Engineering Team Closed the DevOps/Databases Gap Using Atlas

· 6 min read
Rotem Tamir
Building Atlas

"Month over month, we see smaller and smaller incidents.", Luiz Casali, Sr Engineering Manager

Company Background

Unico is a leading digital identity technology provider in Brazil, developing secure and efficient digital identity solutions for businesses and individuals. Their platform helps organizations streamline identity verification processes, delivering a seamless user experience while enhancing security and reducing fraud.

The Missing Layer: Tackling Complexity, Outages, and Risks in Database Schema Management

At Unico, the Platform Engineering team, led by Luiz Casali, is focused on improving developer productivity. "Reducing complexity for developers is one of our top priorities," Luiz explained.

Unico's Platform team had previously built solutions to automate CI/CD workflows for code using Bazel and GitHub Actions and for infrastructure using Terraform and Atlantis. The team was missing a standardized solution for managing database schema changes.
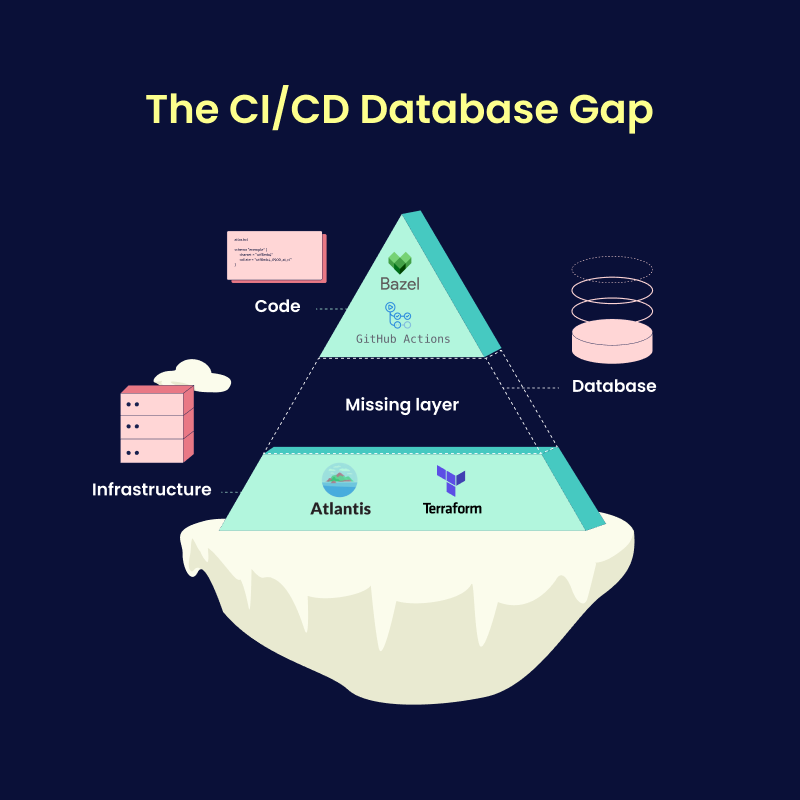
cicd-database-gap

This gap introduced several pressing issues:

  1. Risky Manual Processes: Database schema changes (migrations) were performed manually, increasing the chance of human error.
  2. Unreliable Deployments: Unplanned, database-related outages were common, emphasizing the need for a safer way to handle database changes.
  3. Compliance Requirements: The team needed to document and review schema changes to maintain governance standards, but the lack of automation made this challenging.

Determined to bridge this gap and establish a safer, more efficient solution for developers, Unico's Platform Engineering team began researching the best database migration tools. Thiago da Silva Conceição, a Site Reliability Engineer (SRE) in the team, took the lead on this technical evaluation.

The Challenge of Managing Database Schema Migrations

Traditional schema migration tools posed significant challenges for Unico. As Thiago noted, "Automation with our previous tool was never easy to maintain. It followed a specific pattern, and only a few team members were familiar with it." The team faced limitations that affected usability, integration, and overall productivity:

  • Limited Usability and Adoption: The tool required extensive knowledge, and documentation was limited, making it difficult to adopt across the team.
  • Lack of Automation Support: Automated migrations and reliable error-handling were lacking, leading to inconsistent deployments and a need for additional manual oversight.
  • Compliance Difficulties: The absence of automated documentation and governance features made it challenging to maintain and provide records for audit and compliance requirements.

With these challenges in mind, Unico needed a solution that could offer usability, integration with existing tools, and comprehensive metrics to continuously monitor and improve database migrations.

Evaluating Alternatives and Choosing Atlas

"In the end, choosing Atlas was easy. It is a simple, yet powerful tool, offering a significant impact with many ready-made features that would require customization in other tools."
Thiago Silva Conceição, SRE, Unico

During the search for a new solution, Unico's engineering team prioritized several criteria:

  1. Ease of Use: The tool needed to be straightforward and accessible for all developers, not just a few specialized team members.
  2. Integration and Compatibility: It had to fit naturally with Unico's technology stack, particularly with Terraform, which was already in heavy use.
  3. Metrics and Alerts: Real-time insights and alerts were essential to monitor migrations effectively.

Thiago compared a few traditional solutions before selecting Atlas. Atlas's declarative schema-as-code approach, along with its HCL compatibility and robust cloud management, aligned well with Unico's needs. It allowed the team to automate migrations, eliminate manual errors, and centralize schema management, creating a unified experience across their projects. "Atlas allowed us to keep the DDL in HCL while still supporting SQL scripts for specific use cases through its versioning model," Thiago shared.

One Migration Tool to Rule Them All

schema-migration-tool

Another key priority for Unico's Platform Engineering team was standardization. With multiple teams working across diverse programming languages and databases, The Platform Engineering team needed a unified migration tool that would work for a wide array of use cases, without sacrificing ease of use or reliability. To simplify the developer experience and streamline internal operations, they aimed to find a single solution that could support all teams consistently and seamlessly.

Atlas emerged as the ideal fit by providing plugin support for various databases, ORMs and integrations, making it a flexible tool for Unico's entire tech stack. The ability to standardize migration management with Atlas allowed Unico's Platform Engineering team to enforce consistent practices across all projects. Atlas became the single source of truth for schema management, offering a centralized framework for building policies, integrating into CI/CD pipelines, and supporting developers.

By implementing Atlas as a standard, the Platform Engineering team eliminated the need to train on or maintain multiple tools, reducing complexity and operational overhead. Now, Unico's developers enjoy a unified experience, and the platform team has only one tool to integrate, support, and scale as the company grows.

Implementation: A Smooth Migration Process

The migration to Atlas was seamless, with no need to recreate migration files or impose rigid formats. "We simply imported the schemas from the production database, keeping the process straightforward and efficient," Thiago said. The team was able to quickly onboard Atlas and start seeing results, with pre-built actions in Atlas Cloud providing essential metrics, notifications, and dashboards for tracking progress.

This success reinforced the decision to adopt Atlas:

"Month over month, we see smaller and smaller incidents.

— Luiz Casali, Senior Engineering Manager

Outcome: Faster Development Cycles, Increased Reliability, and Enhanced Compliance

With Atlas in place, Unico's Platform Engineering team has achieved several key outcomes:

  • Accelerated Development Cycles: Automation of database migrations streamlined the development process, enabling faster iterations and more rapid deployments.
  • Increased Reliability: Atlas's linting and testing tools reduced migration errors and enhanced deployment stability, contributing to Unico's goal of reducing incidents.
  • Enhanced Compliance: Atlas's automated documentation ensures that each migration step is recorded, simplifying compliance by providing a clear, auditable record of all schema changes.

By automating these processes, the team has successfully reduced manual work and achieved a more predictable migration workflow. Now, as Unico grows, they are assured that their migration practices will scale smoothly, maintaining operational costs without sacrificing speed or reliability.

ci-cd-database-gap-close

Getting Started

Atlas brings the declarative mindset of infrastructure-as-code to database schema management, similar to Terraform, but focused on databases. Using its unique schema-as-code approach, teams can quickly inspect existing databases and get started with minimal setup.

Like Unico, we recommend anyone looking for a schema migration solution to get started with Atlas by trying it out on one or two small projects. Dive into the documentation, join our Discord community for support, and start managing your schemas as code with ease.

The Hard Truth about GitOps and Database Rollbacks

· 16 min read
Rotem Tamir
Building Atlas

Prepared for KubeCon North America 2024

Introduction

For two decades now, the common practice for handling rollbacks of database schema migrations has been pre-planned "down migration scripts". A closer examination of this widely accepted truth reveals critical gaps that result in teams relying on risky, manual operations to roll back schema migrations in times of crisis.

In this post, we show why our existing tools and practices cannot deliver on the GitOps promise of "declarative" and "continuously reconciled" workflows and how we can use the Operator Pattern to build a new solution for robust and safe schema rollbacks.

The Undo Button

One of the most liberating aspects of working on digital products is the ability to roll back changes. The Undo Button, I would argue, is one of the most transformative features of modern computing.

Correcting mistakes on typewriters was arduous. You would roll the carriage back and type over any errors, leaving messy, visible corrections. For bigger changes, entire pages had to be retyped. Correction fluid like whiteout offered a temporary fix, but it was slow and imprecise, requiring careful application and drying time.

Digital tools changed everything. The Undo Button turned corrections into a simple keystroke, freeing creators to experiment without fear of permanent mistakes. This shift replaced the stress of perfection with the freedom to try, fail, and refine ideas.

Rollbacks and Software Delivery

When it comes to software delivery, having an Undo Button is essential as well. The ability to roll back changes to a previous state is a critical safety net for teams deploying new features, updates, or bug fixes. Specifically, rollbacks impact one of the key metrics of software delivery: Mean Time to Recovery (MTTR).

MTTR is a measure of how quickly a system can recover from failures. When a deployment fails, or a bug is discovered in production, teams generally have two options: triage and fix the issue (roll forward), or roll back to a previous known stable state.

When the fix to an issue is not immediately clear, or the issue is severe, rolling back is often the fastest way to restore service. This is why having a reliable rollback mechanism is crucial for reducing MTTR and ensuring high availability of services.

How are rollbacks even possible?

Undoing a change in a local environment like a word processor is straightforward. There are multiple ways to implement an Undo Button, but they all rely on the same basic principle: the system keeps track of every change made and can revert to a previous state.

In a distributed system like modern, cloud-native applications, things are not so simple. Changes are made across multiple components with complex dependencies and configurations.

The key capability that enables rolling back changes is described in the seminal book, "Accelerate: The Science of Lean Software and DevOps". The authors identify "Comprehensive Configuration Management" as one of the key technical practices that enables high performance in software delivery:

"It should be possible to provision our environments and build, test, and deploy our software in a fully automated fashion purely from information stored in version control.” 1

In theory, this means that if we can store everything there is to know about our system in version control, and have an automated way to apply these changes, we should be able to roll back to a previous state by simply applying a previous commit.

GitOps and Rollbacks

The principle of "Comprehensive Configuration Management" evolved over the years into ideas like "Infrastructure as Code" and "GitOps". These practices advocate for storing all configuration and infrastructure definitions in version control in a declarative format, and using automation to apply these changes to the system.

Projects like ArgoCD and Flux have popularized the GitOps approach to managing Kubernetes clusters. By providing a structured way to define the desired state of your system in Git (e.g., Kubernetes manifests), and automatically reconciling the actual state with it, GitOps tools provide a structured and standardized way to manage satisfy this principle.

On paper, GitOps has finally brought us a working solution for rollbacks. Revert the commit that introduced the issue, and all of your problems are gone!

Problem solved. End of talk. Right?

The Hard Truth

Teams that have tried to fully commit to the GitOps philosophy usually find that the promise of "declarative" and "continuously reconciled" workflows is not as straightforward as it seems. Let's consider why.

Declarative resource management works exceptionally well for stateless resources like containers. The way Kubernetes handles deployments, services, and other resources is a perfect fit for GitOps. Consider how a typical deployment rollout works:

  1. A new replica set is created with the new version of the application.
  2. Health checks are performed to ensure the new version is healthy.
  3. Traffic is gradually shifted to healthy instances of the new version.
  4. As the new version proves stable, the old version is scaled down and eventually removed.

But will this work for stateful resources like databases? Suppose we want to change the schema of a database. Could we apply the same principles to roll back a schema migration? Here's what it would look like:

  1. A new database is spun up with the new schema.
  2. Health checks are performed to ensure the new schema is healthy.
  3. Traffic is gradually shifted to the new database instance.
  4. The old database is removed.

This would get the job done... but you would probably find yourself out of a job soon after.

Stateless resources are really great to manage because we can always throw out whatever isn't working for us and start fresh. But databases are different. They are stateful, and they are comprised not only of a software component (the database engine), the configuration (server parameters and schema), but also the data itself. The data itself cannot, by definition, be provisioned from version control.

Stateful resources like databases require a different approach to manage changes.

Up and Down Migrations

The common practice for managing schema changes in databases is to use "up" and "down" migration scripts in tandem with a migration tool (like Flyway or Liquibase). The idea is simple: when you want to make a change to the schema, you write a script that describes how to apply the change (the "up" migration). Additionally, you write a script that describes how to undo the change (the "down" migration).

For example, suppose you wanted to add a column named "short_bio" to a table named "users". Your up migration script might look like this:

ALTER TABLE users
ADD COLUMN short_bio TEXT;

And your down migration script might look like this:

ALTER TABLE users DROP COLUMN short_bio;

In theory, this concept is sound and satisfies the requirements of "Comprehensive Configuration Management". All information needed to apply and roll back the change is stored in version control.

Theory, once again, is quite different from practice.

The Myth of Down Migrations

After interviewing hundreds of engineers on this topic, we found that despite being a widely accepted concept, down are rarely used in practice. Why?

Naive assumptions

When you write a down migration, you are essentially writing a script that will be executed in the future to revert the changes you are about to make. By definition, this script is written before the "up" changes are applied. This means that the down migration is based on the assumption that the changes will be applied correctly.

But what if they are not?

Suppose the "up" migration was supposed to add two columns, the down file would be written to remove these two columns. But what if the migration was partially applied and only one column was added? Running the down file would fail, and we would be stuck in an unknown state.

Yes, some databases like PostgreSQL support transactional DDL, which means that if the migration fails, the changes are rolled back, and you end up with a state this consistent with a specific revision. But even for PostgreSQL, some operations cannot be run in a transaction, and the database can end up in an inconsistent state.

For MySQL, which does not support transactional DDL, the situation is even worse. If a migration fails halfway through, you are left with only a partially applied migration and no way to roll back.

Data loss

When you are working on a local database, without real traffic, having the up/down mechanism for migrations might feel like hitting Undo and Redo in your favorite text editor. But in a real environment with real traffic, it is not the case.

If you successfully rolled out a migration that added a column to a table, and then decided to revert it, its inverse operation (DROP COLUMN) does not merely remove the column. It deletes all the data in that column. Re-applying the migration would not bring back the data, as it was lost when the column was dropped.

For this reason, teams that want to temporarily deploy a previous version of the application, usually do not revert the database changes, because doing so will result in data loss for their users. Instead, they need to assess the situation on the ground and figure out some other way to handle the situation.

Incompatibility with modern deployment practices

Many modern deployment practices like Continuous Delivery (CD) and GitOps advocate for the software delivery process to be automated and repeatable. This means that the deployment process should be deterministic and should not require manual intervention. A common way of doing this is to have a pipeline that receives a commit, and then automatically deploys the build artifacts from that commit to the target environment.

As it is very rare to encounter a project with a 0% change failure rate, rolling back a deployment is something everyone needs to be prepared for.

In theory, rolling back a deployment should be as simple as deploying the previous version of the application. When it comes to versions of our application code, this works perfectly. We pull and deploy the container image corresponding to the previous version.

This strategy does not work for the database, for two reasons:

  1. For most migration tools, down or rollback is a separate command that needs to be executed specifically. This means that the deployment machinery needs to know what the current version of the target database is in order to decide whether to migrate up or down.
  2. When we pull artifacts from a previous version, they do not contain the down files that are needed to revert the database changes back to the necessary schema - they were only created in a future commit!

These gaps mean that teams are left with two options: either they need to manually intervene to roll back the database changes, or they need to develop a custom solution that can handle the rollback in an automated way.

Down Migrations and GitOps

Going back to our main theme of exploring whether database rollbacks and GitOps can be compatible, let's expand on this last point.

The ArgoCD documentation suggests that the way to integrate schema migrations is to use a Kubernetes Job that executes your migration tool of choice, and to annotate the Job as a PreSync hook:

This image will typically be built as part of your CI/CD pipeline, and will contain the migration tool and the migration scripts for the relevant commit or release:

apiVersion: batch/v1
kind: Job
metadata:
name: db-migration
annotations:
argocd.argoproj.io/hook: PreSync
argocd.argoproj.io/hook-delete-policy: HookSucceeded
spec:
template:
spec:
containers:
- name: migrate
image: your-migration-image:{{ .Values.image.tag }} # Example using Helm values
restartPolicy: Never

When ArgoCD detects a new commit in the Git repository, it will create a new Job that runs the migration tool. If the migration is successful, the Job will complete successfully, and the new version of the application will be deployed.

This will work for the up migration. But what happens when you need to roll back?

Teams commonly hit the two issues we mentioned above:

  1. The deployment machinery does not know what the current version of the target database is, and therefore cannot decide whether to migrate up or down.

    Unless a team has carefully thought about this and implemented a mechanism inside the image to decide what to do, the deployment machinery will always migrate up.

  2. The image that is pulled for the rollback does not contain the down files that are needed to revert the database changes back to the necessary schema. Most migration tools will silently keep the database in the current state.

What are the implications?

  1. The database is no longer in sync with the current Git commit, violating all GitOps principles.

  2. Teams that do need to roll back the database changes are left with a manual process that requires intervention and coordination.

Operators: The GitOps Way

The Operator Pattern is a Kubernetes-native way to extend the Kubernetes API to manage additional resources. Operators typically ship two main components: a Custom Resource Definition (CRD) that defines the new resource type, and a controller that watches for changes to these resources and takes action accordingly.

The Operator Pattern is a perfect fit for managing stateful resources like databases. By extending the Kubernetes API with a new resource type that represents a database schema, we can manage schema changes in a GitOps-friendly way. A specialized controller can watch for changes to these resources and apply the necessary changes to the database in a way that a naive Job cannot.

The Atlas Operator

The Atlas Operator is a Kubernetes Operator that enables you to manage your database schemas natively from your Kubernetes cluster. Built on Atlas, a database schema-as-code tool (sometimes called "like Terraform for databases"), the Atlas Operator extends the Kubernetes API to support database schema management.

Atlas has two core capabilities that are helpful to building a GitOps-friendly schema management solution:

  1. A sophisticated migration planner that can generates migrations by diffing the desired state of the schema with the current state of the database.
  2. A migration analyzer that can analyze a migration and determine whether it is safe to apply and surface risks before the migration is applied.

Declarative vs. Versioned Flows

Atlas supports two kinds of flows for managing database schema changes: declarative and versioned. They are reflected in the two main resources that the Atlas Operator manages:

Declarative: AtlasSchema

The first resource type is AtlasSchema which is used to employ the declarative flow. With AtlasSchema, you define the desired state of the database schema in a declarative way, and the connection string to the target database.

The Operator is then responsible for generating the necessary migrations to bring the database schema to the desired state, and applying them to the database. Here is an example of an AtlasSchema resource:

apiVersion: db.atlasgo.io/v1alpha1
kind: AtlasSchema
metadata:
name: myapp
spec:
url: mysql://root:pass@mysql:3306/example
schema:
sql: |
create table users (
id int not null auto_increment,
name varchar(255) not null,
email varchar(255) unique not null,
short_bio varchar(255) not null,
primary key (id)
);

When the AtlasSchema resource is applied to the cluster, the Atlas Operator will calculate the diff between the database at url and the desired schema, and generate the necessary migrations to bring the database to the desired state.

Whenever the AtlasSchema resource is updated, the Operator will recalculate the diff and apply the necessary changes to the database.

Versioned: AtlasMigration

The second resource type is AtlasMigration which is used to employ the versioned flow. With AtlasMigration, you define the exact migration that you want to apply to the database. The Operator is then responsible for applying any necessary migrations to bring the database schema to the desired state.

Here is an example of an AtlasMigration resource:

apiVersion: db.atlasgo.io/v1alpha1
kind: AtlasMigration
metadata:
name: atlasmigration-sample
spec:
url: mysql://root:pass@mysql:3306/example
dir:
configMapRef:
name: "migration-dir" # Ref to a ConfigMap containing the migration files

When the AtlasMigration resource is applied to the cluster, the Atlas Operator will apply the migrations in the directory specified in the dir field to the database at url. Similarly to classic migration tools, Atlas uses a metadata table on the target database to track which migrations have been applied.

Rollbacks with the Atlas Operator

The Atlas Operator is designed to handle rollbacks in a GitOps-friendly way. This is where the power of the Operator Pattern really shines as it can make nuanced and intelligent decisions about how to handle changes to the managed resources.

To roll back a schema change in an ArgoCD-managed environment, you would simply revert the AtlasSchema or AtlasMigration resource to a previous version. The Atlas Operator would then analyze the changes and generate the necessary migrations to bring the database schema back to the desired state.

Advantages of the Operator Pattern

In the discussion above we kept talking about edge cases that arise when rolling back database schema changes, and concluded that they require manual consideration and intervention. What if we could automate this process?

The Operator Pattern is all about codifying operational knowledge into software. Let's consider how the Operator Pattern can be used to address the challenges we discussed:

  1. Understanding intent. The Operator can discern between up and down migrations. By comparing between the current state of the database and the desired version, the operator decides whether to go up or down.

  2. Having access to the necessary information. Contrary to a Job that only has access to the image it was built with, the Operator stores metadata about the last execution as a ConfigMap via the Kubernetes API. This metadata enables the operator to migrate down even though the current image does not information about the current state.

  3. Intelligent Diffing. Because the Operator is built on top of Atlas's Schema-as-Code engine, it can calculate correct migrations even if the database is in an inconsistent state.

  4. Safety checks. The Operator can analyze the migration and determine whether it is safe to apply. This is a critical feature that can prevent risky migrations from being applied. Depending on your policy, it can even require manual approval for specific types of changes!

Conclusion

In this talk, we explored the challenges of rolling back database schema changes in a GitOps environment. We discussed the limitations of the traditional up/down migration approach, and how the Operator Pattern can be used to build a more robust and automated solution.

If you have any questions or would like to learn more, please don't hesitate to reach out to us on our Discord server.


1: Forsgren, Nicole, Jez Humble, and Gene Kim. Accelerate: The Science of Lean Software and DevOps. IT Revolution Press, 2018.

Why Your Team Needs a Database Schema-as-Code Tool

· 11 min read
Rotem Tamir
Building Atlas

The Evolution of Database Schema Management

In today's world, where software is developed and deployed at a rapid pace, selecting the right tools for your team is crucial. The right tools can help you move faster, be more productive, and reduce the risk of errors and bugs. Most backend applications are backed by a database, and maintaining the database schema is a critical part of the development process.

Our industry has seen many trends in the way database schemas evolve over the years. In the early days, DBAs would manually run SQL DDL commands directly against the database through a terminal. Then came GUI based, point-and-click database management tools that included schema editing capabilities.

In the early 2000s, we saw the rise of "database migration tools" that allowed developers to write versioned database upgrade scripts (usually in SQL), called "migrations", that would be executed by the tool itself. This trend was further intensified with the rise of DevOps and CI/CD, as it became the de-facto standard way for automating database schema management.

The Rise of Database Schema-as-Code

In recent years, we have witnessed a seismic shift in the way cloud infrastructure is managed. The rise of tools such as Terraform and Kubernetes has led to the concept of "Infrastructure-as-Code". As the complexity of infrastructure grew, it became clear that the only way to manage it effectively was to use a declarative approach and treat it "as code".

Infrastructure-as-code, in this context, means that the desired state of the infrastructure is defined in a formal language ("as code") and stored in a version control system (such as Git). The infrastructure is then managed by a tool that compares the desired state to the actual state and makes the necessary changes to bring the actual state to the desired state.

This approach has many advantages over the traditional imperative approach of manually running commands against the infrastructure. It allows for better collaboration between team members, it is more robust and less susceptible to errors, it is self documenting, and allows for better visibility, governance and control into the state of the infrastructure.

Following this trend, some projects such as Atlas and Skeema have started to apply the same principles to database schema management. Instead of using an imperative approach, where developers do the planning and tools are only used to execute the plan and keep track of what has been done, they bring to the table a simpler approach. This approach, which is gaining the name "Database Schema-as-Code", applies a declarative approach to database schema management: developers provide the desired state of the database and the tool automatically plans the required migrations.

A practical example

Let's use Atlas to show a quick example of how database schema-as-code tools work.

Atlas allows users to represent their database schema in plain SQL or in HCL. The schema is saved in a schema file, which holds the desired state of our database.

We will start with a simple schema that represents a users table, in which each user has an ID and a name:

schema.hcl
table "users" {
schema = schema.example
column "id" {
null = false
type = int
}
column "name" {
null = true
type = varchar(100)
}
primary_key {
columns = [column.id]
}
}

Now, let's apply this schema to an empty MySQL database:

atlas schema apply \
-u "mysql://root:pass@localhost:3306/example" \
--to file://schema.hcl \
--dev-url "docker://mysql/8/example"

Atlas will compare the desired state from our schema file to the database URL provided, and plan the migration:

-- Planned Changes:
-- Create "users" table
CREATE TABLE `users` (
`id` int NOT NULL,
`name` varchar(100) NULL,
PRIMARY KEY (`id`)
) CHARSET utf8mb4 COLLATE utf8mb4_0900_ai_ci;
? Are you sure?:
▸ Apply
Lint and edit
Abort

After applying this to our database, we will run the command once more and see that Atlas recognizes there is no drift between the two states:

Schema is synced, no changes to be made

Let's make a simple change to our schema by adding an email column:

schema.hcl
table "users" {
schema = schema.example
column "id" {
null = false
type = int
}
column "name" {
null = true
type = varchar(100)
}
column "email" {
null = true
type = varchar(255)
}
primary_key {
columns = [column.id]
}
}

Now let's run the schema apply command again, and view the migration plan that Atlas will create for us:

-- Planned Changes:
-- Modify "users" table
ALTER TABLE `users` ADD COLUMN `email` varchar(255) NULL;
? Are you sure?:
▸ Apply
Lint and edit
Abort

To conclude, in this example, we got a glimpse of how a tool like Atlas works with a database schema using the declarative approach.

Do you need a Database Schema-as-Code tool?

If you are using an older more traditional database migration tool or not using one at all, you might be wondering if you should consider switching to a Database Schema-as-Code tool. Here are five signs that you might need to consider it:

1. Your team is making changes to the database schema directly in production

The worst kind of tool for managing database schemas is no tool at all. Running migrations manually against production databases should be avoided at all costs. First, humans are notoriously prone to errors, and the risk of making a mistake that will cause downtime or data loss is very high. Second, any changes made directly in production are not tracked anywhere, so it is very hard to know what has been done and by whom. Third, it means that your deployments cannot be fully automated and you are missing out on the benefits of CI/CD.

Using a Database Schema-as-Code tool as the exclusive way of making changes to the database schema is a great way to avoid these problems. It allows you to automate your deployments, track all changes to the database schema in source control, and collaborate more effectively with your team.

2. You don't have a single source of truth for your database schema

Having a single source of truth for how your application is deployed is a key principle of DevOps. It allows you to have a clear picture of the state of your application at any given time, and it allows you to automate your deployments and avoid human errors.

By requiring all migrations to be checked in to source control, traditional migration tools can go a long way to ensure that the database schema is in a consistent state, but they suffer from two issues in this regard:

  1. They only keep track of the changes to the database ("migrations"). To figure out the actual schema of the database at any given version, you need to apply all the migrations up to that version to an empty database and inspect the result with an additional tool. Database Schema-as-Code tools, on the other hand, naturally document the schema of the database in any given version.

  2. They have no way to ensure that the actual database's schema is consistent with the migrations. If someone makes a change directly in the database, there is no way to know about it. When you apply your schema to a target database using a Database Schema-as-Code tool, it will compare the desired state to the actual state and make the necessary changes to bring the actual state to the desired state.

    This ensures that over time your actual databases will not drift from the desired state.

3. You don't have any database experts on your team

In the past, managing database schemas was under the responsibility of DBAs. They were the ones who were responsible for making sure that the database schema is consistent and that all changes are done safely.

In recent years, as cloud-native, microservices-based architectures have become more popular, the amount of databases that each team manages has grown significantly. This has led to a situation where many teams don't have a DBA , and the responsibility for managing the database schema falls on the shoulders of the developers.

If you maintain a small schema with a few tables, you might not feel the need for a tool to help you manage it. But as schemas grow in size and complexity, to contain thousands of database objects (tables, views, functions, stored procedures, etc.), it becomes very hard to manage them manually. A Database Schema-as-Code tool can help you manage your schema more effectively, even if you don't have any DBAs on your team.

4. You manually verify the safety of your database migrations

If your application is small and the stakes for making a mistake are low, you might be able to get away with messing up a schema change now and then. But if your workload is mission-critical, if application downtime or data loss can have a significant impact on your business, you need to make sure that your migrations are safe.

Many teams have been through the unpleasant experience of a failed migration that caused a significant outage. This is usually followed by a change in review processes where migrations are reviewed by multiple team members, and a manual verification process is added to make sure that the migration is safe to run.

This process is time-consuming and error-prone. Even worse, it turns team members with more database experience into bottlenecks, slowing down the development process and team velocity.

Database Schema-as-Code tools can help you automate this process and make it more robust. Atlas, for example, comes with built-in support for Migration Linting, Diff Policies, and other safety mechanisms that help you catch errors and issues before they lead to a full-blown production outage.

5. Your app and infra delivery are way better than your database deployments

When interviewing platform engineers about how their deployment infrastructure works, we keep hearing the same story: "Our deployments are 100% pure Infrastructure-as-Code GitOps goodness, we can do them 50 times a day!" And when we ask about databases… "Oh yeah, there’s that part... It’s not as great."

A lot has changed in the way applications are deployed since the early days of database migrations. The versioned migrations paradigm was a great improvement over the previous manual approach, but it is still very much an imperative approach. Modern application delivery principles such as GitOps and Infrastructure-as-Code work in a declarative way, and so they need a database schema management tool that works in a similar way.

If your application and infra delivery feel like a well-oiled machine, but your database deployments are still semi-manual, or feel clunky and error-prone, you should consider switching to a Database Schema-as-Code tool where you can manage your database schema in a Kubernetes Operator or a Terraform Provider.

Enter: Atlas

Atlas is a Database Schema-as-Code tool that allows you to manage your database schema in a declarative way. With Atlas, developers provide the desired state of the database schema and Atlas automatically plans the required migrations. To get started with Atlas, you can follow our quickstart guide..

Wrapping up

In this article, we have discussed the evolution of database schema management tools and the rise of Database Schema-as-Code tools. We have also discussed five signs that you might need to consider switching to a Database Schema-as-Code tool. I hope you found this article useful.

As always, we would love to hear your feedback and suggestions on the Atlas Discord server.

GitOps for Databases, Part 2: Atlas Operator and ArgoCD

· 7 min read
Rotem Tamir
Building Atlas
info

This is the second post in a two-part tutorial, which demonstrates how to use the Atlas Operator in tandem with Atlas Cloud and ArgoCD to create a slick, modern GitOps workflow for managing your database migrations natively in Kubernetes.

In part one, we demonstrated how to initialize an Atlas project, and create a CI/CD pipeline that automatically plans, verifies and stores your database migrations in Atlas Cloud using GitHub Actions.

In this part, we will show how to deploy these migrations using the Atlas Operator and ArgoCD to demonstrate a complete GitOps workflow for database migrations.

How to GitOps your Database Migrations on Kubernetes

"We can wrap existing schema management solutions into containers, and run them in Kubernetes as Jobs. But that is SILLY. That is not how we work in Kubernetes."

-Viktor Farcic, DevOps ToolKit

As applications evolve, so do their database schemas. The practice of automating the deployment of database schema changes has evolved hand in hand with modern devops principles into what is known as database migrations. As part of this evolution, hundreds of "migration tools" have been created to help developers manage their database migrations. These tools range from ORM and language specific tools like Alembic for Python, to language agnostic tools like Flyway and Liquibase.

When Kubernetes came along and teams started to containerize their applications, the knee-jerk reaction was to wrap these legacy tools in a container and run them as part of the application deployment process. We discussed some of the shortcomings of this approach in a recent KubeCon talk and earlier Webinar.

Atlas was created from the ground up to be a modern database migration tool that embodies modern DevOps principles and is designed to run natively in Kubernetes. The Atlas Operator enables teams to extend the native Kubernetes API with new resource types that represent database schemas and migrations. By using these capabilities it is possible to natively integrate database migrations into your GitOps workflow.

Prerequisites

  • A running Kubernetes cluster - for learning purposes, you can use Minikube, which is a tool that runs a single-node Kubernetes cluster on your laptop.
  • kubectl - a command-line tool for interacting with Kubernetes clusters.
  • Helm - a package manager for Kubernetes.

Setting up the Atlas Operator and ArgoCD

1. Install ArgoCD

To install ArgoCD run the following commands:

kubectl create namespace argocd
kubectl apply -n argocd -f https://raw.githubusercontent.com/argoproj/argo-cd/stable/manifests/install.yaml

Wait until all the pods in the argocd namespace are running:

kubectl wait --for=condition=ready pod --all -n argocd

kubectl will print something like this:

pod/argocd-application-controller-0 condition met
pod/argocd-applicationset-controller-69dbc8585c-6qbwr condition met
pod/argocd-dex-server-59f89468dc-xl7rg condition met
pod/argocd-notifications-controller-55565589db-gnjdh condition met
pod/argocd-redis-74cb89f466-gzk4f condition met
pod/argocd-repo-server-68444f6479-mn5gl condition met
pod/argocd-server-579f659dd5-5djb5 condition met

For more information or if you run into some errors refer to the Argo CD Documentation.

2. Install the Atlas Operator

helm install atlas-operator oci://ghcr.io/ariga/charts/atlas-operator

Helm will print something like this:

Pulled: ghcr.io/ariga/charts/atlas-operator:0.3.6
Digest: sha256:7e29c15e846fa9c25164f4ad5a7cb7f25e9ead2882082f0352985e58c1976f99
NAME: atlas-operator
LAST DEPLOYED: Mon Dec 11 10:25:11 2023
NAMESPACE: default
STATUS: deployed
REVISION: 1
TEST SUITE: None

Wait until the atlas-operator pod is running:

kubectl wait --for=condition=ready pod -l app.kubernetes.io/name=atlas-operator -n default

kubectl will print something like this:

pod/atlas-operator-866dfbc56d-qkkkn condition met

For more information on the installation process, refer to the Atlas Operator Documentation

Step 2: Set up the Target Database

Start by deploying a simple PostgreSQL database using the following command:

kubectl apply -f https://raw.githubusercontent.com/ariga/atlas-operator/master/config/integration/databases/postgres.yaml

This will create a Deployment which runs a single (non-persistent) PostgreSQL instance and a Service that exposes it on port 5432. In addition, it will create a Secret that contains the database credentials.

Wait until the database pod is running:

kubectl wait --for=condition=ready pod -l app=postgres -n default

Step 3: Create the AtlasMigration resource

In order for the Atlas Operator to know which migrations to apply, we need to create an AtlasMigration resource that points to the Atlas Cloud project we created in part one. Create a new directory called manifests in your GitHub repository. In it, create a file called atlas-migration.yaml with the following contents:

manifests/atlas-migration.yaml
apiVersion: db.atlasgo.io/v1alpha1
kind: AtlasMigration
metadata:
name: migration
spec:
urlFrom:
secretKeyRef:
key: url
name: postgres-credentials
cloud:
project: "atlasdemo" # Atlas Cloud project name
tokenFrom:
secretKeyRef:
name: atlas-credentials
key: token
dir:
remote:
name: "atlasdemo" # Migration directory name in your atlas cloud project
tag: "1d579be616db48803bb21713fd836a9165030f18" # See below on how to obtain this value for your project.

This resource tells the Atlas Operator to apply the migrations in the atlasdemo project in Atlas Cloud to the database specified in the postgres-credentials secret. Notice that the tokenFrom field references a secret called atlas-credentials. This secret will contain the Atlas Cloud API token that we created in part one.

To create it run:

kubectl create secret generic atlas-credentials --from-literal=token=aci_<replace with your token>
Obtaining the tag field

Notice the tag field in the dir section. This field tells the Atlas Operator which version of the migrations to apply. In this case, we are telling it to apply the migrations tagged with the commit hash 1d579be616db48803bb21713fd836a9165030f18 which is the commit hash of the merge commit that merged the pull request we created in part one.

To review which tags are available for your migrations, head over to you Atlas Cloud project and click on the Tags tab. You should see something like this:

Commit and push the changes to your GitHub repository.

Step 4: Create the ArgoCD Application

Now that we have created the AtlasMigration resource, we can create an ArgoCD application that will deploy it. Create a file called Application.yaml in the root of your GitHub repository with the following contents:

Application.yaml
apiVersion: argoproj.io/v1alpha1
kind: Application
metadata:
name: atlas-argocd-demo
namespace: argocd
finalizers:
- resources-finalizer.argocd.argoproj.io
spec:
source:
path: manifests
repoURL: 'https://github.com/<your gh user>/<your repo name>'
targetRevision: master
destination:
namespace: default
server: 'https://kubernetes.default.svc'
project: default
syncPolicy:
automated:
prune: true
selfHeal: true
retry:
limit: 5
backoff:
duration: 5s
maxDuration: 3m0s
factor: 2
syncOptions:
- CreateNamespace=true

Be sure to replace the repoURL field with the URL of your GitHub repository.

info

If your repository is private, you will need to create a GitHub Personal Access Token and tell ArgoCD about it by running the following command:

export CURRENT_NS=$(kubectl config view --minify --output 'jsonpath={..namespace}')
kubectl config set-context --current --namespace=argocd
argocd repo add https://github.com/<user>/<repo> --username <user> --password ghp_<your token>
kubectl config set-context --current --namespace=$CURRENT_NS

5. Step 5: Deploy!

Next, apply the application manifest:

kubectl apply -f Application.yaml

Wait until the application is deployed:

kubectl wait --for=condition=ready atlasmigration/migration

Observe the status of the migration object:

 kubectl get atlasmigration/migration -o jsonpath='{.status}' | jq

The output will look similar to:

{
"conditions": [
{
"lastTransitionTime": "2023-12-11T08:38:35Z",
"message": "",
"reason": "Applied",
"status": "True",
"type": "Ready"
}
],
"lastApplied": 1702283914,
"lastAppliedVersion": "20231206075118",
"observed_hash": "6e4feac15a35d20c38e705428de507835c7c58d487eacc84ed012a17b002981d"
}

You can also observe the status of the migration using the Atlas Cloud UI:

Wrapping Up

Let's review the flow that we have created, from end to end:

  • Developers modify the desired state of their schema and use atlas migrate diff locally to generate a migration plan.
  • Developers commit the migration plan to their GitHub repository and create a pull request.
  • GitHub Actions runs the Atlas Continuous Integration workflow, which verifies the migration plan is correct and safe.
  • Once the pull request is merged, a GitHub Actions workflow pushes the new migration to Atlas Cloud. It is tagged with the commit hash of the merge commit.
  • When we are ready to deploy our changes to production, we change the value of the tag field in the AtlasMigration resource to the most recent tag. We push this change to our GitHub repository.
  • ArgoCD detects the change and updates our AtlasMigration resource.
  • The Atlas Operator detects the change and applies the migrations to the database.
  • The database is now up to date with the desired state of our schema!

To summarize, in this tutorial we demonstrated how to use the Atlas Operator and ArgoCD to create a slick, modern GitOps workflow for managing your database migrations natively in Kubernetes.

As always, we would love to hear your feedback and suggestions on our Discord server.

GitOps for Databases, Part 1: CI/CD

· 10 min read
Rotem Tamir
Building Atlas
info

This is the first post in a two-part tutorial, which demonstrates how to use the Atlas Operator in tandem with Atlas Cloud and ArgoCD to create a slick, modern GitOps workflow for managing your database migrations natively in Kubernetes.

GitOps is a software development and deployment methodology that uses Git as the central repository for both code and infrastructure configuration, enabling automated and auditable deployments.

ArgoCD is a Kubernetes-native continuous delivery tool that implements GitOps principles. It uses a declarative approach to deploy applications to Kubernetes, ensuring that the desired state of the application is always maintained.

Kubernetes Operators are software extensions to Kubernetes that enable the automation and management of complex, application-specific, operational tasks with domain-specific knowledge within a Kubernetes cluster.

In this tutorial, we will use the Atlas Operator in tandem with Atlas Cloud and ArgoCD to create a slick, modern GitOps workflow for managing your database migrations natively in Kubernetes.

For the sake of brevity, we are going to split this guide into two parts:

  1. In part one, we will show how to initialize an Atlas project, and create a CI/CD pipeline that will automatically plan, verify and store your database migrations in Atlas Cloud using GitHub Actions.
  2. In part two, we will show how to deploy these migrations using the Atlas Operator and ArgoCD to demonstrate a complete GitOps workflow for database migrations.

Modern CI/CD for Database Migrations

Atlas was built to support a modern CI/CD workflow for database migrations based on the following principles:

  1. Changes to the database are planned automatically. Given the desired state of the database, the system should automatically generate a plan for how to get from the current state to the desired state.
  2. Changes to the database schema are stored in a versioned migration directory. All planned changes to the database are checked in to a versioned migration directory. This directory contains SQL scripts, which are executed in lexicographic order to apply the changes to the database.
  3. Changes to the database are validated during CI. All changes to the database are tested and evaluated against a set of governing policies.
  4. Changes to the database are deployed via automation. No manual steps are required to deploy changes to the database. All changes are deployed via a CI/CD pipeline.

To learn more about these principles, check out our guide to modern CI/CD for database migrations.

In this tutorial, we will show to apply the fourth principle to your database migrations using the Atlas Operator and ArgoCD.

Local Setup

With the principles of modern CI/CD for database migrations in mind, let's see how we can apply them to a simple application that uses a PostgreSQL database.

Prerequisites (for part one)

  1. A GitHub Account - we are going to be setting up some GitHub Actions workflows, so you will need a GitHub account.

  2. The most recent version of Atlas. To get Atlas on Linux or macOS run:

    curl -sSf https://atlasgo.sh | sh

For more installation options, see the docs 3. Docker. To install Docker, follow the instructions here.

  1. The GitHub CLI, gh. To install gh:
    brew install gh

Follow instructions for other platforms here.

Step 1: Define our desired state

Atlas advocates for the declarative approach in which users start their work by defining the desired state of their database and let the system figure out the implementation details. Atlas supports many different ways to define the desired state of your database, called "schema loaders". In this tutorial, we will use a simple SQL file to define our desired state.

In a fresh Git repo, create a file named schema.sql with the following contents:

schema.sql
create table users (
id int primary key,
name varchar(255) not null unique
);

In this project, whenever we want to change the database schema, we will update this file to reflect the desired state of the database.

Step 2: Plan the initial migration

Now that we have defined our desired state, we can use the Atlas CLI to plan the initial migration. Create the following file named atlas.hcl:

env "local" {
src = "file://schema.sql"
dev = "docker://postgres/15/dev"
migration {
dir = "file://migrations"
}
format {
migrate {
diff = "{{ sql . \" \" }}"
}
}
}

Next, run the following command to plan the initial migration:

atlas migrate diff --env local

Observe two new files that were created in the migrations directory:

.
├── atlas.hcl
├── migrations
│ ├── 20231204121249.sql
│ └── atlas.sum
└── schema.sql

Step 3: Push our migration directory to Atlas Cloud

Atlas Cloud is a hosted service that can serve as a central repository for your database migrations. Similarly to how DockerHub is used to store and distribute Docker images, Atlas Cloud can be used to store and distribute database migration directories. Atlas Cloud has a free tier that is suitable for small teams and personal projects which you can use to follow along with this tutorial.

Log in to Atlas Cloud using the following command:

atlas login

If you do not have an existing Atlas Cloud account, you will be prompted to create one.

Next, push your migration directory to Atlas Cloud using the following command:

atlas migrate push --env local atlasdemo

This will create a new project named atlasdemo on Atlas Cloud and push your migration directory to it. Atlas will print a URL to the project page on Atlas Cloud similar to the following:

https://rotemtam85.atlasgo.cloud/dirs/4294967359

Setup GitHub Actions

In this section, we will set up a GitHub Actions workflow that will add Atlas to your CI/CD pipeline.

Create a Bot Token

To write data to your Atlas Cloud account, you will need to supply your CI/CD pipelines with an API key that has write access to your Atlas Cloud account. To learn how to create a bot token, check out our guide on the topic. Use the instructions in this guide to create a token, and make a note of it. We will use it in the next steps.

Install the Atlas Extension

To streamline this process, we have created a gh command that will create the workflow for you. To install the latest version, run:

gh extension install ariga/gh-atlas

Ensure your gh CLI has sufficient permissions

Make sure you have the necessary permissions to configure your action:

gh auth refresh -s write:packages,workflow

Create a GitHub Actions Workflow

Once installed, let's use this extension to generate our GitHub Actions workflow. Run the following command:

gh atlas init-action --token <your-bot-token>  --dir-name="atlasdemo" --driver=postgres

Atlas will scan your repository (locally) for directories containing Atlas migrations and ask you which one you would like to use for CI. Select the desired directory and press "Enter":

Use the arrow keys to navigate: ↓ ↑ → ←
? choose migration directory:
▸ migrations

Atlas will then ask you which database driver this directory contains migrations for. Select the desired driver and press "Enter".

Next, the GitHub extension will save your bot token to a GitHub secret and create a pull request with the necessary configuration for the GitHub Action.

Screenshot Example

The PR contains a GitHub Actions workflow similar to this:

Code Example
name: Atlas
on:
push:
branches:
- master
paths:
- .github/workflows/ci-atlas.yaml
- 'migrations/*'
pull_request:
paths:
- 'migrations/*'
# Permissions to write comments on the pull request.
permissions:
contents: read
pull-requests: write
jobs:
atlas:
services:
# Spin up a postgres:15 container to be used as the dev-database for analysis.
postgres:
image: postgres:15
env:
POSTGRES_DB: dev
POSTGRES_PASSWORD: pass
ports:
- 5432:5432
options: >-
--health-cmd pg_isready
--health-interval 10s
--health-start-period 10s
--health-timeout 5s
--health-retries 5
runs-on: ubuntu-latest
steps:
- uses: actions/checkout@v3
with:
fetch-depth: 0
- uses: ariga/setup-atlas@v0
with:
cloud-token: ${{ secrets.ATLAS_CLOUD_TOKEN_K6MJMK }}
- uses: ariga/atlas-action/migrate/lint@v1
with:
dir: 'file://migrations'
dir-name: 'atlasdemo'
dev-url: 'postgres://postgres:pass@localhost:5432/dev?search_path=public&sslmode=disable'
env:
GITHUB_TOKEN: ${{ github.token }}
- uses: ariga/atlas-action/migrate/push@v1
if: github.ref == 'refs/heads/master'
with:
dir: 'file://migrations'
dir-name: 'atlasdemo'
dev-url: 'postgres://postgres:pass@localhost:5432/dev?search_path=public&sslmode=disable'

After reviewing the changes, merge the pull request to enable the GitHub Action.

Testing our Pipeline

Now that we have set everything up, let's test our pipeline end-to-end. To do so, we will first plan a new change to our database schema.

Edit the Desired Database Schema

Edit the schema.sql file to add a new column to the users table:

schema.sql
create table users (
id int primary key,
name varchar(255) not null unique,
email varchar(255) not null unique
);

Generate a New Migration

Next, run the following command to automatically generate a new migration:

atlas migrate diff --env local add_email_column

This will create a new file in the migrations directory:

.
├── atlas.hcl
├── migrations
│ ├── 20231204121249.sql
│ ├── 20231206075118_add_email_column.sql
│ └── atlas.sum
└── schema.sql

Create a new Pull Request

Next, create a branch and push the changes to GitHub:

git checkout -b add-email-column
git add .
git commit -m "Add email column"
git push --set-upstream origin add-email

Next, use the gh CLI to create a new pull request:

gh pr create --title "migrations: add email column" --body "adding email column to users table"

Atlas Reviews the Pull Request

Based on the configuration in the GitHub Actions workflow we created, Atlas will automatically review your migration directory whenever a new pull request that affects it is opened. When Atlas is done running, it will comment on your PR with the results of the review:

Interesting! Atlas found some issues with our migration. Let's click on the report to see what they are:

Atlas warns us about two issues. The first is that adding a non-nullable varchar column "email" will fail in case the "users" table is not empty. The second is that creating an index non-concurrently causes write locks on the "users" table. Since we are in the early stages of development, we can safely ignore these issues for now. Let's merge the pull request and see what happens.

gh pr merge --squash

Atlas Pushes the Migrations to Atlas Cloud

Once GitHub Actions detects that a new push to the master branch has been merged, per our configuration, it will run the atlas migrate push command to push the migrations to Atlas Cloud. Once the push is complete, our schema will be updated in the Atlas Cloud schema viewer screen:

Wrapping Up Part One

That's it for part one! In this tutorial, we have shown how to use Atlas Cloud and GitHub Actions to create a slick, modern CI/CD pipeline for your database migrations. In part two, we will show how to deploy these migrations using the Atlas Operator and ArgoCD to demonstrate a complete GitOps workflow for database migrations.

As always, we would love to hear your feedback and suggestions on our Discord server.