Announcing v0.17: Triggers and Improved ERDs

Hi everyone,
I hope you are enjoying the holiday season, because we are here today with the first Atlas release of 2024: v0.17. It's been only a bit over a week since our last release, but we have some exciting new features we couldn't wait to share with you:
- Trigger Support - Atlas now supports managing triggers on MySQL, PostgreSQL, MariaDB and SQLite databases.
- Improved ERDs - You can now visualize your schema's SQL views, as well as create filters to select the specific database objects you wish to see.
Without further ado, let's dive in!
Trigger Support
Triggers are currently in beta and available to logged-in users only. To use this feature, run:
atlas login
Triggers are a powerful feature of relational databases that allow you to run custom code when certain events occur on a table or a view. For example, you can use triggers to automatically update the amount of stock in your inventory when a new order is placed or to create an audit log of changes to a table. Using this event-based approach, you can implement complex business logic in your database, without having to write any additional code in your application.
Managing triggers as part of the software development lifecycle can be quite a challenge. Luckily, Atlas's database schema-as-code approach makes it easy to do!
Let's use Atlas to build a small chunk of a simple e-commerce application:
-
Download the latest version of the Atlas CLI:
- macOS + Linux
- Homebrew
- Docker
- Windows
- CI
- Manual Installation
To download and install the latest release of the Atlas CLI, simply run the following in your terminal:
curl -sSf https://atlasgo.sh | shGet the latest release with Homebrew:
brew install ariga/tap/atlasTo pull the Atlas image and run it as a Docker container:
docker pull arigaio/atlas
docker run --rm arigaio/atlas --help
If the container needs access to the host network or a local directory, use the
--net=hostflag and mount the desired directory:docker run --rm --net=host \
-v $(pwd)/migrations:/migrations \
arigaio/atlas migrate apply \
--url "mysql://root:pass@:3306/test"Download the latest release and move the atlas binary to a file location on your system PATH.
GitHub Actions
Use the setup-atlas action to install Atlas in your GitHub Actions workflow:
- uses: ariga/setup-atlas@v0
  with:
    cloud-token: ${{ secrets.ATLAS_CLOUD_TOKEN }}
Other CI Platforms
For other CI/CD platforms, use the installation script. See the CI/CD integrations for more details.
-
Make sure you are logged in to Atlas:
atlas login -
Let's spin up a new PostgreSQL database using
docker:docker run --name db -e POSTGRES_PASSWORD=pass -d -p 5432:5432 postgres:16 -
Next, let's define and apply the base tables for our application:
 table "inventory" {
   schema = schema.public
   column "item_id" {
     null = false
     type = serial
   }
   column "item_name" {
     null = false
     type = character_varying(255)
   }
   column "quantity" {
     null = false
     type = integer
   }
   primary_key {
     columns = [column.item_id]
   }
 }
 table "orders" {
   schema = schema.public
   column "order_id" {
     null = false
     type = serial
   }
   column "item_id" {
     null = false
     type = integer
   }
   column "order_quantity" {
     null = false
     type = integer
   }
   primary_key {
     columns = [column.order_id]
   }
   foreign_key "orders_item_id_fkey" {
     columns     = [column.item_id]
     ref_columns = [table.inventory.column.item_id]
     on_update   = NO_ACTION
     on_delete   = NO_ACTION
   }
 }
This defines two tables:
inventoryandorders. Theinventorytable holds information about the items in our store, and theorderstable holds information about orders placed by our customers. Theorderstable has a foreign key constraint to theinventorytable, to ensure that we can't place an order for an item that doesn't exist in our inventory.Apply this schema on our local Postgres instance using the Atlas CLI:
atlas schema apply \
   --dev-url 'docker://postgres/16?search_path=public' \
   --to file://schema.hcl \
   -u 'postgres://postgres:pass@:5432/postgres?search_path=public&sslmode=disable' \
   --auto-approve
This command will apply the schema defined in
schema.hclto the local Postgres instance. Notice the--auto-approveflag, which instructs Atlas to automatically apply the schema without prompting for confirmation. -
Let's now populate our database with some inventory items. We can do this using the
psqlcommand that is installed inside the default PostgreSQL Docker image:docker exec -it db psql -U postgres -c "INSERT INTO inventory (item_name, quantity) VALUES ('Apple', 10);"
docker exec -it db psql -U postgres -c "INSERT INTO inventory (item_name, quantity) VALUES ('Banana', 20);"
docker exec -it db psql -U postgres -c "INSERT INTO inventory (item_name, quantity) VALUES ('Orange', 30);" -
Now, let's define the business logic for our store using a
FUNCTIONand aTRIGGER. Append these definitions toschema.hcl:function "update_inventory" {
schema = schema.public
lang = PLpgSQL
return = trigger
as = <<-SQL
BEGIN
UPDATE inventory
SET quantity = quantity - NEW.order_quantity
WHERE item_id = NEW.item_id;
RETURN NEW;
END;
SQL
}
trigger "after_order_insert" {
on = table.orders
after {
insert = true
}
foreach = ROW
execute {
function = function.update_inventory
}
}We start by defining a
FUNCTIONcalledupdate_inventory. This function is written inPL/pgSQL, the procedural language for PostgreSQL. The function accepts a single argument, which is aTRIGGERobject. The function updates theinventorytable to reflect the new order, and then returns theNEWrow, which is the row that was just inserted into theorderstable.Next, we define a
TRIGGERcalledafter_order_insert. This trigger is executed after a new row is inserted into theorderstable. The trigger executes theupdate_inventoryfunction for each row that was inserted.Apply the updated schema using the Atlas CLI:
atlas schema apply \
   --dev-url 'docker://postgres/16?search_path=public' \
   --to file://schema.hcl \
   -u 'postgres://postgres:pass@:5432/postgres?search_path=public&sslmode=disable' \
   --auto-approve
Notice that Atlas automatically detects that we have added a new
FUNCTIONand a newTRIGGER, and applies them to the database. -
Finally, let's test our application to see that it actually works. We can do this by inserting a new row into the
orderstable:docker exec -it db psql -U postgres -c "INSERT INTO orders (item_id, order_quantity) VALUES (1, 5);"This statement creates a new order for 5
Apples.Now, let's check the
inventorytable to see that the order was processed correctly:docker exec -it db psql -U postgres -c "SELECT quantity FROM inventory WHERE item_name='Apple';"You should see the following output:
 quantity
 ---------
         5
(1 row)
Amazing! Our trigger automatically detected the creation of a new order of apples, and updated the inventory accordingly from 10 to 5.
Improved ERDs
One of the most frequently used capabilities in Atlas is schema visualization. Having a visual representation of your data model can be helpful as it allows for easier comprehension of complex data structures, and enables developers to better understand and collaborate on the data model of the application they are building.
Visualizing Database Views
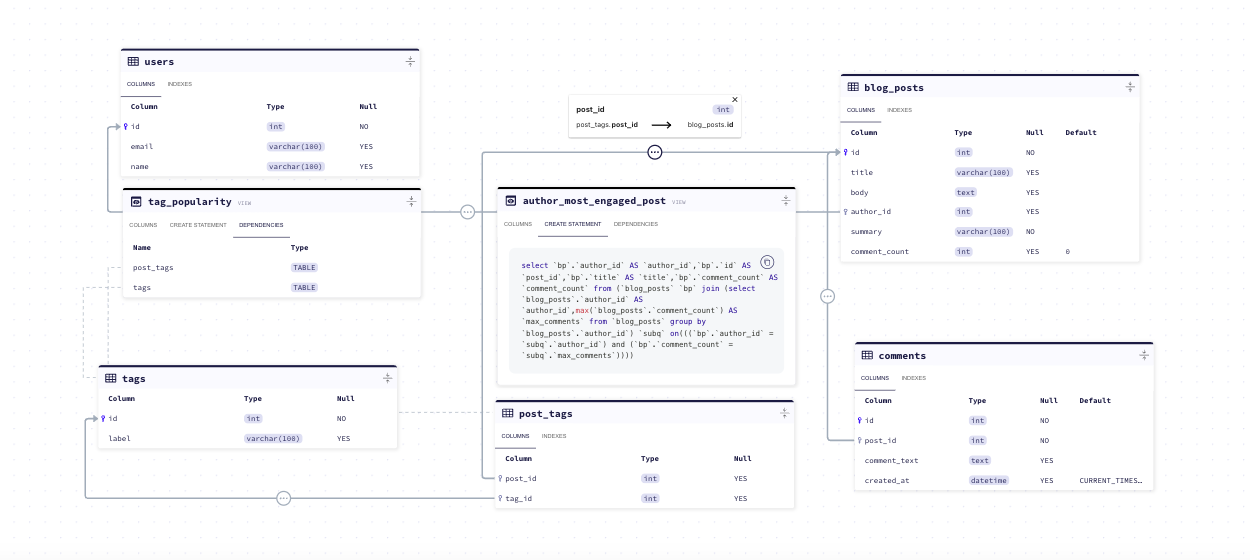
Until recently, the ERD showed schema's tables and the relations between them. With the most recent release, the ERD now visualizes database views!
Within each view you can find its:
- Columns - the view's columns, including their data types and nullability.
- Create Statement - the SQL CREATE statement, based on your specific database type.
- Dependencies - a list of the tables (or other views) it is connected to. Clicking on this will map edges to each connected object in the schema.
As of recently (including this release), we have added support for functions, stored procedures and triggers which are all coming soon to the ERD!
To play with a schema that contains this feature, head over to the live demo.
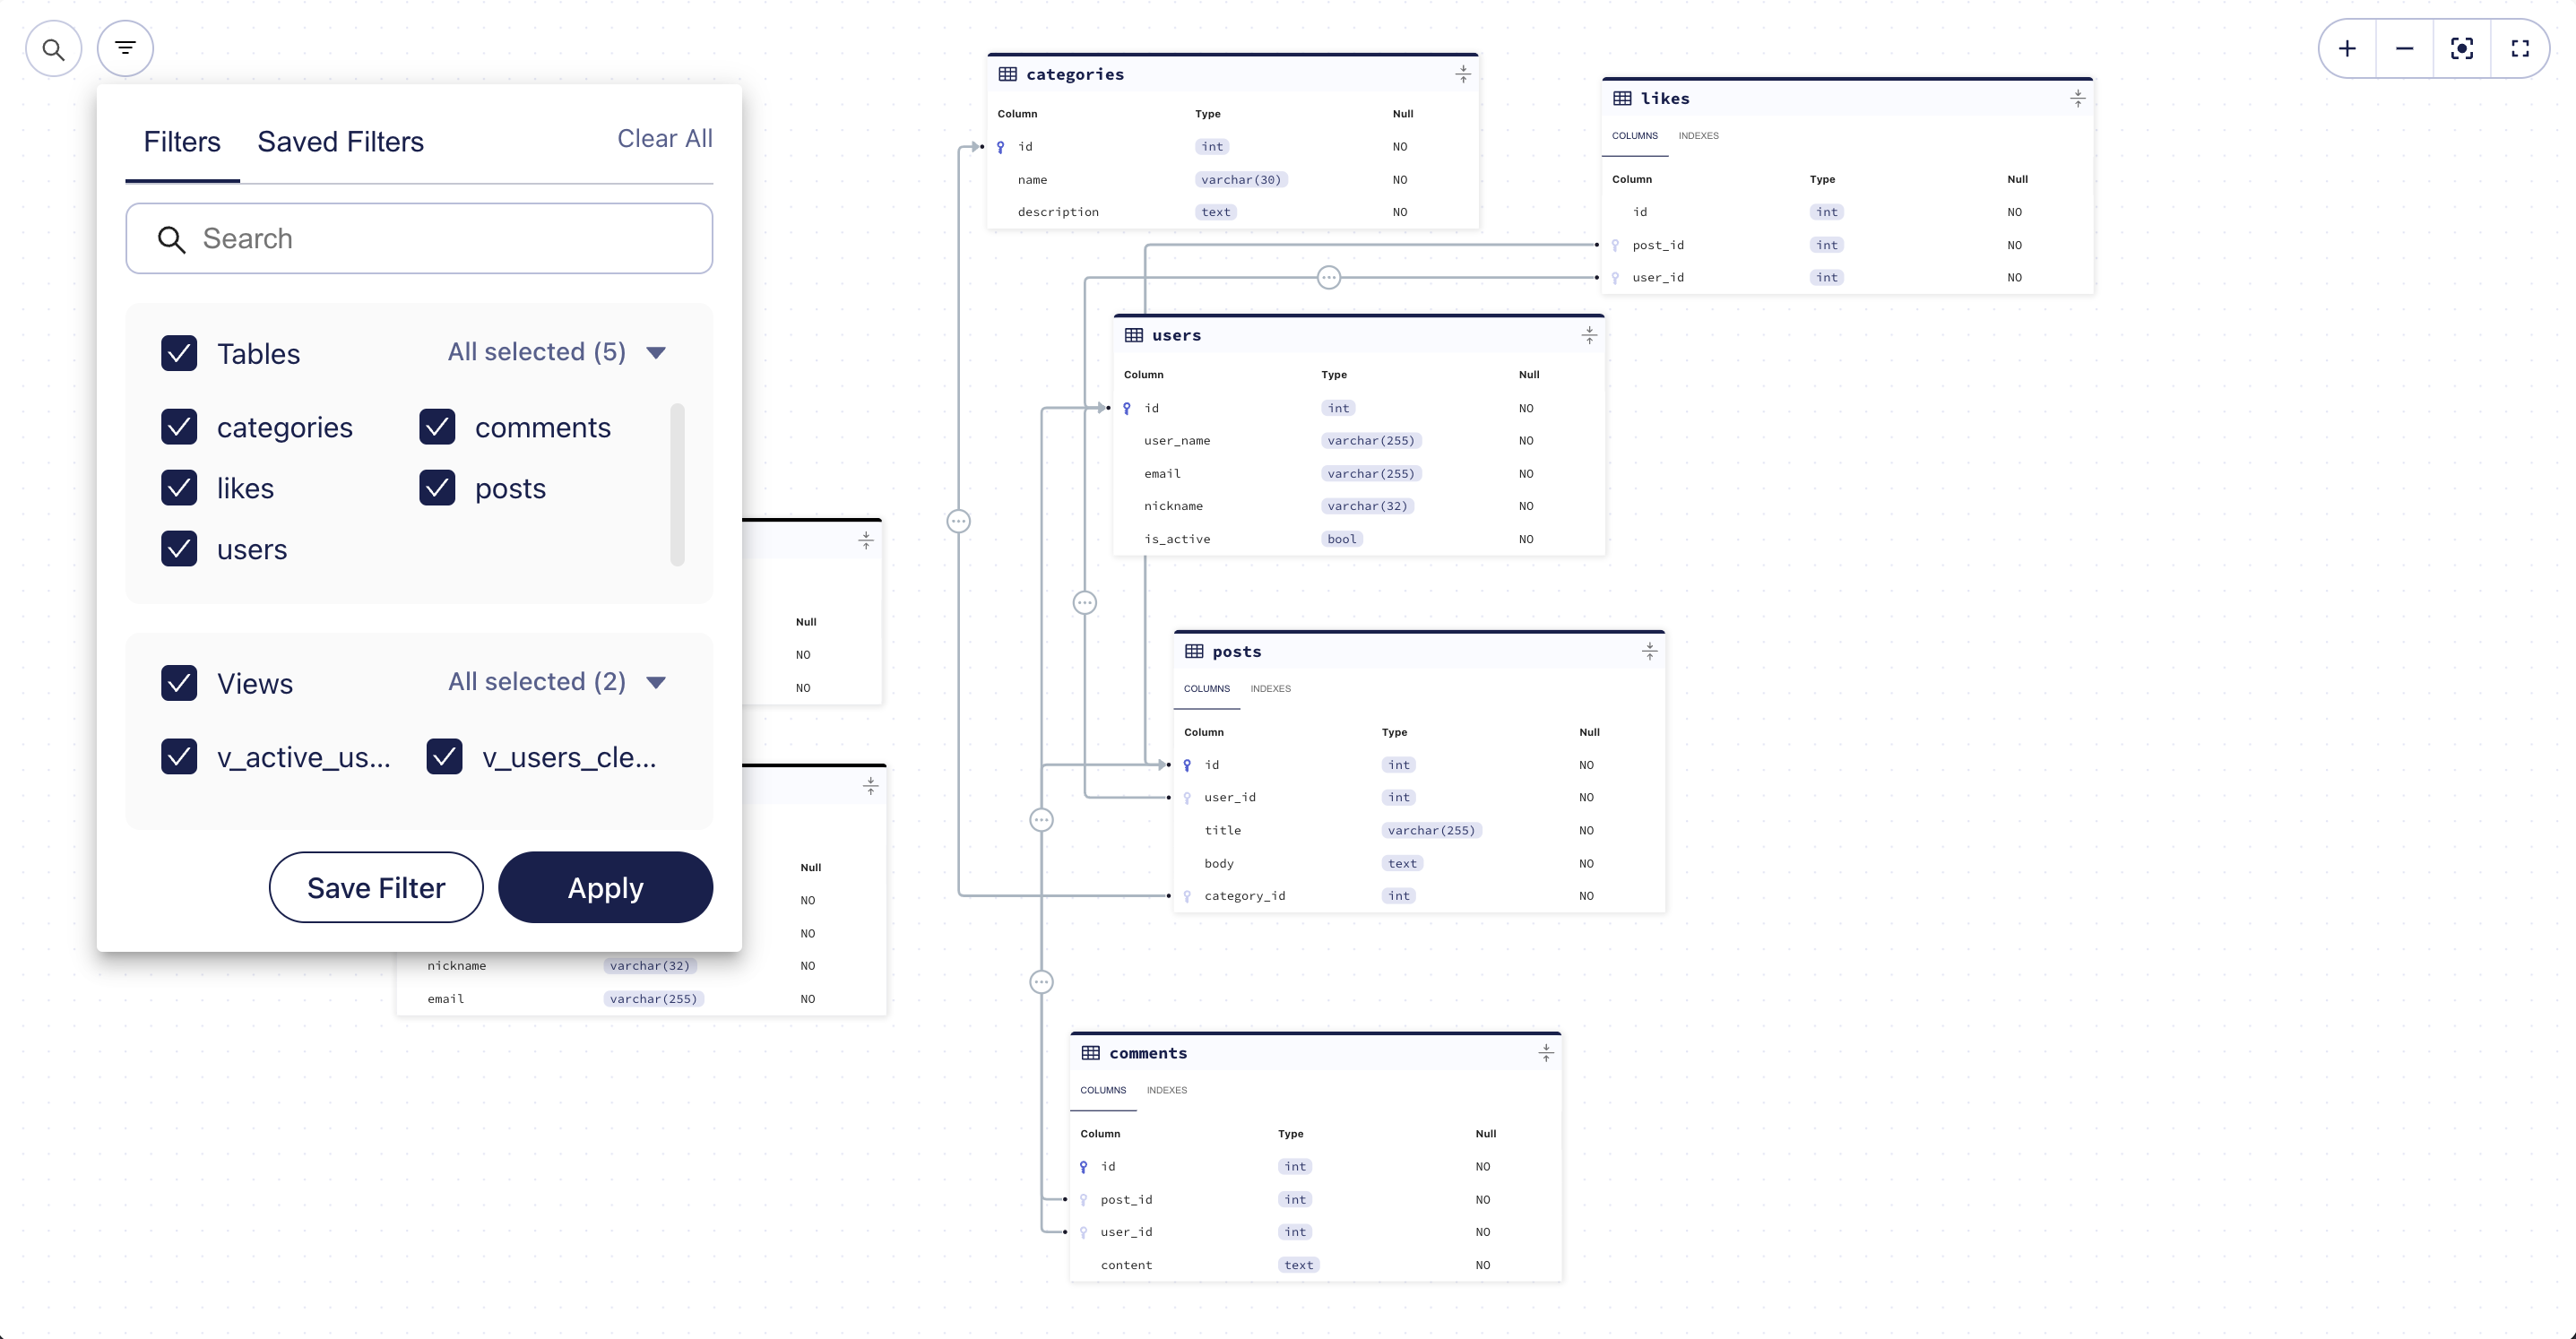
ERD Filters
In cases where you have many database objects and prefer to focus in on a specific set of tables and views, you can narrow down your selection by creating a filter. Filters can be saved for future use. This can be great when working on a feature that affects a specific part of the schema, this way you can easily refer to it as needed.
Wrapping up
That's it! I hope you try out (and enjoy) all of these new features and find them useful. As always, we would love to hear your feedback and suggestions on our Discord server.