GitOps for Databases, Part 2: Atlas Operator and ArgoCD

This is the second post in a two-part tutorial, which demonstrates how to use the Atlas Operator in tandem with Atlas Cloud and ArgoCD to create a slick, modern GitOps workflow for managing your database migrations natively in Kubernetes.
In part one, we demonstrated how to initialize an Atlas project, and create a CI/CD pipeline that automatically plans, verifies and stores your database migrations in Atlas Cloud using GitHub Actions.
In this part, we will show how to deploy these migrations using the Atlas Operator and ArgoCD to demonstrate a complete GitOps workflow for database migrations.
How to GitOps your Database Migrations on Kubernetes
"We can wrap existing schema management solutions into containers, and run them in Kubernetes as Jobs. But that is SILLY. That is not how we work in Kubernetes."
-Viktor Farcic, DevOps ToolKit
As applications evolve, so do their database schemas. The practice of automating the deployment of database schema changes has evolved hand in hand with modern devops principles into what is known as database migrations. As part of this evolution, hundreds of "migration tools" have been created to help developers manage their database migrations. These tools range from ORM and language specific tools like Alembic for Python, to language agnostic tools like Flyway and Liquibase.
When Kubernetes came along and teams started to containerize their applications, the knee-jerk reaction was to wrap these legacy tools in a container and run them as part of the application deployment process. We discussed some of the shortcomings of this approach in a recent KubeCon talk and earlier Webinar.
Atlas was created from the ground up to be a modern database migration tool that embodies modern DevOps principles and is designed to run natively in Kubernetes. The Atlas Operator enables teams to extend the native Kubernetes API with new resource types that represent database schemas and migrations. By using these capabilities it is possible to natively integrate database migrations into your GitOps workflow.
Prerequisites
- A running Kubernetes cluster - for learning purposes, you can use Minikube, which is a tool that runs a single-node Kubernetes cluster on your laptop.
- kubectl - a command-line tool for interacting with Kubernetes clusters.
- Helm - a package manager for Kubernetes.
Setting up the Atlas Operator and ArgoCD
1. Install ArgoCD
To install ArgoCD run the following commands:
kubectl create namespace argocd
kubectl apply -n argocd -f https://raw.githubusercontent.com/argoproj/argo-cd/stable/manifests/install.yaml
Wait until all the pods in the argocd namespace are running:
kubectl wait --for=condition=ready pod --all -n argocd
kubectl will print something like this:
pod/argocd-application-controller-0 condition met
pod/argocd-applicationset-controller-69dbc8585c-6qbwr condition met
pod/argocd-dex-server-59f89468dc-xl7rg condition met
pod/argocd-notifications-controller-55565589db-gnjdh condition met
pod/argocd-redis-74cb89f466-gzk4f condition met
pod/argocd-repo-server-68444f6479-mn5gl condition met
pod/argocd-server-579f659dd5-5djb5 condition met
For more information or if you run into some errors refer to the Argo CD Documentation.
2. Install the Atlas Operator
helm install atlas-operator oci://ghcr.io/ariga/charts/atlas-operator
Helm will print something like this:
Pulled: ghcr.io/ariga/charts/atlas-operator:0.3.6
Digest: sha256:7e29c15e846fa9c25164f4ad5a7cb7f25e9ead2882082f0352985e58c1976f99
NAME: atlas-operator
LAST DEPLOYED: Mon Dec 11 10:25:11 2023
NAMESPACE: default
STATUS: deployed
REVISION: 1
TEST SUITE: None
Wait until the atlas-operator pod is running:
kubectl wait --for=condition=ready pod -l app.kubernetes.io/name=atlas-operator -n default
kubectl will print something like this:
pod/atlas-operator-866dfbc56d-qkkkn condition met
For more information on the installation process, refer to the Atlas Operator Documentation
Step 2: Set up the Target Database
Start by deploying a simple PostgreSQL database using the following command:
kubectl apply -f https://raw.githubusercontent.com/ariga/atlas-operator/master/config/integration/databases/postgres.yaml
This will create a Deployment which runs a single (non-persistent) PostgreSQL instance and a Service that
exposes it on port 5432. In addition, it will create a Secret that contains the database credentials.
Wait until the database pod is running:
kubectl wait --for=condition=ready pod -l app=postgres -n default
Step 3: Create the AtlasMigration resource
In order for the Atlas Operator to know which migrations to apply, we need to create an AtlasMigration resource
that points to the Atlas Cloud project we created in part one.
Create a new directory called manifests in your GitHub repository. In it,
create a file called atlas-migration.yaml with the following contents:
apiVersion: db.atlasgo.io/v1alpha1
kind: AtlasMigration
metadata:
  name: migration
spec:
  urlFrom:
    secretKeyRef:
      key: url
      name: postgres-credentials
  cloud:
    project: "atlasdemo" # Atlas Cloud project name
    tokenFrom:
      secretKeyRef:
        name: atlas-credentials
        key: token
  dir:
    remote:
      name: "atlasdemo" # Migration directory name in your atlas cloud project
      tag: "1d579be616db48803bb21713fd836a9165030f18" # See below on how to obtain this value for your project.
This resource tells the Atlas Operator to apply the migrations in the atlasdemo project in Atlas Cloud to the
database specified in the postgres-credentials secret. Notice that the tokenFrom field references a secret
called atlas-credentials. This secret will contain the Atlas Cloud API token that we created in
part one.
To create it run:
kubectl create secret generic atlas-credentials --from-literal=token=aci_<replace with your token>
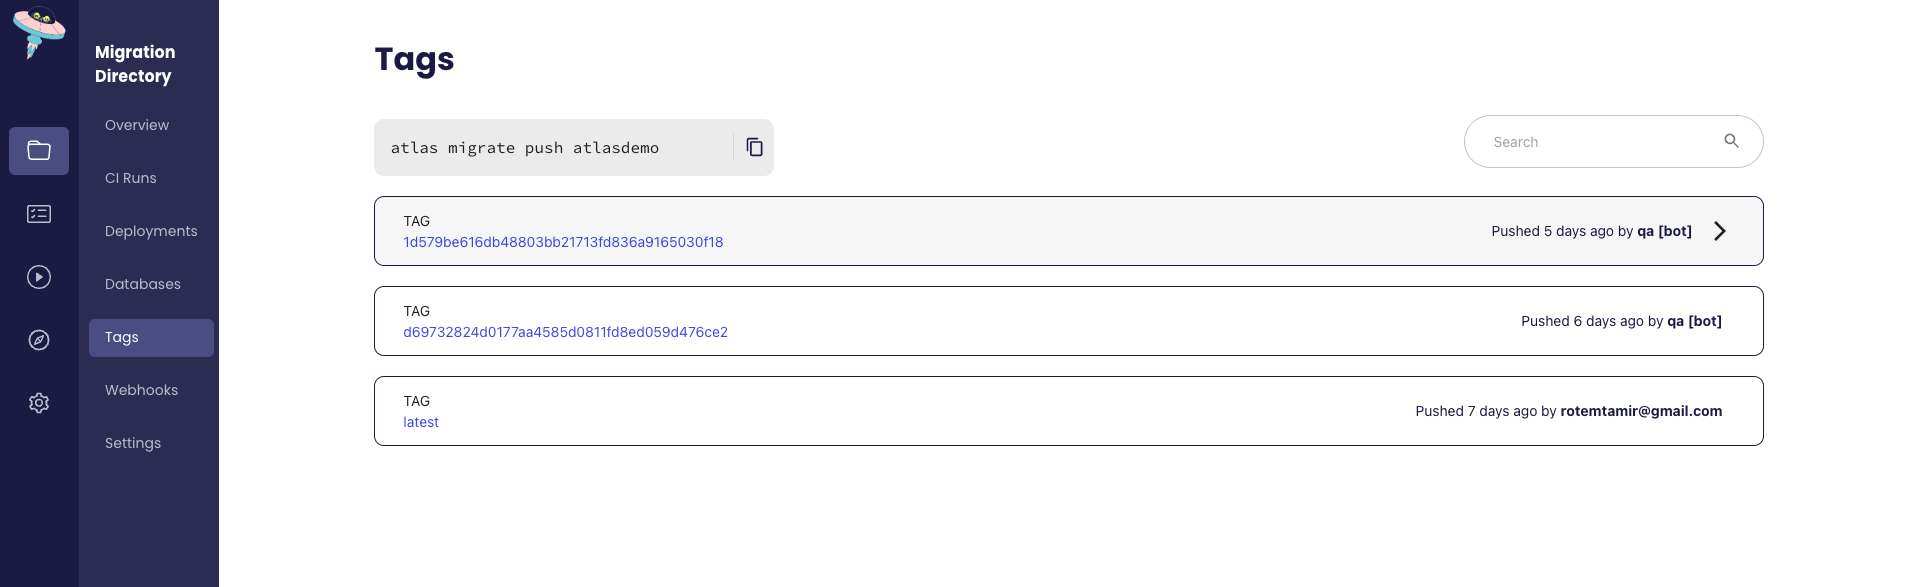
tag fieldNotice the tag field in the dir section. This field tells the Atlas Operator which version of the migrations
to apply. In this case, we are telling it to apply the migrations tagged with the commit hash
1d579be616db48803bb21713fd836a9165030f18 which is the commit hash of the merge commit that merged the pull
request we created in part one.
To review which tags are available for your migrations, head over to you Atlas Cloud project and click on the
Tags tab. You should see something like this:
Commit and push the changes to your GitHub repository.
Step 4: Create the ArgoCD Application
Now that we have created the AtlasMigration resource, we can create an ArgoCD application that will deploy it.
Create a file called Application.yaml in the root of your GitHub repository with the following contents:
apiVersion: argoproj.io/v1alpha1
kind: Application
metadata:
  name: atlas-argocd-demo
  namespace: argocd
  finalizers:
    - resources-finalizer.argocd.argoproj.io
spec:
  source:
    path: manifests
    repoURL: 'https://github.com/<your gh user>/<your repo name>'
    targetRevision: master
  destination:
    namespace: default
    server: 'https://kubernetes.default.svc'
  project: default
  syncPolicy:
    automated:
      prune: true
      selfHeal: true
    retry:
      limit: 5
      backoff:
        duration: 5s
        maxDuration: 3m0s
        factor: 2
    syncOptions:
      - CreateNamespace=true
Be sure to replace the repoURL field with the URL of your GitHub repository.
If your repository is private, you will need to create a GitHub Personal Access Token and tell ArgoCD about it by running the following command:
export CURRENT_NS=$(kubectl config view --minify --output 'jsonpath={..namespace}')
kubectl config set-context --current --namespace=argocd
argocd repo add https://github.com/<user>/<repo> --username <user> --password ghp_<your token>
kubectl config set-context --current --namespace=$CURRENT_NS
5. Step 5: Deploy!
Next, apply the application manifest:
kubectl apply -f Application.yaml
Wait until the application is deployed:
kubectl wait --for=condition=ready atlasmigration/migration
Observe the status of the migration object:
kubectl get atlasmigration/migration -o jsonpath='{.status}' | jq
The output will look similar to:
{
  "conditions": [
    {
      "lastTransitionTime": "2023-12-11T08:38:35Z",
      "message": "",
      "reason": "Applied",
      "status": "True",
      "type": "Ready"
    }
  ],
  "lastApplied": 1702283914,
  "lastAppliedVersion": "20231206075118",
  "observed_hash": "6e4feac15a35d20c38e705428de507835c7c58d487eacc84ed012a17b002981d"
}
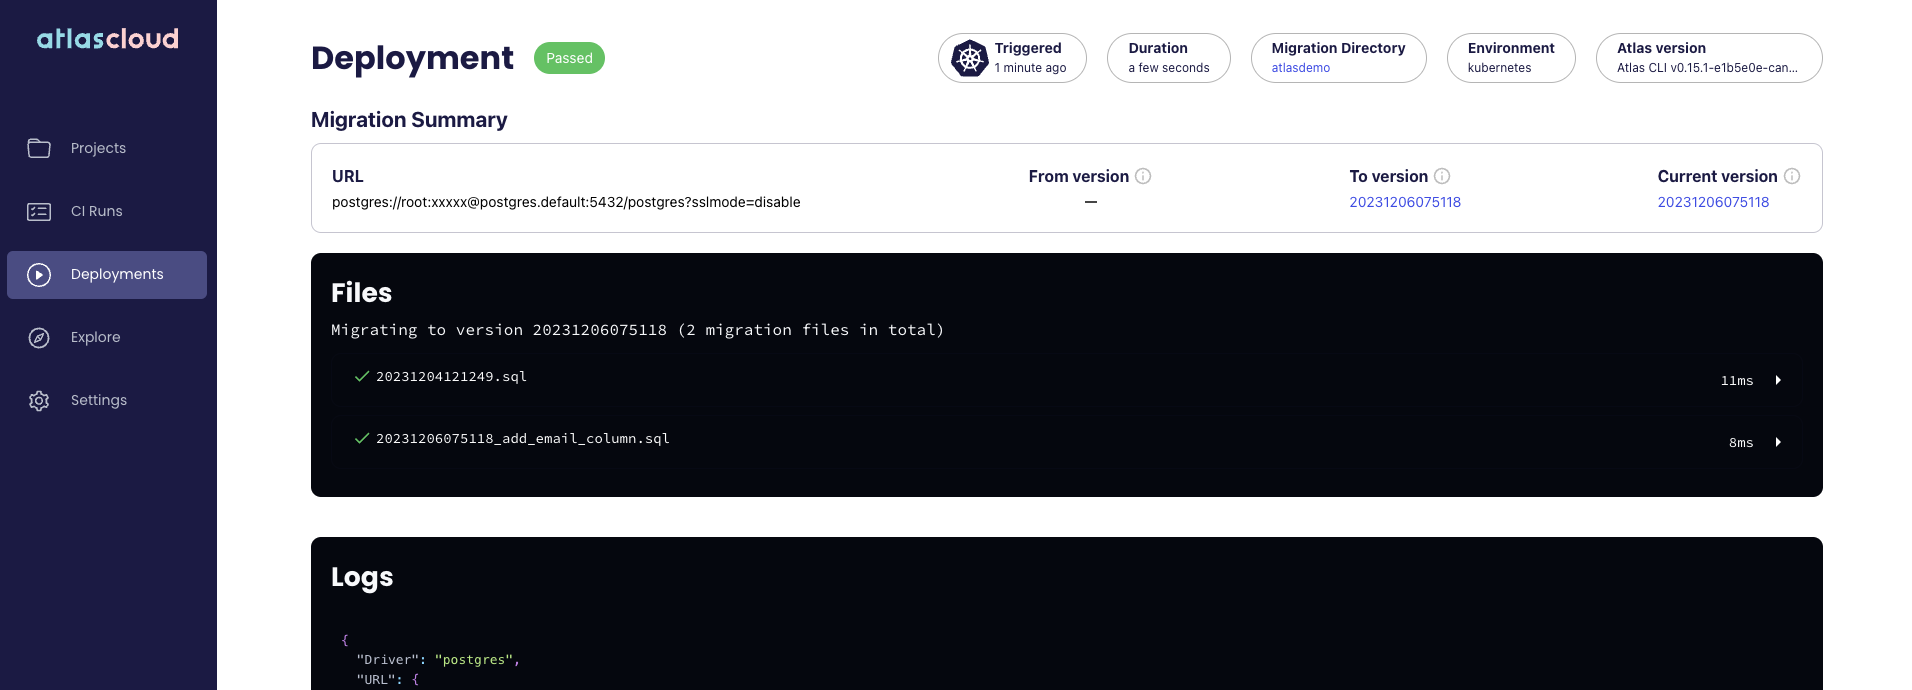
You can also observe the status of the migration using the Atlas Cloud UI:
Wrapping Up
Let's review the flow that we have created, from end to end:
- Developers modify the desired state of their schema and use
atlas migrate difflocally to generate a migration plan. - Developers commit the migration plan to their GitHub repository and create a pull request.
- GitHub Actions runs the Atlas Continuous Integration workflow, which verifies the migration plan is correct and safe.
- Once the pull request is merged, a GitHub Actions workflow pushes the new migration to Atlas Cloud. It is tagged with the commit hash of the merge commit.
- When we are ready to deploy our changes to production, we change the value of the
tagfield in theAtlasMigrationresource to the most recent tag. We push this change to our GitHub repository. - ArgoCD detects the change and updates our
AtlasMigrationresource. - The Atlas Operator detects the change and applies the migrations to the database.
- The database is now up to date with the desired state of our schema!
To summarize, in this tutorial we demonstrated how to use the Atlas Operator and ArgoCD to create a slick, modern GitOps workflow for managing your database migrations natively in Kubernetes.
As always, we would love to hear your feedback and suggestions on our Discord server.