Snowflake Schema Management: Atlas vs schemachange vs SnowDDL

Snowflake's cloud data platform has transformed data warehousing, yet many teams still manage schema changes using manually-composed SQL scripts and verification processes. As data teams grow and pipelines become more complex, these approaches often become more challenging to maintain and much riskier to use.
Schema changes in production environments can quickly lead to unexpected behavior and inconsistent data, and having more contributors increases the risk of human error leading to costly downtime or data integrity issues. These cases are familiar to many data teams because the traditional manual database deployment methods come with implicit risks.
To address these challenges, Snowflake teams have begun adopting tools to automate schema changes, enforce safety checks, and ensure consistent deployments across environments.
In this post, we will compare three popular Snowflake schema management tools – Atlas, schemachange, and SnowDDL – and guide you in building reliable CI/CD pipelines to deploy schema changes with more confidence and control.
The Challenge: Why Snowflake Schema Management is Hard
Unlike application code, database schemas are stateful. This means that every change must be carefully planned and executed to avoid locking the database or bringing down critical systems. A single mistake in a migration script can lead to:
- Data loss from dropping columns or tables,
- Downtime from blocking DDL operations ,
- Inconsistent environments when changes aren't applied uniformly,
- Complex rollback processes when schema changes need to be undone, or
- Compliance challenges from untracked schema drift
Schema-as-Code: A Modern Approach
Branching off the idea of Infrastructure-as-Code, the Schema-as-Code approach allows you to manage your schema as if it were your everyday code, thus making it a stateless process. Instead of writing migration scripts manually, you can:
- Define your desired schema state in a file
- Generate migration plans from the schema's current state to the desired state automatically
- Apply these changes with safety checks
- Track all changes in version control
This approach enables:
- ✅ Reproducible environments - any environment can be built from the code
- ✅ Automatic rollbacks - revert to any previous schema version
- ✅ Drift detection - catch manual changes that break consistency
- ✅ Multi-tenant deployments - apply changes across many databases
- ✅ Policy enforcement - prevent dangerous operations automatically
About Atlas
Atlas is a modern database schema management tool that utilizes the Schema-as-Code approach for schema management. Built by the creators of Ent, Atlas provides a comprehensive platform for managing database schemas across multiple environments with built-in safety checks, automated migration planning, and enterprise-grade features.
Atlas offers a thorough approach to Snowflake schema management with its ability to understand your database schema as code to create migrations, but there are several other key features that set it apart:
1. Flexible Workflow Support
Atlas uniquely supports three different workflow patterns, allowing teams to choose the approach that best fits their needs:
- Declarative Migrations: Similar to Terraform, Atlas compares the current state of the database against the desired state, then generates and executes a migration plan to achieve that state.
- Versioned Migrations: A more traditional approach where Atlas writes versioned migration scripts in a directory, allowing teams to track changes over time. These files can be modified, linted, and applied to other environments.
- Hybrid Approach: Use declarative schemas for new development and maintain versioned migrations for complex data transformations.
2. Automatic Migration Planning
Atlas automatically generates the minimal SQL needed to transform your Snowflake schema from its current state to the desired state. This eliminates human error and ensures optimal migration paths.
3. Advanced Safety Features
Atlas includes over 40 built-in linting rules specifically designed for database safety:
- Destructive Change Detection: Prevents accidental data loss
- Lock Analysis: Identifies operations that might cause downtime
- Constraint Validation: Ensures referential integrity
- Backward Compatibility: Warns about breaking changes
4. Real-time Drift Detection
Atlas continuously monitors your production Snowflake environment and alerts you when someone makes manual changes outside your CI/CD process. This is critical for maintaining compliance and preventing configuration drift.
Learn more about setting up drift detection for your environments.
5. Enterprise Integration
Atlas provides first-class integrations with:
- GitHub Actions for automated CI/CD
- Terraform for infrastructure-as-code workflows
- Kubernetes Operator for cloud-native deployments
- Slack/Webhooks for team notifications
- DataDog for monitoring integrations
About schemachange
schemachange is an official migration tool developed by Snowflake Labs. It follows the traditional database migration approach popularized by tools like Flyway and Liquibase.
With schemachange, you write SQL migration scripts, version them sequentially, and apply them to your Snowflake databases. This process is designed for teams that prefer working directly with SQL and want an official tool from the Snowflake ecosystem.
Key characteristics:
- SQL-first approach: Write migration scripts in pure SQL
- Sequential versioning: Files are executed in alphanumeric order
- Jinja templating: Supports dynamic SQL generation for complex scenarios
- Official support: Maintained by Snowflake Labs with community contributions
About SnowDDL
SnowDDL is an open-source tool that takes a declarative, configuration-driven approach to Snowflake schema management. Instead of writing SQL scripts, you define your desired schema state in YAML configuration files. SnowDDL then generates and applies the necessary DDL statements to achieve that state. It's particularly strong at managing account-level objects and provides a structured approach to organizing Snowflake resources.
Key characteristics:
- YAML configuration: Define schemas declaratively in structured configuration files
- Account-level support: Manages databases, schemas, warehouses, roles, and other account objects
- Dependency resolution: Automatically handles dependencies between objects
- Environment isolation: Uses prefixes to separate development, staging, and production environments
Atlas vs schemachange vs SnowDDL: Complete Comparison
Now that we've gone over the basics of each tool, let's compare them across key features and capabilities:
| Feature | Atlas | schemachange | SnowDDL |
|---|---|---|---|
| Approach & Workflow | Declarative, versioned, and hybrid options | Versioned migration scripts | Declarative YAML configuration |
| Schema Definition | HCL, SQL files and ORMs | SQL migration files | YAML configuration files |
| Planning Migration | Database and Schema Level | Manual planning | Database, Schema and Account-level |
| Safety Checks | 40+ automated linting rules, pre-migration validation | Basic safe/unsafe operation classification | |
| Schema Validation | 40+ lint rules, custom policies | ||
| Testing Framework | Built-in schema testing | ||
| Rollback Support | Automatic rollback to any schema version | Manual rollback scripts required | Automatic rollback via Git history |
| Drift Detection | Real-time monitoring with alerts | ||
| Environment Management | Built-in multi-environment support | Prefix-based environment separation | |
| Templating & Programatic | HCL configuration + Go Templating | Jinja templating | YAML-based configuration + Python |
| CI/CD Integration | Many CI/CD platforms | ||
| IDE Extensions | VSCode and JetBrains support | ||
| Enterprise Features | Policy enforcement, compliance tracking | ||
| Maintenance | Active development by Ariga | Maintained by Snowflake Labs | Single maintainer |
Quick Decision Guide
Based on our comparisons, choose the right tool for your Snowflake schema management needs:
| Decision Factor | Atlas | schemachange | SnowDDL |
|---|---|---|---|
| Safety & Compliance | ✅ 40+ safety checks, drift detection, enterprise features | ⚠️ Manual reviews only | 🔶 Basic safety features, operation classification |
| Multi-environment CI/CD | ✅ Built-in environment management | ❌ Manual setup required | 🔶 Prefix-based environment separation |
| Team Collaboration | ✅ Advanced templating, policy enforcement, testing | ⚠️ Standard SQL collaboration | 🔶 Structured YAML configuration |
| Schema-level Management | ⚠️ Database/schema focused | ❌ Not supported | ✅ Support comprehensive objects |
| CI/CD Platform Integration | ✅ GitHub Actions, GitLab, Jenkins, Azure DevOps | ⚠️ Custom scripting required | ⚠️ Custom scripting required |
| ORM & Framework Support | ✅ Django, GORM, Ent, Prisma, TypeORM | ❌ Not supported | ❌ Not supported |
| Team Size | ✅ Enterprise and medium teams | ⚠️ Small to medium teams | 🔶 Medium teams |
| Long-term Scalability | ✅ Excellent | ⚠️ Limited | 🔶 Good |
| Learning Investment | 🔶 Medium-High | ✅ Low | 🔶 Medium |
Production-Ready Snowflake CI/CD with Atlas
If Atlas seems to be the tool for you and you'd like to try it out, let's walk through an example of a complete CI/CD pipeline setup that handles real-world scenarios like multiple environments, safety checks, and rollback capabilities.
Prerequisites
Before starting, ensure you have:
- A Snowflake account with appropriate roles (
SYSADMIN,ACCOUNTADMIN) - Atlas CLI installed locally
- A GitHub repository for your schema code
Step 1: Environment Setup
Create dedicated Snowflake databases for each environment:
CREATE DATABASE ANALYTICS_MYDB;
CREATE DATABASE ANALYTICS_PROD_DEVDB;
CREATE DATABASE ANALYTICS_PROD;
ANALYTICS_MYDB: Each data engineer will have their own development databaseANALYTICS_PROD: The production databaseANALYTICS_PROD_DEVDB: Atlas will use this database to compute migration plans
Step 2: Define Your Schema
Create a new directory for your schema files:
mkdir snowflake-schema && cd snowflake-schema
Define your schema in snowflake-schema/schema.hcl:
schema "PUBLIC" {
  retention_time = 1
}
table "USERS" {
  schema         = schema.PUBLIC
  retention_time = 1
  column "ID" {
    null = false
    type = NUMBER(38)
  }
  column "EMAIL" {
    null = true
    type = VARCHAR(255)
  }
  column "DISPLAY_NAME" {
    null = true
    type = VARCHAR(255)
  }
}
Define your Atlas project file atlas.hcl to configure environments and connections:
variable "SNOWFLAKE_ACCESS_TOKEN" {
    type = string
    default = getenv("SNOWFLAKE_ACCESS_TOKEN")
}

variable "SNOWFLAKE_USERNAME" {
    type = string
    default = getenv("SNOWFLAKE_USERNAME")
}

variable "SNOWFLAKE_ACCOUNT_IDENTIFIER" {
    type = string
    default = getenv("SNOWFLAKE_ACCOUNT_IDENTIFIER")
}

variable "SNOWFLAKE_WAREHOUSE" {
    type = string
    default = getenv("SNOWFLAKE_WAREHOUSE")
}

env {
  name = atlas.env
  url = "snowflake://${var.SNOWFLAKE_USERNAME}:${var.SNOWFLAKE_ACCESS_TOKEN}@${var.SNOWFLAKE_ACCOUNT_IDENTIFIER}/ANALYTICS_MYDB?warehouse=${var.SNOWFLAKE_WAREHOUSE}"
  schema {
    src = "file://schema.hcl"
  }
}

env "prod" {
  url = "snowflake://${var.SNOWFLAKE_USERNAME}:${var.SNOWFLAKE_ACCESS_TOKEN}@${var.SNOWFLAKE_ACCOUNT_IDENTIFIER}/ANALYTICS_PROD?warehouse=${var.SNOWFLAKE_WAREHOUSE}"
  dev = "snowflake://${var.SNOWFLAKE_USERNAME}:${var.SNOWFLAKE_ACCESS_TOKEN}@${var.SNOWFLAKE_ACCOUNT_IDENTIFIER}/ANALYTICS_PROD_DEVDB?warehouse=${var.SNOWFLAKE_WAREHOUSE}"
  schema {
    src = "file://schema.hcl"
    repo {
        name = "clickhouse-declarative-example"
    }
  }
}
Step 3: Apply Schema to Development Environment
Export your Snowflake credentials as environment variables:
export SNOWFLAKE_ACCESS_TOKEN=<your_access_token>
export SNOWFLAKE_USERNAME=<your_username>
export SNOWFLAKE_ACCOUNT_IDENTIFIER=<your_account_identifier>
export SNOWFLAKE_WAREHOUSE=<your_warehouse>
Then, apply the schema to your development database:
atlas schema apply --env MYDB
The result should look like this:
Planning migration statements (1 in total):

  -- create "users" table:
    -> CREATE TABLE "PUBLIC"."USERS" (
         "ID" NUMBER NOT NULL,
         "EMAIL" VARCHAR(255) NULL,
         "DISPLAY_NAME" VARCHAR(255) NULL
       ) DATA_RETENTION_TIME_IN_DAYS = 1;

-------------------------------------------

? Approve or abort the plan:
  ▸ Approve and apply
    Abort
Step 4: Push Schema to Registry
Push your schema to the Atlas Registry for later use in the CI/CD pipeline:
atlas schema push snowflake-declarative-demo --env "production"
The output should confirm that the schema was successfully pushed:
Schema: snowflake-declarative-demo
  -- Atlas URL: atlas://snowflake-declarative-demo
  -- Cloud URL: https://ariga-atlas.atlasgo.cloud/schemas/141733942994
Step 5: Set Up CI/CD Pipeline
Create a complete GitHub Actions workflow file at .github/workflows/cicd.yml:
name: CICD for Snowflake
on:
  push:
    branches:
      - master
  pull_request:
    branches:
      - master
permissions:
  contents: read
  pull-requests: write
env:
  GITHUB_TOKEN: ${{ github.token }}
  SNOWFLAKE_USERNAME:  ${{ secrets.SNOWFLAKE_USERNAME }}
  SNOWFLAKE_ACCESS_TOKEN: ${{ secrets.SNOWFLAKE_ACCESS_TOKEN }}
  SNOWFLAKE_ACCOUNT_IDENTIFIER: ${{ secrets.SNOWFLAKE_ACCOUNT_IDENTIFIER }}
  SNOWFLAKE_WAREHOUSE: ${{ secrets.SNOWFLAKE_WAREHOUSE }}
jobs:
  plan:
    if: ${{ github.event_name == 'pull_request' }}
    runs-on: ubuntu-latest
    steps:
      - uses: actions/checkout@v4
      - name: Setup Atlas
        uses: ariga/setup-atlas@master
        with:
          cloud-token: ${{ secrets.ATLAS_CLOUD_TOKEN }}
          version: beta
      - name: Run schema plan
        uses: ariga/atlas-action/schema/plan@master
        with:
          env: production
  approve-push:
    name: approve-push
    if: ${{ github.event_name == 'push' && github.ref == 'refs/heads/master' }}
    runs-on: ubuntu-latest
    steps:
      - uses: actions/checkout@v4
      - name: Setup Atlas
        uses: ariga/setup-atlas@v0
        with:
          cloud-token: ${{ secrets.ATLAS_CLOUD_TOKEN }}
          version: 'beta'
      - name: Approve the plan
        id: plan-approve
        uses: ariga/atlas-action/schema/plan/approve@master
        with:
          env: production
      - name: Push the schema
        id: schema-push
        uses: ariga/atlas-action/schema/push@master
        with:
          env: production
  deploy:
    needs: approve-push
    runs-on: ubuntu-latest
    steps:
      - uses: actions/checkout@v4
      - name: Setup Atlas
        uses: ariga/setup-atlas@master
        with:
          cloud-token: ${{ secrets.ATLAS_CLOUD_TOKEN }}
          version: beta
      - name: Run schema apply
        uses: ariga/atlas-action/schema/apply@master
        env:
          GITHUB_TOKEN: ${{ github.token }}
        with:
          env: production
This workflow does the following:
- Plan: On pull requests, it generates a migration plan based on the schema changes
- Approve: On pushes to
master, it approves the migration plan - Deploy: After approving the migration plan, it is deployed to the production environment
Step 6: Test Your CI/CD Pipeline
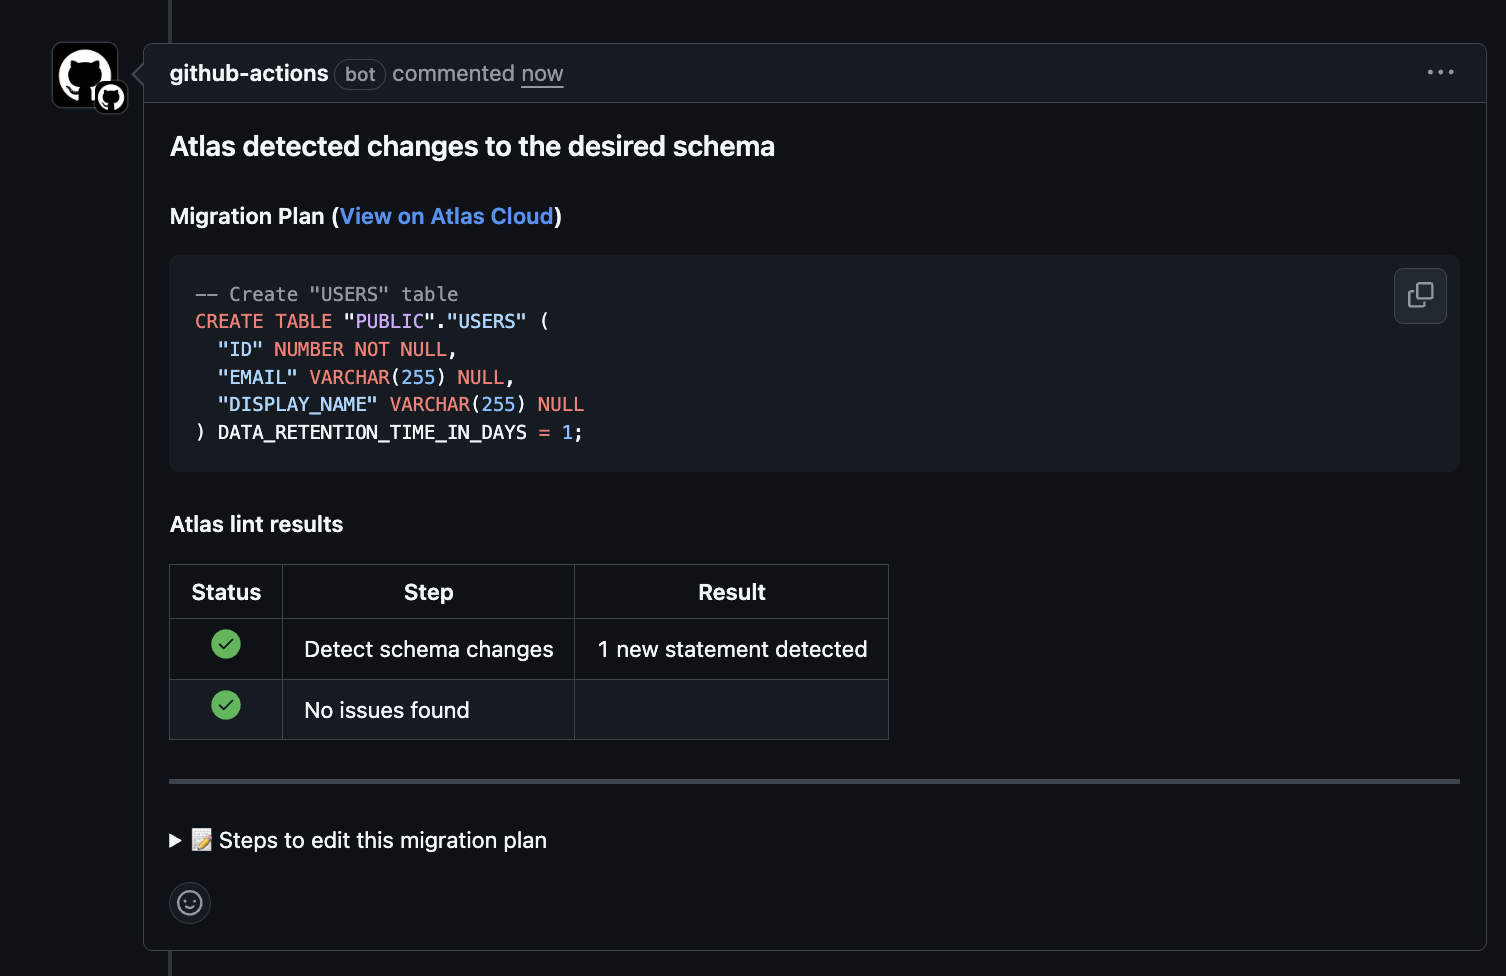
Once you have set up the CI/CD pipeline and pushed your changes to GitHub, you can test it by making a local change to your schema and creating a pull request with your changes.
Atlas Actions will automatically generate a migration plan based on the changes you made and comment on the pull request with the plan details. Merging the pull request will trigger the Atlas Actions to approve the plan and deploy it to your production Snowflake database.
Step 7: Configure Schema Linting
Let's test the safety features by attempting to delete a column in your schema:
schema "PUBLIC" {
  retention_time = 1
}
table "USERS" {
  schema         = schema.PUBLIC
  retention_time = 1
  column "ID" {
    null = false
    type = NUMBER(38)
  }
  column "EMAIL" {
    null = true
    type = VARCHAR(255)
  }
- column "DISPLAY_NAME" {
-   null = true
-   type = VARCHAR(255)
- }
}
Make sure to also modify the atlas.hcl file to add a lint rule that prevents this destructive change:
...

env "prod" {
  url = "snowflake://${var.SNOWFLAKE_USERNAME}:${var.SNOWFLAKE_ACCESS_TOKEN}@${var.SNOWFLAKE_ACCOUNT_IDENTIFIER}/ANALYTICS_PROD?warehouse=${var.SNOWFLAKE_WAREHOUSE}"
  dev = "snowflake://${var.SNOWFLAKE_USERNAME}:${var.SNOWFLAKE_ACCESS_TOKEN}@${var.SNOWFLAKE_ACCOUNT_IDENTIFIER}/ANALYTICS_PROD_DEVDB?warehouse=${var.SNOWFLAKE_WAREHOUSE}"
  schema {
    src = "file://schema.hcl"
    repo {
        name = "clickhouse-declarative-example"
    }
    lint {
      destructive {
        error = true
      }
    }
  }
}
Push your changes to GitHub and create a pull request.

Atlas will automatically detect the destructive change and comment on the pull request, preventing the merge until the issue is resolved.
Conclusion
While traditional manual approaches to Snowflake schema management may work well for small teams or simple schemas, they can quickly become bottlenecks as your data infrastructure grows in complexity and criticality.
To address these challenges, the three tools we explored each serve different needs when it comes to improving the Snowflake schema change process:
-
For teams just starting their schema management journey, schemachange provides the gentlest learning curve with official Snowflake support.
-
For teams managing complex Snowflake environments with multiple account-level objects, SnowDDL's YAML configuration approach offers structure and organization.
-
For teams prioritizing safety, automation, and enterprise features, Atlas provides the most comprehensive solution with its 40+ safety checks, real-time drift detection, and seamless CI/CD integration.
Moving Forward
Database schema changes can become a competitive advantage rather than a risk when managed properly. Investing in proper tooling and processes pays off in reduced downtime, improved team productivity, and enhanced data reliability.
The most important step is to move away from manual schema changes toward an automated, version-controlled approach. Start small, implement safety checks early, and gradually expand your automation as your team becomes comfortable with the new workflow.
Ready to get started? Try Atlas for free by signing up for Atlas Cloud and explore our Snowflake documentation to begin building your production-ready CI/CD pipeline today.
As with our other beta programs, we're looking for feedback from early adopters. If you're interested in participating: