Ad-hoc Schema Change Approvals with Terraform and Atlas
Introduction
Ideally, all schema changes should be pre-approved. However, in some cases, you might not have a pre-approved plan for a schema change. For instance, you might be deploying a schema after some manual change was made to the target database, or you might be deploying to an environment that doesn't have a CI pipeline for schema changes at all.
In such cases, you can set up an ad-hoc approval flow to define in which cases the Provider should pause the migration process and wait for human approval before applying the schema change.
Overview
Using the lint.review configuration, users may control how the Terraform Provider should behave when it encounters
a schema change. The possible values for this configuration are:
| Description | |
|---|---|
ALWAYS | Pauses the migration process and waits for human approval before applying the schema change. |
WARNING | Analyze the proposed schema change and wait for approval if any diagnostics are found. |
ERROR | Analyze the proposed schema change and wait for approval if any severe diagnostics (errors) are found. |
Guide: Using Ad-hoc Approvals
Step 1: Setup Terraform project
The Approval feature is available only to Atlas Pro users. To use this feature, run:
Run the following command to start a PostgreSQL container:
docker run --name postgres -e POSTGRES_PASSWORD=postgres -d -p 5432:5432 postgres
Let's create a new file named main.tf with Atlas configured:
terraform {
  required_providers {
    atlas = {
      source = "ariga/atlas"
      version = ">=0.9.6"
    }
  }
}

resource "atlas_schema" "example" {
  hcl = <<EOF
table "users" {
  schema = schema.public
  column "id" {
    null = false
    type = integer
  }
  primary_key {
    columns = [column.id]
  }
}
schema "public" {
  comment = "standard public schema"
}
EOF
  url = "postgres://postgres:postgres@localhost:5432/postgres?search_path=public&sslmode=disable"
  dev_url = "docker://postgres/16/dev"
}
In this configuration, we are using the Atlas Terraform provider to manage a PostgreSQL database running in a Docker container
(in this case, postgres).
Verify that the configuration is correct by running:
terraform init
terraform apply -auto-approve
This will create a new table named users in the public schema of the PostgreSQL database.
You can verify this by connecting to the database and running the following query:
docker exec -it postgres psql -U postgres -d postgres -c "SELECT table_schema, table_name FROM information_schema.tables WHERE table_name = 'users';"
You should see something like this:
 table_schema | table_name
--------------+------------
 public       | users
(1 row)
Step 2: Create a Schema Registry Repo
In order to use ad-hoc approvals, the Atlas Provider needs a backing repository to store the plans and their states.
-
Before proceeding, make sure you have an account on Atlas Cloud. If you don't have one you can create one for free in under a minute on our signup page.
-
Once you have an account, create a new repository by clicking the "+" button in the top right corner of the page.
-
Choose "Declarative Workflow".
-
Name your repository, in our example we are using
ad-hoc-approval. -
Choose the database engine you're using (in our example we are using PostgreSQL).
-
Click "Create Repository".
Step 3: Create a Bot Token Secret
In order for the Provider to be able to interact with the Schema Registry, it needs a bot token. Follow the documentation for creating a bot token.
Step 4: Update the main.tf file
Next, update the atlas_schema.example resource to include a reference to our newly created Schema Registry repository,
our bot token secret, and the lint.review configuration:
terraform {
  required_providers {
    atlas = {
      source = "ariga/atlas"
      version = ">=0.9.6"
    }
  }
}

variable "atlas_token" {
  description = "Atlas token for authentication"
  type        = string
  sensitive = true
}

provider "atlas" {
  cloud {
    repo = "ad-hoc-approval"
    token = var.atlas_token
  }
}

resource "atlas_schema" "example" {
  hcl = <<EOF
table "users" {
  schema = schema.public
  column "id" {
    null = false
    type = integer
  }
  primary_key {
    columns = [column.id]
  }
}
schema "public" {
  comment = "standard public schema"
}
EOF
  url = "postgres://postgres:postgres@localhost:5432/postgres?search_path=public&sslmode=disable"
  dev_url = "docker://postgres/16/dev"
  lint {
    review = "ALWAYS"
  }
}
Notice the following changes:
-
We added a
provider "atlas"block to themain.tffile. This block contains thecloudsection, which contains therepofield that references the name of the Schema Registry repository we created in Step 2. Thetokenfield refers to the bot token created in Step 3. -
We added a
lint.reviewfield to theatlas_schema.exampleresource. This field tells the Provider to trigger the approval process when applying the resource change.
Apply the updated resource and provide the bot token by running:
terraform apply
Step 5: Verify approval is required
Next, let's modify the schema to add a new column name to the users table. Update the atlas_schema.example resource with the following content:
resource "atlas_schema" "example" {
  hcl = <<EOF
table "users" {
  schema = schema.public
  column "id" {
    null = false
    type = integer
  }
  column "name" {
    null = false
    type = varchar(255)
  }
  primary_key {
    columns = [column.id]
  }
}
schema "public" {
  comment = "standard public schema"
}
EOF
  url = "postgres://postgres:postgres@localhost:5432/postgres?search_path=public&sslmode=disable"
  dev_url = "docker://postgres/16/dev"
  lint {
    review = "ALWAYS"
  }
}
Apply the updated resource:
terraform apply
If we did everything correctly, the provider should show a warning message about the plan must be approved before applying the resource:
╷
│ Warning: Plan Pending Approval
│
│ with atlas_schema.example,
│ on main.tf line 23, in resource "atlas_schema" "example":
│ 23: resource "atlas_schema" "example" {
│
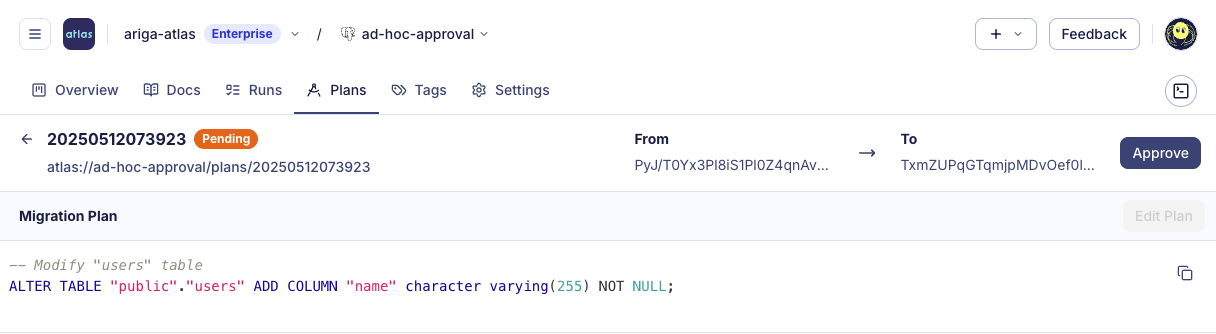
│ The schema plan is awaiting approval. Please review and approve it before proceeding:
│
│ https://your-tenant.atlasgo.cloud/schemas/141733935668/plans/210453400319
╵
Visit the URL to review the proposed schema change and approve it:
Note: Use the
review_timeoutconfiguration to set a maximum waiting time for approval. By default, there is no timeout, and the provider will return an error immediately if the plan is not approved.
Conclusion
In this guide, we learned how to set up an ad-hoc approval flow to define in which cases the Terraform Provider should pause the migration process and wait for human approval before applying the schema change.