Introduction to Versioned Migrations
This guide offers a high-level overview of the Atlas versioned migration workflow. It walks you through the steps of creating a migration directory, automatically generating SQL migration from its desired schema, pushing the migration directory to the Atlas Schema Registry, and applying changes to databases. For more in-depth guides, please check out the other pages in this section or visit our guides.
Creating the first migration
One of Atlas's most popular features is its ability to automatically generate SQL migration scripts based on a desired schema. A schema can be defined in several ways: through Atlas's HCL language, standard SQL, external ORMs or programs. In this guide, we will use a SQL schema to define our desired state.
First, let's create a simple SQL schema containing two tables: users and repos and name it schema.sql:
- PostgreSQL
- MySQL
- SQL Server
- ClickHouse
- Redshift
CREATE TABLE "users" (
  "id" bigint,
  "name" varchar NOT NULL,
  PRIMARY KEY ("id")
);

CREATE TABLE "repos" (
  "id" bigint,
  "name" varchar NOT NULL,
  "owner_id" bigint NOT NULL,
  PRIMARY KEY ("id"),
  CONSTRAINT "owner_id" FOREIGN KEY ("owner_id") REFERENCES "users" ("id")
);
CREATE TABLE `users` (
  `id` bigint,
  `name` varchar(255) NOT NULL,
  PRIMARY KEY (`id`)
);

CREATE TABLE `repos` (
  `id` bigint,
  `name` varchar(255) NOT NULL,
  `owner_id` bigint NOT NULL,
  PRIMARY KEY (`id`),
  CONSTRAINT `owner_id` FOREIGN KEY (`owner_id`) REFERENCES `users` (`id`)
);
CREATE TABLE [users] (
  [id] bigint,
  [name] nvarchar(255) NOT NULL,
  PRIMARY KEY ([id])
);

CREATE TABLE [repos] (
  [id] bigint,
  [name] varchar(255) NOT NULL,
  [owner_id] bigint NOT NULL,
  PRIMARY KEY ([id]),
  CONSTRAINT [owner_id] FOREIGN KEY ([owner_id]) REFERENCES [users] ([id])
);
CREATE TABLE `users` (
  `id` UInt64,
  `name` String NOT NULL,
  PRIMARY KEY (`id`)
) ENGINE = MergeTree() ORDER BY id;

CREATE TABLE `repos` (
  `id` UInt64,
  `name` String NOT NULL,
  `owner_id` Bigint NOT NULL,
  PRIMARY KEY (`id`),
) ENGINE = MergeTree() ORDER BY id;
CREATE TABLE "users" (
  "id" bigint,
  "name" varchar NOT NULL
);

CREATE TABLE "repos" (
  "id" bigint,
  "name" varchar NOT NULL,
  "owner_id" bigint NOT NULL
);
After creating our desired schema (schema.sql), let's run Atlas to generate the migration script needed to apply it to
a database.
- PostgreSQL
- MySQL
- SQL Server
- ClickHouse
- Redshift
atlas migrate diff initial \
  --to file://schema.sql \
  --dev-url "docker://postgres/15/dev?search_path=public" \
  --format '{{ sql . "  " }}'
atlas migrate diff initial \
  --to file://schema.sql \
  --dev-url "docker://mysql/8/dev" \
  --format '{{ sql . "  " }}'
atlas migrate diff initial \
  --to file://schema.sql \
  --dev-url "docker://sqlserver/2022-latest/dev?mode=schema" \
  --format '{{ sql . "  " }}'
atlas migrate diff initial \
  --to file://schema.sql \
  --dev-url "docker://clickhouse/23.11/dev" \
  --format '{{ sql . "  " }}'
atlas migrate diff initial \
  --to file://schema.sql \
  --dev-url "redshift://user:pass@redshift-cluster:5439/dev?search_path=public&sslmode=disable" \
  --format '{{ sql . "  " }}'
dev-url- The concept of the Dev Database is explained in detail in this link.format- Instructs Atlas to generate migration scripts with two-space indentation. Without this flag, the migrations won't have any indentation.
Run ls migrations, and you'll notice that Atlas has created two files:
- 20230823134343_initial.sql
- atlas.sum
-- Create "users" table
CREATE TABLE "users" (
  "id" bigint NOT NULL,
  "name" character varying NOT NULL,
  PRIMARY KEY ("id")
);
-- Create "repos" table
CREATE TABLE "repos" (
  "id" bigint NOT NULL,
  "name" character varying NOT NULL,
  "owner_id" bigint NOT NULL,
  PRIMARY KEY ("id"),
  CONSTRAINT "owner_id" FOREIGN KEY ("owner_id") REFERENCES "users" ("id") ON UPDATE NO ACTION ON DELETE NO ACTION
);
In addition to the migration directory, Atlas maintains a file name atlas.sum which is used
to ensure the integrity of the migration directory and force developers to deal with situations
where migration order or contents was modified after the fact.
h1:kGsXTVLtL0vs9Un8aaGKwMHZ2iMibgTQxwyAt7+Elcw=
20230823134343_initial.sql h1:OQUf1t0+0UWHRjZrShFt8Wn+0If4HRka1fpy8JdH6G4=
Pushing migrations to Atlas Registry
Now that we have our first migration, we can apply it to a database. There are multiple ways to accomplish this, with most methods covered in the guides section. In this example, we'll demonstrate how to push migrations to the Atlas Registry, much like how Docker images are pushed to Docker Hub.
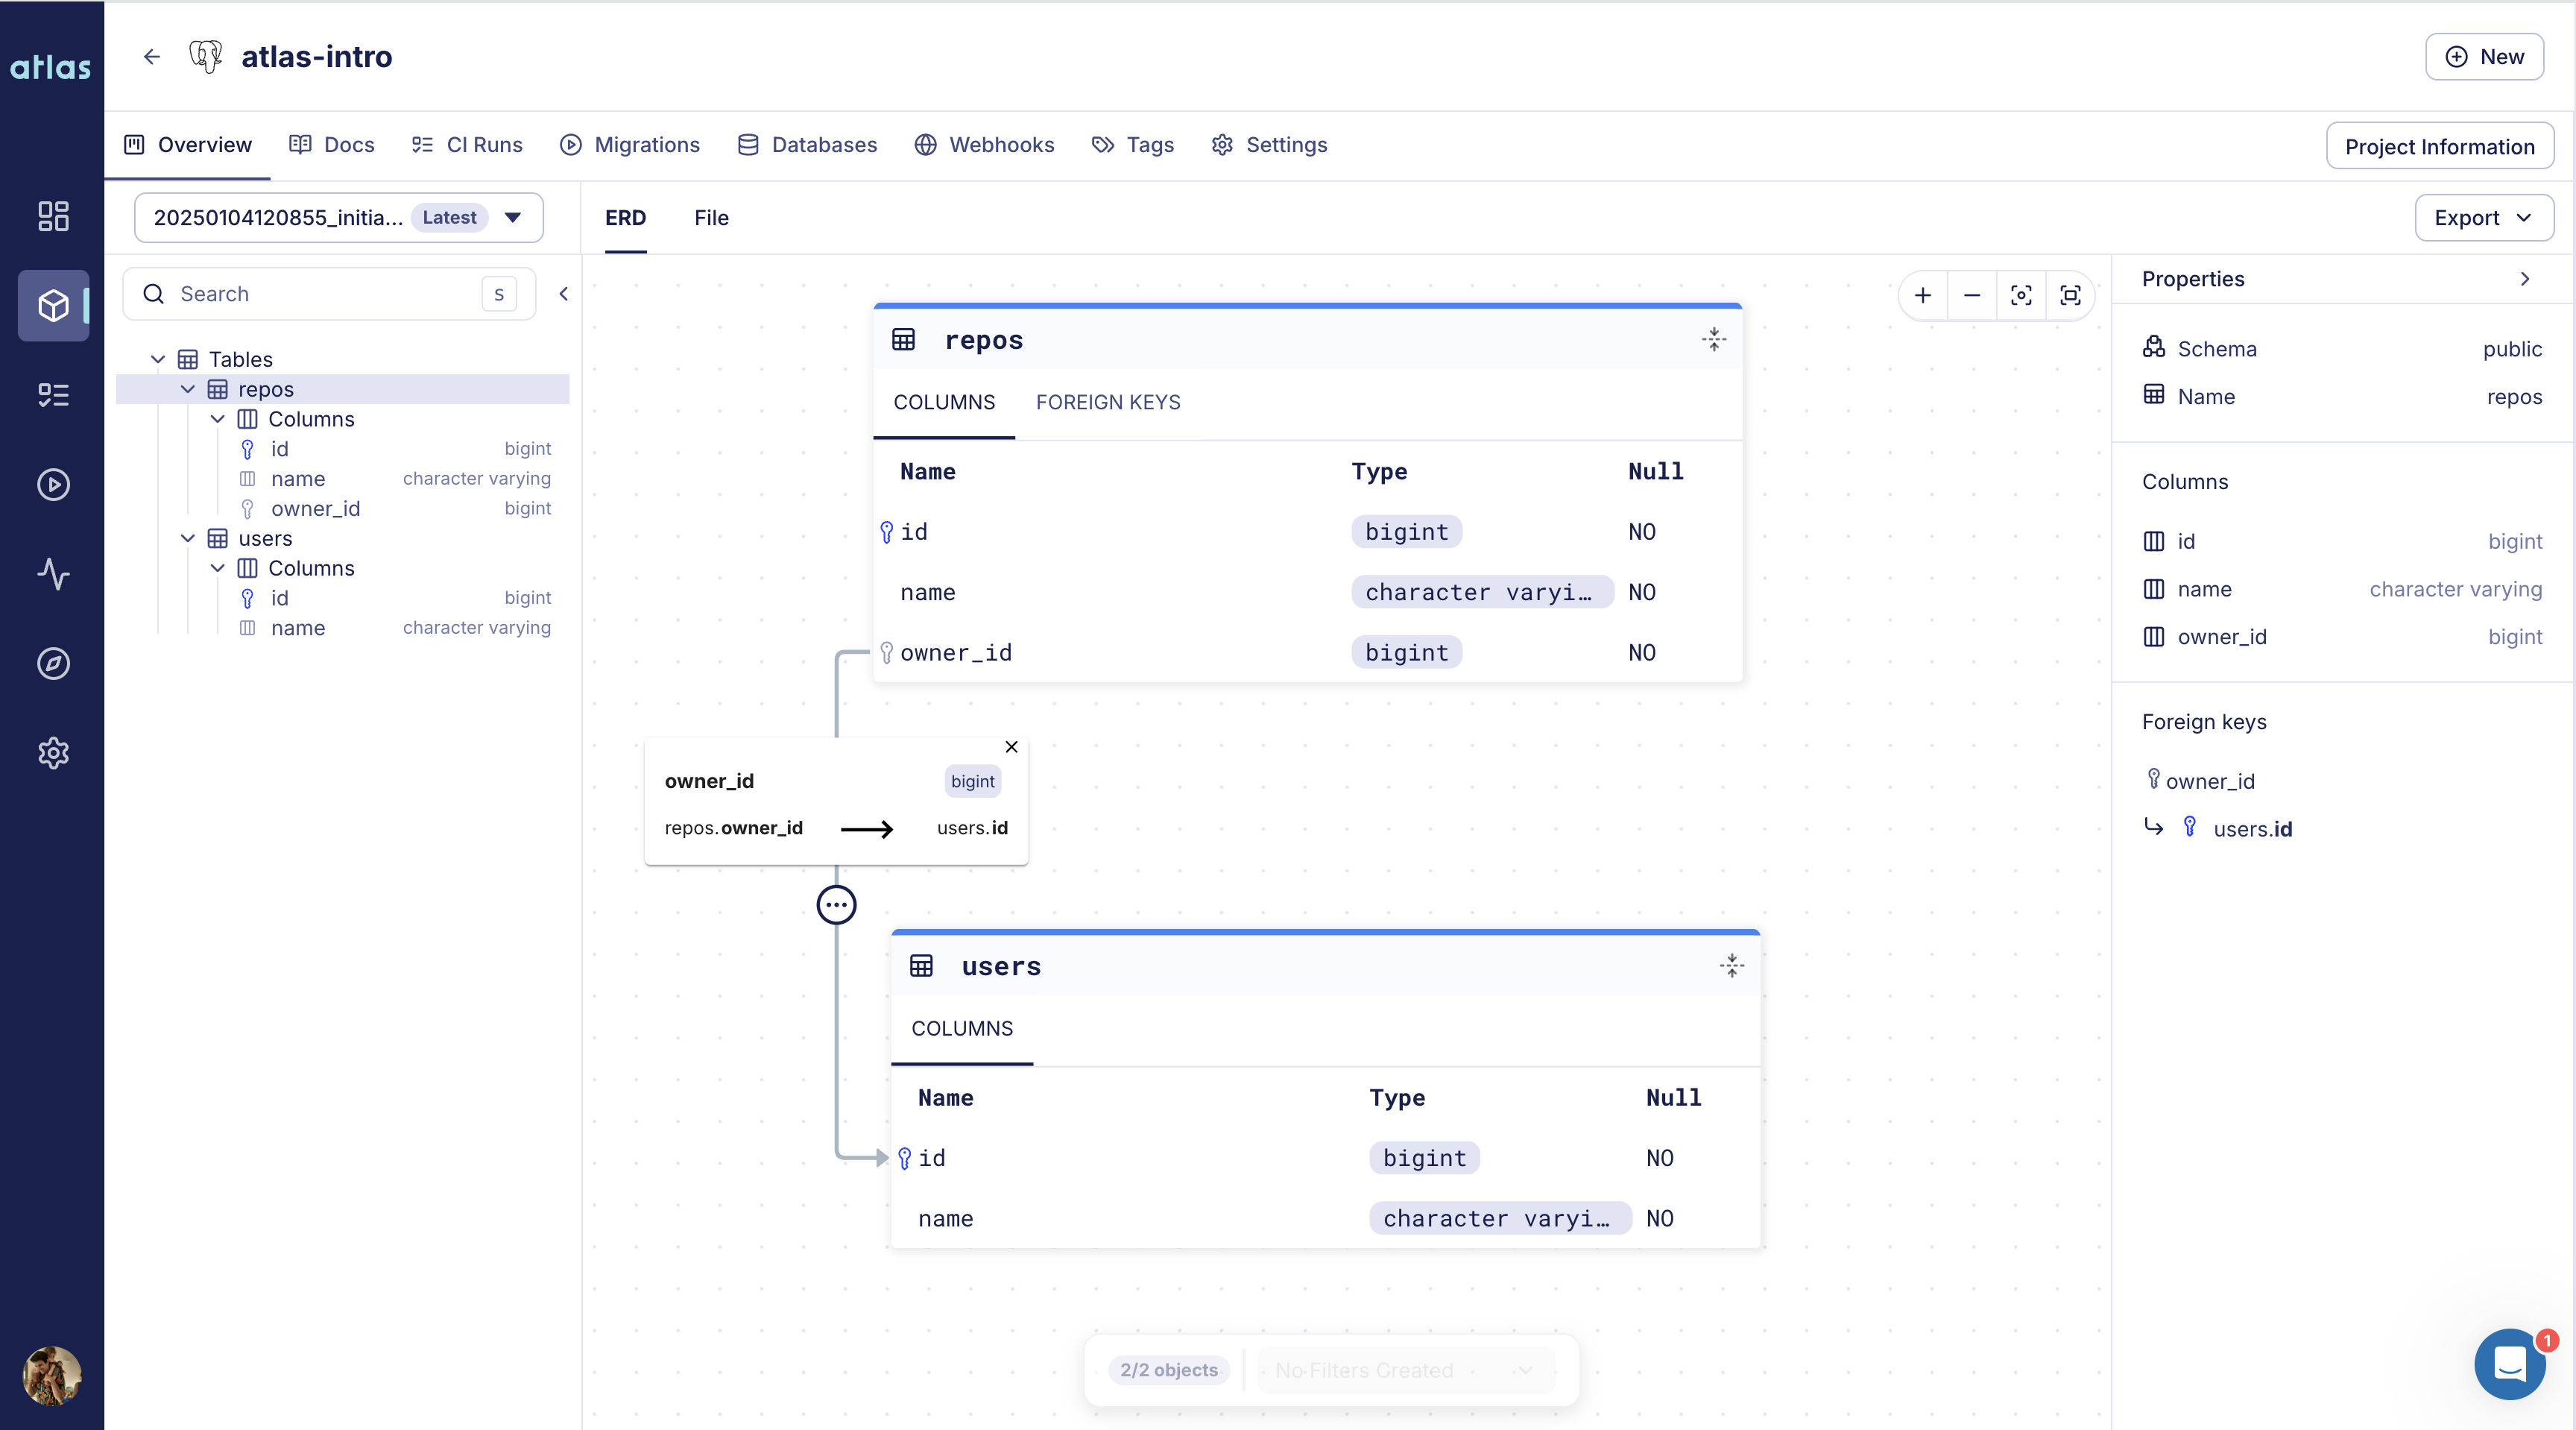
Migration Directory created with atlas migrate push
First, log in to Atlas. If it's your first time, you'll be prompted to create both an account and a workspace (organization):
atlas login
After logging in, let's name our new migration project atlas-intro and run atlas migrate push:
- PostgreSQL
- MySQL
- MariaDB
- SQLite
- SQL Server
- ClickHouse
- Redshift
- Snowflake
atlas migrate push atlas-intro \
  --dev-url "docker://postgres/15/dev?search_path=public"
atlas migrate push atlas-intro \
  --dev-url "docker://mysql/8/dev"
atlas migrate push atlas-intro \
  --dev-url "docker://mariadb/latest/dev"
atlas migrate push atlas-intro \
  --dev-url "sqlite://dev?mode=memory"
atlas migrate push atlas-intro \
  --dev-url "docker://sqlserver/2022-latest"
atlas migrate push atlas-intro \
  --dev-url "docker://clickhouse/23.11"
atlas migrate push atlas-intro \
  --dev-url "redshift://user:pass@redshift-cluster:5439/dev"
atlas migrate push atlas-intro \
  --dev-url "snowflake://user:pass@account_identifier/dev"
After our migration directory is pushed, Atlas prints a URL to the created directory, similar to the one shown in the image above.
Applying migrations
Once our atlas-intro migration directory has been pushed, we can apply it to a database from any CD platform without
needing to pull our migration files from source control. For the sake of this example, let's spin up a local database
that represents our production database to apply the migrations to it:
- PostgreSQL
- MySQL
- SQL Server
- ClickHouse
docker run --rm -d --name atlas-demo -e POSTGRES_PASSWORD=pass -e POSTGRES_DB=example -p 5432:5432 postgres
docker run --rm -d --name atlas-demo -e MYSQL_ROOT_PASSWORD=pass -e MYSQL_DATABASE=example -p 3306:3306 mysql
docker run --rm -d --name atlas-demo -e ACCEPT_EULA=Y -e MSSQL_PID=Developer -e MSSQL_SA_PASSWORD=P\@ssw0rd0995 -p 1434:1433 mcr.microsoft.com/mssql/server:2022-latest
docker run --rm -d --name atlas-demo -e CLICKHOUSE_DB=example -p 9000:9000 clickhouse/clickhouse-server:latest
Then, we'll create a simple Atlas configuration file (atlas.hcl) to store the settings for our environment:
- PostgreSQL
- MySQL
- SQL Server
- ClickHouse
- Redshift
# The "local" environment represents our local testings.
env "local" {
  url = "postgres://postgres:pass@:5432/example?search_path=public&sslmode=disable"
  migration {
    dir = "atlas://atlas-intro"
  }
}
# The "local" environment represents our local testings.
env "local" {
  url = "mysql://root:pass@:3306/example"
  migration {
    dir = "atlas://atlas-intro"
  }
}
# The "local" environment represents our local testings.
env "local" {
  url = "sqlserver://sa:P@ssw0rd0995@:1433?database=master"
  migration {
    dir = "atlas://atlas-intro"
  }
}
# The "local" environment represents our local testings.
env "local" {
  url = "clickhouse://localhost:9000/example"
  migration {
    dir = "atlas://atlas-intro"
  }
}
# The "local" environment represents our local testings.
env "local" {
  url = "redshift://user:pass@redshift-cluster:5439/example?search_path=public&sslmode=disable"
  migration {
    dir = "atlas://atlas-intro"
  }
}
The final step is to apply the migrations to the database. Let's run atlas migrate apply with the --env flag
to instruct Atlas to select the environment configuration from the atlas.hcl file:
atlas migrate apply --env local
Boom! After applying the migration, you should receive a link to the deployment and the database where the migration was applied. Here's an example of what it should look like:
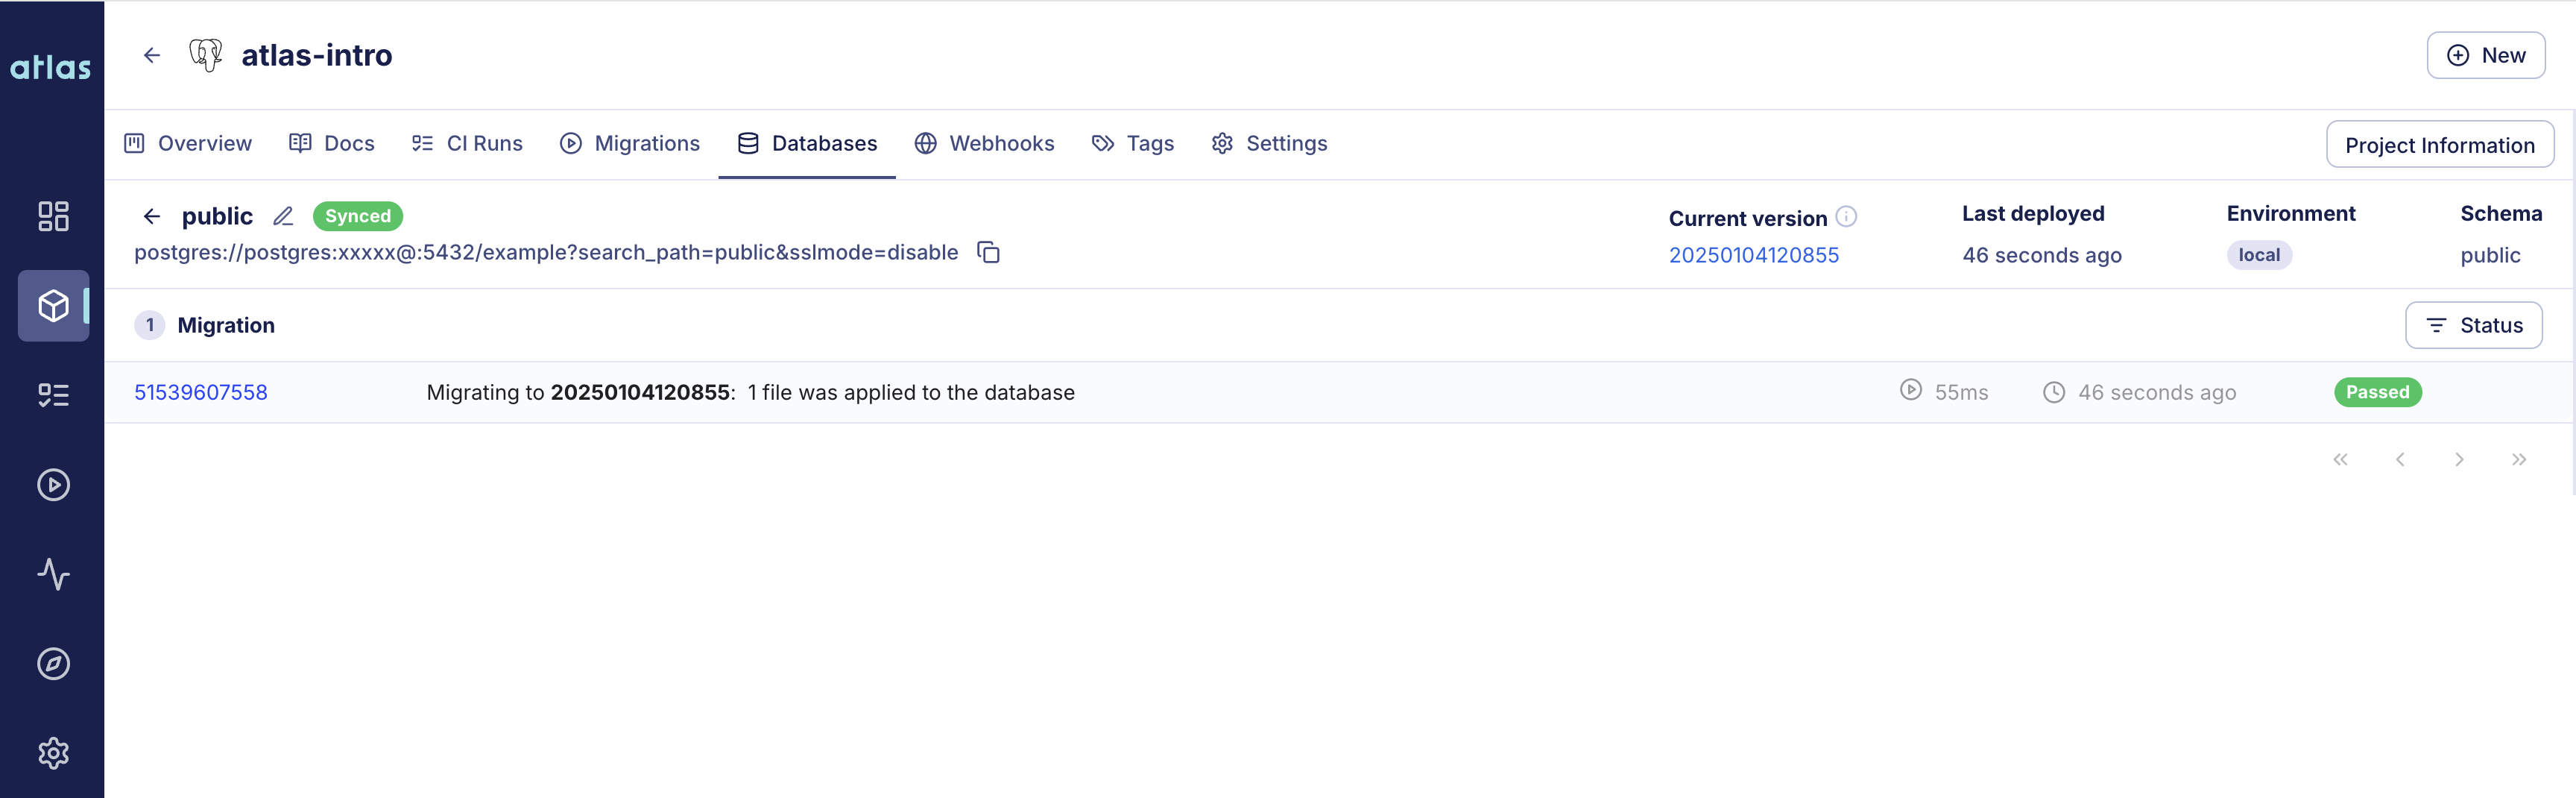
Migration history of a database schema created with atlas migrate apply
By clicking on the most recent deployment, you can view the full migration report from the latest run:
Screenshot example
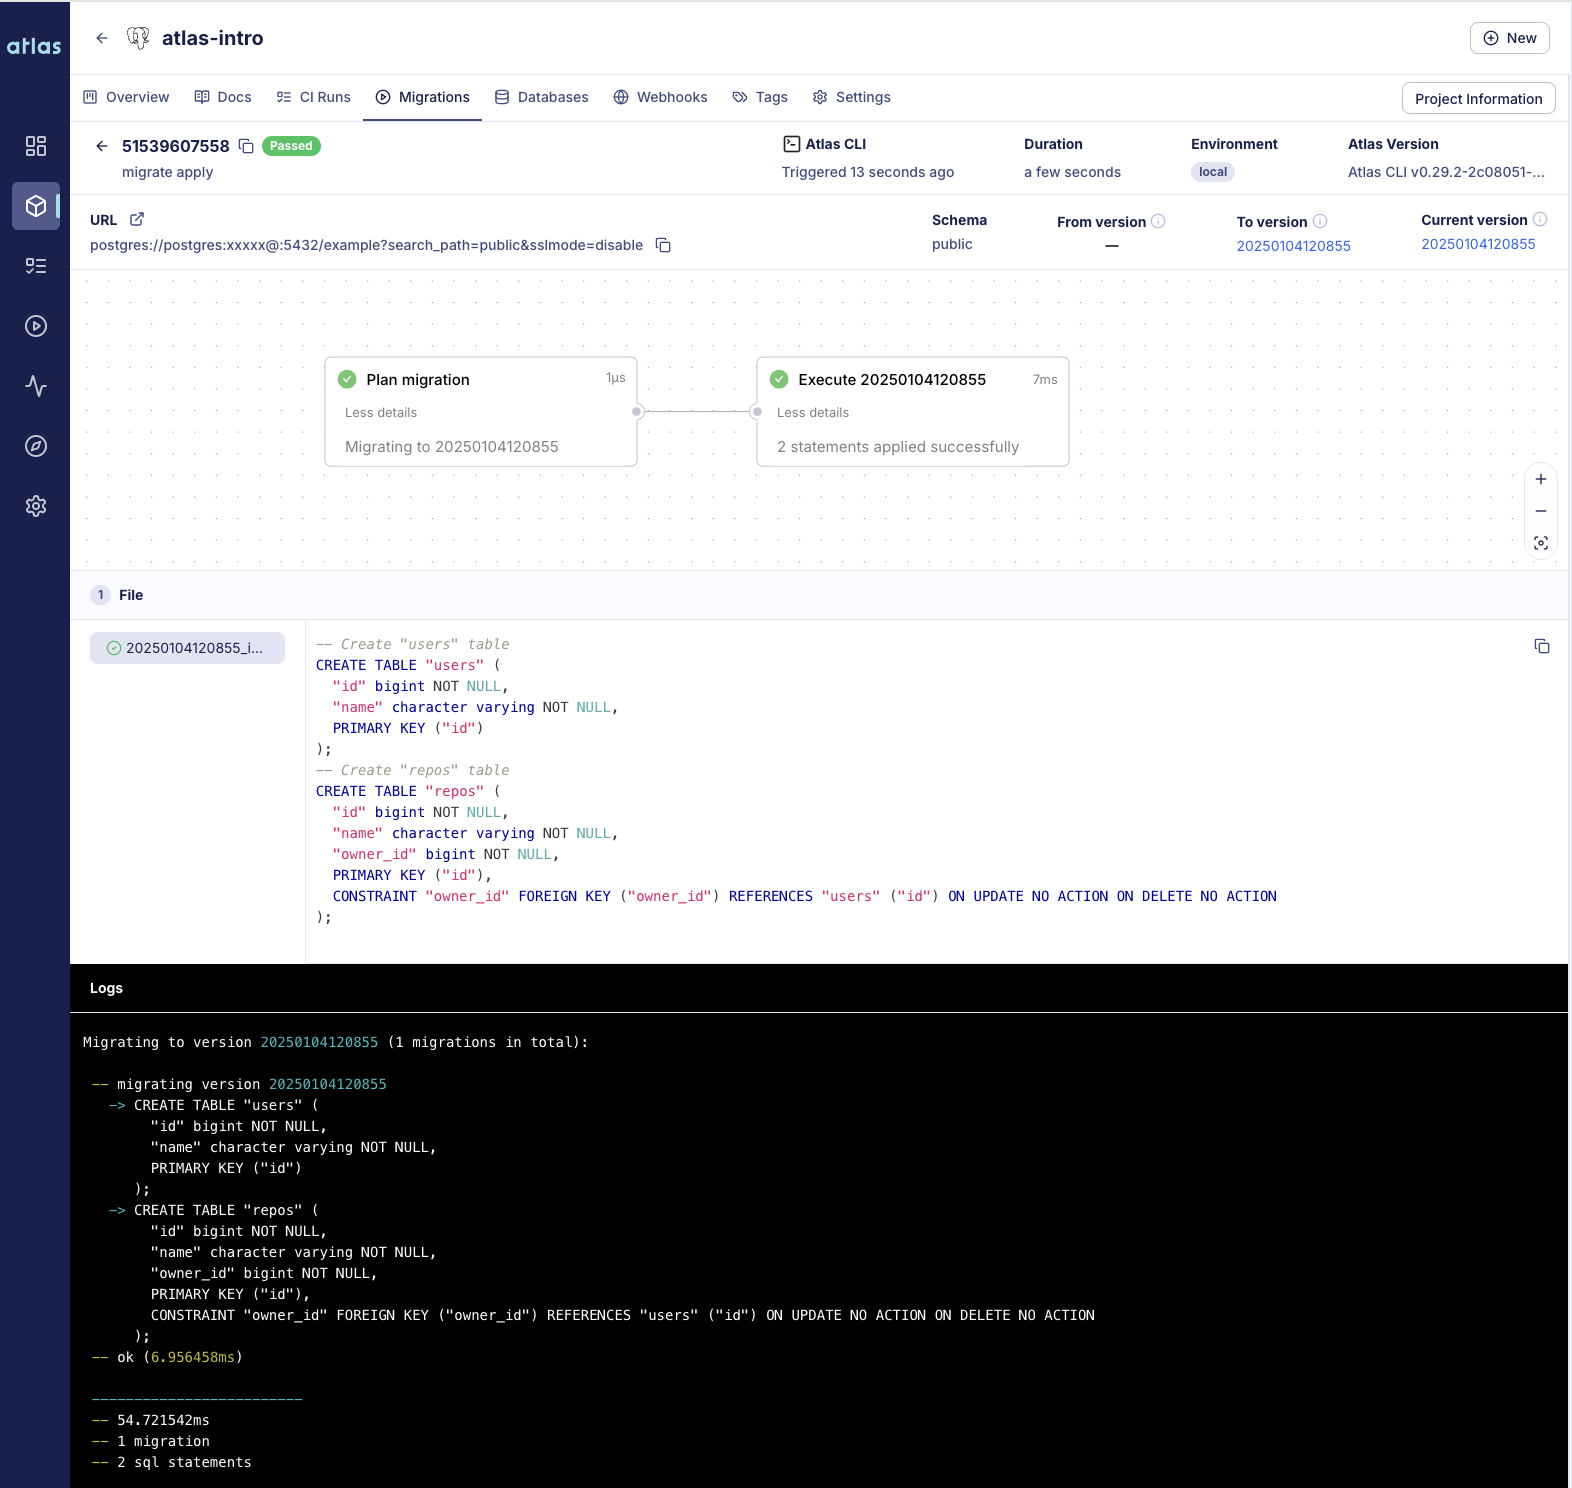
Migration deployment reported created with atlas migrate apply
Generating another migration
After applying the first migration, it's time to update our schema defined in schema.sql and tell Atlas to generate
another migration. This will bring the migration directory (and the databases) in line with the new state defined by
the desired schema (schema.sql).
Let's make two changes to our schema:
- Add a new
descriptioncolumn to ourrepostable. - Add a new
commitstable with foreign keys linking to both thereposanduserstables.
- PostgreSQL
- MySQL
- SQL Server
- ClickHouse
- Redshift
CREATE TABLE "users" (
  "id" bigint,
  "name" varchar NOT NULL,
  PRIMARY KEY ("id")
);

CREATE TABLE "repos" (
  "id" bigint,
  "name" varchar NOT NULL,
  "description" varchar NULL,
  "owner_id" bigint NOT NULL,
  PRIMARY KEY ("id"),
  CONSTRAINT "owner_id" FOREIGN KEY ("owner_id") REFERENCES "users" ("id")
);

CREATE TABLE "commits" (
  "id" bigint,
  "message" varchar NOT NULL,
  "repo_id" bigint NOT NULL,
  "author_id" bigint NOT NULL,
  PRIMARY KEY ("id"),
  CONSTRAINT "repo_id" FOREIGN KEY ("repo_id") REFERENCES "repos" ("id"),
  CONSTRAINT "author_id" FOREIGN KEY ("author_id") REFERENCES "users" ("id")
);
CREATE TABLE `users` (
  `id` bigint,
  `name` varchar(255) NOT NULL,
  PRIMARY KEY (`id`)
);

CREATE TABLE `repos` (
  `id` bigint,
  `name` varchar(255) NOT NULL,
  `description` varchar(255) NULL,
  `owner_id` bigint NOT NULL,
  PRIMARY KEY (`id`),
  CONSTRAINT `owner_id` FOREIGN KEY (`owner_id`) REFERENCES `users` (`id`)
);

CREATE TABLE `commits` (
  `id` bigint,
  `message` varchar(255) NOT NULL,
  `repo_id` bigint NOT NULL,
  `author_id` bigint NOT NULL,
  PRIMARY KEY (`id`),
  CONSTRAINT `repo_id` FOREIGN KEY (`repo_id`) REFERENCES `repos` (`id`),
  CONSTRAINT `author_id` FOREIGN KEY (`author_id`) REFERENCES `users` (`id`)
);
CREATE TABLE [users] (
  [id] bigint,
  [name] nvarchar(255) NOT NULL,
  PRIMARY KEY ([id])
);

CREATE TABLE [repos] (
  [id] bigint,
  [name] nvarchar(255) NOT NULL,
  [description] nvarchar(255) NULL,
  [owner_id] bigint NOT NULL,
  PRIMARY KEY ([id]),
  CONSTRAINT [owner_id] FOREIGN KEY ([owner_id]) REFERENCES [users] ([id])
);

CREATE TABLE [commits] (
  [id] bigint,
  [message] nvarchar(255) NOT NULL,
  [repo_id] bigint NOT NULL,
  [author_id] bigint NOT NULL,
  PRIMARY KEY ([id]),
  CONSTRAINT [repo_id] FOREIGN KEY ([repo_id]) REFERENCES [repos] ([id]),
  CONSTRAINT [author_id] FOREIGN KEY ([author_id]) REFERENCES [users] ([id])
);
CREATE TABLE `users` (
  `id` UInt64,
  `name` String NOT NULL,
  PRIMARY KEY (`id`)
) ENGINE = MergeTree() ORDER BY id;

CREATE TABLE `repos` (
  `id` UInt64,
  `name` String NOT NULL,
  `description` String NULL,
  `owner_id` Bigint NOT NULL,
  PRIMARY KEY (`id`),
) ENGINE = MergeTree() ORDER BY id;

CREATE TABLE `commits` (
  `id` UInt64,
  `message` String NOT NULL,
  `repo_id` Bigint NOT NULL,
  `author_id` Bigint NOT NULL,
  PRIMARY KEY (`id`),
) ENGINE = MergeTree() ORDER BY id;
CREATE TABLE "users" (
  "id" bigint,
  "name" varchar NOT NULL,
  PRIMARY KEY ("id")
);

CREATE TABLE "repos" (
  "id" bigint,
  "name" varchar NOT NULL,
  "description" varchar NULL,
  "owner_id" bigint NOT NULL
);

CREATE TABLE "commits" (
  "id" bigint,
  "message" varchar NOT NULL,
  "repo_id" bigint NOT NULL,
  "author_id" bigint NOT NULL
);
Next, we're ready to run atlas migrate diff again to generate the new migration:
- PostgreSQL
- MySQL
- SQL Server
- ClickHouse
- Redshift
atlas migrate diff add_commits \
  --to file://schema.sql \
  --dev-url "docker://postgres/15/dev?search_path=public" \
  --format '{{ sql . "  " }}'
atlas migrate diff add_commits \
  --to file://schema.sql \
  --dev-url "docker://mysql/8/dev" \
  --format '{{ sql . "  " }}'
atlas migrate diff add_commits \
  --to file://schema.sql \
  --dev-url "docker://sqlserver/2022-latest/dev?mode=schema" \
  --format '{{ sql . "  " }}'
atlas migrate diff add_commits \
  --to file://schema.sql \
  --dev-url "docker://clickhouse/23.11/dev" \
  --format '{{ sql . "  " }}'
atlas migrate diff add_commits \
  --to file://schema.sql \
  --dev-url "redshift://user:pass@redshift-cluster:5439/dev?search_path=public&sslmode=disable" \
  --format '{{ sql . "  " }}'
Run ls migrations, and you'll notice that a new migration has been generated. Let's run atlas migrate push again
and observe the update on the migration directory page:
- PostgreSQL
- MySQL
- MariaDB
- SQLite
- SQL Server
- ClickHouse
- Redshift
- Snowflake
atlas migrate push atlas-intro \
  --dev-url "docker://postgres/15/dev?search_path=public"
atlas migrate push atlas-intro \
  --dev-url "docker://mysql/8/dev"
atlas migrate push atlas-intro \
  --dev-url "docker://mariadb/latest/dev"
atlas migrate push atlas-intro \
  --dev-url "sqlite://dev?mode=memory"
atlas migrate push atlas-intro \
  --dev-url "docker://sqlserver/2022-latest"
atlas migrate push atlas-intro \
  --dev-url "docker://clickhouse/23.11"
atlas migrate push atlas-intro \
  --dev-url "redshift://user:pass@redshift-cluster:5439/dev"
atlas migrate push atlas-intro \
  --dev-url "snowflake://user:pass@account_identifier/dev"
- ERD Diff
- SQL Diff
- Full ERD
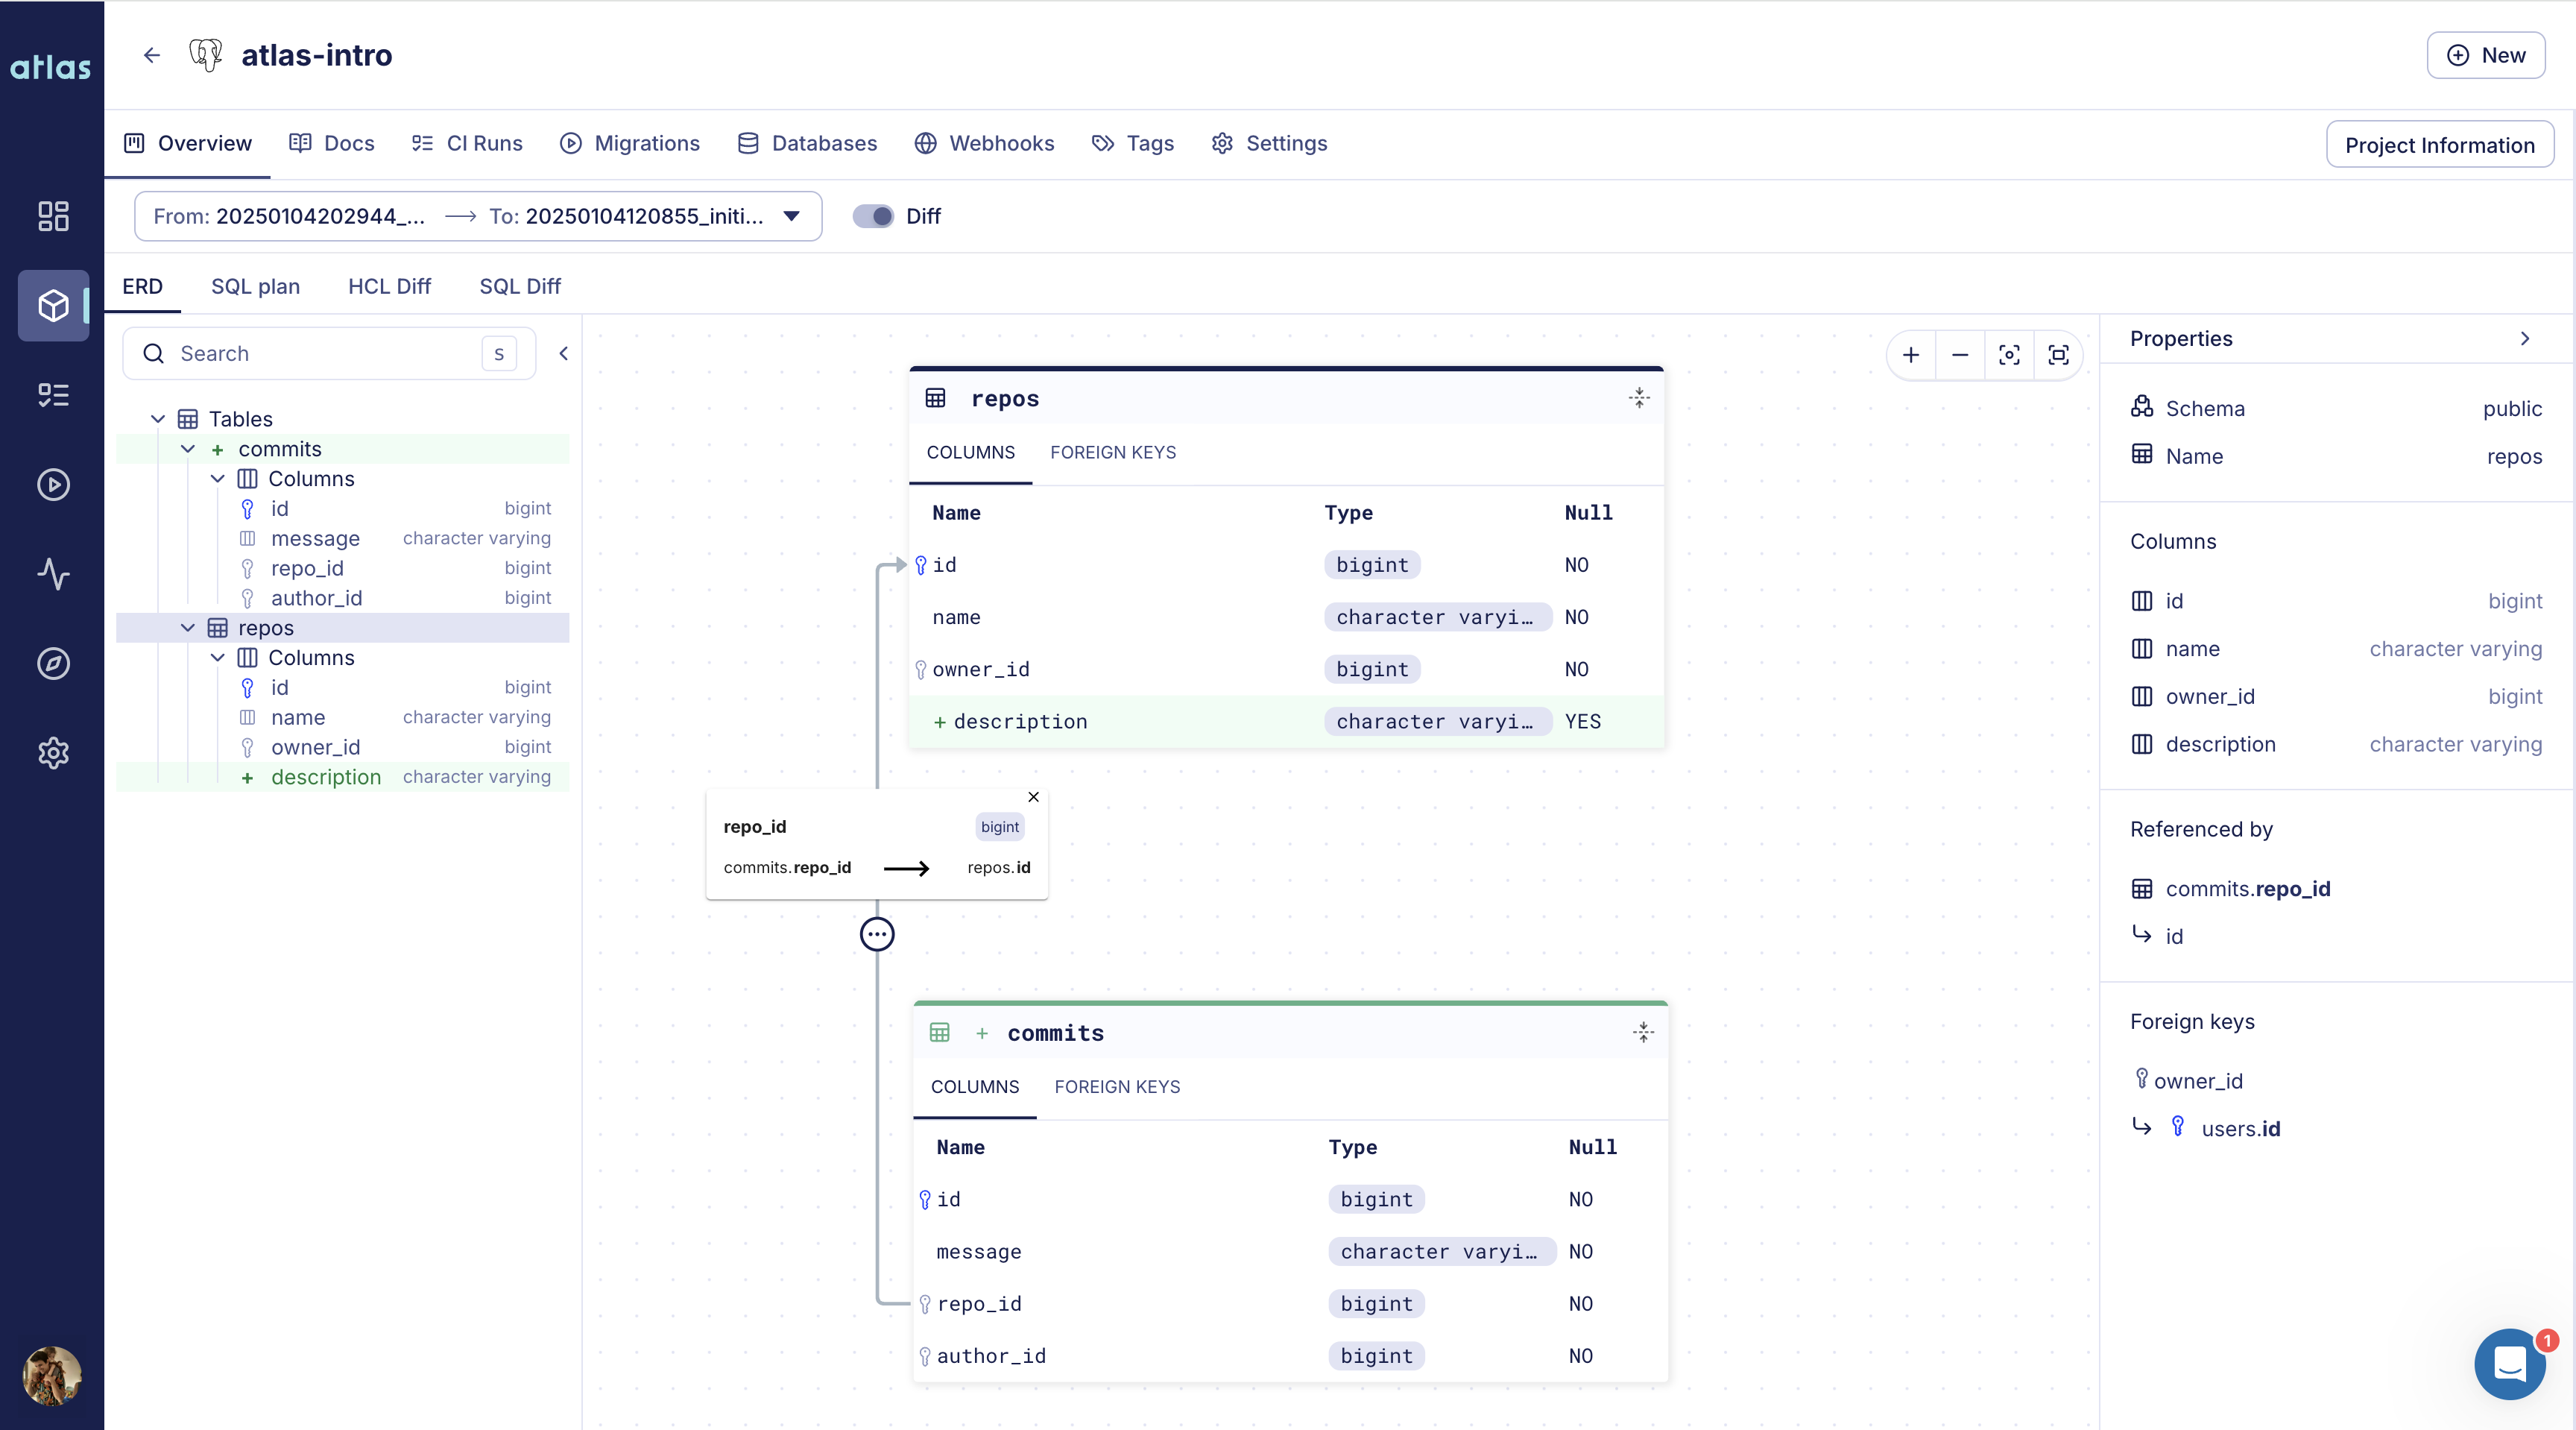
Migration Directory updated with atlas migrate push
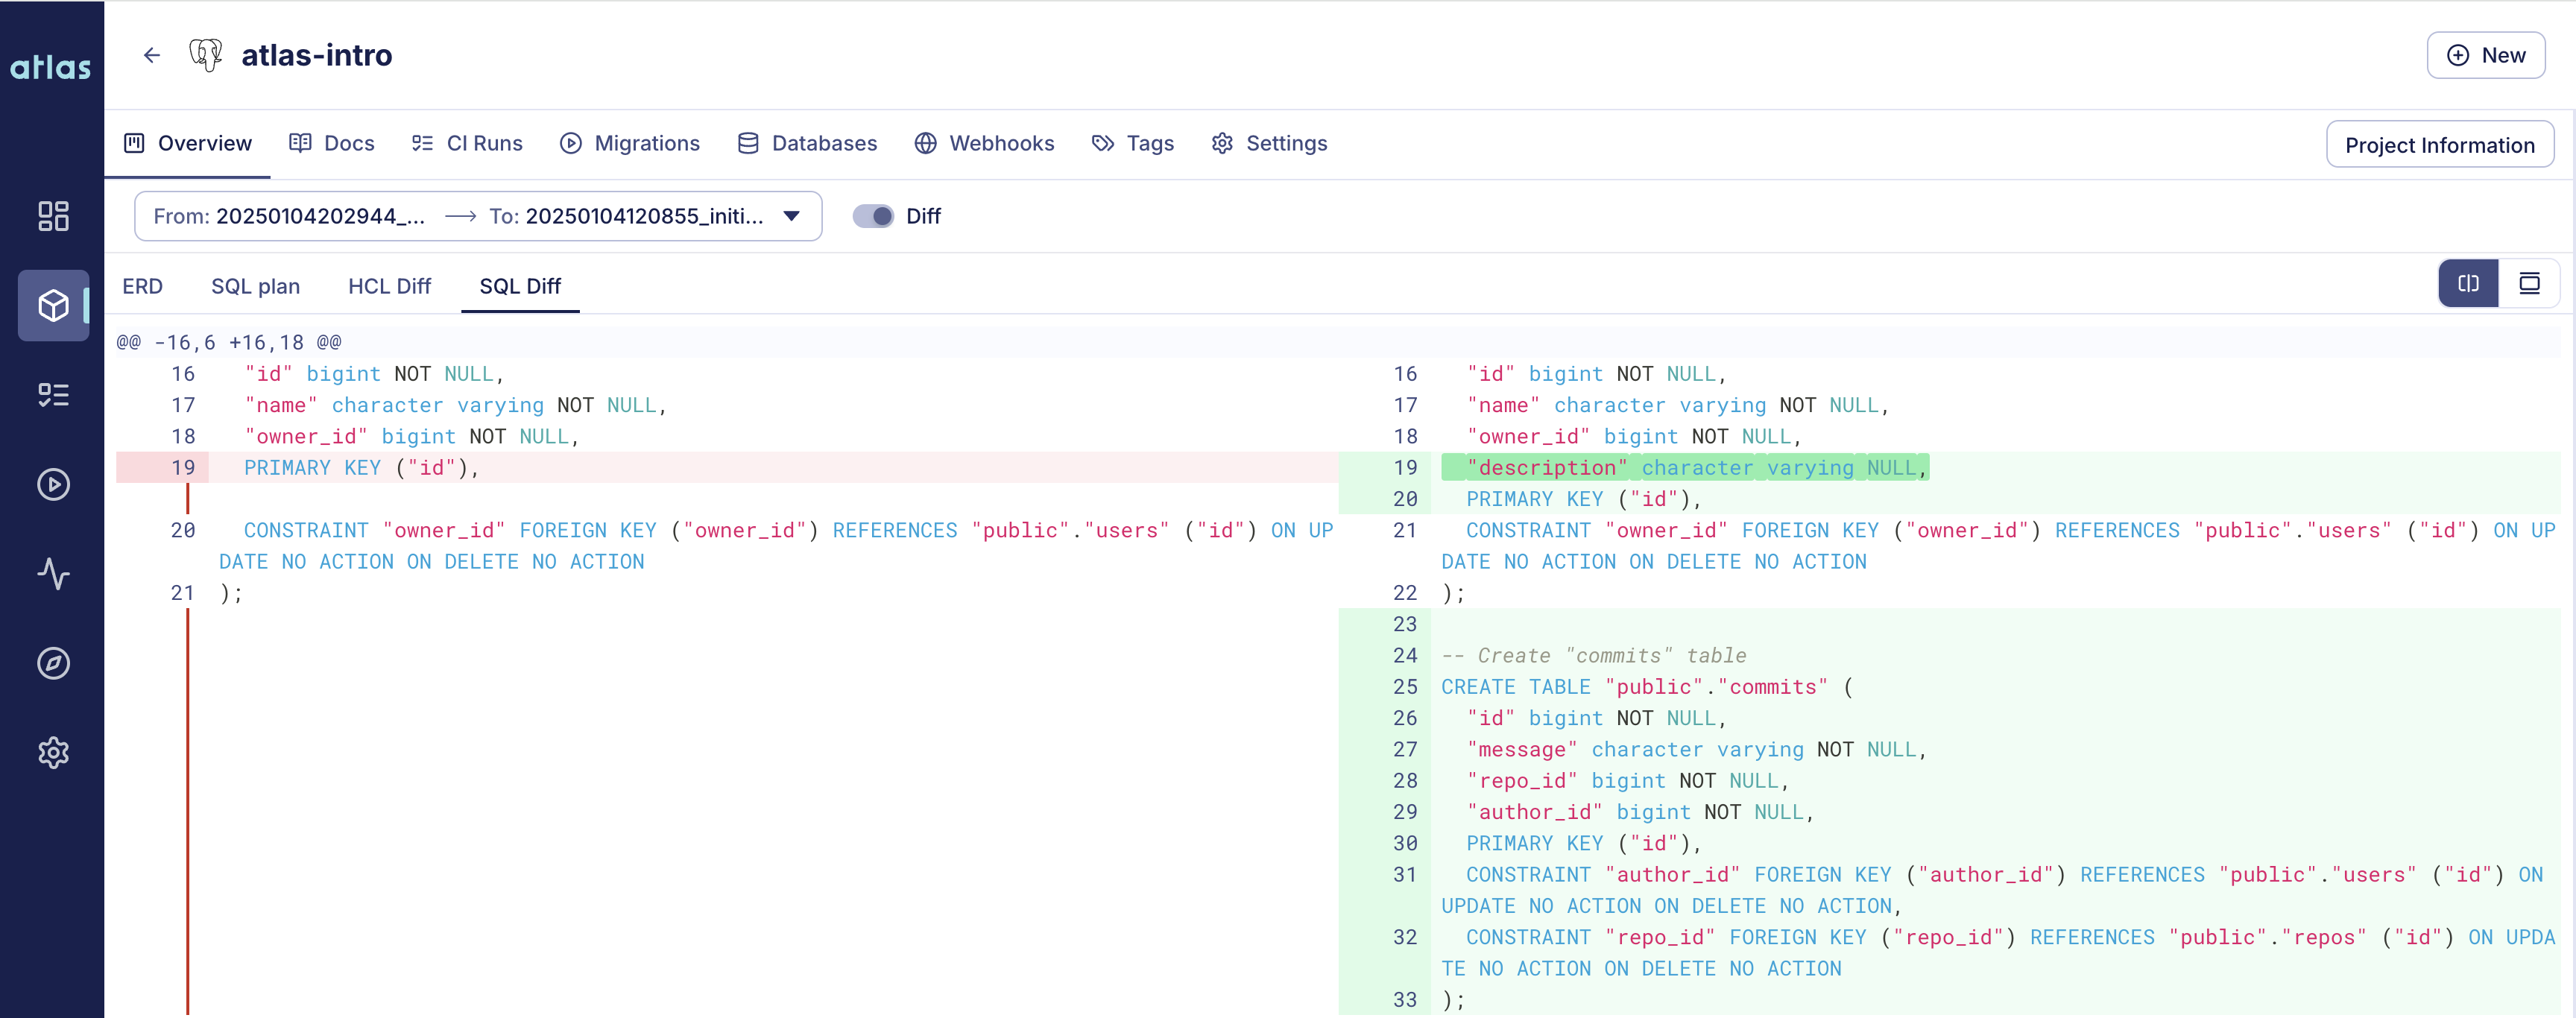
Migration Directory updated with atlas migrate push
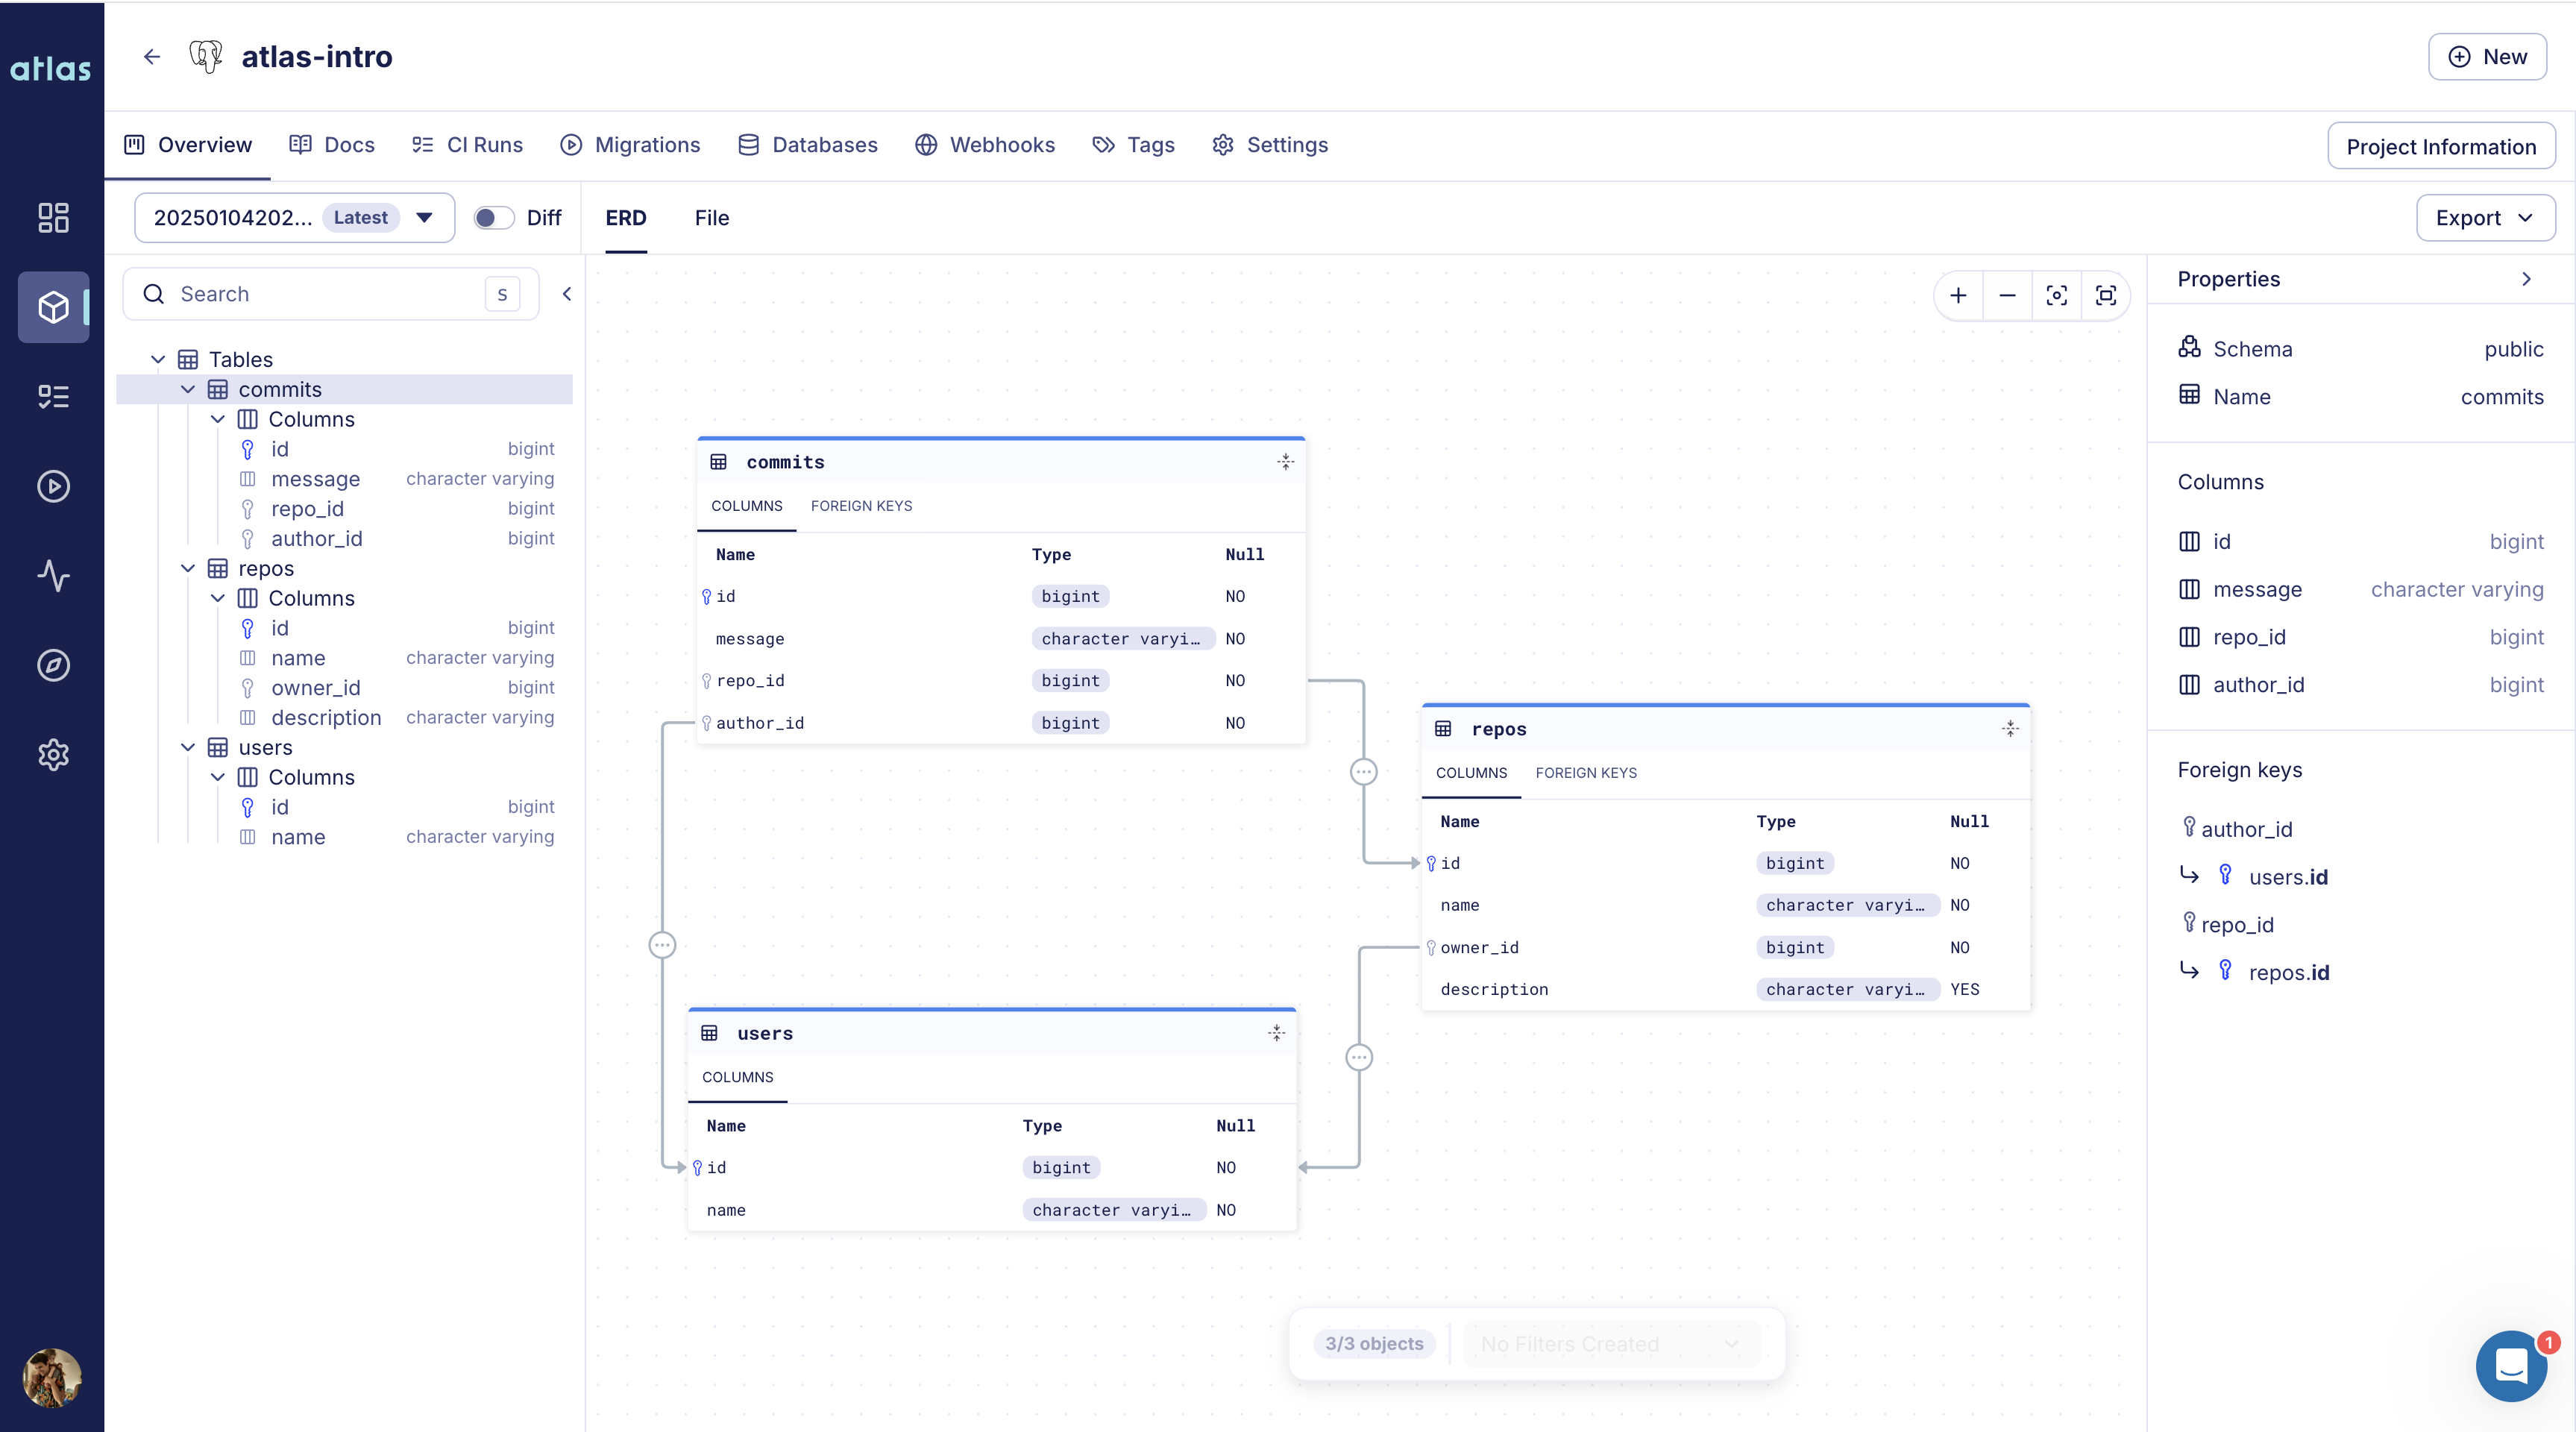
Migration Directory updated with atlas migrate push
Once pushed, you'll notice in the Databases tab that our database is in a Pending state. This means that the latest migration has been pushed but not yet applied to the database.
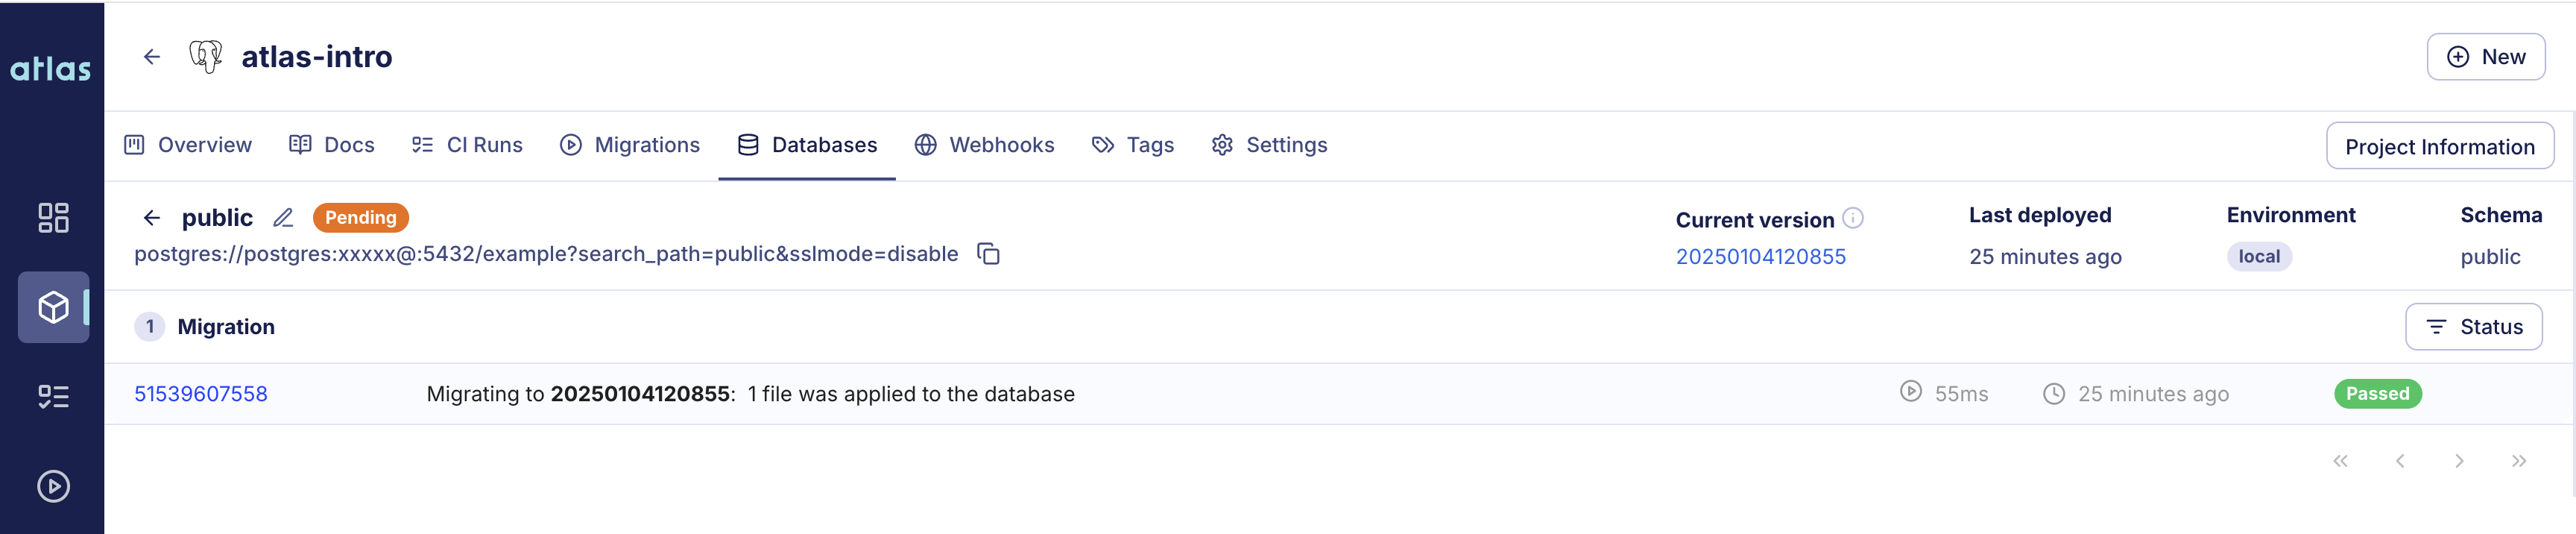
Database schema public is in Pending mode
Let's apply our latest migration and check our database again:
atlas migrate apply --env local
As you can see below, the database is now In Sync with the migration directory:
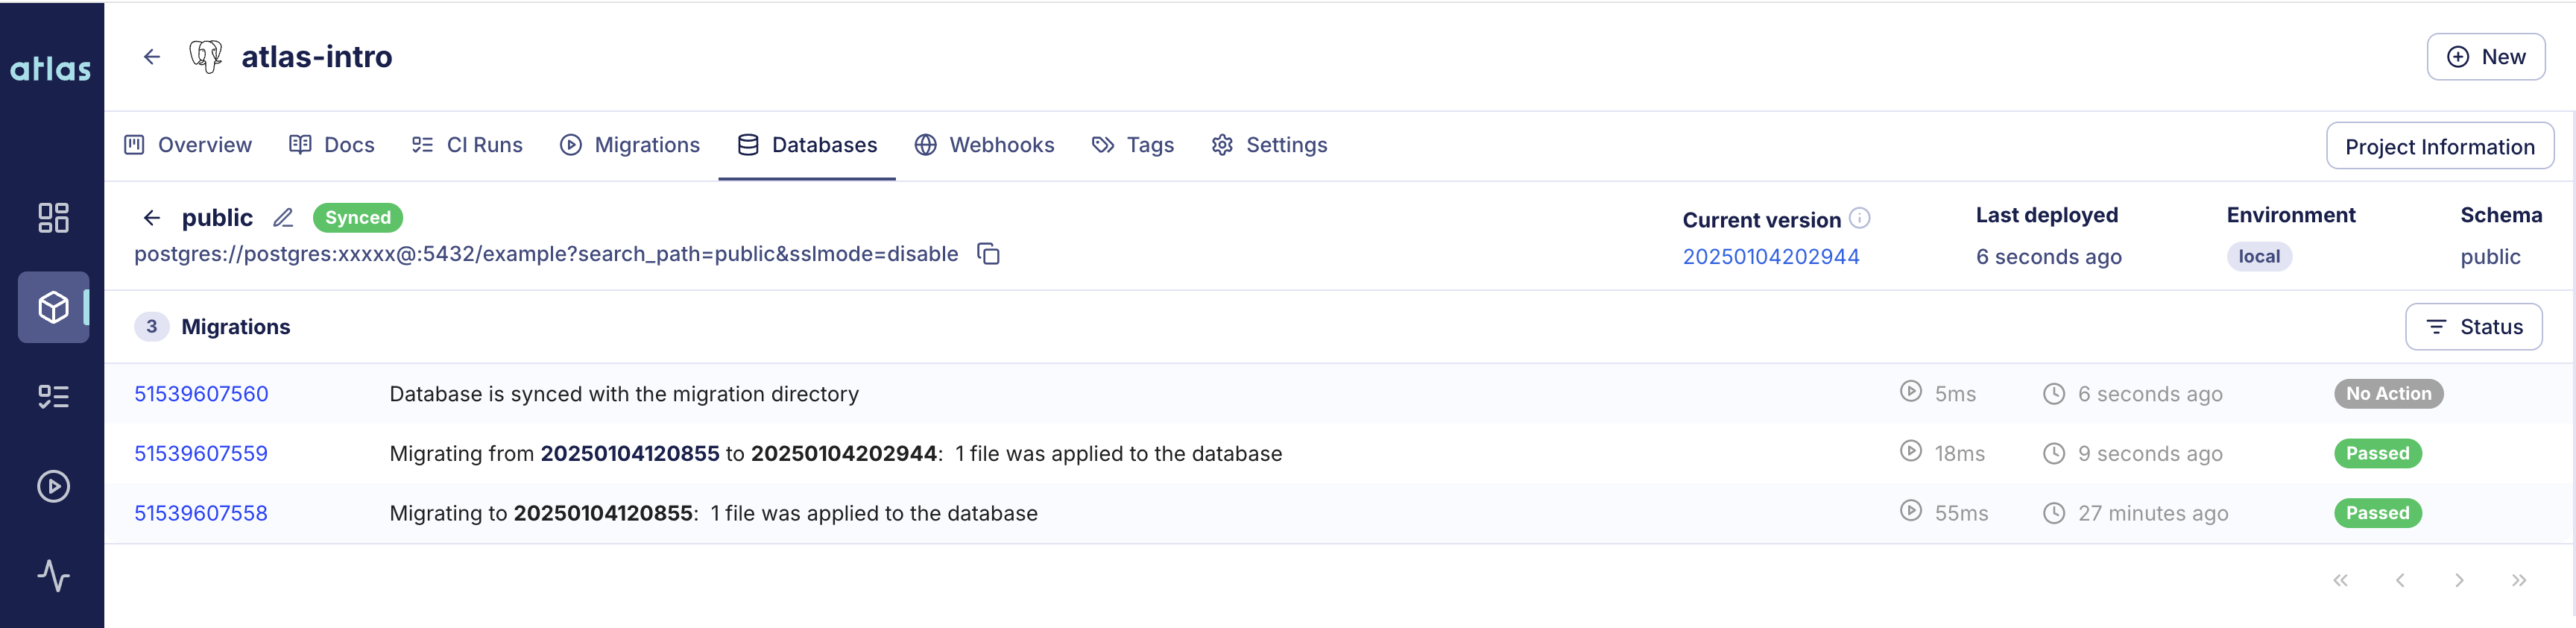
Database schema public is in In Sync mode
Next Steps
In this short tutorial we learned how to use atlas to generate migrations, push them to an Atlas workspace and apply them to
databases. For more in-depth guides, please check out the other pages in this section or visit our Guides section.
We have a super friendly #getting-started channel on our community chat on Discord.
For web-based, free, and fun (GIFs included) support:
Join our Discord server