Pre-planning Schema Migrations
When using the declarative workflow, users have the option to save migration plans to be reviewed and approved before applying them to the database.
Note: If you are not familiar with the atlas schema apply command, please refer to the Applying Schema Changes
guide first.
The atlas schema plan command is available exclusively to Pro users. To use this feature, run:
atlas login
Overview
Declarative schema changes can be approved in one of the following ways:
- Manual review and approval by a human
- Automatic approval using the
--auto-approveflag, though this may be risky in a production database - Automatic approval based on the lint-review policy, which requires human review only if the linter detects issues or errors
These options depend on the database state and cannot predict whether the migration will succeed, fail, or abort.
This is where atlas schema plan becomes useful.
The atlas schema plan command allows users to pre-plan, review, and approve migrations before executing atlas schema apply
on the database. This enables users to preview and modify SQL changes, involve team members in the review process, and ensure
that no human intervention is required during the atlas schema apply phase.
How does it work?
In short (more details below), atlas schema plan generates a migration plan for the specified Schema Transition
(State1 -> State2) and stores it in the Atlas Registry.
During atlas schema apply, Atlas checks if there is an approved migration plan for this specific schema transition and
applies it without recalculating SQL changes at runtime or requiring user approval.
Local Example
Let's consider a simple example. We have a table users with two columns id and name, and we want to add a new column
email to the table.
Setup
First, you should have your schema-as-code definition of our current schema state (schema.sql in this example) and an atlas.hcl
configuration file containing the name of the Atlas Registry schema repository we will be using (app).
- Schema Definition
- Config File
CREATE TABLE users (
  id INTEGER PRIMARY KEY AUTOINCREMENT,
  name TEXT
);
env "local" {
  # URL to the target database
  url = "sqlite://main.db"
  # URL to the dev-database
  dev = "sqlite://dev?mode=memory"
  schema {
    # Desired schema state
    src = "file://schema.sql"
    # Atlas Registry config
    repo {
      name = "app"
    }
  }
}
Run atlas schema push to create the schema in Atlas Registry:
> atlas schema push --env local

Schema: app
  -- Atlas URL: atlas://app
  -- Cloud URL: https://a8m.atlasgo.cloud/schemas/141733920781
Then, run atlas schema apply to align the database with the schema state:
atlas schema apply --env local --auto-approve
Changing the Schema
At this stage, we want to add a non-nullable email column to the users table. Let's update the schema.sql file and then run
atlas schema plan to generate a migration plan.
CREATE TABLE users (
  id INTEGER PRIMARY KEY AUTOINCREMENT,
  name TEXT,
  email TEXT NOT NULL
);
We run atlas schema plan to generate a migration plan for adding the email column to the users table:
atlas schema plan --env local
The output looks like this:
Planning migration from local database to file://schema.sql (1 statement in total):

  -- add column "email" to table: "users":
    -> ALTER TABLE `users` ADD COLUMN `email` text NOT NULL;

-------------------------------------------

Analyzing planned statements (1 in total):

  -- data dependent changes detected:
    -- L2: Adding a non-nullable "text" column "email" will fail in case table "users"
       is not empty https://atlasgo.io/lint/analyzers#MF103
  -- ok (346.192µs)

  -------------------------
  -- 5.038728ms
  -- 1 schema change
  -- 1 diagnostic
? Approve or abort the plan:
  ▸ Approve and push
    Abort
Data-Dependent Changes
Atlas detects data-dependent changes in the migration plan and provides a diagnostic message. In this case, it warns
that adding the non-nullable email column, will fail if the users table is not empty. The recommended solution is to
provide a default value for the new column.
We'll "Abort" this plan and fix it by adding a default value to the email column:
CREATE TABLE users (
  id INTEGER PRIMARY KEY AUTOINCREMENT,
  name TEXT,
  email TEXT NOT NULL DEFAULT 'unknown'
);
Now, we run atlas schema plan again to generate a new migration plan and approve it:
atlas schema plan --env local
Planning migration from local database to file://schema.sql (1 statement in total):

  -- add column "email" to table: "users":
    -> ALTER TABLE `users` ADD COLUMN `email` text NOT NULL DEFAULT 'unknown';

-------------------------------------------

Analyzing planned statements (1 in total):

  -- no diagnostics found

  -------------------------
  -- 6.393773ms
  -- 1 schema change
? Approve or abort the plan:
  ▸ Approve and push
    Abort
Once approved, the migration plan will be pushed to the Atlas Registry and can be applied using atlas schema apply.
Plan Status: APPROVED
  -- Atlas URL: atlas://app/plans/20240923085308
  -- Cloud URL: https://a8m.atlasgo.cloud/schemas/141733920769/plans/210453397504
At this stage, we can run atlas schema apply to apply the changes to the database on any environment without
re-calculating the SQL changes at runtime or requiring human intervention.
Applying approved migration using pre-planned file 20240923085308 (1 statement in total):

  -- add column "email" to table: "users"
    -> ALTER TABLE `users` ADD COLUMN `email` text NOT NULL DEFAULT 'unknown';
  -- ok (749.815µs)

  -------------------------
  -- 802.902µs
  -- 1 migration
  -- 1 sql statement
Atlas Registry
Atlas Registry allows you to store, version, and maintain a single source of truth for your database schemas and its migration plans. It is similar to Docker Hub, but for your schemas and migrations.
In addition to functioning as storage, it is schema-aware and provides extra capabilities such as ER diagrams, SQL diffing, schema docs, and more.
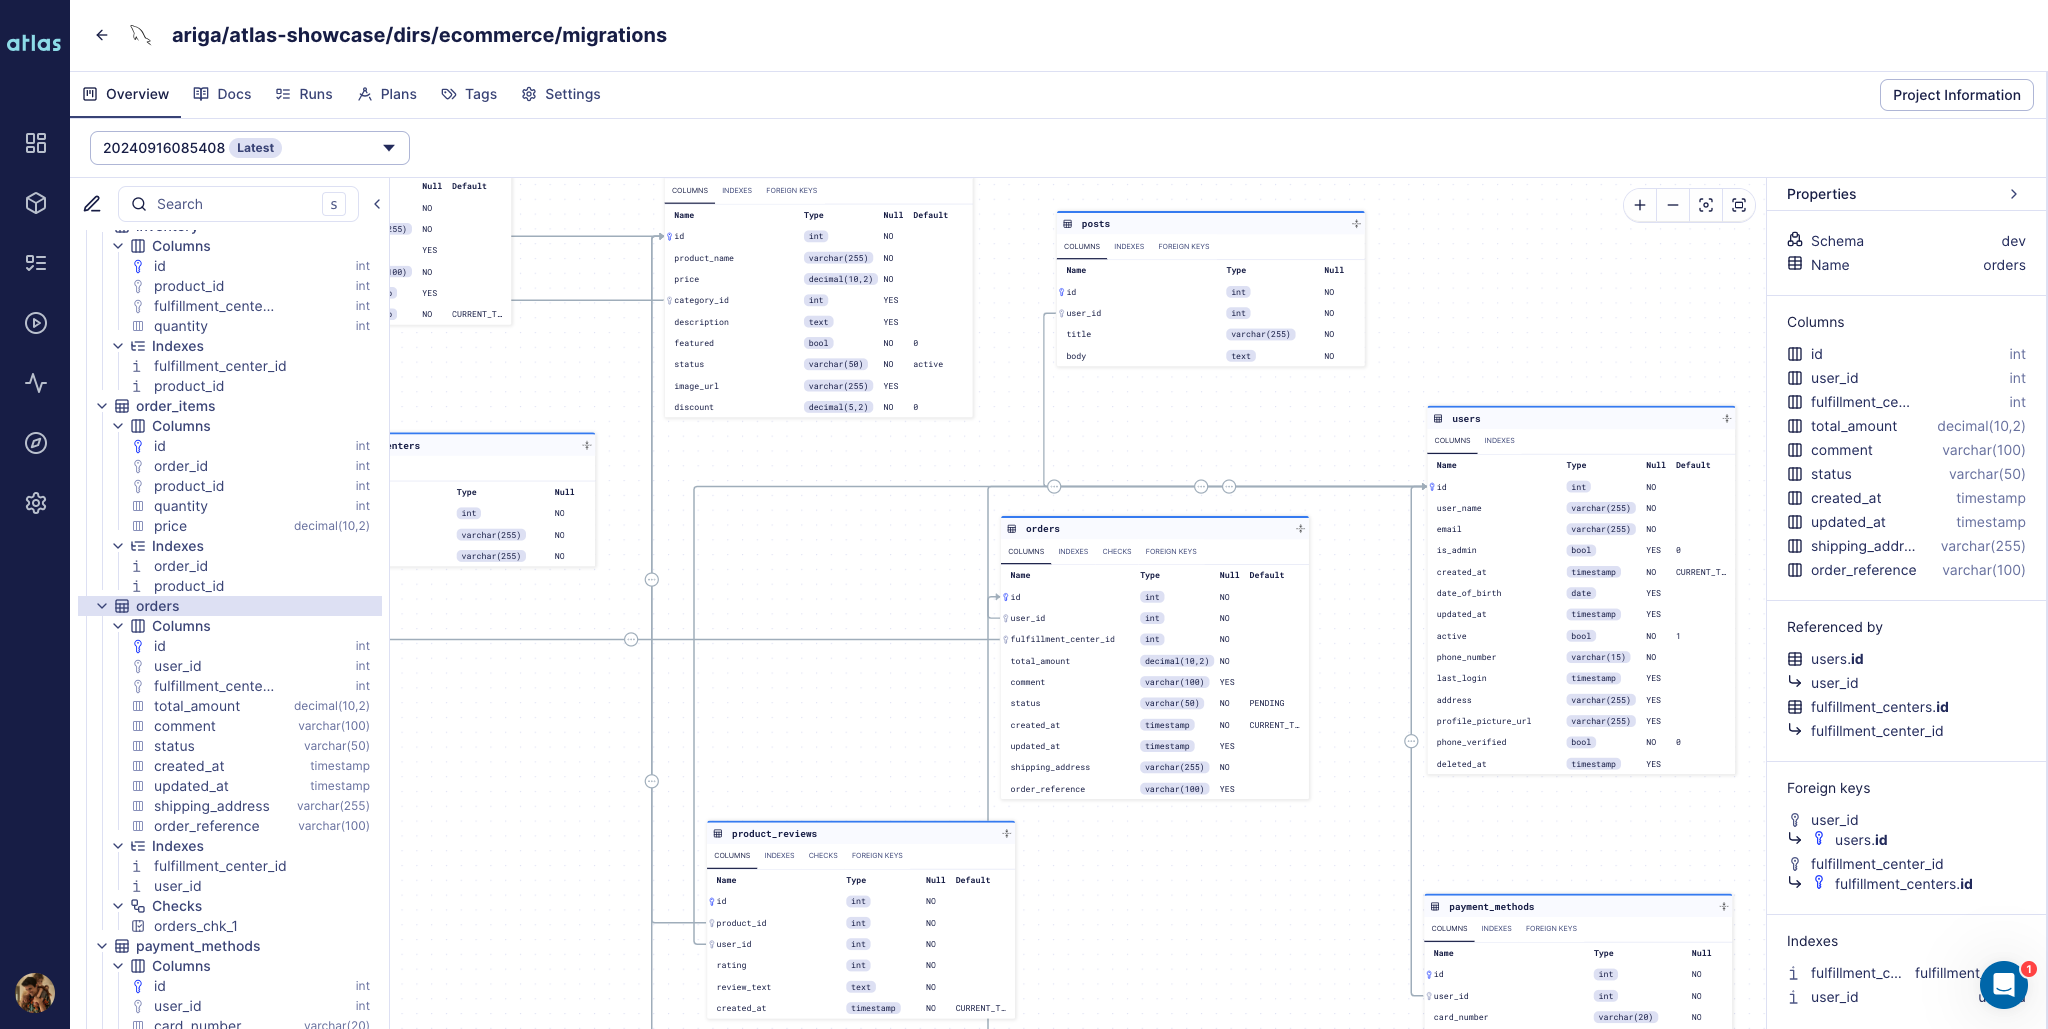
Schema pushed with atlas schema push
Edit a Plan
One of the first questions that come to mind when comparing the declarative approach to the versioned approach is: Can I edit a migration plan?
There are three ways to edit a migration plan:
-
Edit in-place:
- Ensure the
EDITORenvironment variable is set (e.g.,export EDITOR=vim). - Run
atlas schema plan --editto open the plan in the default editor. Upon closing, the plan will be pushed after approval.
- Ensure the
-
Save, edit, and push:
- Run
atlas schema plan --saveto save the plan to a file and edit it manually. - Run
atlas schema plan push --file file://<path> --env <config-env>to push the edited plan to the Atlas Registry.
- Run
-
Pull, edit, and push:
- Pull a remote plan by running
atlas schema plan pull --url atlas://<schema>/plans/<plan> > name.plan.hcl. - Open
name.plan.hclin the editor, and edit themigrationattribute. - Push the edited plan to the Atlas Registry by running
atlas schema plan push --file file://<path>.
- Pull a remote plan by running
Example
Let's edit the migration plan from the example above by changing all email
columns with 'unknown' value to a computed email value:
- First, we pull the plan into a file named
20240923085308.plan.hcl:
atlas schema plan pull --url atlas://app/plans/20240923085308 > 20240923085308.plan.hcl
plan "20240923085308" {
  from      = "vJYpErjN4kWJpw4nRaJcEX3xx/jExj4a05Ll3Y7gXr4="
  to        = "B5OVckDEeHcaSdYCUMEfYe8CZN85ahLkef44hfwCe2g="
  migration = <<-SQL
  -- Add column "email" to table: "users"
  ALTER TABLE `users` ADD COLUMN `email` text NOT NULL DEFAULT 'unknown';
  SQL
}
Note that the from and to are fingerprints of the schema states. They are used to identify the states in the
schema transition. We will ignore them for now (without changing them, of course) and focus on the migration attribute.
- Next, we edit the
migrationattribute to change all rows with'unknown'emails to a computed email value:
plan "20240916133205" {
  from      = "vJYpErjN4kWJpw4nRaJcEX3xx/jExj4a05Ll3Y7gXr4="
  to        = "B5OVckDEeHcaSdYCUMEfYe8CZN85ahLkef44hfwCe2g="
  migration = <<-SQL
  -- Add column "email" to table: "users"
  ALTER TABLE `users` ADD COLUMN `email` text NOT NULL DEFAULT 'unknown';
  -- Change all unknown "email" columns with a new computed email
  UPDATE `users` SET `email` = PRINTF('%s+a8m@atlasgo.cloud', `name`) WHERE `email` = 'unknown';
  SQL
}
- Then, we push the edited plan to the Atlas Registry:
atlas schema plan push --file file://20240923085308.plan.hcl
Planning migration statements (2 in total):

  -- add column "email" to table: "users":
    -> ALTER TABLE `users` ADD COLUMN `email` text NOT NULL DEFAULT 'unknown';
  -- change all unknown "email" columns with a new computed email
    -> UPDATE `users` SET `email` = PRINTF('%s+a8m@atlasgo.cloud', `name`) WHERE `email` = 'unknown';

-------------------------------------------

Analyzing planned statements (2 in total):

  -- no diagnostics found

  -------------------------
  -- 43.566575ms
  -- 2 schema changes
? Approve or abort the plan:
  ▸ Approve and push
    Abort
Once approved, the migration plan will be pushed to the Atlas Registry.
Note that if your manual changes are not in sync with the desired state (i.e., do not bring the database to the desired state), Atlas will detect the schema drift and reject this migration plan.
-
Running
atlas schema applywill apply the changes to the database, including the newUPDATEstatement.Applying approved migration using pre-planned file 20240923085308 (2 statements in total):
-- add column "email" to table: "users"
-> ALTER TABLE `users` ADD COLUMN `email` text NOT NULL DEFAULT 'unknown';
-- ok (826.977µs)
-- change all unknown "email" columns with a new computed email
-> UPDATE `users` SET `email` = PRINTF('%s+a8m@atlasgo.cloud', `name`) WHERE `email` = 'unknown';
-- ok (447.152µs)
-------------------------
-- 1.353026ms
-- 1 migration
-- 2 sql statements
Approve a Plan
By default, atlas schema plan pushes plans in an APPROVED state to the Atlas Registry. However, in some cases,
we may prefer to create the plan in a PENDING state and approve it later after it passes the team's review.
There are two ways to create a plan in a PENDING state and approve it after review:
- Manual workflow:
- Run
atlas schema plan --pending - Run
atlas schema plan approveor go to the Atlas Registry Web UI to approve the plan
- Run
- Automated (CI) workflow:
- When setting the
schema/planGitHub Action for your repository, Atlas automatically creates a plan in aPENDINGstate. - Then, after the PR is merged, Atlas auto-approves the created plan in the Atlas Registry.
- When setting the
Users can protect their registry schemas by limiting who can push changes, push approved plans, or approve existing plans.
To enable this for your schema, go to the schema repository settings in the Atlas Registry and enable the Protected Flows option.
Pull a Plan
To pull a plan from the Atlas Registry, use the atlas schema plan pull command:
atlas schema plan pull \
  --url atlas://app/plans/add_email > add_email.plan.hcl
Lint a Plan
To lint a plan (remote or local) before pushing it to the Atlas Registry, use the atlas schema plan lint command:
atlas schema plan lint \
  --file file://add_email.plan.hcl \
  --env local
Handling Multiple Plans
Running atlas schema apply searches for a migration plan in the Atlas Registry and applies it to the database, if it exists.
However, in unusual cases, you may have multiple (approved) migration plans for the same schema transition (e.g., one per environment).
In that case, running atlas schema apply will abort with the following error:
Error: multiple pre-planned migrations were found in the registry for this schema transition.

  Current hash: vJYpErjN4kWJpw4nRaJcEX3xx/jExj4a05Ll3Y7gXr4=
  Desired hash: hna312Vk535aibL1hTRcBlxeyUvIwV6Mov7kfaZ2+3s=

Plans found:

  atlas://app/plans/<plan-one>
  atlas://app/plans/<plan-two>

To resolve the issue, either delete the conflicting plans or provide the plan URL explicitly using the --plan flag.
In this case, we either delete the conflicting plans from the Atlas Registry or provide the plan URL explicitly using
the --plan flag:
> atlas schema apply \
  --env local \
  --plan 20240923085308

Applying approved migration using pre-planned file 20240923085308 (2 statements in total):

  -- add column "email" to table: "users"
    -> ALTER TABLE `users` ADD COLUMN `email` text NOT NULL DEFAULT 'unknown';
  -- ok (789.621µs)

  -- change all unknown "email" columns with a new computed email
    -> UPDATE `users` SET `email` = PRINTF('%s+a8m@atlasgo.cloud', `name`) WHERE `email` = 'unknown';
  -- ok (883.177µs)

  -------------------------
  -- 1.77283ms
  -- 1 migration
  -- 2 sql statements
List Plans
To list all plans in the Atlas Registry for the given schema transition, use the atlas schema plan list command:
atlas schema plan list \
  --env local
Plan Status: APPROVED
  -- Atlas URL: atlas://app/plans/add_email
  -- Cloud URL: https://<tenant>.atlasgo.cloud/schemas/<schema-id>/plans/<plan-id>
GitHub Actions
Atlas provides an official GitHub Actions integration to automatically plan, review, and approve declarative schema migrations within PR workflows.
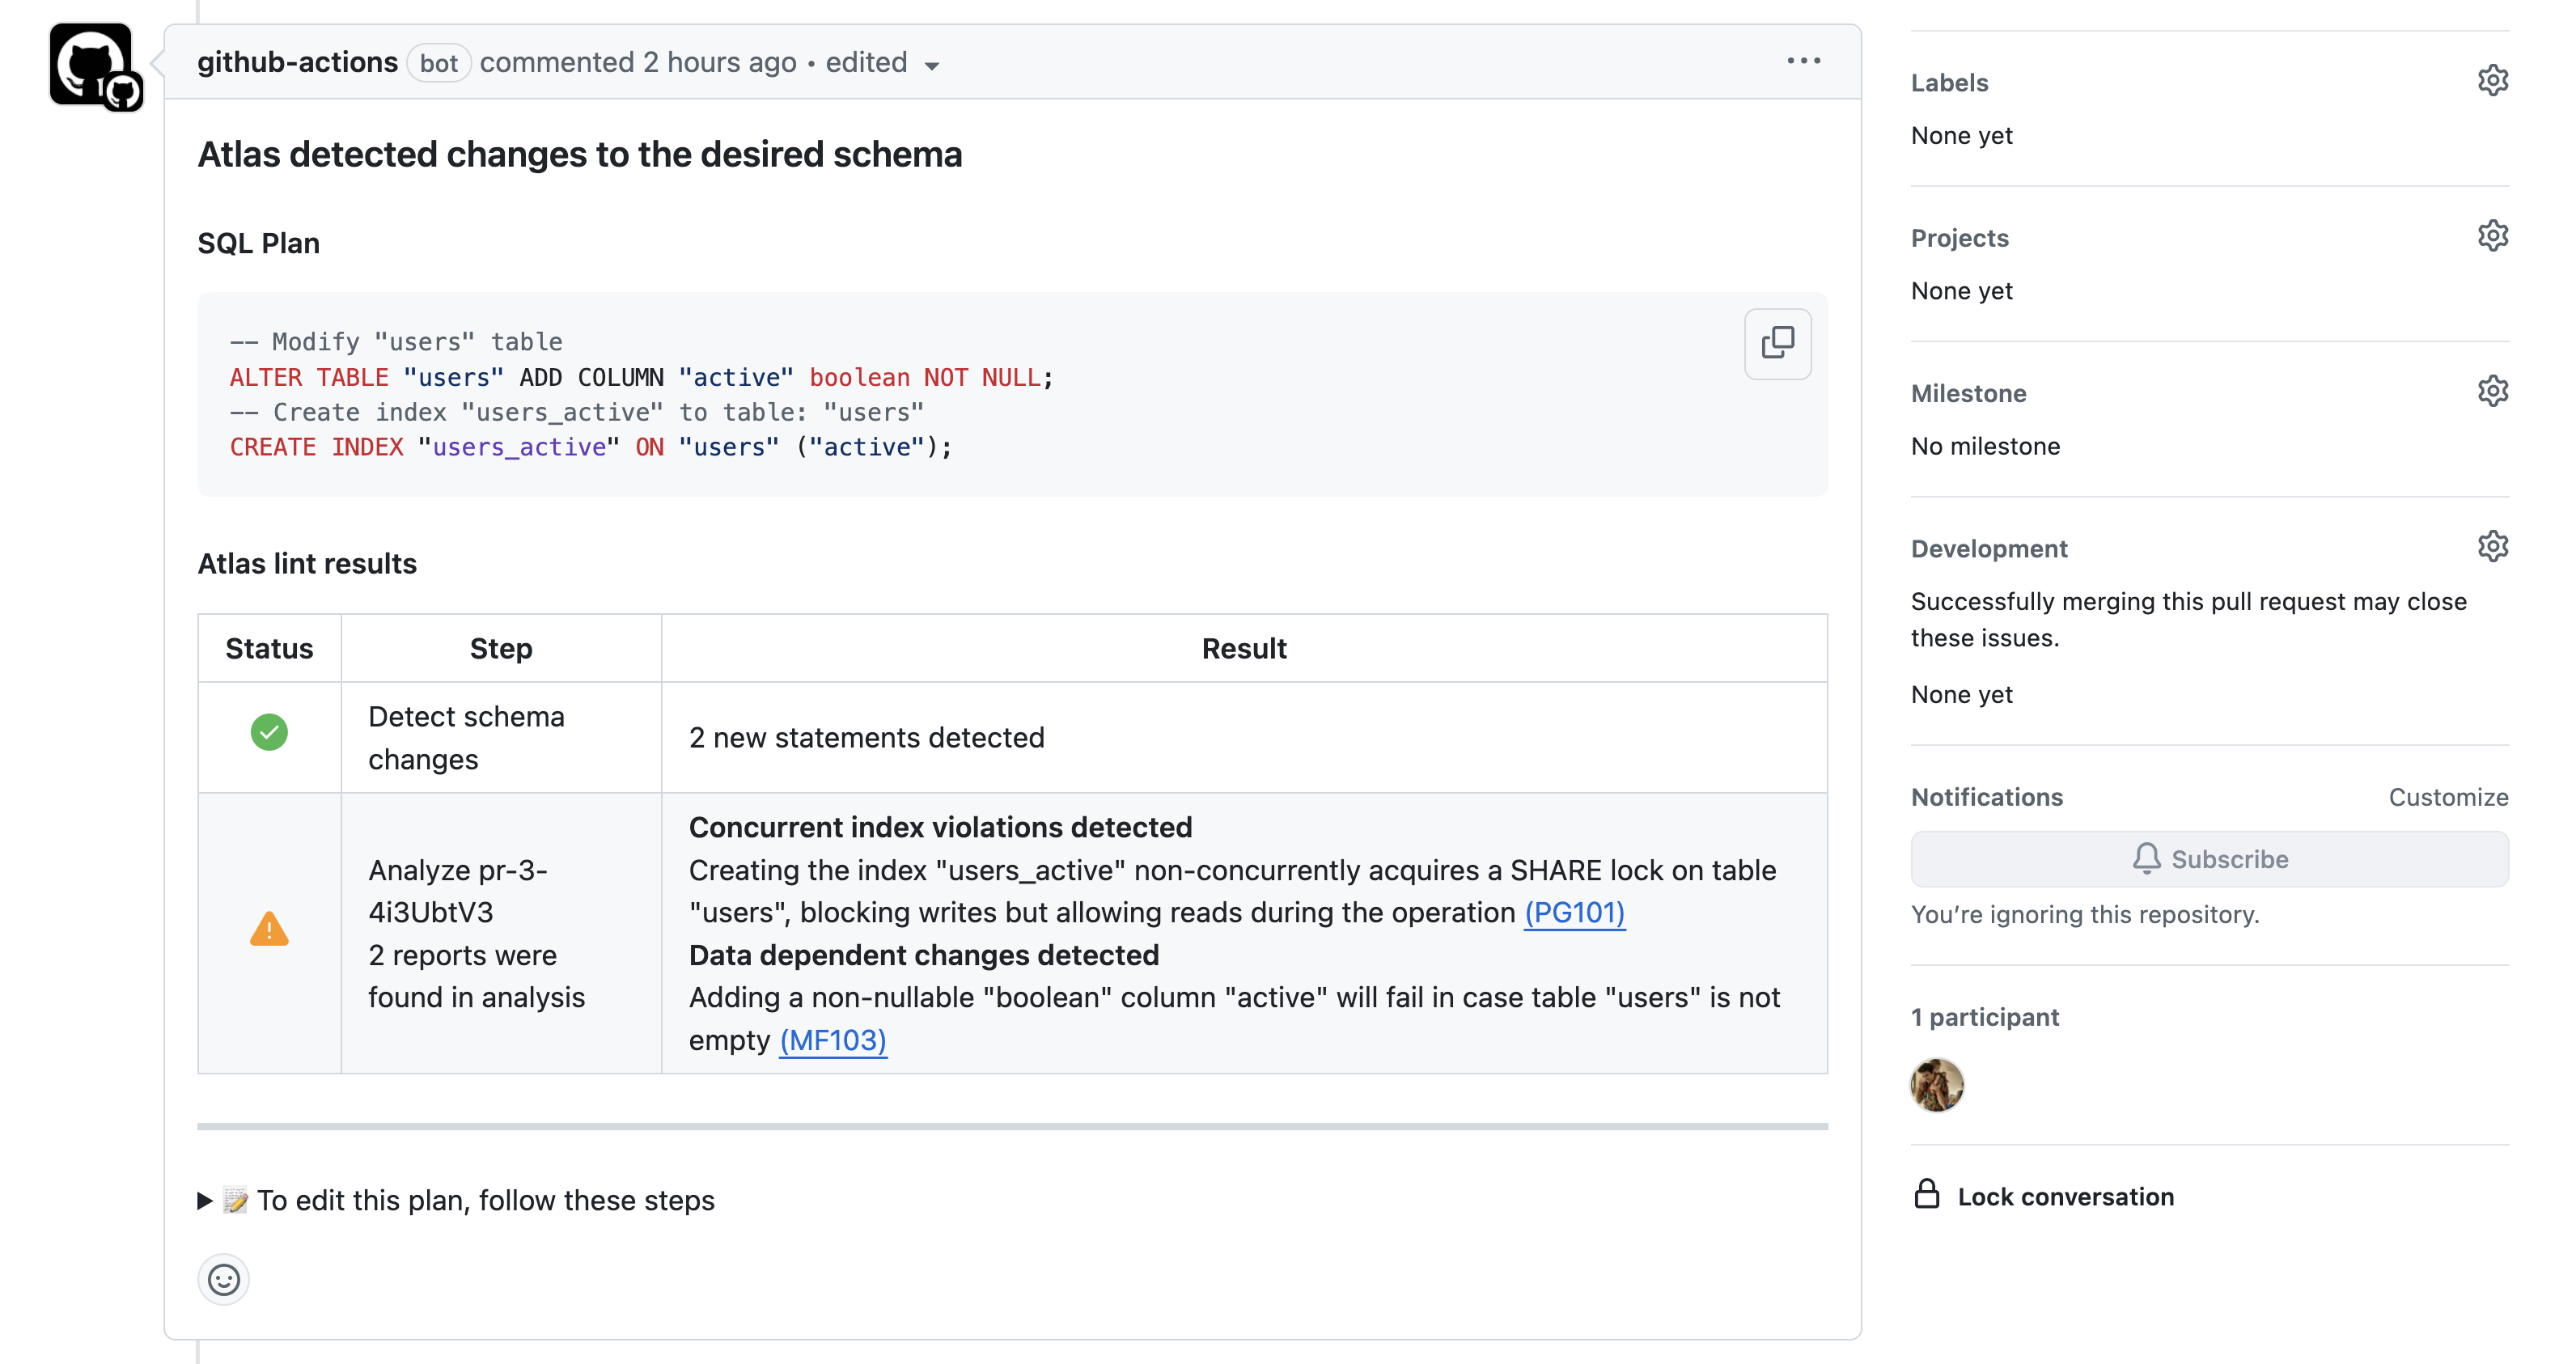
Plan Generated by atlas schema plan
Let's see how this works by going through an example:
Create a Schema Repository in Atlas Registry
Let's create a schema repository named demo in Atlas Registry with the following SQL schema:
- Schema Definition
- Config File
CREATE TABLE users (
  id BIGSERIAL PRIMARY KEY
);
env "dev" {
  # The URL to the dev-database.
  dev = "docker://postgres/15/dev?search_path=public"
  schema {
    # Desired schema state.
    src = "file://schema.sql"
    # Atlas Registry config.
    repo {
      name = "demo"
    }
  }
}
To create the schema repository in the Atlas Registry, run the following command:
> atlas schema push --env dev

https://<your-tenant>.atlasgo.cloud/schemas/141733920769
Set up the schema/push Action
To keep our schema repository up-to-date with the latest changes, we can set up the schema/push GitHub Action. This
automatically pushes the schema to the Atlas Registry whenever changes are made to schema.sql:
name: Plan Declarative Migrations
on:
  push:
    branches:
      - master
    paths:
      - .github/workflows/atlas-plan-push.yaml
      - 'schema.sql' # Can be a path to HCL, ORM, other instead.
permissions:
  contents: read
jobs:
  push:
    runs-on: ubuntu-latest
    steps:
      - uses: actions/checkout@v3
        with:
          fetch-depth: 0
      - uses: ariga/setup-atlas@v0
        with:
          cloud-token: ${{ secrets.ATLAS_TOKEN }}
      - uses: ariga/atlas-action/schema/push@v1
        with:
          env: dev # Use the "dev" environment from the atlas.hcl file.
To push the schema to Atlas Registry from your GitHub Action, set up a GitHub secret named ATLAS_TOKEN using your Atlas
Cloud token. To create a token, follow these instructions.
Set up the schema/plan and schema/plan/approve Actions
The last step is to update our workflow file with the schema/plan and schema/plan/approve Actions:
schema/planautomatically plans the schema migration whenever changes are made to the SQL schema file. After a plan is created, it is pushed to the Atlas Registry inPENDINGstate.schema/plan/approveautomatically approves the pending plan in the Atlas Registry when the PR is merged to the master branch.
To avoid a race condition between the push and plan workflows, we can merge them into a single workflow.
Plan Inputs
from- Defines the current state of the schema to calculate the migration from. If not provided, Atlas will use theurlin theatlas.hclfile (same asatlas schema apply). If theurlattribute is not set, Atlas will use the last known state from the Atlas Registry.to- Defines the desired state of the schema to calculate the migration to. If not provided, Atlas will use theschema.srcattribute in theatlas.hclfile.
Make sure schema/plan and schema/plan/approve receive the same database URL used by schema/apply.
Without it, schema/plan will default to using the last known state from the Atlas Registry, which may differ from
your actual database state. This becomes critical when passing an explicit plan to apply (e.g., --plan flag or
plan: input in CI). The plan's "from" state must match the actual database state, otherwise you'll get:
Abort: The plan "From" hash does not match the current state hash
To fix this, pass the database URL as an environment variable or use the from input in all steps.
name: Plan Declarative Migrations
on:
  workflow_dispatch:
  push:
    branches:
      - master
    paths:
      - .github/workflows/atlas-plan-push.yaml
      - 'schema.sql'
  pull_request:
    branches:
      - master
    paths:
      - .github/workflows/atlas-plan-push.yaml
      - 'schema.sql'
permissions:
  contents: read
  pull-requests: write
jobs:
  plan:
    name: plan
    if: ${{ github.event_name == 'pull_request' }}
    runs-on: ubuntu-latest
    steps:
      - uses: actions/checkout@v4
      - name: Setup Atlas
        uses: ariga/setup-atlas@v0
        with:
          cloud-token: ${{ secrets.ATLAS_TOKEN }}
      - name: Run schema plan
        uses: ariga/atlas-action/schema/plan@v1
        env:
          GITHUB_TOKEN: ${{ github.token }}
        with:
          env: dev
  approve-push:
    name: approve-push
    if: ${{ github.event_name == 'push' && github.ref == 'refs/heads/master' }}
    runs-on: ubuntu-latest
    env:
      GITHUB_TOKEN: ${{ github.token }}
    steps:
      - uses: actions/checkout@v4
      - name: Setup Atlas
        uses: ariga/setup-atlas@v0
        with:
          cloud-token: ${{ secrets.ATLAS_TOKEN }}
      # Plan against the latest schema state (one before the PR).
      - name: Approve the plan
        id: plan-approve
        uses: ariga/atlas-action/schema/plan/approve@v1
        with:
          env: dev
      # Push the schema after the plan is approved.
      - name: Push the schema
        id: schema-push
        uses: ariga/atlas-action/schema/push@v1
        with:
          env: dev
Control the Plan with PR Comments
In addition to the local edit flow, you can comment Atlas directives directly on the PR to control the generated
migration. These directives, similar to GitHub Slash Commands, are parsed by the schema/plan action and translated into
Atlas migration directives.
Some examples:
-
Migration linting flags destructive changes as errors unless configured otherwise. However, you can use the
/atlas:nolint destructivedirective in the PR description to append this directive to the plan and ignore linting diagnostics for destructive changes. -
The
schema applycommand executes migration plans within a transaction unless set tononeusing the--txmodeflag. Some migrations, however, cannot be run in a transaction. In such cases, you can use the/atlas:txmode nonedirective in the PR description to set the transaction mode tonone, and Atlas will respect this during theschema applystage.
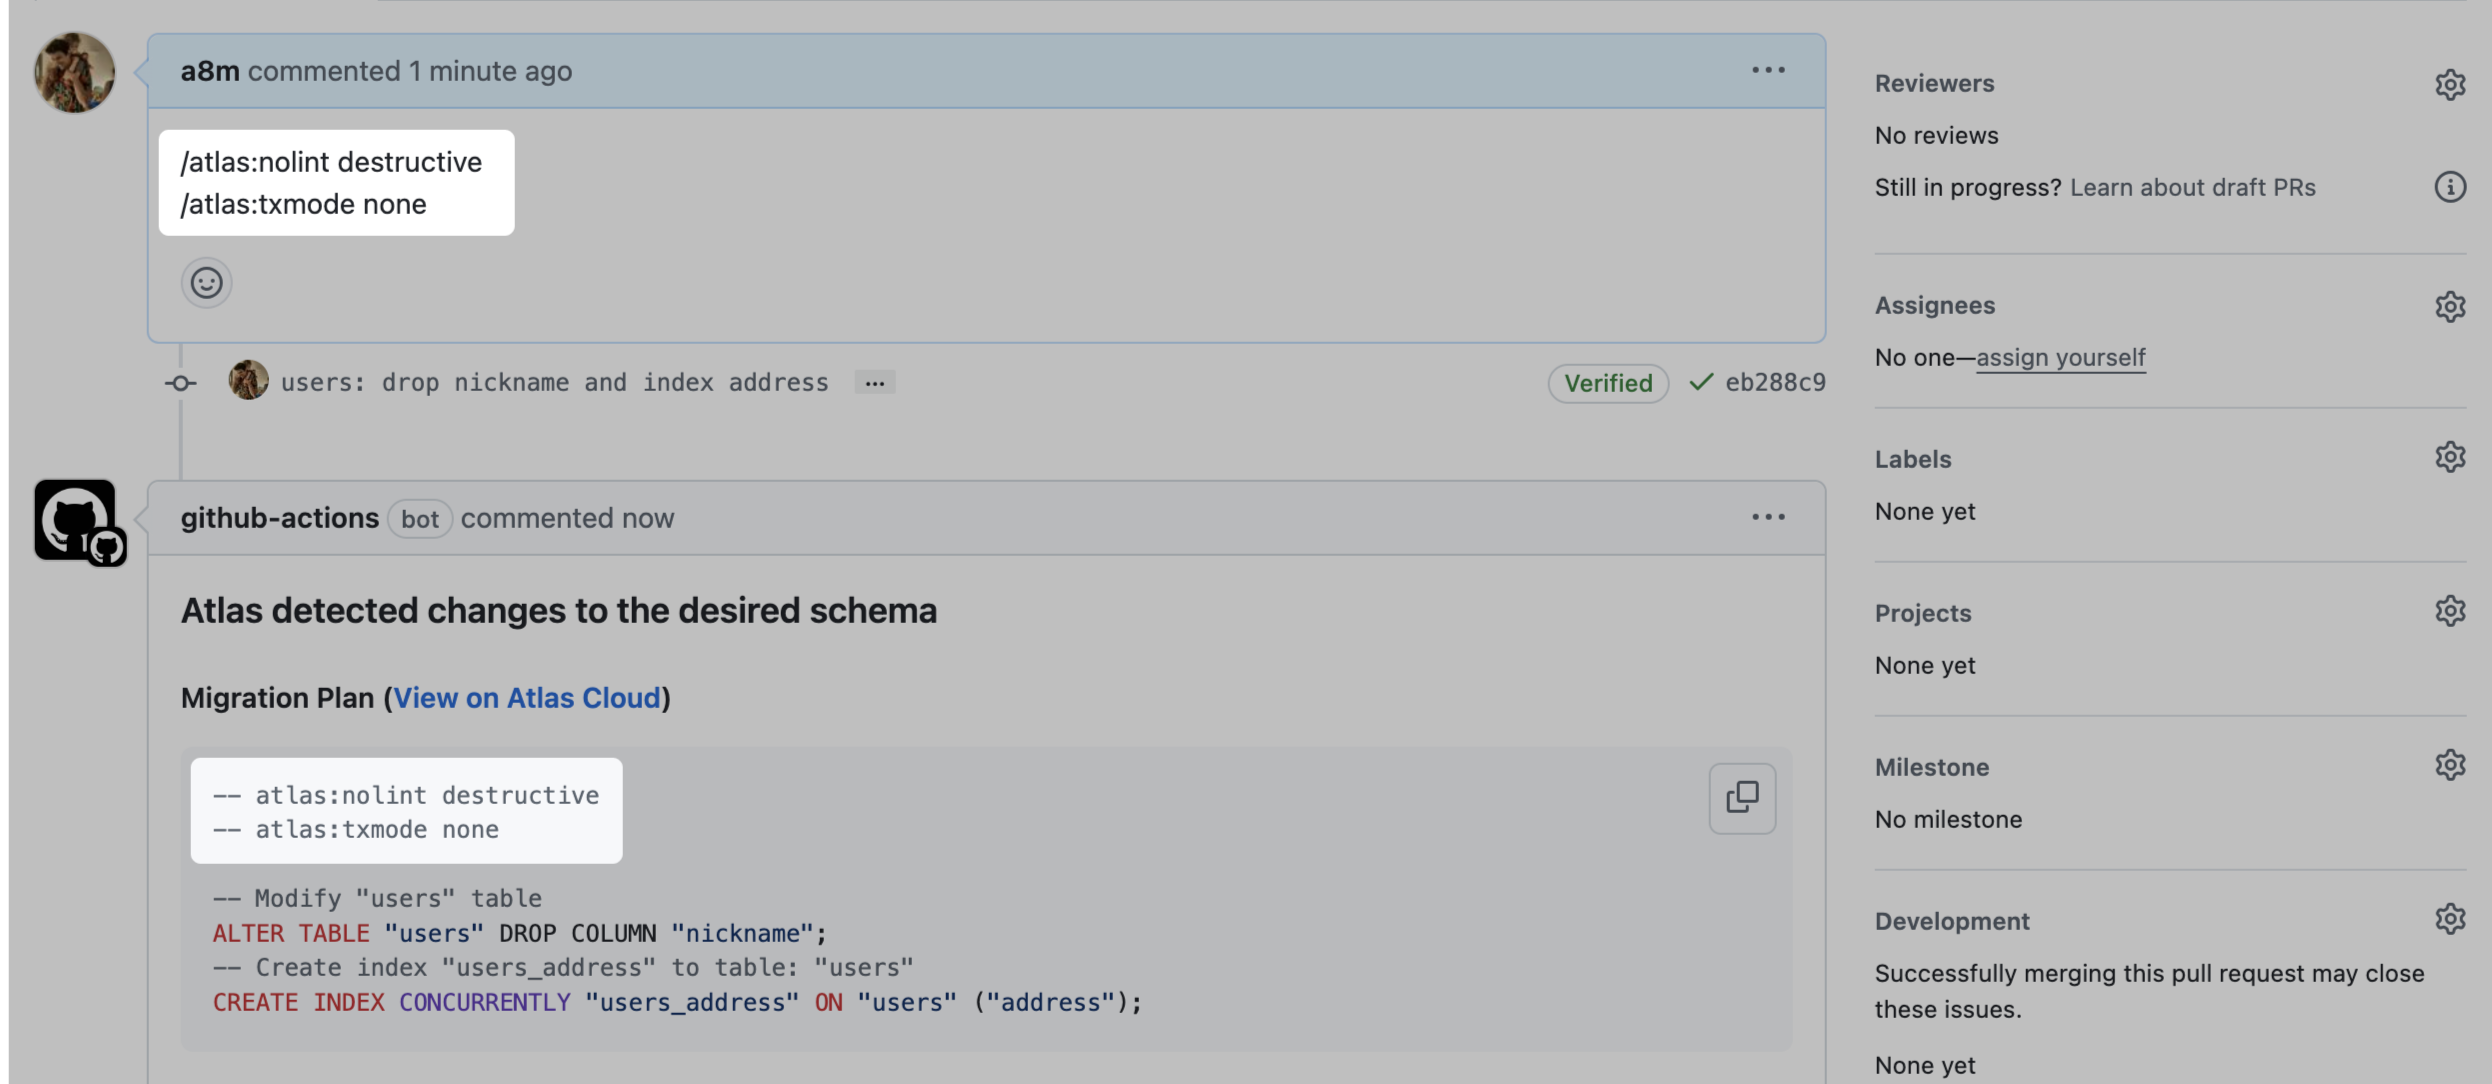
Adding directives in the PR