Pre-approved Declarative Schema Migrations Using GitHub Actions
Introduction
One of the main benefits of moving schema changes into a declarative workflow is the ability to offload the responsibility of planning schema changes from developers to a specialized tool. However, since the database is such a critical part of applications, many organizations still want to have a human in the loop to approve schema changes before they are applied.
With pre-approvals, schema changes are planned during the development or CI process and stored in the schema registry.
How Pre-approvals work
Pre-approvals work by adding two automated steps to the schema change process:
-
Plan Generation - When a schema change is detected, the CI pipeline runs the
atlas schema plancommand to create a migration plan by diffing the target database against the desired schema. The CI runner must have Atlas installed and access to the database for this step.This is typically accomplished using the
ariga/atlas-action/schema/planGitHub Action but can be done using any method that can run theatlas schema plancommand. -
Plan Approval - The PR containing the schema changes is reviewed by a human. The migration plan is included in the PR description or as a comment. Once the plan is reviewed and approved, the PR is merged.
This step is manual and requires a human to review the changes and the migration plan.
Once the PR is merged, a second automated step stores the approved plan in the schema registry. This is typically done using the
ariga/atlas-action/schema/plan/approveGitHub Action.
Once the plan is stored in the registry, ariga/atlas-action/schema/apply behaves differently.
Every time the action is executed, it checks whether the corresponding migration plan has been approved:
- If the plan is approved, it will be used for the
schema/applyaction without recalculating the migration. - If the plan is not approved, the command fails and requires human intervention.
Guide: Pre-approval flows
In this guide, we demonstrate how to set up pre-approval flows for declarative migrations using GitHub Actions.
Step 1: Set up the Atlas Project
Let's start by setting up an Atlas project. In this guide we will be managing a simple Neon Postgres database and defining our desired schema using plain SQL files.
First, create a new repository on GitHub and clone it to your local machine.
In this directory, create a new file named schema.sql with the following content:
CREATE TABLE users (
    id SERIAL PRIMARY KEY,
    name VARCHAR(100) NOT NULL
);
Next, let's create the project configuration file atlas.hcl:
variable "db_url" {
  type = string
  default = getenv("DB_URL")
}

env {
  name = atlas.env
  url = var.db_url
  schema {
    src = "file://schema.sql"
    repo {
      name = "preapproval-gh"
    }
  }
  dev = "docker://postgres/16/dev"
}
Verify the project is set up correctly by running the following commands:
- Start a local database for development via Docker:
docker run --name postgres -e POSTGRES_PASSWORD=postgres -d -p 5432:5432 postgres
- Export the database URL to your environment:
export DB_URL="postgres://postgres:postgres@localhost:5432/postgres?search_path=public&sslmode=disable"
- Diff the current schema with the desired schema:
atlas schema diff --env local --from env://url --to env://schema.src --format "{{ sql . }}"
If everything is set up correctly, you should see the diff between the current schema (presumably empty) and the desired schema:
-- Create "users" table
CREATE TABLE "users" ("id" serial NOT NULL, "name" character varying(100) NOT NULL, PRIMARY KEY ("id"));
Finally, commit these changes to the mainline branch of your repository.
Step 2: Push to Schema Registry
Before proceeding, make sure you have an Atlas Cloud account and are logged in:
atlas login
If you don't have an account or need to log in, follow the instructions on the screen.
Now, push the schema to the registry:
atlas schema push --env local
If the push is successful, your output should resemble the following:
Schema: preapproval-gh
  -- Atlas URL: atlas://preapproval-gh
  -- Cloud URL: https://your-org.atlasgo.cloud/schemas/141733920820
You can visit the Cloud URL to see the schema in the registry.
Step 3: Set up CI & CD
Now that we have our schema in the registry, let's set up a GitHub Action to manage the pre-approval process.
-
You have a Bot Token with access to the registry repo we just pushed to. To learn how to create a Bot Token, please refer to the Atlas docs.
-
You add the Bot Token to your GitHub repository secrets as
ATLAS_TOKEN. To learn how, refer to the GitHub docs. -
You have a Neon database set up. To learn how to set up a Neon database, please refer to the Neon docs. You can also use any other database supported by Atlas.
-
You store the database URL in a GitHub secret named
NEON_DB_URL.
Next, create a new file in your repository named .github/workflows/pre-approval.yml with the following content:
name: Atlas Declarative Migrations

on:
  workflow_dispatch:
  push:
    branches:
      - master
  pull_request:
    branches:
      - master

permissions:
  contents: read
  pull-requests: write

jobs:
  plan:
    if: github.event_name == 'pull_request'
    name: Plan Migration
    runs-on: ubuntu-latest
    steps:
      - uses: actions/checkout@v4

      - name: Setup Atlas
        uses: ariga/setup-atlas@v0
        with:
          cloud-token: ${{ secrets.ATLAS_TOKEN }}

      - name: Run schema plan
        uses: ariga/atlas-action/schema/plan@v1
        env:
          GITHUB_TOKEN: ${{ github.token }}
        with:
          from: ${{ secrets.NEON_DB_URL }}
          env: "ci"

  deploy:
    if: github.event_name == 'push' && github.ref == 'refs/heads/master'
    name: Deploy Migration
    runs-on: ubuntu-latest
    env:
      GITHUB_TOKEN: ${{ github.token }}
    steps:
      - uses: actions/checkout@v4

      - name: Setup Atlas
        uses: ariga/setup-atlas@v0
        with:
          cloud-token: ${{ secrets.ATLAS_TOKEN }}

      - name: Approve the plan
        id: plan-approve
        uses: ariga/atlas-action/schema/plan/approve@v1
        with:
          from: ${{ secrets.NEON_DB_URL }}
          env: "cd"

      - name: Push the schema
        id: schema-push
        uses: ariga/atlas-action/schema/push@v1
        with:
          env: "cd"

      - name: Apply the schema
        id: schema-apply
        uses: ariga/atlas-action/schema/apply@v1
        with:
          url: ${{ secrets.NEON_DB_URL }}
          to: ${{ steps.schema-push.outputs.url }}
          env: "cd"
Then push the workflow to mainline branch
git checkout master
git add .
git commit -m "Setup pre-approval flow"
git push origin master
Let's break down the workflow's two main jobs:
On Pull Request
- Setup Atlas - This step sets up the Atlas CLI with the provided token.
- Run schema plan - This step runs the
atlas schema plancommand to generate a migration plan. The plan is then included in the PR description. These are the provided inputs:working-directory- The directory where the schema files are located.from- The database URL to compare against.env- The environment to use for the plan. We useciagain to mark this as a CI environment.
On Push to Master
- Setup Atlas - This step sets up the Atlas CLI with the provided token.
- Approve the plan - This step approves the plan generated in the previous step. The plan is then stored in the schema
registry. These are the provided inputs:
working-directory- The directory where the schema files are located.from- The database URL to compare against.env- The environment to use for the plan. We usecito differentiate between the CI environment and the local environment.
- Push the schema - This step pushes the schema to the schema registry. These are the provided inputs:
working-directory- The directory where the schema files are located.env- The environment to use for the plan. Again,cidenotes the CI environment.
- Apply the schema - This step applies the schema to the database. These are the provided inputs:
url- The database URL to apply the schema to.to- The URL of the schema in the schema registry.env- The environment to use for the plan. We usecdto mark this as a CD environment.
Step 4: Verify the workflow
Now that we have our CI and CD workflows set up, let's verify that everything is working correctly.
- Create a new branch in your repository and make a change to the
schema.sqlfile. For example, add a new column to theuserstable:
CREATE TABLE users (
    id SERIAL PRIMARY KEY,
    name VARCHAR(100) NOT NULL,
    email VARCHAR(100) NOT NULL
);
- Commit the changes and push them to your repository:
git checkout -b add-email-column
git add schema.sql
git commit -m "Add email column to users table"
git push origin add-email-column
- Create a pull request from the
add-email-columnbranch to themasterbranch. - The CI workflow should automatically run and generate a migration plan. You should see the migration plan in the PR
description or as a comment.
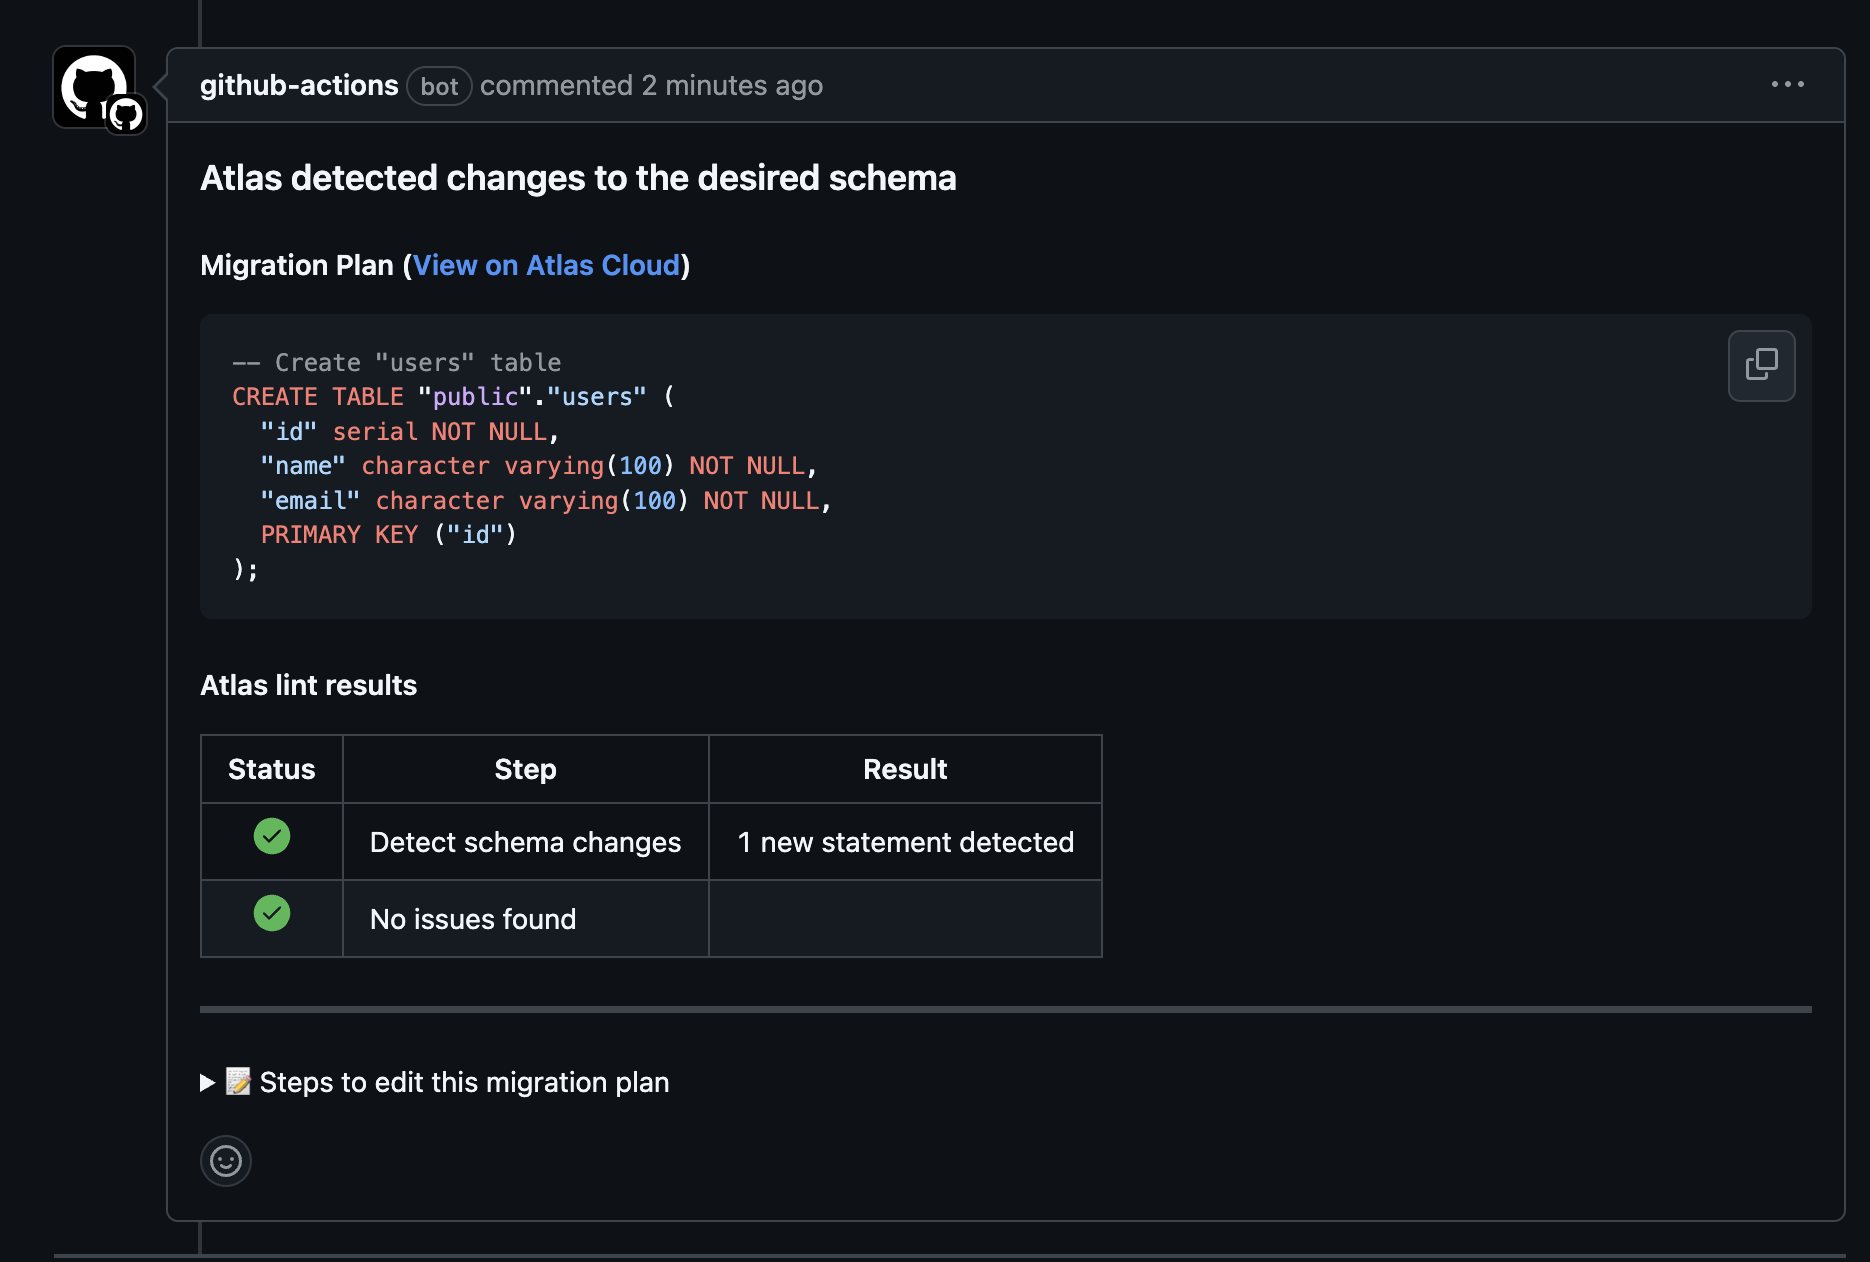
- Review the PR and the migration plan. Once you are satisfied with the changes, merge the PR.
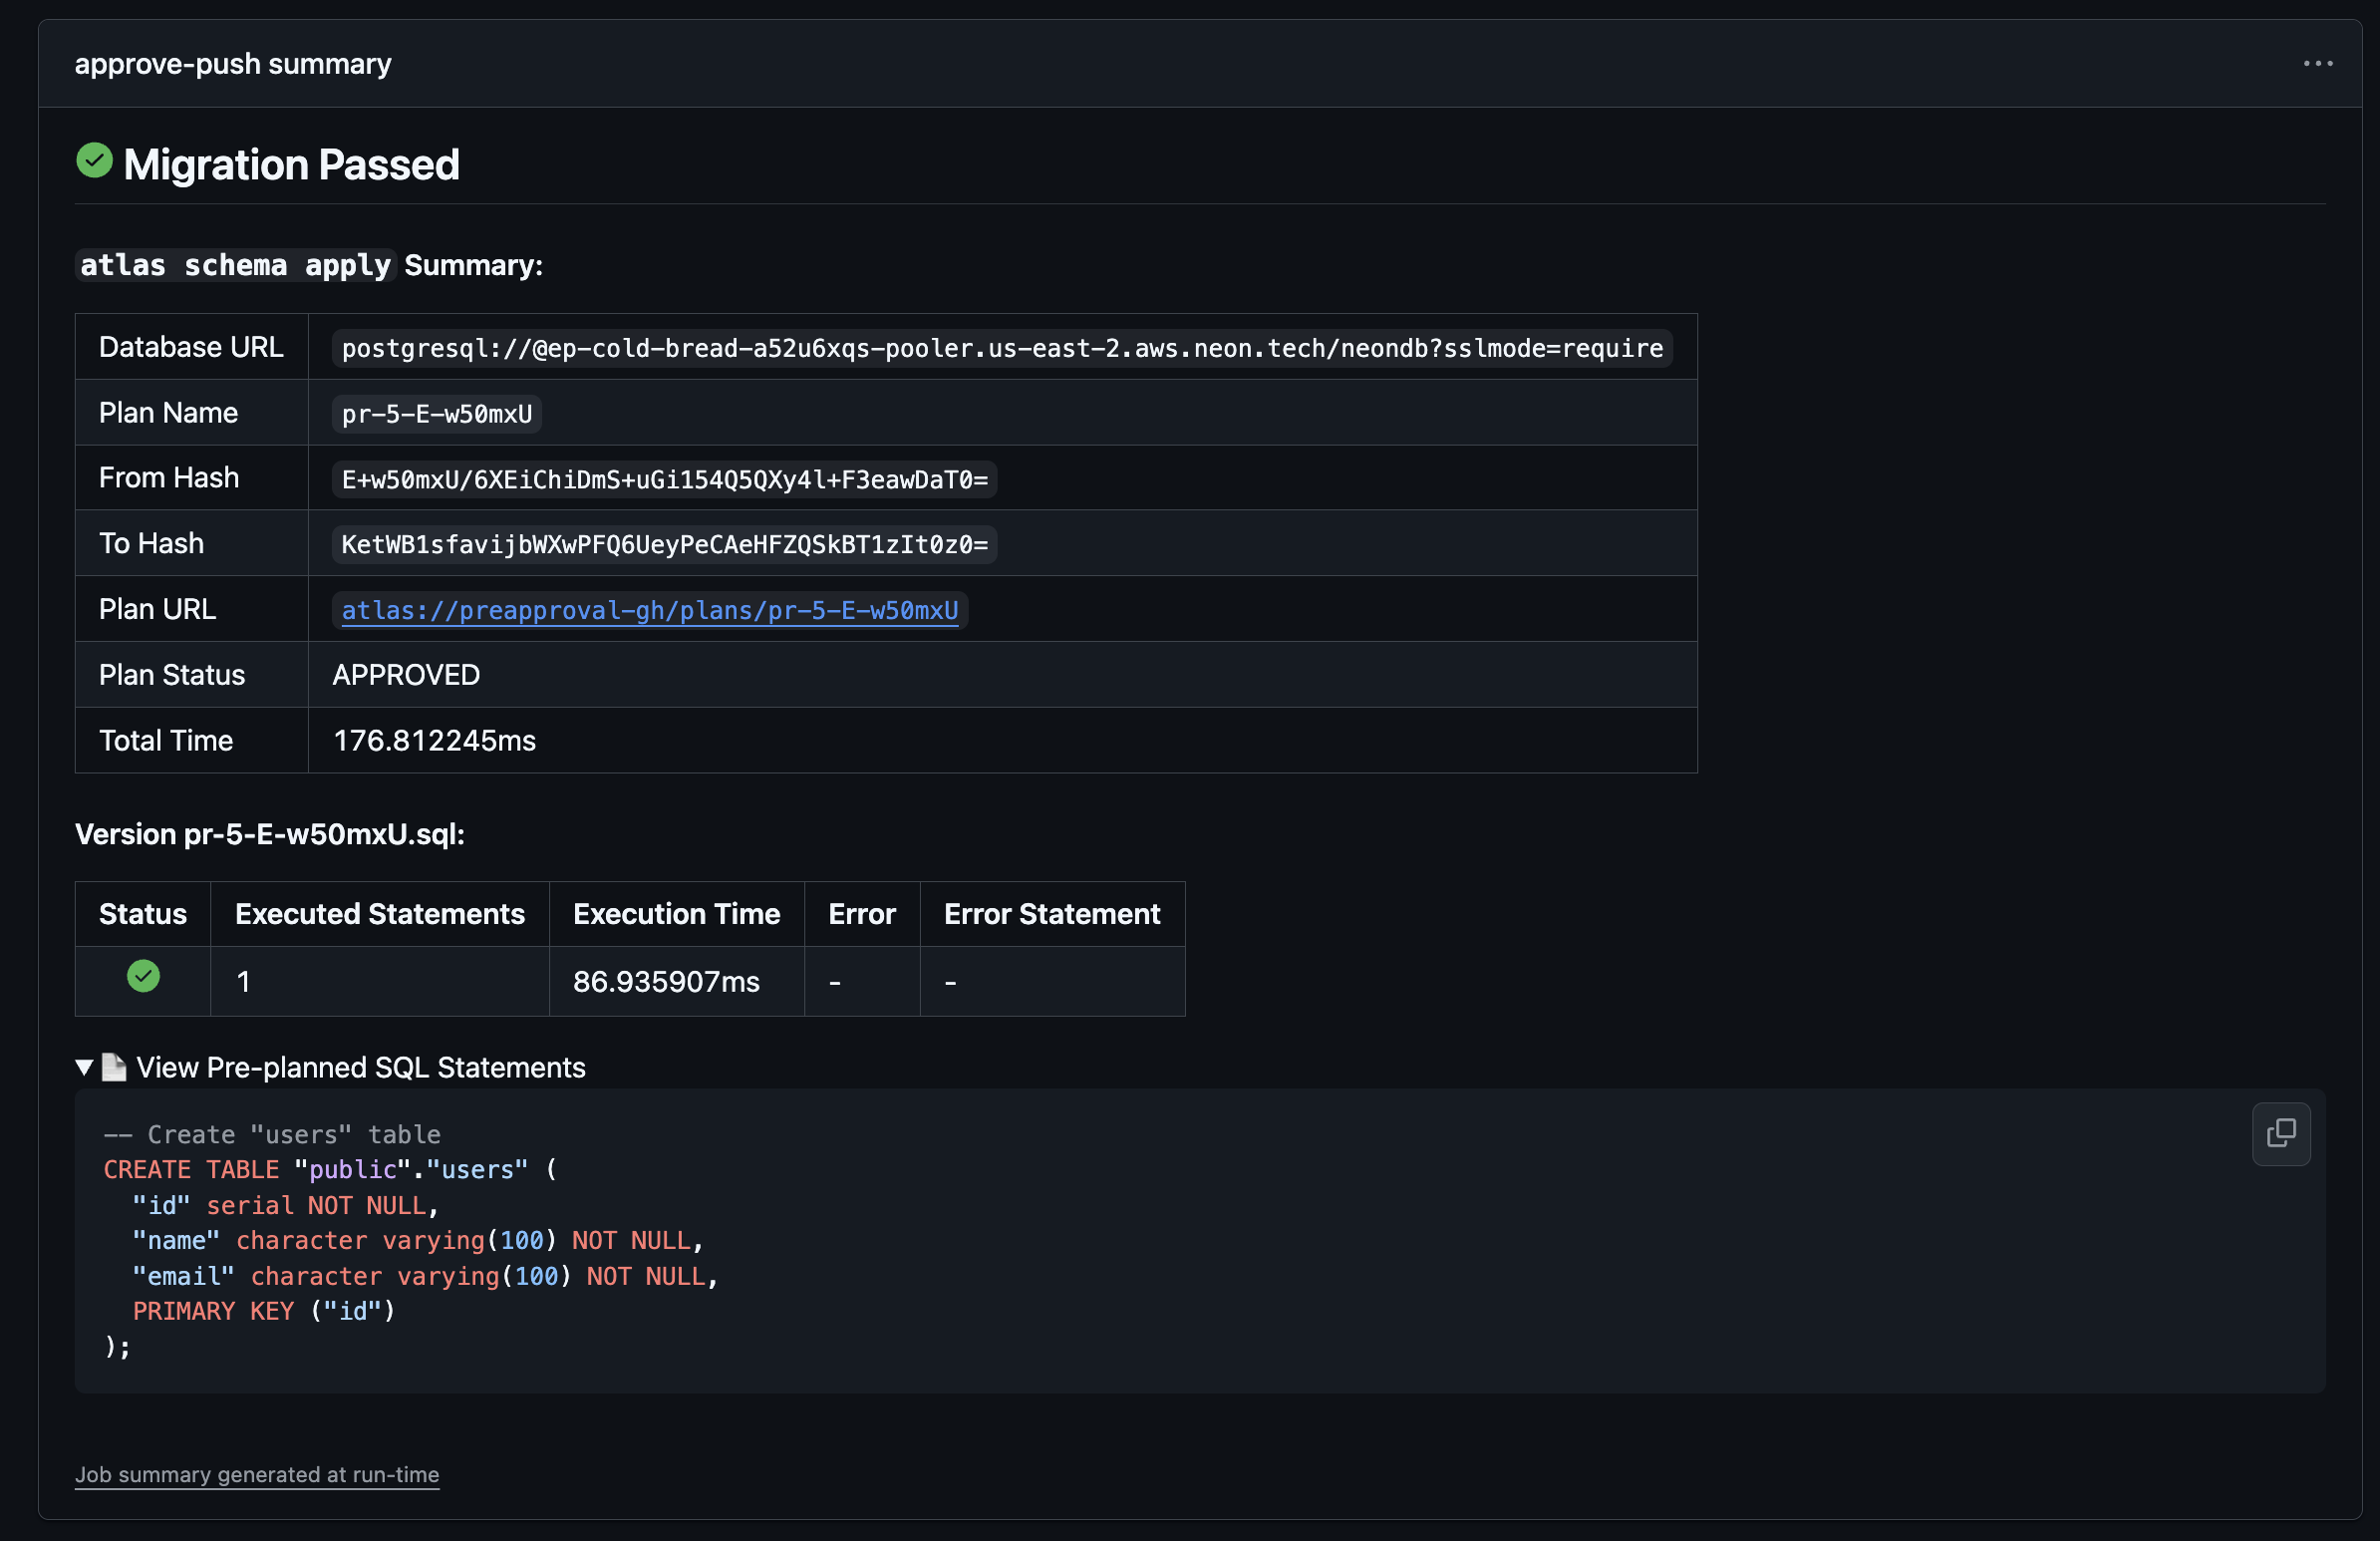
- The CD workflow should automatically approve and apply the migration plan. You should see the report in the GitHub Actions log:
Conclusion
In this guide, we demonstrated how to set up pre-approval flows for declarative migrations using GitHub Actions.