Automatic MySQL Schema Migrations with Atlas
MySQL is an open-source relational database management system. It offers powerful capabilities for handling complex queries, ensuring data integrity, and scaling to meet the needs of growing applications.
However, managing a large database schema in MySQL can be challenging due to the complexity of related data structures and the need for coordinated schema changes across multiple teams and applications.
Enter: Atlas
Atlas helps developers manage their database schema as code - abstracting away the intricacies of database schema management. With Atlas, users provide the desired state of the database schema and Atlas automatically plans the required migrations.
In this guide, we will dive into setting up Atlas for MySQL schema migration and introduce the different workflows available.
Prerequisites
- Docker
- Atlas installed on your machine:
- macOS + Linux
- Homebrew
- Docker
- Windows
- CI
- Manual Installation
To download and install the latest release of the Atlas CLI, simply run the following in your terminal:
curl -sSf https://atlasgo.sh | sh
Get the latest release with Homebrew:
brew install ariga/tap/atlas
To pull the Atlas image and run it as a Docker container:
docker pull arigaio/atlas
docker run --rm arigaio/atlas --help
If the container needs access to the host network or a local directory, use the --net=host flag and mount the desired
directory:
docker run --rm --net=host \
  -v $(pwd)/migrations:/migrations \
  arigaio/atlas migrate apply \
  --url "mysql://root:pass@:3306/test"
Download the latest release and move the atlas binary to a file location on your system PATH.
GitHub Actions
Use the setup-atlas action to install Atlas in your GitHub Actions workflow:
- uses: ariga/setup-atlas@v0
  with:
    cloud-token: ${{ secrets.ATLAS_CLOUD_TOKEN }}
Other CI Platforms
For other CI/CD platforms, use the installation script. See the CI/CD integrations for more details.
Inspecting our Database
Let's start off by spinning up a database using Docker:
docker run --rm -d --name atlas-demo -p 3306:3306 -e MYSQL_ROOT_PASSWORD=pass -e MYSQL_DATABASE=example mysql
For this example we will begin with a minimal database with a users table and an id as the primary key.
CREATE TABLE "users" (
    "id" bigint,
    "name" varchar(100) NOT NULL,
    PRIMARY KEY ("id")
);
To create the table above on our local database, we can run the following command:
docker exec atlas-demo mysql -ppass -e 'USE example; CREATE TABLE users(id INT PRIMARY KEY, name VARCHAR(100));'
The atlas schema inspect command supports reading the database description provided by a URL and outputting it in
different formats, including Atlas DDL (default), SQL, and JSON. In this guide, we will
demonstrate the flow using both the Atlas DDL and SQL formats, as the JSON format is often used for processing the
output using jq.
- Atlas DDL (HCL)
- SQL
To inspect our locally-running MySQL instance, use the -u flag and write the output to a file named schema.hcl:
atlas schema inspect -u "mysql://root:pass@localhost:3306/example" > schema.hcl
Open the schema.hcl file to view the Atlas schema that describes our database.
table "users" {
  schema = schema.example
  column "id" {
    null = false
    type = bigint
  }
  column "name" {
    null = true
    type = varchar(100)
  }
  primary_key {
    columns = [column.id]
  }
}
schema "example" {
  charset = "utf8mb4"
  collate = "utf8mb4_0900_ai_ci"
}
This first block represents a table resource with id and name
columns. The schema field references the example schema that is defined in the block below. In addition, the primary_key
sub-block defines the id column as the primary key for the table. Atlas strives to mimic the syntax of the database
that the user is working against. In this case, the type for the id column is bigint, and varchar(100) for the name column.
To inspect our locally-running MySQL instance, use the -u flag and write the output to a file named schema.sql:
atlas schema inspect -u "mysql://root:pass@localhost:3306/example" --format '{{ sql . }}' > schema.sql
Open the schema.sql file to view the inspected SQL schema that describes our database.
-- Create "users" table
CREATE TABLE "users" (
    "id" bigint NOT NULL,
    "name" varchar(100) NOT NULL,
    PRIMARY KEY ("id")
);
For in-depth details on the atlas schema inspect command, covering aspects like inspecting specific schemas,
handling multiple schemas concurrently, excluding tables, and more, refer to our documentation
here.
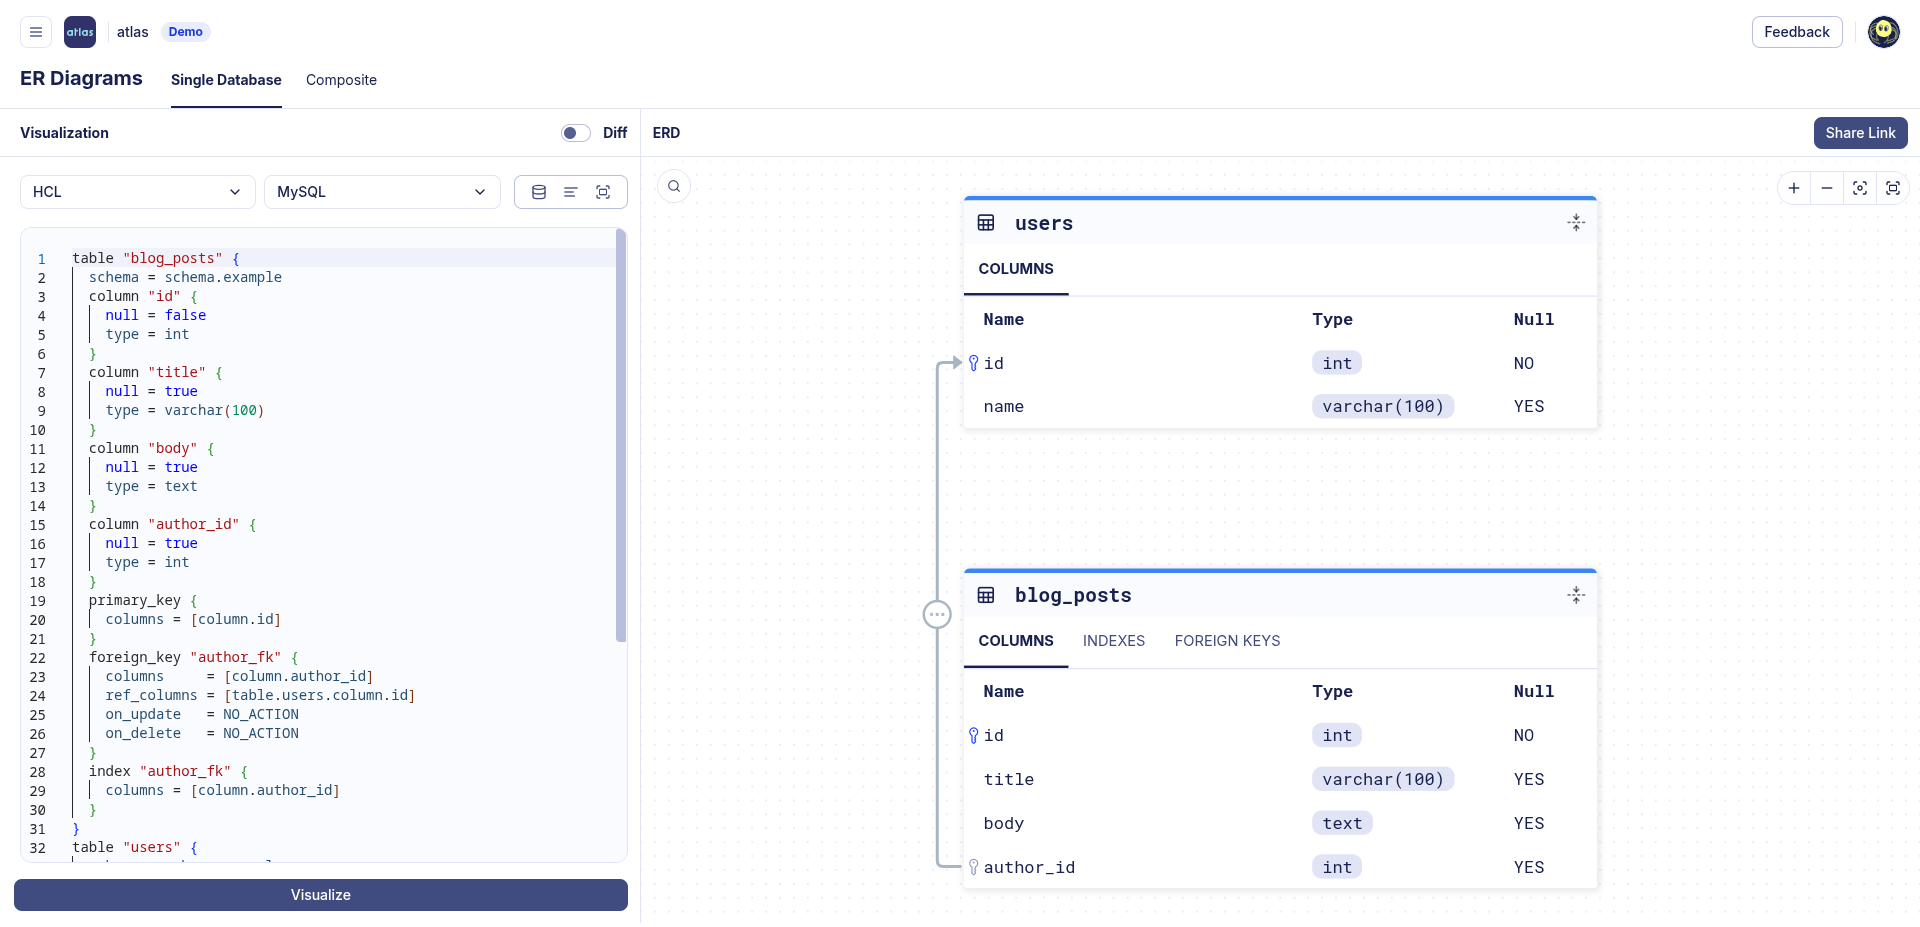
To generate an Entity Relationship Diagram (ERD), or a visual representation of our schema, we can add the -w flag
to the inspect command:
atlas schema inspect -u "mysql://root:pass@localhost:3306/example" -w
Declarative Migrations
The declarative approach lets users manage schemas by defining the desired state of the database as code. Atlas then inspects the target database and calculates an execution plan to reconcile the difference between the desired and actual states. Let's see this in action.
We will start off by making a change to our schema file, such as adding a repos table:
- Atlas DDL (HCL)
- SQL
table "users" {
  schema = schema.example
  column "id" {
    null = false
    type = bigint
  }
  column "name" {
    null = true
    type = varchar(100)
  }
  primary_key {
    columns = [column.id]
  }
}
table "repos" {
  schema = schema.example
  column "id" {
    type = bigint
    null = false
  }
  column "name" {
    type = varchar(100)
    null = false
  }
  column "owner_id" {
    type = bigint
    null = false
  }
  primary_key {
    columns = [column.id]
  }
  foreign_key "fk_repo_owner" {
    columns     = [column.owner_id]
    ref_columns = [table.users.column.id]
  }
}
schema "example" {
  charset = "utf8mb4"
  collate = "utf8mb4_0900_ai_ci"
}
-- Create "users" table
CREATE TABLE users (
  id BIGINT NOT NULL,
  name VARCHAR(100) NOT NULL,
  PRIMARY KEY (id)
);

-- Create "repos" table
CREATE TABLE repos (
  id BIGINT NOT NULL,
  name VARCHAR(100) NOT NULL,
  owner_id BIGINT NOT NULL,
  PRIMARY KEY (id),
  FOREIGN KEY (owner_id) REFERENCES users(id)
);
Now that our desired state has changed, to apply these changes to our database, Atlas will plan a migration for us
by running the atlas schema apply command:
- Atlas DDL (HCL)
- SQL
atlas schema apply \
  -u "mysql://root:pass@localhost:3306/example" \
  --to file://schema.hcl \
  --dev-url "docker://mysql/8/example"
atlas schema apply \
-u "mysql://root:pass@localhost:3306/example" \
--to file://schema.sql \
--dev-url "docker://mysql/8/example"
Click Approve and apply and that's it! You have successfully run a declarative migration.
For a more detailed description of the atlas schema apply command refer to our documentation
here.
To ensure that the changes have been made to the schema, let's run the inspect command with the -w flag once more
and view the ERD:
Versioned Migrations
The versioned approach tracks each schema change in separate migration files. Sometimes called "change-based migrations", it allows each change to the database schema to be checked-in to source control and reviewed during code-review. You can still benefit from Atlas intelligently planning migrations for you, however they are not automatically applied.
Creating the first versioned migration
In the versioned migration workflow, our database state is managed by a migration directory. The migration directory holds all of the migration files created by Atlas, and the sum of all files in lexicographical order represents the current state of the database.
To create our first migration file, we will run the atlas migrate diff command, and we will provide the necessary parameters:
--dirthe URL to the migration directory, by default it is file://migrations.--tothe URL of the desired state. A state can be specified using a database URL, HCL or SQL schema, or another migration directory.--dev-urla URL to a Dev Database that will be used to compute the diff.
- Atlas DDL (HCL)
- SQL
atlas migrate diff initial \
--to file://schema.hcl \
--dev-url "docker://mysql/8/example"
atlas migrate diff initial \
--to file://schema.sql \
--dev-url "docker://mysql/8/example"
Run ls migrations, and you'll notice that Atlas has automatically created a migration directory for us, as well as
two files:
- 20240221153232_initial.sql
- atlas.sum
-- Create "users" table
CREATE TABLE `users` (
  `id` bigint NOT NULL,
  `name` varchar(100) NULL,
  PRIMARY KEY (`id`)
) CHARSET utf8mb4 COLLATE utf8mb4_0900_ai_ci;
-- Create "repos" table
CREATE TABLE `repos` (
  `id` bigint NOT NULL,
  `name` varchar(100) NOT NULL,
  `owner_id` bigint NOT NULL,
  PRIMARY KEY (`id`),
  INDEX `fk_repo_owner` (`owner_id`),
  CONSTRAINT `fk_repo_owner` FOREIGN KEY (`owner_id`) REFERENCES `users` (`id`) ON UPDATE NO ACTION ON DELETE NO ACTION
) CHARSET utf8mb4 COLLATE utf8mb4_0900_ai_ci;
h1:19FfvbJvenroC2lBiH2G46Oeao6YDJSqz7co+bNKCFY=
20240221153232_initial.sql h1:ACoDqBEQ80lC6pTSyjEL1wsjZhc5RLzOrVisBb+SEDQ=
The migration file represents the current state of our database, and the sum file is used by Atlas to maintain the integrity of the migration directory. To learn more about the sum file, read the documentation.
Pushing migration directories to Atlas
Now that we have our first migration, we can apply it to a database. There are multiple ways to accomplish this, with most methods covered in the guides section. In this example, we'll demonstrate how to push migrations to Atlas Cloud, much like how Docker images are pushed to Docker Hub.
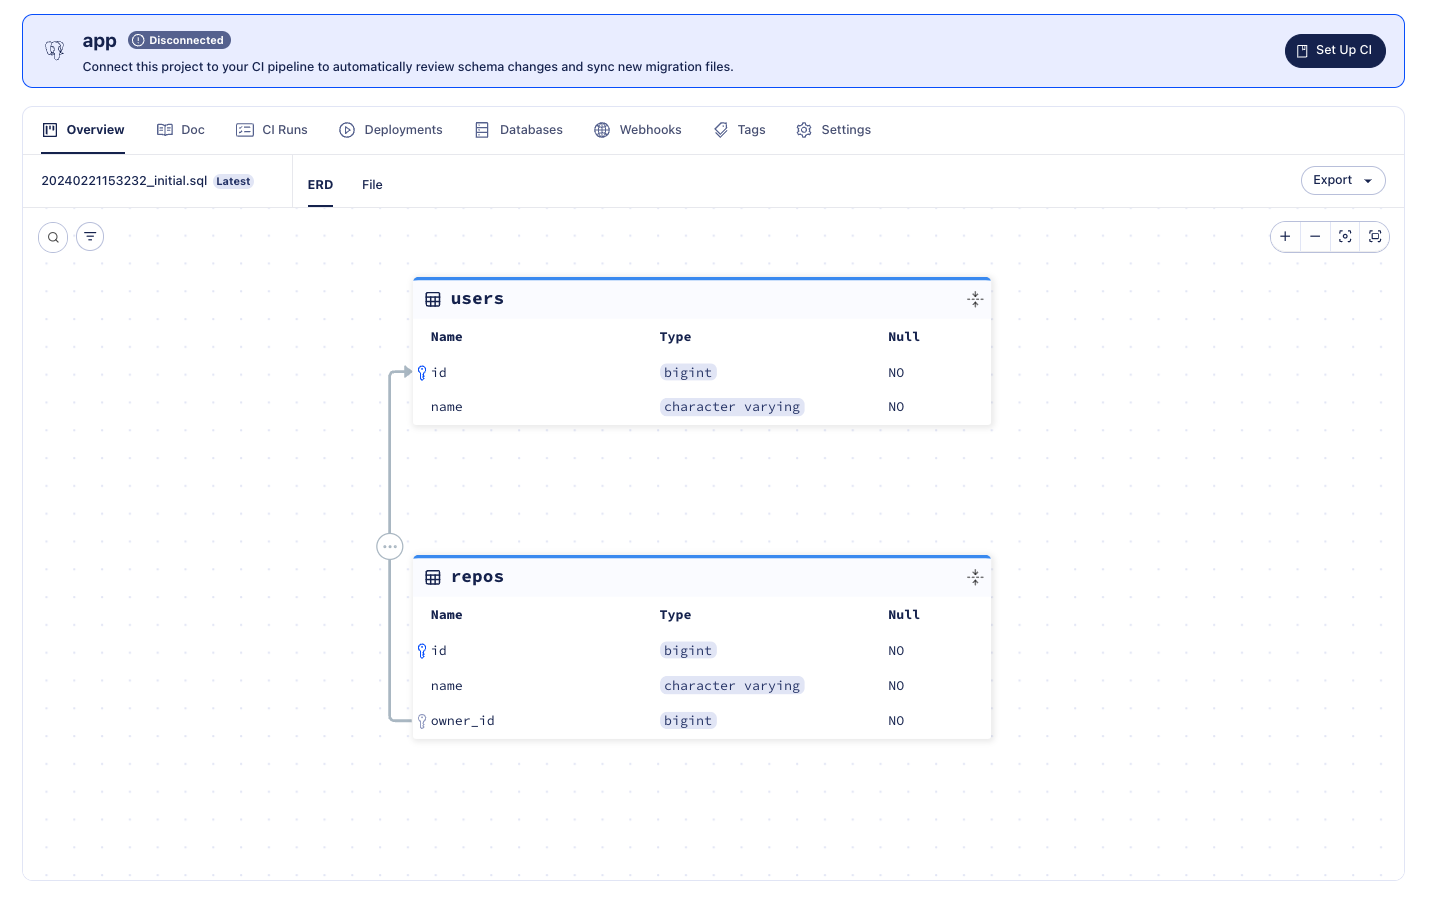
Migration Directory created with atlas migrate push
First, let's log in to Atlas. If it's your first time, you will be prompted to create both an account and a workspace (organization):
- Via Web
- Via Token
- Via Environment Variable
atlas login
atlas login --token "ATLAS_TOKEN"
ATLAS_TOKEN="ATLAS_TOKEN" atlas login
Let's name our new migration project app and run atlas migrate push:
atlas migrate push app \
--dev-url "docker://mysql/8/example"
Once the migration directory is pushed, Atlas prints a URL to the created directory, similar to the once shown in the image above.
Applying migrations
Once our app migration directory has been pushed, we can apply it to a database from any CD platform without
necessarily having our directory there.
Let's create another database using Docker to resemble a local environment, this time on port 3305:
docker run --rm -d --name atlas-demo -p 3305:3305 -e MYSQL_ROOT_PASSWORD=pass mysql
Next, we'll create a simple Atlas configuration file (atlas.hcl) to store the settings for our local environment:
# The "dev" environment represents our local testings.
env "local" {
  url = "mysql://root:pass@localhost:3305"
  migration {
    dir = "atlas://app"
  }
}
The final step is to apply the migrations to the database. Let's run atlas migrate apply with the --env flag
to instruct Atlas to select the environment configuration from the atlas.hcl file:
atlas migrate apply --env local
Boom! After applying the migration, you should receive a link to the deployment and the database where the migration was applied. Here's an example of what it should look like:
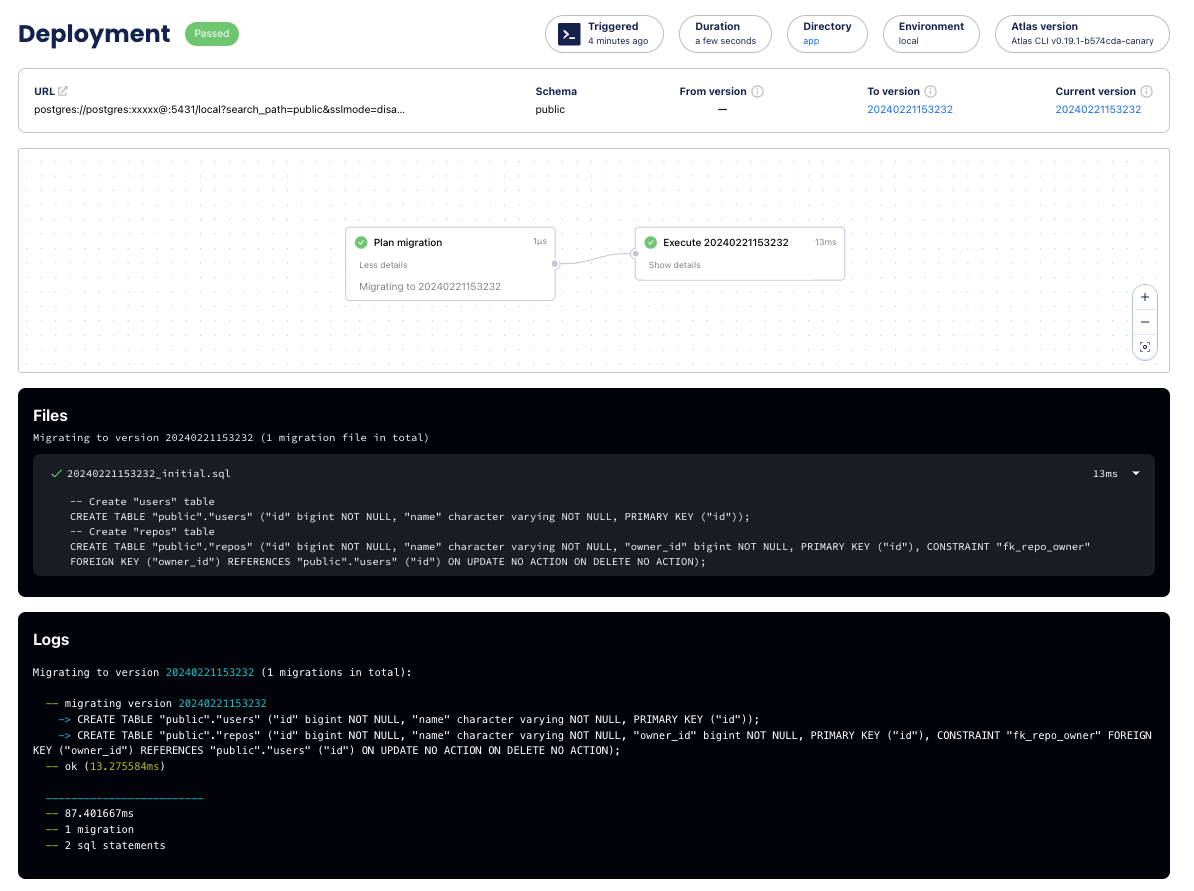
Migration deployment report created with atlas migrate apply
Generating another migration
After applying the first migration, it's time to update our schema defined in the schema file and tell Atlas to generate another migration. This will bring the migration directory (and the database) in line with the new state defined by the desired schema (schema file).
Let's make two changes to our schema:
- Add a new
descriptioncolumn to our repos table - Add a new
commitstable
- Atlas DDL (HCL)
- SQL
table "users" {
  schema = schema.example
  column "id" {
    null = false
    type = bigint
  }
  column "name" {
    null = false
    type = varchar(100)
  }
  primary_key {
    columns = [column.id]
  }
}
table "repos" {
  schema = schema.example
  column "id" {
    type = bigint
    null = false
  }
  column "name" {
    type = varchar(100)
    null = false
  }
  column "description" {
    type = varchar(255)
    null = true
  }
  column "owner_id" {
    type = bigint
    null = false
  }
  primary_key {
    columns = [column.id]
  }
  foreign_key "fk_repo_owner" {
    columns     = [column.owner_id]
    ref_columns = [table.users.column.id]
  }
}
table "commits" {
  schema = schema.example
  column "id" {
    type = bigint
    null = false
  }
  column "message" {
    type = varchar(255)
    null = false
  }
  column "repo_id" {
    type = bigint
    null = false
  }
  column "author_id" {
    type = bigint
    null = false
  }
  primary_key {
    columns = [column.id]
  }
  foreign_key "fk_commit_repo" {
    columns     = [column.repo_id]
    ref_columns = [table.repos.column.id]
  }
  foreign_key "fk_commit_author" {
    columns     = [column.author_id]
    ref_columns = [table.users.column.id]
  }
}
schema "example" {
  comment = "standard example schema"
}
-- Create "users" table
CREATE TABLE users (
  id BIGINT NOT NULL,
  name VARCHAR(100) NOT NULL,
  PRIMARY KEY (id)
);

-- Create "repos" table
CREATE TABLE repos (
  id BIGINT NOT NULL,
  name VARCHAR(100) NOT NULL,
  description VARCHAR(255) NULL,
  owner_id BIGINT NOT NULL,
  PRIMARY KEY (id),
  FOREIGN KEY (owner_id) REFERENCES users(id)
);

-- Create "commits" table
CREATE TABLE commits (
  id BIGINT NOT NULL,
  message VARCHAR(255) NOT NULL,
  repo_id BIGINT NOT NULL,
  author_id BIGINT NOT NULL,
  PRIMARY KEY (id),
  FOREIGN KEY (repo_id) REFERENCES repos(id),
  FOREIGN KEY (author_id) REFERENCES users(id)
);
Next, let's run the atlas migrate diff command once more:
- Atlas DDL (HCL)
- SQL
atlas migrate diff add_commits \
--to file://schema.hcl \
--dev-url "docker://mysql/8/example"
atlas migrate diff add_commits \
--to file://schema.sql \
--dev-url "docker://mysql/8/example"
Run ls migrations, and you'll notice that a new migration file has been generated.
-- Modify "users" table
ALTER TABLE `users` MODIFY COLUMN `name` varchar(100) NOT NULL;
-- Modify "repos" table
ALTER TABLE `repos` ADD COLUMN `description` varchar(255) NULL;
-- Create "commits" table
CREATE TABLE `commits` (
  `id` bigint NOT NULL,
  `message` varchar(255) NOT NULL,
  `repo_id` bigint NOT NULL,
  `author_id` bigint NOT NULL,
  PRIMARY KEY (`id`),
  INDEX `fk_commit_author` (`author_id`),
  INDEX `fk_commit_repo` (`repo_id`),
  CONSTRAINT `fk_commit_author` FOREIGN KEY (`author_id`) REFERENCES `users` (`id`) ON UPDATE NO ACTION ON DELETE NO ACTION,
  CONSTRAINT `fk_commit_repo` FOREIGN KEY (`repo_id`) REFERENCES `repos` (`id`) ON UPDATE NO ACTION ON DELETE NO ACTION
) CHARSET utf8mb4 COLLATE utf8mb4_0900_ai_ci;
Let's run atlas migrate push again and observe the new file on the migration directory page.
atlas migrate push app \
--dev-url "docker://mysql/8/example"
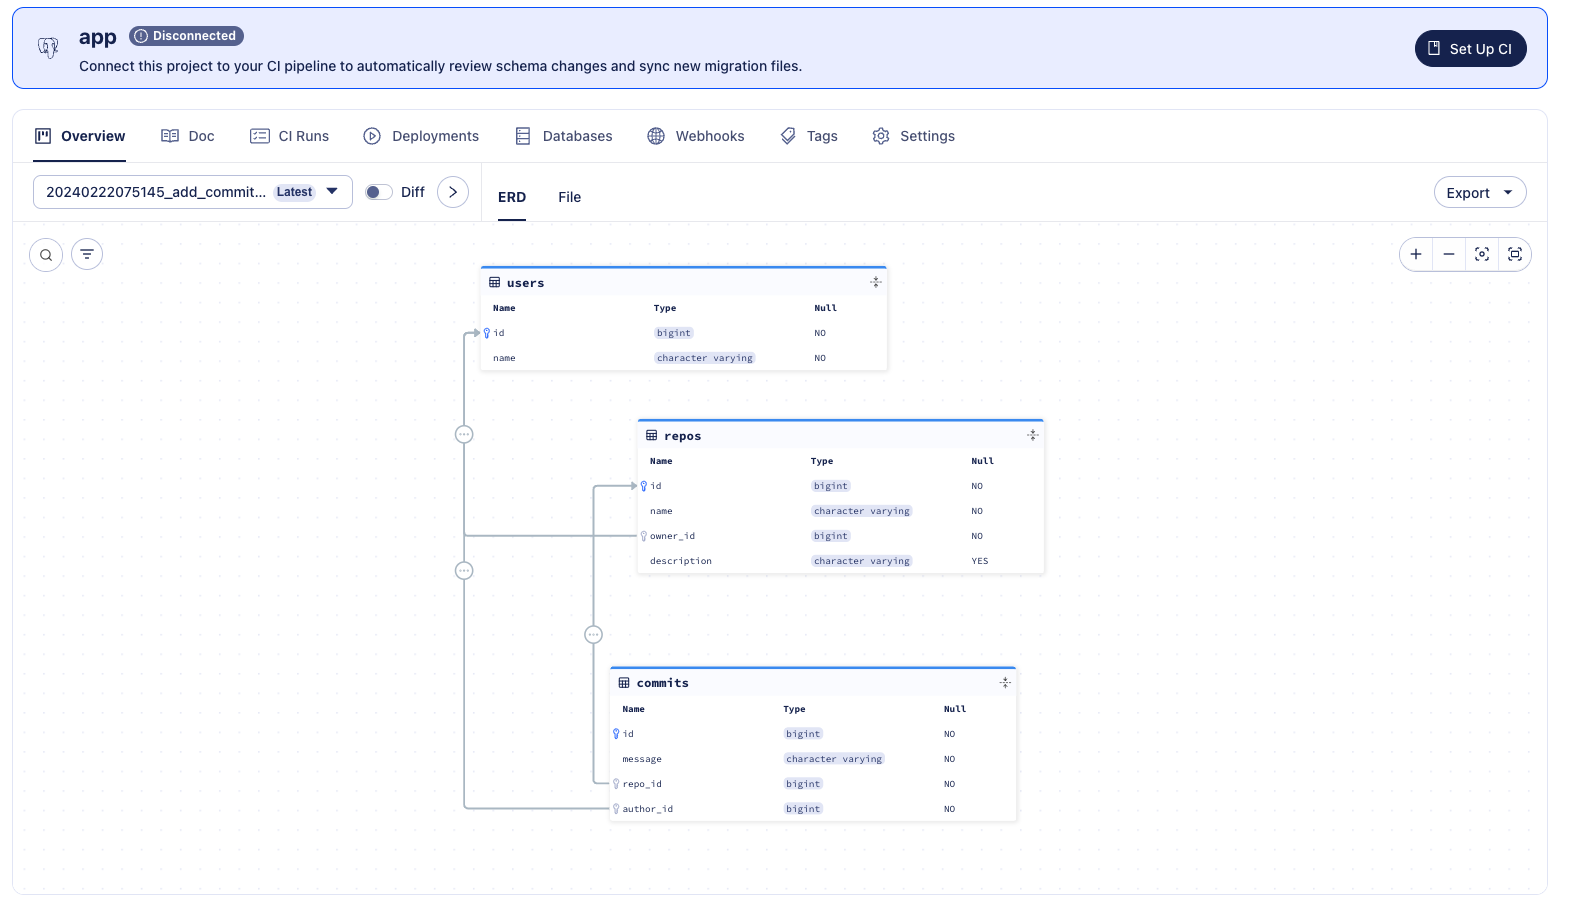
Migration Directory created with atlas migrate push
Next Steps
In this guide we learned about the declarative and versioned workflows, and how to use Atlas to generate migrations, push them to an Atlas workspace and apply them to databases.
Next steps:
- Read the full docs to learn HCL schema syntax or about specific MySQL column types
- Learn how to set up CI for your migration directory
- Deploy schema changes with Terraform or Kubernetes
- Learn about modern CI/CD principles for databases
For more in-depth guides, check out the other pages in this section or visit our Docs section.
Have questions? Feedback? Find our team on our Discord server.