Automatic Oracle Schema Migrations with Atlas
Oracle is a trademark of Oracle Corporation. Atlas is not affiliated with or endorsed by Oracle.
Oracle is a versatile database management system supporting both relational and object-relational data models. It's a popular choice for a wide range of uses due to its scalability, flexibility, and security.
However, managing a large database schema with Oracle can be challenging due to the complexity of related data structures and the need for coordinated schema changes across multiple teams and applications.
Enter: Atlas
Atlas helps developers manage their database schema as code, abstracting away the intricacies of database schema management. With Atlas, users provide the desired state of the database schema and Atlas automatically plans the required migrations.
In this guide, we will set up Atlas for automatic (declarative) and versioned Oracle schema migration using the declarative workflow.
Oracle is only available on the Pro plan or during a Trial. Upgrade your plan to get started.
Prerequisites
-
Docker
-
Atlas installed on your machine:
- macOS + Linux
- Docker
- Windows
To download and install the custom release of the Atlas CLI, simply run the following in your terminal:
curl -sSf https://atlasgo.sh | ATLAS_FLAVOR="oracle" shTo pull the Atlas image and run it as a Docker container:
docker pull arigaio/atlas:latest-extended
docker run --rm arigaio/atlas:latest-extended --help
If the container needs access to the host network or a local directory, use the
--net=hostflag and mount the desired directory:docker run --rm --net=host \
-v $(pwd)/migrations:/migrations \
arigaio/atlas:latest-extended migrate apply \
--url "oracle://PDBADMIN:Pssw0rd0995@localhost:1521/FREEPDB1"Download the custom release and move the atlas binary to a file location on your system PATH.
-
An Atlas Pro account. To use the Oracle driver, simply run:
$ atlas login
Inspecting our Database
To spin up a local Oracle Database instance using docker run:
docker run --rm -e 'ORACLE_PWD=Pssw0rd0995' -p 1521:1521 --name atlas-demo -d \
  container-registry.oracle.com/database/free:latest-lite
Note that the Oracle Database image is a bit larger than other database images, so it may take a while to download.
After the container is up and running, you need to connect to it and update the permissions of the PDBADMIN user to allow Atlas to create
and modify tables and columns:
docker exec -i atlas-demo sqlplus \
  -S 'sys/Pssw0rd0995@127.0.0.1:1521/FREEPDB1' AS SYSDBA <<SQL
GRANT CONNECT, RESOURCE, SELECT_CATALOG_ROLE TO PDBADMIN;
-- Grant privileges to manage schemas in the PDB
GRANT CREATE USER, CREATE ANY TABLE, CREATE VIEW TO PDBADMIN;
GRANT ALTER USER, ALTER ANY TABLE TO PDBADMIN;
GRANT DROP USER, DROP ANY TABLE TO PDBADMIN;
-- Grant execute on DBMS_LOCK to create advisory locks
GRANT EXECUTE ON SYS.DBMS_LOCK TO PDBADMIN;
SQL
If you don't setup the permissions correctly, you will get an error when trying to apply a schema.
Error: acquiring database lock: sql/oracle: allocate lock: ORA-06550: line 1, column 7:
PLS-00201: identifier 'DBMS_LOCK' must be declared
ORA-06550: line 1, column 7:
PL/SQL: Statement ignored
 error occur at position: 6
The atlas schema inspect command supports reading the database description provided by a URL and outputting it in
different formats, including Atlas DDL (default), SQL, and JSON. In this guide, we will
demonstrate the flow using the SQL format.
To inspect our locally-running Oracle instance, use the -url flag and write the output to a file named schema.sql:
atlas schema inspect --url 'oracle://PDBADMIN:Pssw0rd0995@localhost:1521/FREEPDB1' > schema.sql
For in-depth details on the atlas schema inspect command, covering aspects like inspecting specific schemas,
handling multiple schemas concurrently, excluding tables, and more, refer to our documentation
here.
Declarative Migrations
Atlas supports a workflow called declarative schema migrations. In this workflow, you first define the desired state of your database schema (in one of many supported formats and languages). Then, you let Atlas calculate the diff between the desired state and the actual state of your database. Atlas then generates the SQL commands that will bring your database to the desired state.
Let's see this in action.
First, create a new file name schema.sql. This file will contain the desired state of our database in plain SQL.
-- Create the users table
CREATE TABLE users (
  id NUMBER CONSTRAINT PK_users PRIMARY KEY,
  email VARCHAR2(255),
  display_name VARCHAR2(255)
);

-- Create the posts table with a custom name for the FK constraint
CREATE TABLE posts (
  id NUMBER CONSTRAINT PK_posts PRIMARY KEY,
  title VARCHAR2(255),
  body CLOB,
  author_id NUMBER,
  CONSTRAINT author_fk FOREIGN KEY (author_id) REFERENCES users(id)
);
Resource names in Oracle are case-sensitive and are converted to uppercase by default. To use lowercase names, you need to wrap them in double quotes.
For example, CREATE TABLE "users" will create a table named users, while CREATE TABLE users will create a table named USERS.
Atlas always quotes the resource names in the generated SQL, to ensure that they are created with the correct case.
Applying our schema
Next, let's apply this schema to our database using the atlas schema apply command.
atlas schema apply -u "oracle://PDBADMIN:Pssw0rd0995@localhost:1521/FREEPDB1" \
  --to file://schema.sql \
  --dev-url "docker://oracle/free:latest-lite?t=10m"
Atlas will connect to our target database to inspect its current state. Next, it will use the dev-database to normalize our schema and generate the SQL commands that will bring our database to the desired state:
- Since the Oracle Container is slow to start, we add
t=10mto the dev-url to allow it to run for 10 minutes. If you run into trouble with the dev container, you can addv=1to see more verbose logs. - In Oracle, the schema name is the name of the user in the connection string, so the tables will be created in the
PDBADMINschema.
Planning migration statements (2 in total):

  -- add new table named "users":
    -> CREATE TABLE "USERS" (
         "ID" NUMBER NOT NULL,
         "EMAIL" VARCHAR2(255),
         "DISPLAY_NAME" VARCHAR2(255),
         CONSTRAINT "PK_USERS" PRIMARY KEY ("ID")
       )
  -- add new table named "posts":
    -> CREATE TABLE "POSTS" (
         "ID" NUMBER NOT NULL,
         "TITLE" VARCHAR2(255),
         "BODY" CLOB,
         "AUTHOR_ID" NUMBER,
         CONSTRAINT "PK_POSTS" PRIMARY KEY ("ID"),
         CONSTRAINT "AUTHOR_FK" FOREIGN KEY ("AUTHOR_ID") REFERENCES "USERS" ("ID")
       )

-------------------------------------------

Analyzing planned statements (2 in total):

  -- no diagnostics found

  -------------------------
  -- 4.424169042s
  -- 2 schema changes

-------------------------------------------

? Approve or abort the plan:
  ▸ Approve and apply
    Abort
After applying the schema, Atlas confirms that the changes were applied:
-------------------------------------------

Applying approved migration (2 statements in total):

  -- add new table named "users"
    -> CREATE TABLE "USERS" (
         "ID" NUMBER NOT NULL,
         "EMAIL" VARCHAR2(255),
         "DISPLAY_NAME" VARCHAR2(255),
         CONSTRAINT "PK_USERS" PRIMARY KEY ("ID")
       )
  -- ok (88.693875ms)

  -- add new table named "posts"
    -> CREATE TABLE "POSTS" (
         "ID" NUMBER NOT NULL,
         "TITLE" VARCHAR2(255),
         "BODY" CLOB,
         "AUTHOR_ID" NUMBER,
         CONSTRAINT "PK_POSTS" PRIMARY KEY ("ID"),
         CONSTRAINT "AUTHOR_FK" FOREIGN KEY ("AUTHOR_ID") REFERENCES "USERS" ("ID")
       )
  -- ok (18.533542ms)

  -------------------------
  -- 107.422708ms
  -- 1 migration
  -- 2 sql statements
Next, let's re-run the atlas schema apply command. This time, Atlas will detect that the database is
already in the desired state and will not generate any changes:
Schema is synced, no changes to be made
Altering our schema
Now, let's make some changes to our schema. Open the schema.sql file and add a new column to the users table:
CREATE TABLE users (
  id NUMBER CONSTRAINT PK_users PRIMARY KEY,
  email VARCHAR2(255),
  display_name VARCHAR2(255),
+ bio VARCHAR2(1024) -- New column added
);
Next, let's re-run the atlas schema apply command. This time, Atlas will detect that the schema has changed
and will generate the needed SQL commands to bring the database to the desired state:
Planning migration statements (1 in total):

  -- add columns to table "users":
    -> ALTER TABLE "USERS" ADD "BIO" VARCHAR2(1024)

-------------------------------------------

Analyzing planned statements (1 in total):

  -- no diagnostics found

  -------------------------
  -- 1.582271459s
  -- 1 schema change

-------------------------------------------

? Approve or abort the plan:
  ▸ Approve and apply
    Abort
After applying the changes, Atlas confirms once again that the changes were applied:
-------------------------------------------

Applying approved migration (1 statement in total):

  -- add columns to table "users"
    -> ALTER TABLE "USERS" ADD "BIO" VARCHAR2(1024)
  -- ok (111.057416ms)

  -------------------------
  -- 111.109958ms
  -- 1 migration
  -- 1 sql statement
Visualizing our schema
One of the most useful features of Atlas is the ability to visualize your database schema. To do so, run the
atlas schema inspect command with the -w (web) flag:
atlas schema inspect --url='oracle://PDBADMIN:Pssw0rd0995@localhost:1521/FREEPDB1' -w
Atlas will ask whether you would like to create your visualization publicly (in a publicly accessible URL) or privately (in your Atlas Cloud account):
? Where would you like to share your schema visualization?:
  ▸ Publicly (gh.atlasgo.cloud)
    Privately (giautm.atlasgo.cloud)
For this demo, let's choose the public option. Atlas will create the visualization and open it in your default browser:
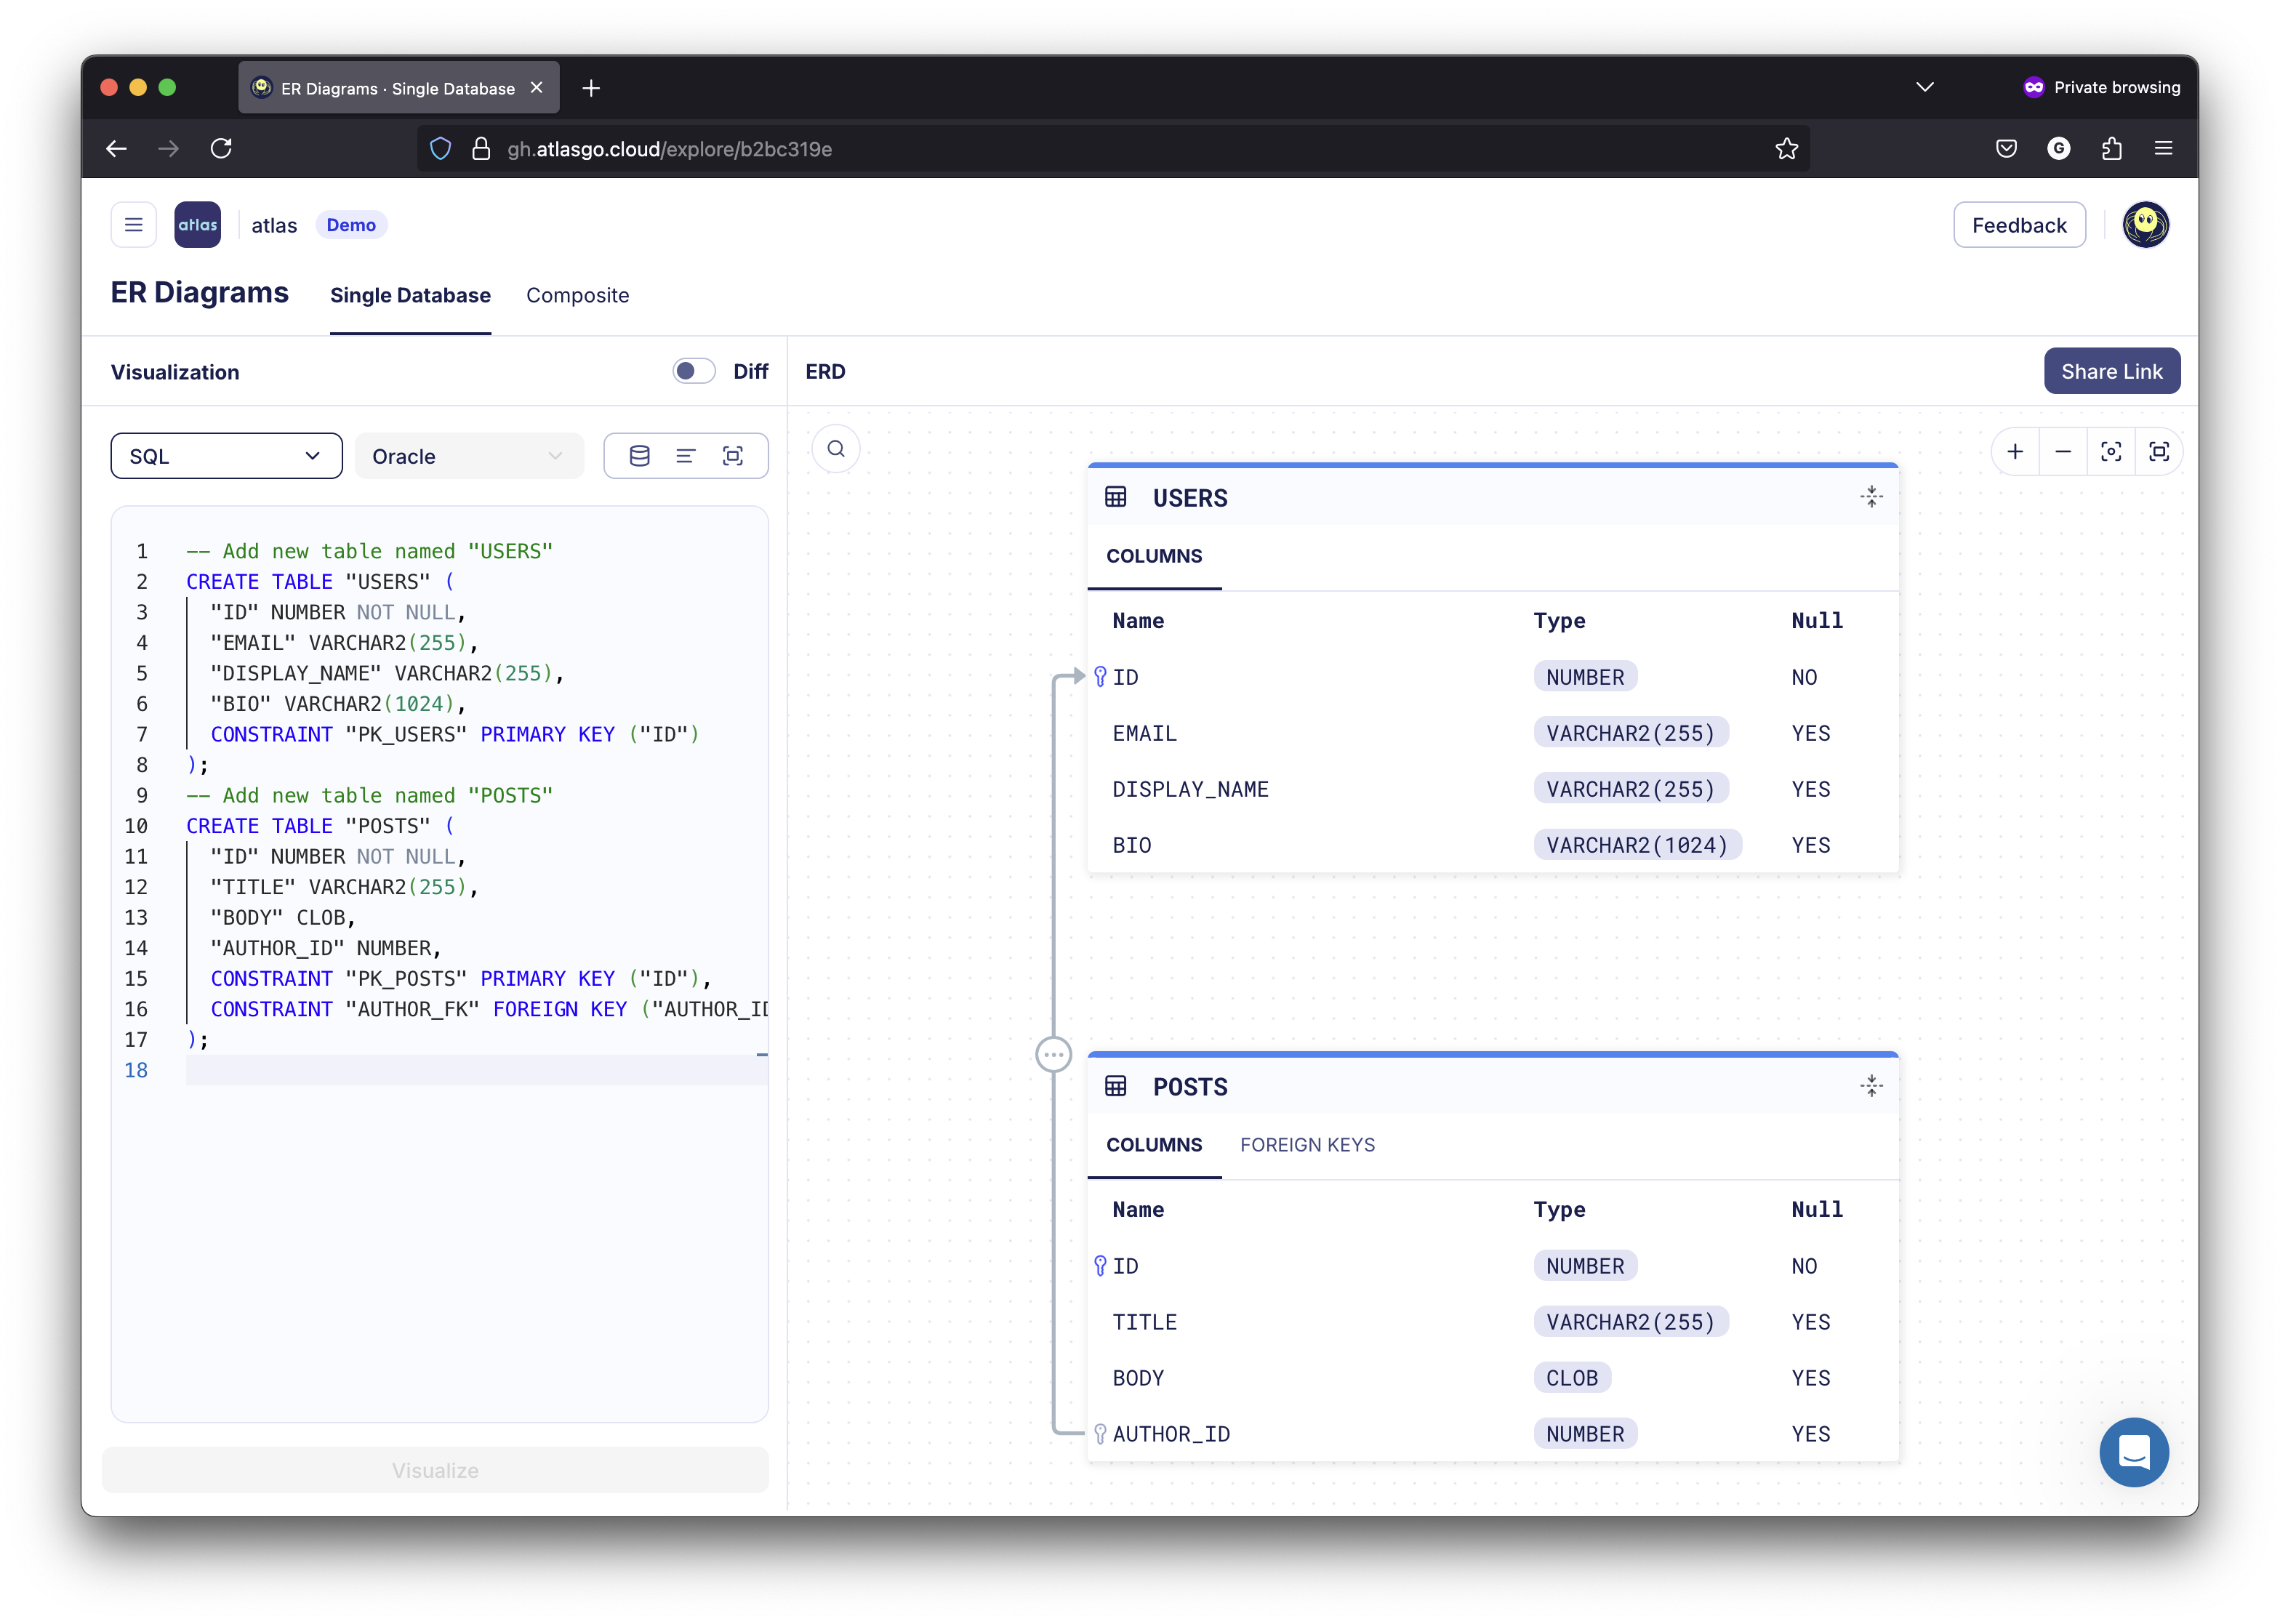
See it for yourself at: https://gh.atlasgo.cloud/explore/b2bc319e
Wrapping up
In this guide we have demonstrated how to set up Atlas to manage your Oracle database schema. We have also demonstrated some of the basic capabilities of Atlas, such as declarative schema migrations, and schema visualization. These two features are just the tip of the iceberg. Atlas has many more features that can help you better manage your database! To learn more, check out the Atlas documentation.
As always, we would love to hear your feedback and suggestions on our Discord server.