Managing Multi-Tenant Migrations with Atlas Cloud Control Plane
In the previous section, we demonstrated how to use the Atlas CLI to manage migrations for a database-per-tenant architecture. Next, we will see how to use the Atlas Cloud Control Plane to manage migrations across multiple databases.
Setting up
In this section, we will be continuing our minimal example from before, so if you are just joining us, please follow the steps in the previous section to set up your project.
Additionally, you will need an Atlas Cloud account. If you don't have one, you can sign up for free by running the following command and following the instructions on the screen:
atlas login
Pushing our project to Atlas Cloud
In order to manage our migrations across multiple databases, we need push our project to the Atlas Cloud
Schema Registry. But first, let's set up a local env block in our atlas.hcl file. Append the following
to the file:
env "local" {
  dev = "sqlite://?mode=memory"
  migration {
    dir = "file://migrations"
  }
}
Next, push the project to the Atlas Cloud Schema Registry by running the following command:
atlas migrate push --env prod db-per-tenant
Atlas will push our migration directory to the Schema Registry and print the URL of the project, for example:
https://rotemtam85.atlasgo.cloud/dirs/4294967396
Working with Atlas Cloud
Deploying from the Registry
Once we have successfully pushed our project to the Schema Registry, we can deploy from it to our target
databases. To do this, let's make a small change to our prod env in atlas.hcl:
env "prod" {
  for_each = toset(local.tenant)
  url = "sqlite://${each.value}.db"
  migration {
    dir = "atlas://db-per-tenant"
  }
}
Now, we can deploy the migrations to our target databases by running:
atlas migrate apply --env prod
Atlas will read the most recent version of our migration directory from the schema registry, apply the migrations to each target database, report the results to Atlas Cloud, and print the results:
No migration files to execute
No migration files to execute
https://rotemtam85.atlasgo.cloud/deployments/sets/94489280593
In this case, we see that there were no new migrations to apply to the target databases. Let's show how this flow works when there is work to be done in the next section.
Another migration
Let's plan another migration to our project. Create a new migration file by running:
atlas migrate new --edit seed_users
In the editor, add the following SQL statements:
INSERT INTO users (id, name) VALUES (1, "a8m");
INSERT INTO users (id, name) VALUES (2, "rotemtam");
Save the file and exit the editor. Let's push the new migration to the Schema Registry:
atlas migrate push --env prod db-per-tenant
Deploying the new migration
After successfully pushing the new migration, we can deploy it to our target databases by running:
atlas migrate apply --env prod
Atlas will apply the new migration to each target database and print the results:
Migrating to version 20240721111345 from 20240721101205 (1 migrations in total):

  -- migrating version 20240721111345
    -> INSERT INTO users (id, name) VALUES (1, "a8m");
    -> INSERT INTO users (id, name) VALUES (2, "rotemtam");
  -- ok (1.106417ms)

  -------------------------
  -- 7.441584ms
  -- 1 migration
  -- 2 sql statements
Migrating to version 20240721111345 from 20240721101205 (1 migrations in total):

  -- migrating version 20240721111345
    -> INSERT INTO users (id, name) VALUES (1, "a8m");
    -> INSERT INTO users (id, name) VALUES (2, "rotemtam");
  -- ok (1.061709ms)

  -------------------------
  -- 3.272584ms
  -- 1 migration
  -- 2 sql statements
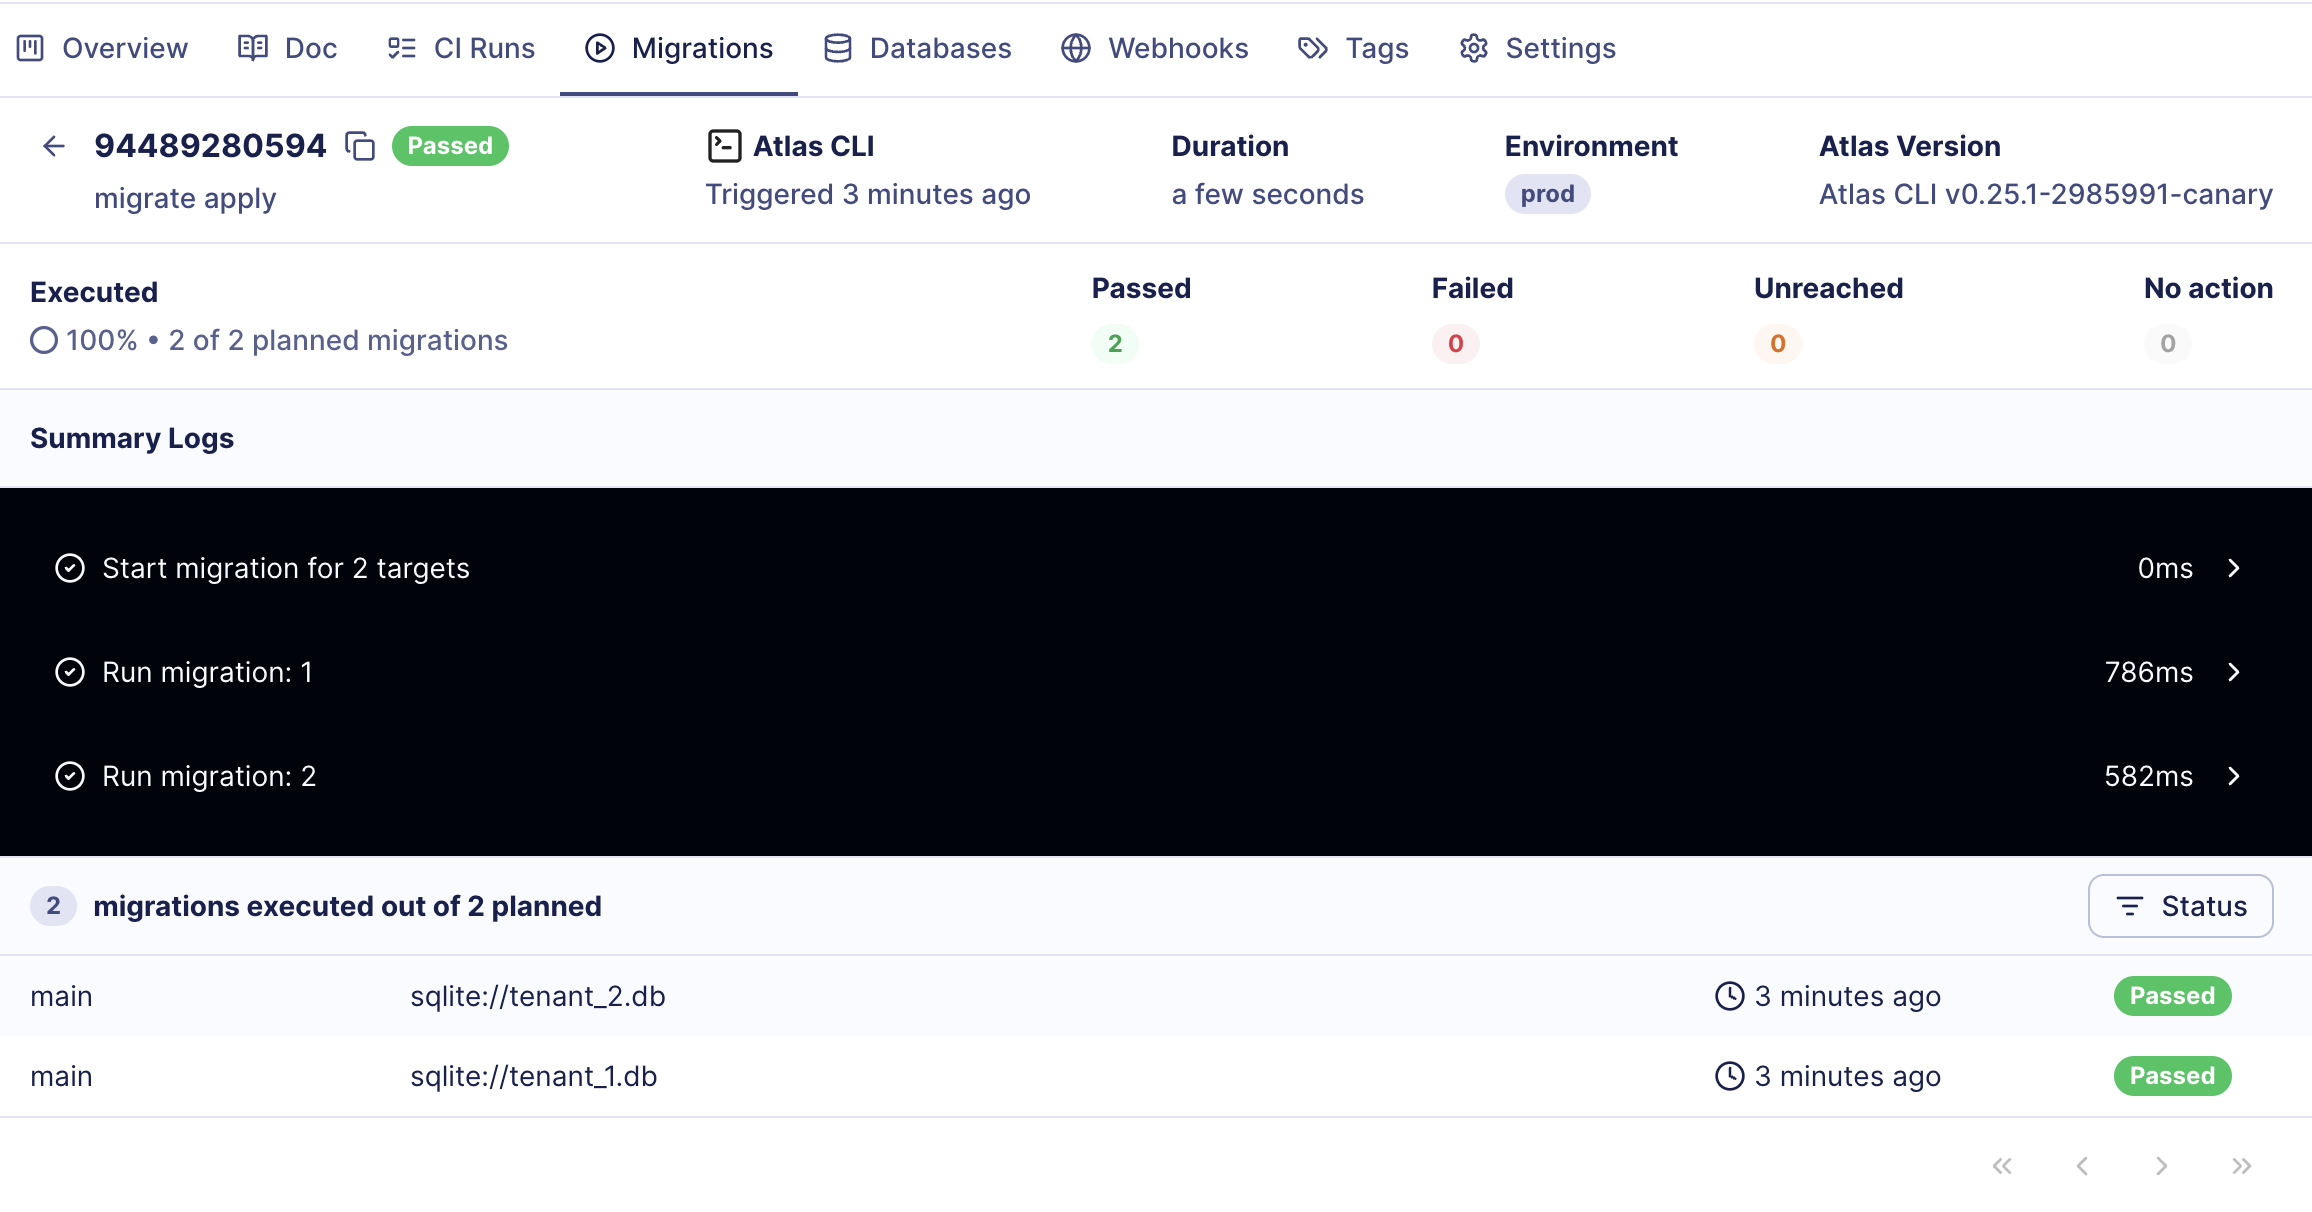
https://rotemtam85.atlasgo.cloud/deployments/sets/94489280594
Following the link will take you to the Atlas Cloud UI, where you can see the details of the deployment:
Gaining Visibility
The Atlas Cloud Control Plane provides a centralized view of all your deployments across multiple databases. You can see the status of each deployment, the target databases, and the results of each migration.
Database Status
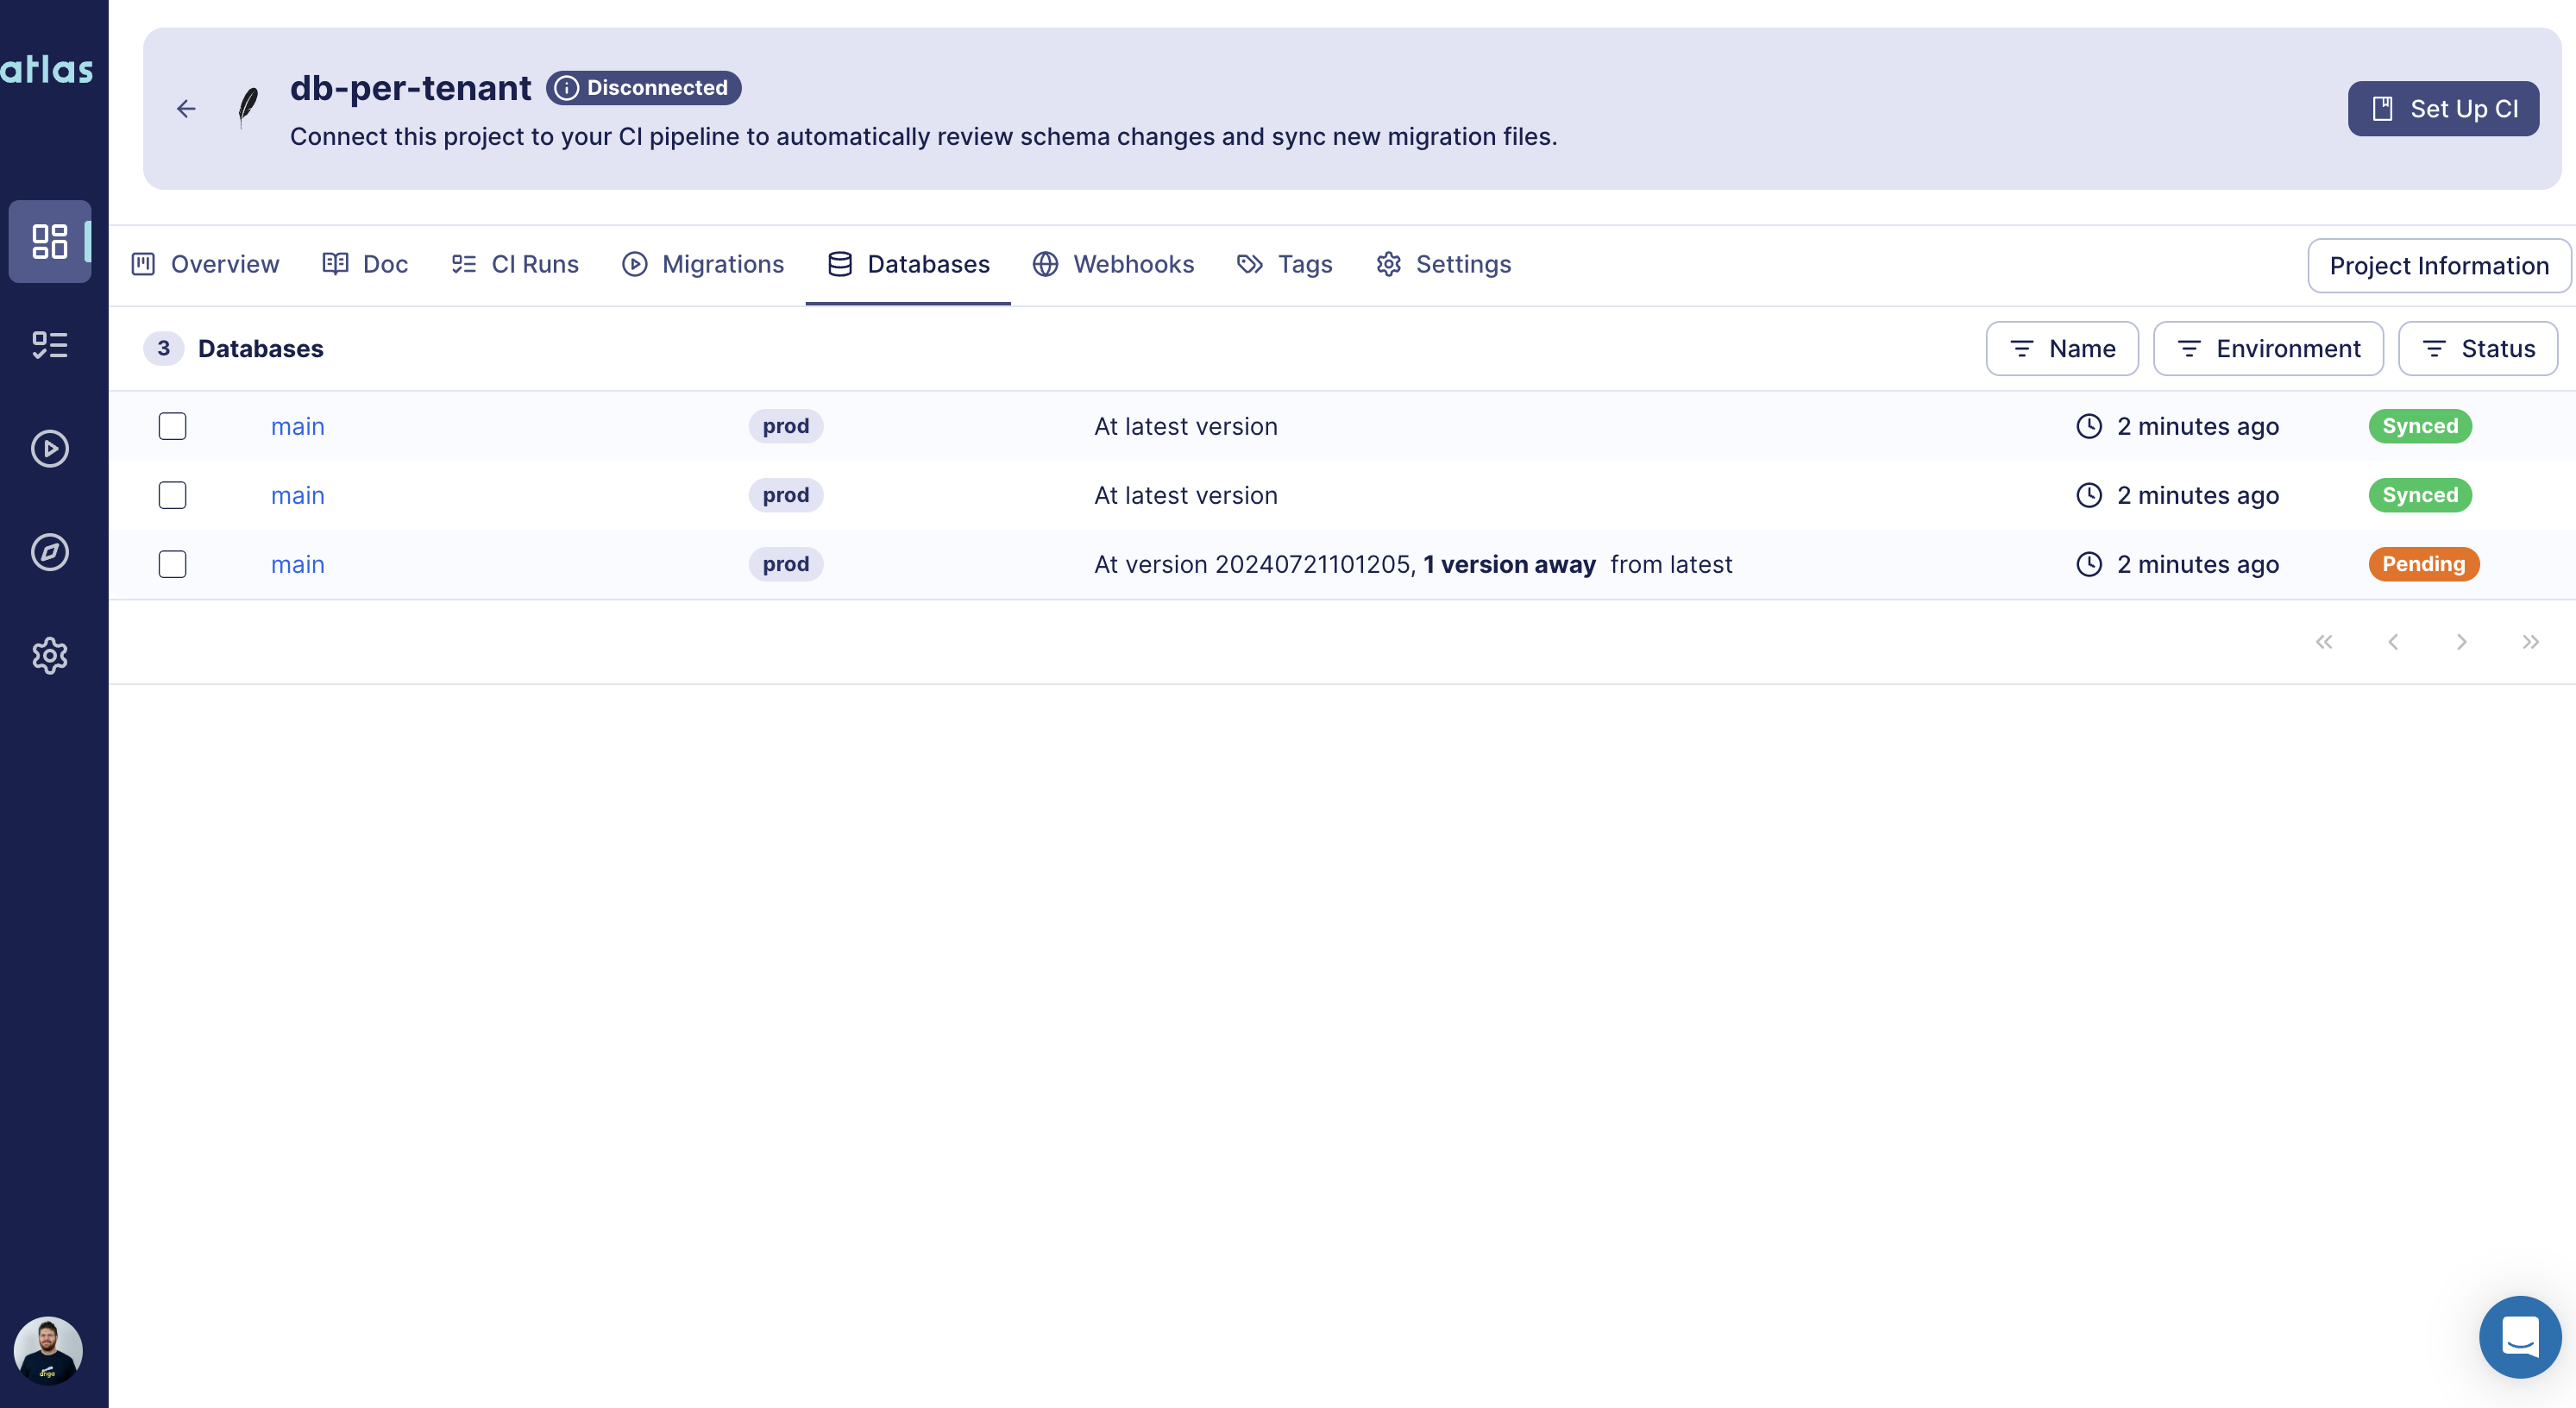
To view the status of the different databases in your project, navigate to the "Databases" tab in the Atlas Cloud UI. Here, you can see the status of each database, the most recent migration applied, and the results of the migration.
Databases can be in one of three states:
- Synced - The database is up-to-date with the most recent migration.
- Pending - The database is waiting for a new migration to be applied.
- Error - An error occurred while applying the migration.
Troubleshooting
If an error occurs during a migration, having a centralized view of all your deployments can help you quickly identify the issue and take corrective action. You can view the error message, the target database, and the migration that caused the error.
Suppose we run a deployment that fails during the schema migration phase, we can easily locate the error in the Atlas Cloud UI by navigating to the "Migrations" tab:
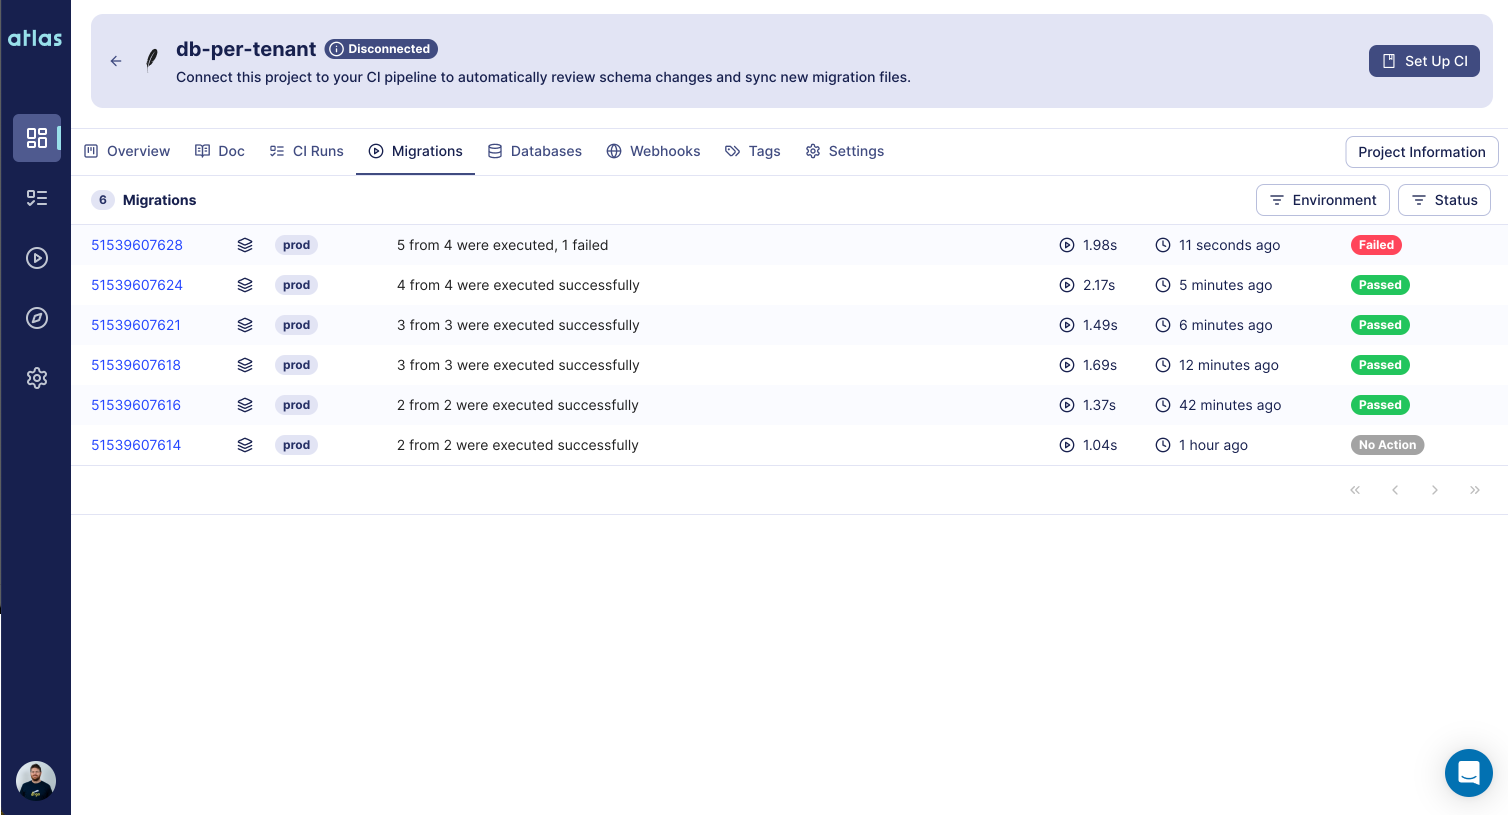
We quickly find the failed deployment and drill down to diagnose the issue:
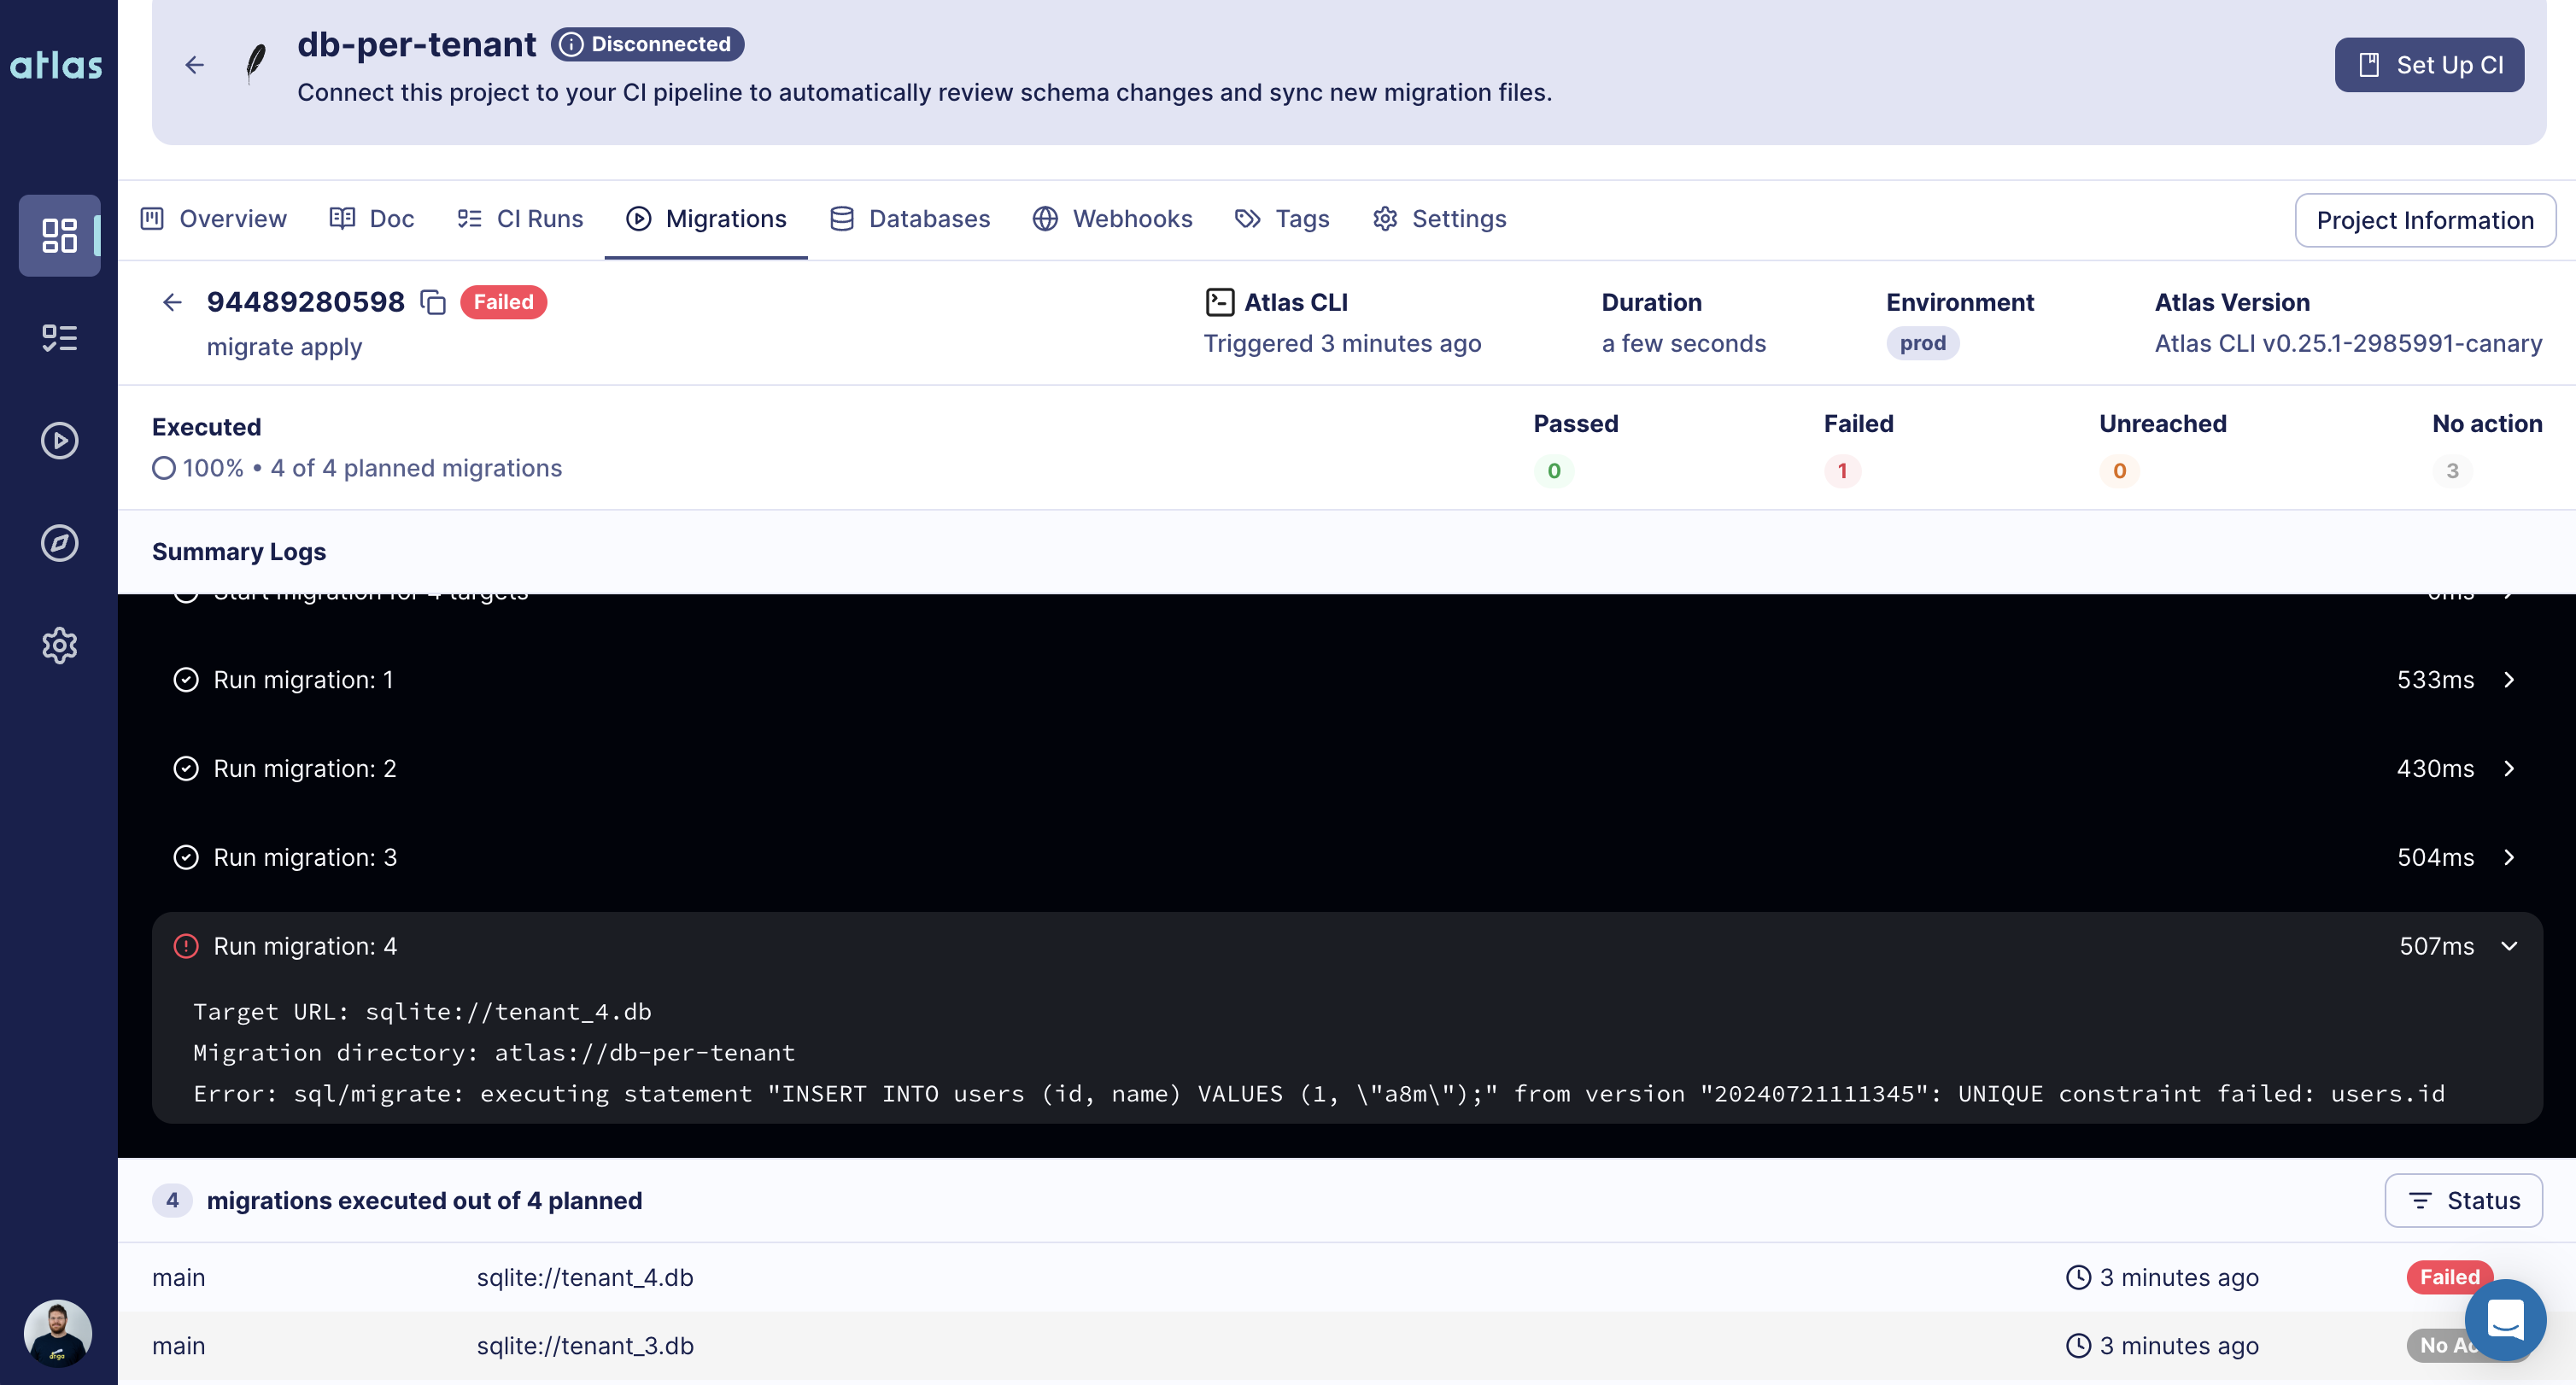
From the logs, we see that 3 out of 4 migrations passed without action, but the last one failed. We see that it failed
on tenant_4.db with the error message:
Error: sql/migrate: executing statement "INSERT INTO users (id, name) VALUES (1, \"a8m\");" from version "20240721111345": UNIQUE constraint failed: users.id
We can further drill down into the specific database target migration:
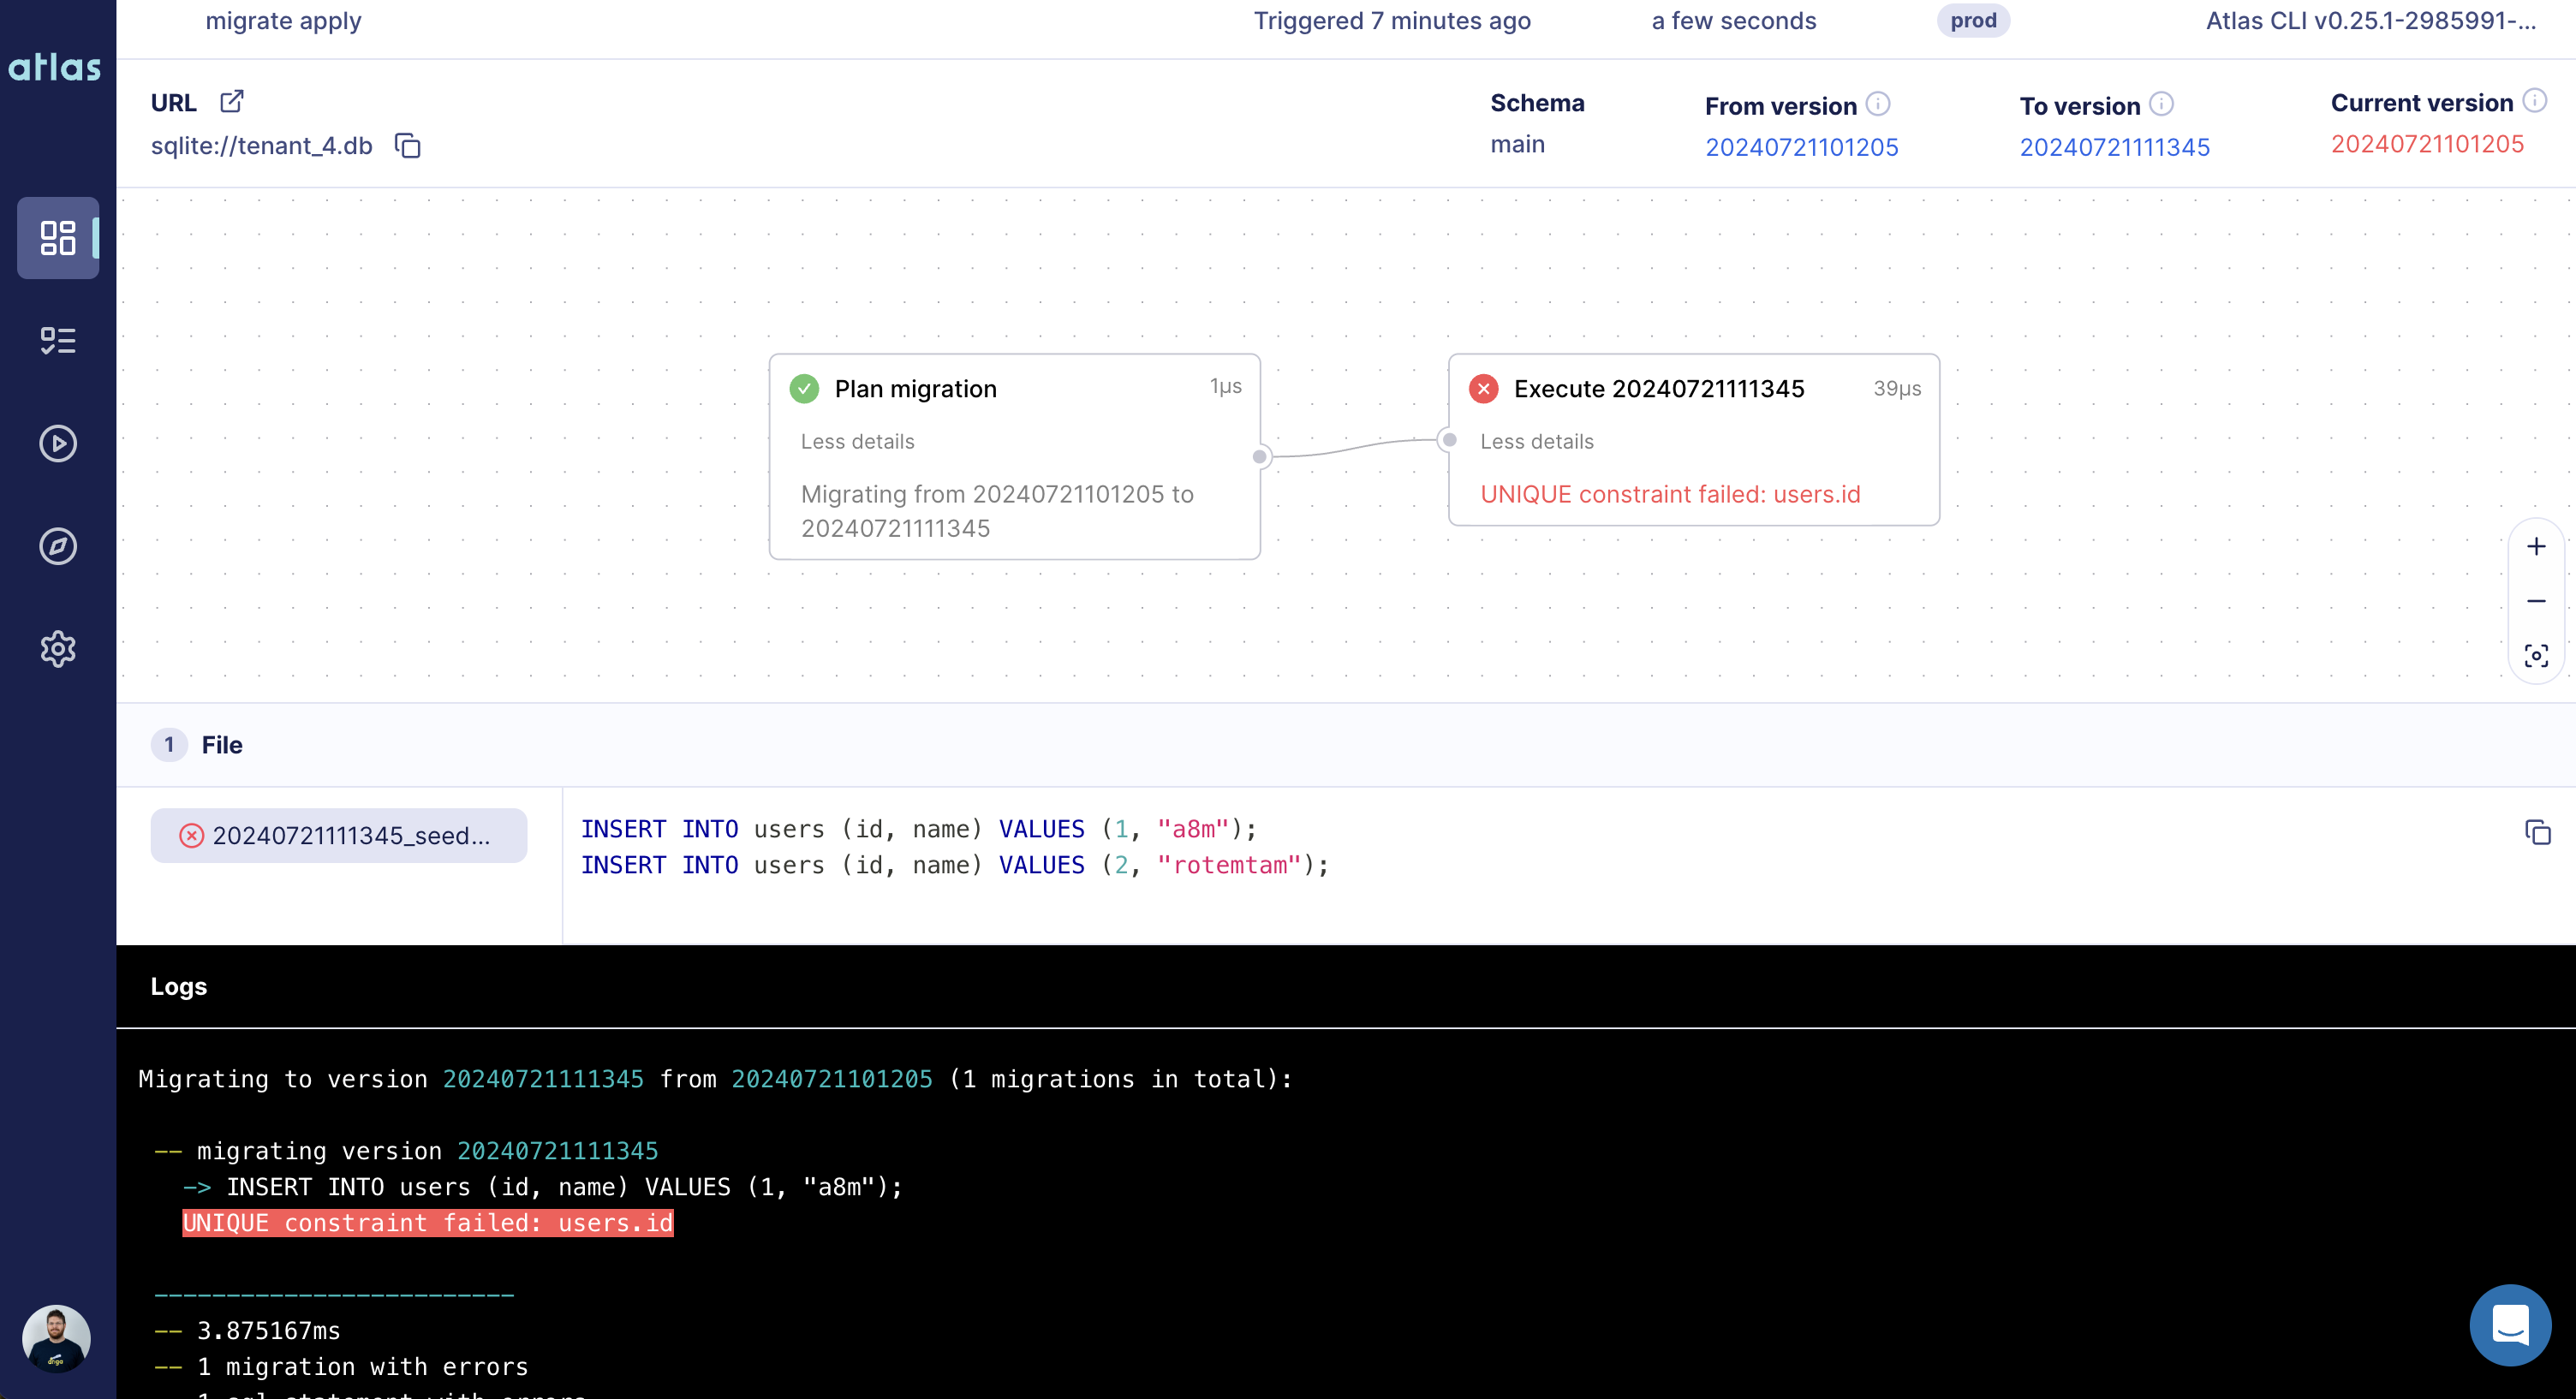
We now clearly see the issue, our data migration failed due to a unique constraint violation. Now, we can take corrective action to fix the issue and reapply the migration - usually by fixing the problematic data in our target database.
Conclusion
In this section, we demonstrated how to use the Atlas Cloud Control Plane to manage migrations across multiple target databases. We showed how to push our project to the Atlas Cloud Schema Registry, deploy migrations to target databases, and gain visibility into the status of our deployments.
While it is possible to manage migrations using the Atlas CLI, the Atlas Cloud Control Plane provides a centralized view of all your deployments, making it easier to manage and troubleshoot issues across multiple databases.