Snowflake Database Security as Code (Declarative)
Managing access in Snowflake usually starts the same way: someone opens a worksheet and runs a few
GRANT statements. It works, until it doesn't. A few months later, nobody can say with confidence who
can read which table, how the roles actually fit together, or why a particular user has the access they
have. The grants live only in your account's current state: there's no history, no code review, no diff,
and no straightforward way to catch when someone changed something by hand.
Snowflake's role model makes this trickier than it first appears. There are two kinds of roles (account roles and database roles), with different rules about what they can do and how they're used, on top of the access-role/functional-role pattern most teams eventually converge on. Wiring that graph together by hand, correctly, and keeping it consistent across environments is exactly the kind of stateful, error-prone work that belongs in version control.
Enter: Atlas
Atlas lets you manage Snowflake access control as code: account roles, database roles, the role-to-role
and role-to-user grant graph, and object GRANTs, all declared in HCL and applied with the atlas CLI.
You describe the access model you want; Atlas computes the CREATE ROLE, GRANT, and REVOKE statements
to get there, shows you the plan, and applies it. This guide builds a complete, working example from
scratch.
Prerequisites
- A Snowflake account with a role that can create roles and grant privileges (an admin role, or one
granted
CREATE ROLE/CREATE DATABASE ROLEon the relevant databases). - A separate database in the same account to use as a dev-database when planning changes (explained below).
- An Atlas Pro account (run atlas login to authenticate)
- Atlas installed on your machine with Snowflake support:
- macOS + Linux
- Docker
- Windows
To download and install the custom release of the Atlas CLI, simply run the following in your terminal:
curl -sSf https://atlasgo.sh | ATLAS_FLAVOR="snowflake" sh
To pull the Atlas image and run it as a Docker container:
docker pull arigaio/atlas:latest-extended
docker run --rm arigaio/atlas:latest-extended --help
If the container needs access to the host network or a local directory, use the --net=host flag and mount the desired
directory:
docker run --rm --net=host \
  -v $(pwd)/migrations:/migrations \
  arigaio/atlas:latest-extended migrate apply \
  --url "oracle://PDBADMIN:Pssw0rd0995@localhost:1521/FREEPDB1"
Download the custom release and move the atlas binary to a file location on your system PATH.
Configuring Atlas
Role and permission management is disabled by default. Enable it per-environment in your atlas.hcl
with a schema.mode block, and tell Atlas which objects to manage with include:
env "snowflake" {
  url = "snowflake://user:pass@account/ANALYTICS/PUBLIC"
  dev = "snowflake://user:pass@account/ANALYTICS_DEV/PUBLIC"

  schema {
    src = "file://schema.sf.hcl"
    mode {
      roles       = true   # inspect & manage account/database roles
      permissions = true   # inspect & manage GRANT/REVOKE
    }
  }

  # only the analytics team's roles, so Atlas never touches anything else in your account.
  include = [
    "PUBLIC",
    "an_*[type=role]",
    "kim[type=user]",
  ]
}
an_*[type=role] matches both account and database roles, since they share the same spec type. This one
line scopes every command to the analytics team's roles. Users aren't team-scoped, so list the ones your
team manages explicitly.
The connection URL uses the snowflake:// scheme in one of two shapes: a path form
(snowflake://user:pass@account/DATABASE/SCHEMA) or a DSN/query form
(snowflake://user:pass@account?database=DB&schema=SCHEMA).
A separate dev database (dev) is required for planning: Atlas replays your
desired HCL to normalize it before comparing against the target. It must live in the same account as your
target.
Defining Roles
First, define the objects that permissions will reference:
schema "PUBLIC" {}

table "events" {
  schema = schema.PUBLIC
  column "id" {
    null = false
    type = NUMBER
  }
}
view "events_view" {
  schema     = schema.PUBLIC
  depends_on = [table.events]
  as         = "SELECT \"id\" FROM \"PUBLIC\".\"events\""
}
Snowflake's access model
Snowflake has two kinds of roles:
- Account roles are global to the account. They are granted to users, and a user can activate an
account role within a session (
USE ROLE). - Database roles are scoped to a single database. They can hold privileges on objects inside that database, but a database role cannot be activated in a session on its own. Rather, database roles can only be useful when granted to an account role.
Most teams organize their roles using the access-role/functional-role pattern:
- Access roles hold privileges on objects, like a
readerthat canSELECTor awriterthat canINSERT. Inside a database, database roles (e.g.dbreader/dbwriter) do the same job. - Functional roles map to what a person does, like
analyst. A functional role isn't granted object privileges directly; instead it's granted the access roles it needs. Users are then granted functional roles.
Put together, privileges roll up into access roles, access roles (and, via the bridge, database roles) roll up into a functional role, and the functional role is granted to a user:
+---------------------+
| Object privileges   |
| e.g. SELECT, INSERT |
+--+------------------+
   |
   | granted to
   v
+--+------------------------------------+
| Access role: reader / writer          |
| or database role: dbreader / dbwriter |
+--+------------------------------------+
   |
   | granted to
   v
+--+-----------------------+
| Functional role: analyst |
| (an account role)        |
+--+-----------------------+
   |
   | granted to
   v
+--+--------+
| User: kim |
+--+--------+
Atlas is built around this pattern, and the running example below implements it end to end.
For a full reference, see Snowflake's Overview of Access Control.
The building blocks: four HCL blocks
Atlas models Snowflake access control with four top-level HCL blocks. They're all realm-level (alongside
schema, table, and view, not nested inside them). See full reference in the
HCL for Snowflake doc.
| Block | Maps to | Key attributes | member_of may reference |
|---|---|---|---|
role "x" {} | account role (CREATE ROLE) | comment, member_of | account roles and database roles |
database_role "x" {} | database role (CREATE DATABASE ROLE) | comment, member_of | database roles only |
user "x" {} | role grants only (no CREATE/DROP USER) | member_of | account roles only |
permission {} | GRANT / REVOKE | to, for, privileges, grantable | — |
There are two limitations:
- Atlas does not create or drop Snowflake users. A
userblock manages role membership only: the user must already exist in your account or elseapplyfails. Provisioning users, passwords, and default warehouses stays outside Atlas. - A
permissioncan targetDATABASE,schema,table, orview, not yet functions, procedures, sequences, stages, warehouses, or individual columns.
Add the following to your schema.sf.hcl file. We give every role a short team-code prefix
(here an, for the analytics team), so reader becomes an_reader, analyst becomes an_analyst,
and so on. That naming convention is what lets each team scope Atlas to just its own roles later
(swap an for your team's code).
# Database roles: hold object privileges inside the database; they may nest.
database_role "an_dbreader" {}
database_role "an_dbwriter" {
  comment   = "db writes"
  member_of = [database_role.an_dbreader]
}

# Account roles: `an_analyst` aggregates the access roles AND a database role (the bridge).
role "an_reader" {}
role "an_writer" {}
role "an_analyst" {
  comment   = "analytics"
  member_of = [role.an_reader, role.an_writer, database_role.an_dbreader]
}

# `kim` must already exist in Snowflake. Atlas only manages the role grant.
user "kim" {
  member_of = [role.an_analyst]
}
The line that ties the two role worlds together is an_analyst's member_of: it lists two account roles
(an_reader, an_writer) and a database role (an_dbreader). That last reference is the bridge, making
an_dbreader's privileges reachable by a user who activates an_analyst.
Defining Permissions
With roles in place, grant privileges on schemas, tables, and views.
permission {
  to         = database_role.an_dbreader
  for        = table.events
  privileges = [SELECT]
}
permission {
  to         = database_role.an_dbwriter
  for        = table.events
  privileges = [INSERT]
}
permission {
  to         = role.an_reader
  for        = schema.PUBLIC
  privileges = [USAGE]
}
permission {
  to         = role.an_reader
  for        = table.events
  privileges = [SELECT]
}
permission {
  to         = role.an_writer
  for        = table.events
  privileges = [INSERT]
}
permission {
  to         = role.an_analyst
  for        = view.events_view
  privileges = [SELECT]
  grantable  = true
}
Applying Changes
Run atlas schema apply to diff the desired state against the live database and execute the changes:
atlas schema apply --env snowflake
Atlas produces a plan showing every role, grant, and table it will create:
Planning migration statements (18 in total):

  -- create role "an_analyst":
    -> CREATE ROLE "an_analyst" COMMENT = 'analytics'
  -- create database role "an_dbreader":
    -> CREATE DATABASE ROLE "an_dbreader"
  -- create database role "an_dbwriter":
    -> CREATE DATABASE ROLE "an_dbwriter" COMMENT = 'db writes'
  -- create role "an_reader":
    -> CREATE ROLE "an_reader"
  -- create role "an_writer":
    -> CREATE ROLE "an_writer"
  -- grant database role "an_dbreader" to "an_analyst":
    -> GRANT DATABASE ROLE "an_dbreader" TO ROLE "an_analyst"
  -- grant role "an_reader" to "an_analyst":
    -> GRANT ROLE "an_reader" TO ROLE "an_analyst"
  -- grant role "an_writer" to "an_analyst":
    -> GRANT ROLE "an_writer" TO ROLE "an_analyst"
  -- grant database role "an_dbreader" to "an_dbwriter":
    -> GRANT DATABASE ROLE "an_dbreader" TO DATABASE ROLE "an_dbwriter"
  -- grant role "an_analyst" to user "kim":
    -> GRANT ROLE "an_analyst" TO USER "kim"
  -- grant on schema "PUBLIC" to "an_reader":
    -> GRANT USAGE ON SCHEMA "PUBLIC" TO ROLE "an_reader"
  -- create "events" table:
    -> CREATE TABLE "PUBLIC"."events" ( ... )
  -- grant on table "events" to "an_dbreader":
    -> GRANT SELECT ON TABLE "PUBLIC"."events" TO DATABASE ROLE "an_dbreader"
  -- grant on table "events" to "an_dbwriter":
    -> GRANT INSERT ON TABLE "PUBLIC"."events" TO DATABASE ROLE "an_dbwriter"
  -- grant on table "events" to "an_reader":
    -> GRANT SELECT ON TABLE "PUBLIC"."events" TO ROLE "an_reader"
  -- grant on table "events" to "an_writer":
    -> GRANT INSERT ON TABLE "PUBLIC"."events" TO ROLE "an_writer"
  -- create "events_view" view:
    -> CREATE VIEW "PUBLIC"."events_view" ( ... ) AS SELECT "id" FROM "PUBLIC"."events"
  -- grant on view "events_view" to "an_analyst":
    -> GRANT SELECT ON VIEW "PUBLIC"."events_view" TO ROLE "an_analyst" WITH GRANT OPTION

-------------------------------------------

? Approve or abort the plan:
  ▸ Approve and apply
    Abort
After approving, verify with atlas schema inspect:
$ atlas schema diff --env snowflake
Schemas are synced, no changes to be made.
What Atlas Manages, and What it Doesn't (Yet)
Atlas is deliberately scoped here, and knowing the edges up front saves surprises:
- Atlas never emits
CREATE USER,ALTER USER, orDROP USER. Auserblock manages role membership only: the user must already exist, and users that aren't in your HCL are left untouched (Atlas won't revoke their roles). - Grant targets are limited to
DATABASE,schema,table, andview. Functions, procedures, sequences, stages, tags, warehouses, and column-level grants aren't managed. - The privilege vocabulary is fixed:
USAGE,MONITOR,MODIFY,CREATE SCHEMA,CREATE TABLE,SELECT,INSERT,UPDATE,DELETE,REFERENCES, andALL. - System roles (
ACCOUNTADMIN,SECURITYADMIN,SYSADMIN,USERADMIN,ORGADMIN,PUBLIC, and the rest) are skipped on inspection, so you can't accidentally drop them. for = DATABASEgrants are inspect-only. Grants on schemas, tables, and views are planned and applied normally, but a database-wide grant bakes the database name into its SQL, which differs between your dev and target databases, so Atlas can't plan it via diff. It surfaces such grants oninspect; manage them out of band.
These limits aside, the pattern that matters most still holds: roles and object grants as reviewable code.
Every access change becomes a commit with an author and a diff, reviewed through the same pull-request flow
as the rest of your schema. atlas schema diff still catches what slips through, a stray GRANT from a
worksheet shows up in review instead of becoming a mystery, though database-wide grants and the unmanaged
object types above remain blind spots.
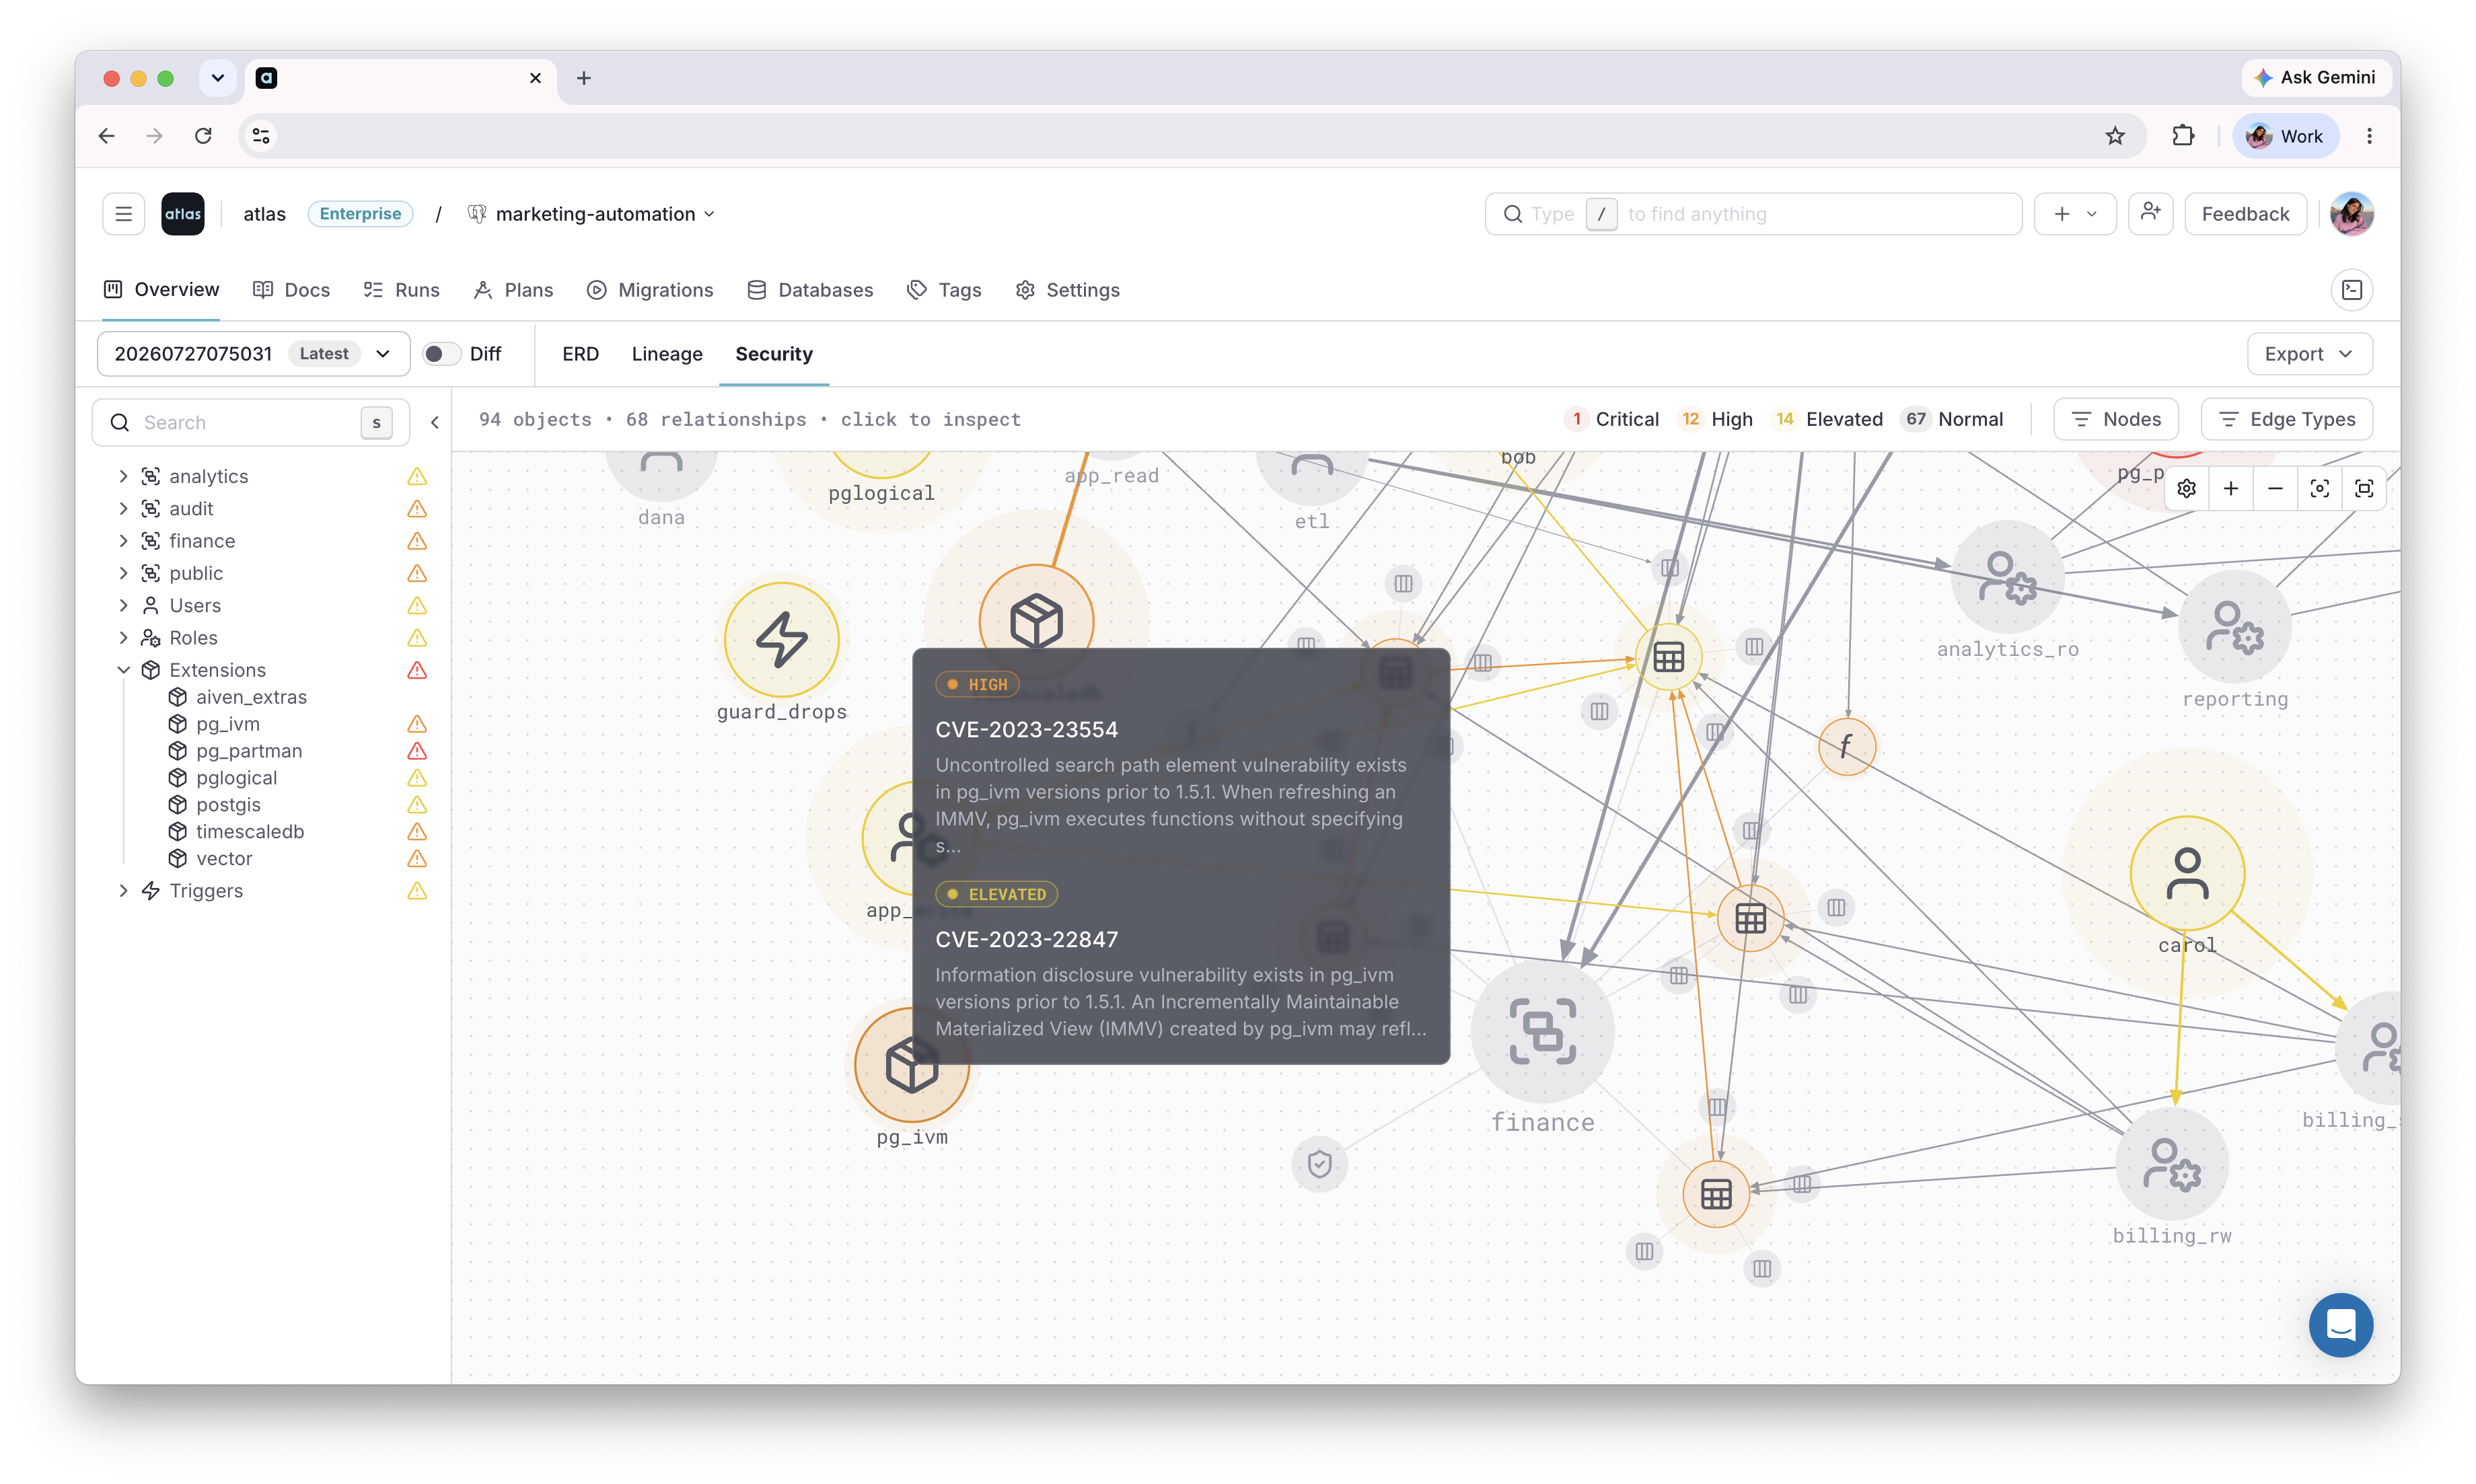
Visualize on Atlas Registry
Once these roles and grants are applied, use the Security Graph to see how they connect across the repository, and flag any risky access patterns automatically.
Next Steps
- Getting Started with Snowflake - the full schema-management workflow this guide builds on
- Snowflake Lineage Graph - trace column-level lineage across the tables and views your roles grant access to
- CI/CD setup - deploy declarative schemas to production
Have questions? Feedback? Find our team on our Discord server or schedule a demo.