CI/CD for Databases on GitLab (Declarative)
GitLab is a popular, open-source alternative to GitHub. In addition to a self-hosted version, GitLab also offers a hosted version at gitlab.com. Similar to GitHub, GitLab offers users storage for Git repositories, issue tracking, and CI/CD pipelines.
In this guide we will demonstrate how to use GitLab CI and Atlas to setup CI pipelines for your database schema changes using the declarative migrations workflow.
Prerequisites
Installing Atlas
- macOS + Linux
- Homebrew
- Docker
- Windows
- CI
- Manual Installation
To download and install the latest release of the Atlas CLI, simply run the following in your terminal:
curl -sSf https://atlasgo.sh | sh
Get the latest release with Homebrew:
brew install ariga/tap/atlas
To pull the Atlas image and run it as a Docker container:
docker pull arigaio/atlas
docker run --rm arigaio/atlas --help
If the container needs access to the host network or a local directory, use the --net=host flag and mount the desired
directory:
docker run --rm --net=host \
  -v $(pwd)/migrations:/migrations \
  arigaio/atlas migrate apply \
  --url "mysql://root:pass@:3306/test"
Download the latest release and move the atlas binary to a file location on your system PATH.
GitHub Actions
Use the setup-atlas action to install Atlas in your GitHub Actions workflow:
- uses: ariga/setup-atlas@v0
  with:
    cloud-token: ${{ secrets.ATLAS_CLOUD_TOKEN }}
Other CI Platforms
For other CI/CD platforms, use the installation script. See the CI/CD integrations for more details.
Installation instructions can be found here.
After installing Atlas locally, you will need to log in to your organization. You can do this by running the following command:
atlas login
Creating a bot token
In order to report the results of your CI runs to Atlas Cloud, you will need to create a bot token for Atlas Cloud to use.
Follow these instructions to create a token and copy it.
Next, in your Gitlab project go to Settings -> CI/CD -> Variables and create a new variable called
ATLAS_CLOUD_TOKEN. Paste your token in the value field.
Make sure the variables are exported (the "Protect variable" checkbox is unchecked), so that they are available to all branches.
Creating a variable for your database URL
To avoid having plain-text database URLs which may contain sensitive information in your configuration files, create
another variable named DB_URL and populate it with the URL (connection string) of your database.
To learn more about formatting URLs for different databases, see the URL documentation.
Creating a Gitlab access token (optional)
Atlas will need permissions to comment lint reports on merge requests. To enable it, in your Gitlab project go to Settings -> Access Tokens. Create a new token. The role field should be set to "Reporter" or higher, and the "API" checkbox should be checked.
Copy the token, and then go to Settings -> CI/CD -> Variables and create
a new variable called GITLAB_TOKEN. Paste the token in the value field.
Offline Access
Atlas GitLab CI Components include built-in grant caching for offline continuity by storing .atlas as cache/artifacts and restoring it for subsequent runs.
No additional cache setup is required if you use the official Atlas components.
Declarative Migrations Workflow
In the declarative workflow, developers provide the desired state of the database, as code. Atlas can read database schemas from various formats such as plain SQL, Atlas HCL, ORM models, and even another live database. Atlas then connects to the target database and calculates the diff between the current state and the desired state. It then generates a migration plan to bring the database to the desired state.
In this guide, we will use the SQL schema format.
Our goal
When a merge request containing changes to the schema, we want Atlas to:
- Compare the current state (your database) with the new desired state.
- Create a migration plan show it to the user for approval.
- Mark the plan as approved when the merge request is approved and merged.
- During deployment, use the approved plan to apply the changes to the database.
Creating a simple SQL schema
Create a file named schema.sql and fill it with the following content:
-- create table "users"
CREATE TABLE users(
	id int NOT NULL,
	name varchar(100) NULL,
	PRIMARY KEY(id)
);

-- create table "blog_posts"
CREATE TABLE blog_posts(
	id int NOT NULL,
	title varchar(100) NULL,
	body text NULL,
	author_id int NULL,
	PRIMARY KEY(id),
	CONSTRAINT author_fk FOREIGN KEY(author_id) REFERENCES users(id)
);
Then, create a configuration file for Atlas named atlas.hcl as follows:
env "gitlab" {
    url = getenv("DB_URL")
    schema {
        src = "file://schema.sql"
        repo {
            name = "app"
        }
    }
}
Pushing the schema to Atlas Cloud
To push our initial schema to the Schema Registry on Atlas Cloud, run the following command:
- PostgreSQL
- MySQL
- MariaDB
- SQLite
- SQL Server
- ClickHouse
$ atlas schema push app \
  --dev-url "docker://postgres/15/dev?search_path=public" \
  --env gitlab
$ atlas schema push app \
  --dev-url "docker://mysql/8/dev" \
  --env gitlab
$ atlas schema push app \
  --dev-url "docker://mariadb/latest/dev" \
  --env gitlab
$ atlas schema push app \
  --dev-url "sqlite://dev?mode=memory" \
  --env gitlab
$ atlas schema push app \
  --dev-url "docker://sqlserver/2022-latest" \
  --env gitlab
$ atlas schema push app \
  --dev-url "docker://clickhouse/23.11" \
  --env gitlab
Setting up GitLab CI
Create a .gitlab-ci.yml file with the following pipelines, based on the type of your database.
- PostgreSQL
- MySQL
- MariaDB
- SQLite
- SQL Server
- ClickHouse
image: ubuntu:latest

services:
  - postgres:latest

variables:
  POSTGRES_DB: dev
  POSTGRES_USER: user
  POSTGRES_PASSWORD: pass

stages:
  - plan
  - push
  - apply

include:
  - component: $CI_SERVER_FQDN/arigaio/atlas/schema-plan@~latest
    inputs:
      stage: plan
      env: gitlab
      dev-url: "postgres://user:pass@postgres/dev?sslmode=disable"
      atlas-cloud-token: $ATLAS_CLOUD_TOKEN

  - component: $CI_SERVER_FQDN/arigaio/atlas/schema-push@~latest
    inputs:
      stage: push
      env: gitlab
      dev-url: "postgres://user:pass@postgres/dev?sslmode=disable"
      latest: true
      atlas-cloud-token: $ATLAS_CLOUD_TOKEN

  - component: $CI_SERVER_FQDN/arigaio/atlas/schema-plan-approve@~latest
    inputs:
      stage: push
      env: gitlab
      dev-url: "postgres://user:pass@postgres/dev?sslmode=disable"
      atlas-cloud-token: $ATLAS_CLOUD_TOKEN

  - component: $CI_SERVER_FQDN/arigaio/atlas/schema-apply@~latest
    inputs:
      stage: apply
      env: gitlab
      dev-url: "postgres://user:pass@postgres/dev?sslmode=disable"
      atlas-cloud-token: $ATLAS_CLOUD_TOKEN
image: ubuntu:latest

services:
  - mysql:latest

variables:
  MYSQL_ROOT_PASSWORD: pass
  MYSQL_DATABASE: dev

stages:
  - plan
  - push
  - apply

include:
  - component: $CI_SERVER_FQDN/arigaio/atlas/schema-plan@~latest
    inputs:
      stage: plan
      env: gitlab
      dev-url: "mysql://root:pass@mysql/dev"
      atlas-cloud-token: $ATLAS_CLOUD_TOKEN

  - component: $CI_SERVER_FQDN/arigaio/atlas/schema-push@~latest
    inputs:
      stage: push
      env: gitlab
      dev-url: "mysql://root:pass@mysql/dev"
      latest: true
      atlas-cloud-token: $ATLAS_CLOUD_TOKEN

  - component: $CI_SERVER_FQDN/arigaio/atlas/schema-plan-approve@~latest
    inputs:
      stage: push
      env: gitlab
      dev-url: "mysql://root:pass@mysql/dev"
      atlas-cloud-token: $ATLAS_CLOUD_TOKEN

  - component: $CI_SERVER_FQDN/arigaio/atlas/schema-apply@~latest
    inputs:
      stage: apply
      env: gitlab
      dev-url: "mysql://root:pass@mysql/dev"
      atlas-cloud-token: $ATLAS_CLOUD_TOKEN
image: ubuntu:latest

services:
  - mariadb:latest

variables:
  MYSQL_ROOT_PASSWORD: pass
  MYSQL_DATABASE: dev

stages:
  - plan
  - push
  - apply

include:
  - component: $CI_SERVER_FQDN/arigaio/atlas/schema-plan@~latest
    inputs:
      stage: plan
      env: gitlab
      dev-url: "mariadb://root:pass@mysql/dev"
      atlas-cloud-token: $ATLAS_CLOUD_TOKEN

  - component: $CI_SERVER_FQDN/arigaio/atlas/schema-push@~latest
    inputs:
      stage: push
      env: gitlab
      dev-url: "mariadb://root:pass@mysql/dev"
      latest: true
      atlas-cloud-token: $ATLAS_CLOUD_TOKEN

  - component: $CI_SERVER_FQDN/arigaio/atlas/schema-plan-approve@~latest
    inputs:
      stage: push
      env: gitlab
      dev-url: "mariadb://root:pass@mysql/dev"
      atlas-cloud-token: $ATLAS_CLOUD_TOKEN

  - component: $CI_SERVER_FQDN/arigaio/atlas/schema-apply@~latest
    inputs:
      stage: apply
      env: gitlab
      dev-url: "mariadb://root:pass@mysql/dev"
      atlas-cloud-token: $ATLAS_CLOUD_TOKEN
image: ubuntu:latest

stages:
  - plan
  - push
  - apply

include:
  - component: $CI_SERVER_FQDN/arigaio/atlas/schema-plan@~latest
    inputs:
      stage: plan
      env: gitlab
      dev-url: "sqlite://db?mode=memory"
      atlas-cloud-token: $ATLAS_CLOUD_TOKEN

  - component: $CI_SERVER_FQDN/arigaio/atlas/schema-push@~latest
    inputs:
      stage: push
      env: gitlab
      dev-url: "sqlite://db?mode=memory"
      latest: true
      atlas-cloud-token: $ATLAS_CLOUD_TOKEN

  - component: $CI_SERVER_FQDN/arigaio/atlas/schema-plan-approve@~latest
    inputs:
      stage: push
      env: gitlab
      dev-url: "sqlite://db?mode=memory"
      atlas-cloud-token: $ATLAS_CLOUD_TOKEN

  - component: $CI_SERVER_FQDN/arigaio/atlas/schema-apply@~latest
    inputs:
      stage: apply
      env: gitlab
      dev-url: "sqlite://db?mode=memory"
      atlas-cloud-token: $ATLAS_CLOUD_TOKEN
image: ubuntu:latest

services:
  - name: mcr.microsoft.com/mssql/server:2022-latest
    alias: sqlserver

variables:
    ACCEPT_EULA: Y
    MSSQL_PID: Developer
    MSSQL_SA_PASSWORD: P@ssw0rd0995

stages:
  - plan
  - push
  - apply

include:
  - component: $CI_SERVER_FQDN/arigaio/atlas/schema-plan@~latest
    inputs:
      stage: plan
      env: gitlab
      dev-url: sqlserver://sa:P@ssw0rd0995@sqlserver:1433?database=master
      atlas-cloud-token: $ATLAS_CLOUD_TOKEN

  - component: $CI_SERVER_FQDN/arigaio/atlas/schema-push@~latest
    inputs:
      stage: push
      env: gitlab
      dev-url: sqlserver://sa:P@ssw0rd0995@sqlserver:1433?database=master
      latest: true
      atlas-cloud-token: $ATLAS_CLOUD_TOKEN

  - component: $CI_SERVER_FQDN/arigaio/atlas/schema-plan-approve@~latest
    inputs:
      stage: push
      env: gitlab
      dev-url: sqlserver://sa:P@ssw0rd0995@sqlserver:1433?database=master
      atlas-cloud-token: $ATLAS_CLOUD_TOKEN

  - component: $CI_SERVER_FQDN/arigaio/atlas/schema-apply@~latest
    inputs:
      stage: apply
      env: gitlab
      dev-url: sqlserver://sa:P@ssw0rd0995@sqlserver:1433?database=master
      atlas-cloud-token: $ATLAS_CLOUD_TOKEN
image: ubuntu:latest

services:
  - name: clickhouse/clickhouse-server:23.10
    alias: clickhouse

variables:
  CLICKHOUSE_DB: dev
  CLICKHOUSE_DEFAULT_ACCESS_MANAGEMENT: 1
  CLICKHOUSE_PASSWORD: pass
  CLICKHOUSE_USER: root

stages:
  - plan
  - push
  - apply

include:
  - component: $CI_SERVER_FQDN/arigaio/atlas/schema-plan@~latest
    inputs:
      stage: plan
      env: gitlab
      dev-url: clickhouse://root:pass@localhost:9000/dev
      atlas-cloud-token: $ATLAS_CLOUD_TOKEN

  - component: $CI_SERVER_FQDN/arigaio/atlas/schema-push@~latest
    inputs:
      stage: push
      env: gitlab
      dev-url: clickhouse://root:pass@localhost:9000/dev
      latest: true
      atlas-cloud-token: $ATLAS_CLOUD_TOKEN

  - component: $CI_SERVER_FQDN/arigaio/atlas/schema-plan-approve@~latest
    inputs:
      stage: push
      env: gitlab
      dev-url: clickhouse://root:pass@localhost:9000/dev
      atlas-cloud-token: $ATLAS_CLOUD_TOKEN

  - component: $CI_SERVER_FQDN/arigaio/atlas/schema-apply@~latest
    inputs:
      stage: apply
      env: gitlab
      dev-url: clickhouse://root:pass@localhost:9000/dev
      atlas-cloud-token: $ATLAS_CLOUD_TOKEN
-
When a new merge request is opened, the
schema-plancomponent will check if the desired state of the schema was changed. If it was, Atlas will generate a migration plan, lint it and post the report as a merge request comment. -
When the merge request is merged, two things happen: First, the updated schema is pushed to the schema registry by the
schema-pushcomponent. Second, the plan that was created in the merege request will be approved. -
The
schema-applycomponent will then be used to apply the new state of the schema to the database, using the plan that was just approved.
Testing our pipeline
Let's see our CI/CD pipeline in action!
Step 1: make a schema change
Let's add the "address" column to the users table:
-- create table "users"
CREATE TABLE users(
	id int NOT NULL,
	name varchar(100) NULL,
	address varchar(100) NULL,
	PRIMARY KEY(id)
);

-- create table "blog_posts"
CREATE TABLE blog_posts(
	id int NOT NULL,
	title varchar(100) NULL,
	body text NULL,
	author_id int NULL,
	PRIMARY KEY(id),
	CONSTRAINT author_fk FOREIGN KEY(author_id) REFERENCES users(id)
);
Now, let's commit the change to a new branch, push it to GitLab and open a merge request.
The schema-plan component will use Atlas to create a migration plan from the current state of the database to the new desired state:
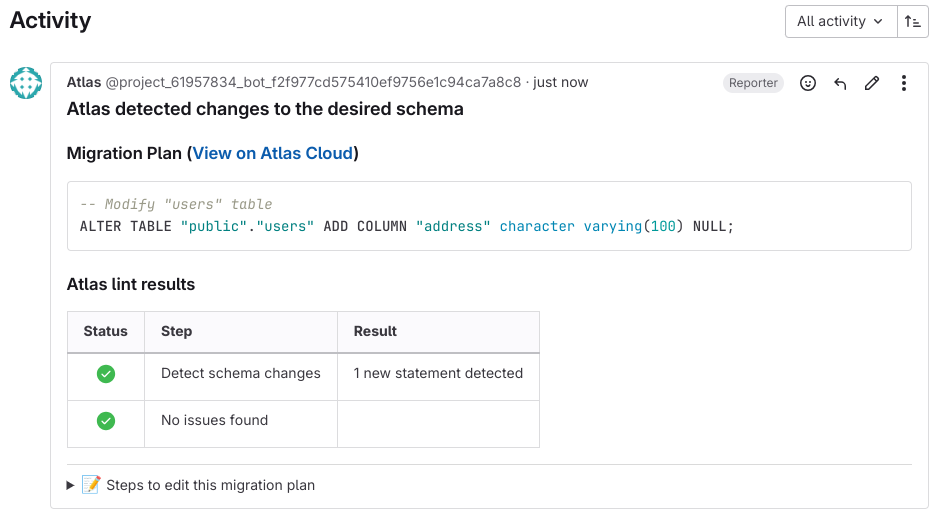
There are two things to note:
- The comment also includes instructions to edit the plan. This is usefull when the plan has lint issues (for example, dropping a column will raise a "desctructive changes" error).
- The plan is created in a "pending" state, which means Atlas can't use it yet against the real database.
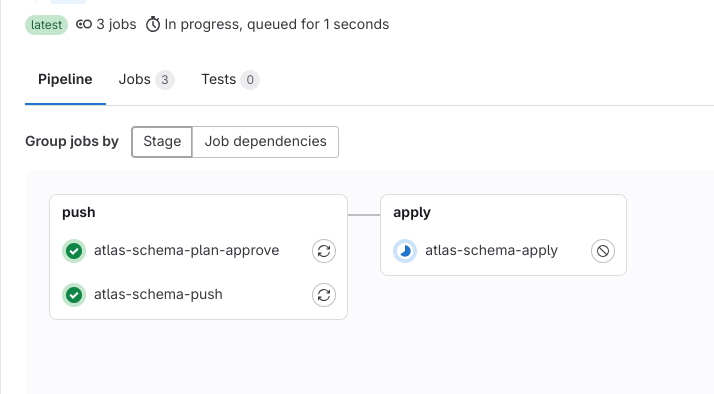
Merging the changes
Let's hit the merge button to merge the changes with the main branch. A new pipeline will be fired, with 3 jobs:
The schema-plan-approve job will approve the plan that was generated earlier, the schema-push job will sync the new desired state in the schema registry,
And then the schema-apply job will deploy the changes to our database.
The last thing to do is to inspect our database to make sure the changes were applied correctly:
- PostgreSQL
- MySQL
- MariaDB
- SQLite
- SQL Server
- ClickHouse
$ atlas schema diff \
  --from $DB_URL \
  --to "file://schema.sql" \
  --dev-url "docker://postgres/15/dev?search_path=public"
Schemas are synced, no changes to be made.
$ atlas schema diff \
  --from $DB_URL \
  --to "file://schema.sql" \
  --dev-url "docker://mysql/8/dev"
Schemas are synced, no changes to be made.
$ atlas schema diff \
  --from $DB_URL \
  --to "file://schema.sql" \
  --dev-url "docker://mariadb/latest/dev"
Schemas are synced, no changes to be made.
$ atlas schema diff \
  --from $DB_URL \
  --to "file://schema.sql" \
  --dev-url "sqlite://dev?mode=memory"
Schemas are synced, no changes to be made.
$ atlas schema diff \
  --from $DB_URL \
  --to "file://schema.sql" \
  --dev-url "docker://sqlserver/2022-latest"
Schemas are synced, no changes to be made.
$ atlas schema diff \
  --from $DB_URL \
  --to "file://schema.sql" \
  --dev-url "docker://clickhouse/23.11"
Schemas are synced, no changes to be made.
Wrapping up
In this guide, we demonstrated how to use GitLab CI/CD with Atlas to set up a modern CI/CD pipeline for declarative schema migrations. Here's what we accomplished:
- Automated migration linting on every pull request to catch issues early
- Centralized migration management by pushing to Atlas Cloud's Schema Registry
- Automated deployments to your target database when changes are merged
For more information on the declarative workflow, see the Declarative Migrations documentation.
Next steps
- Learn about Atlas Cloud for enhanced collaboration
- Explore migration testing to validate your migrations
- Read about declarative migrations as an alternative workflow
- Check out the GitLab CI/CD reference for all available actions