CI/CD for Databases with Azure DevOps Repos
Azure DevOps provides a complete DevOps solution with integrated source control (Azure Repos) and CI/CD pipelines (Azure Pipelines). When your code is hosted in Azure Repos, you can configure pipelines to automatically trigger on pull requests and branch changes, creating a seamless development workflow.
In this guide, we will demonstrate how to set up Atlas database CI/CD workflows using Azure Repos with Azure DevOps Pipelines, including the necessary branch policies and PR triggers.
Prerequisites
Installing Atlas
- macOS + Linux
- Homebrew
- Docker
- Windows
- CI
- Manual Installation
To download and install the latest release of the Atlas CLI, simply run the following in your terminal:
curl -sSf https://atlasgo.sh | sh
Get the latest release with Homebrew:
brew install ariga/tap/atlas
To pull the Atlas image and run it as a Docker container:
docker pull arigaio/atlas
docker run --rm arigaio/atlas --help
If the container needs access to the host network or a local directory, use the --net=host flag and mount the desired
directory:
docker run --rm --net=host \
  -v $(pwd)/migrations:/migrations \
  arigaio/atlas migrate apply \
  --url "mysql://root:pass@:3306/test"
Download the latest release and move the atlas binary to a file location on your system PATH.
GitHub Actions
Use the setup-atlas action to install Atlas in your GitHub Actions workflow:
- uses: ariga/setup-atlas@v0
  with:
    cloud-token: ${{ secrets.ATLAS_CLOUD_TOKEN }}
Other CI Platforms
For other CI/CD platforms, use the installation script. See the CI/CD integrations for more details.
After installing Atlas locally, log in to your organization by running the following command:
atlas login
Setting up Azure DevOps
- Create an Azure DevOps organization if you don't have one already.
- Create a new project in your Azure DevOps organization.
- Create or import a repository in Azure Repos for your project.
- Add the Atlas extension to your organization from the Azure DevOps Marketplace.
Creating an Atlas Cloud bot token
To report CI run results to Atlas Cloud, create an Atlas Cloud bot token by following these instructions. Copy the token and store it as a secret using the following steps.
Creating secrets in Azure DevOps
In your Azure DevOps project, go to Pipelines → Library and create a variable group:
- Create a variable group named "atlas-vars".
- Add the following variables:
ATLAS_TOKEN- Your Atlas Cloud bot token (mark as secret)DB_URL- Your database connection string (mark as secret)
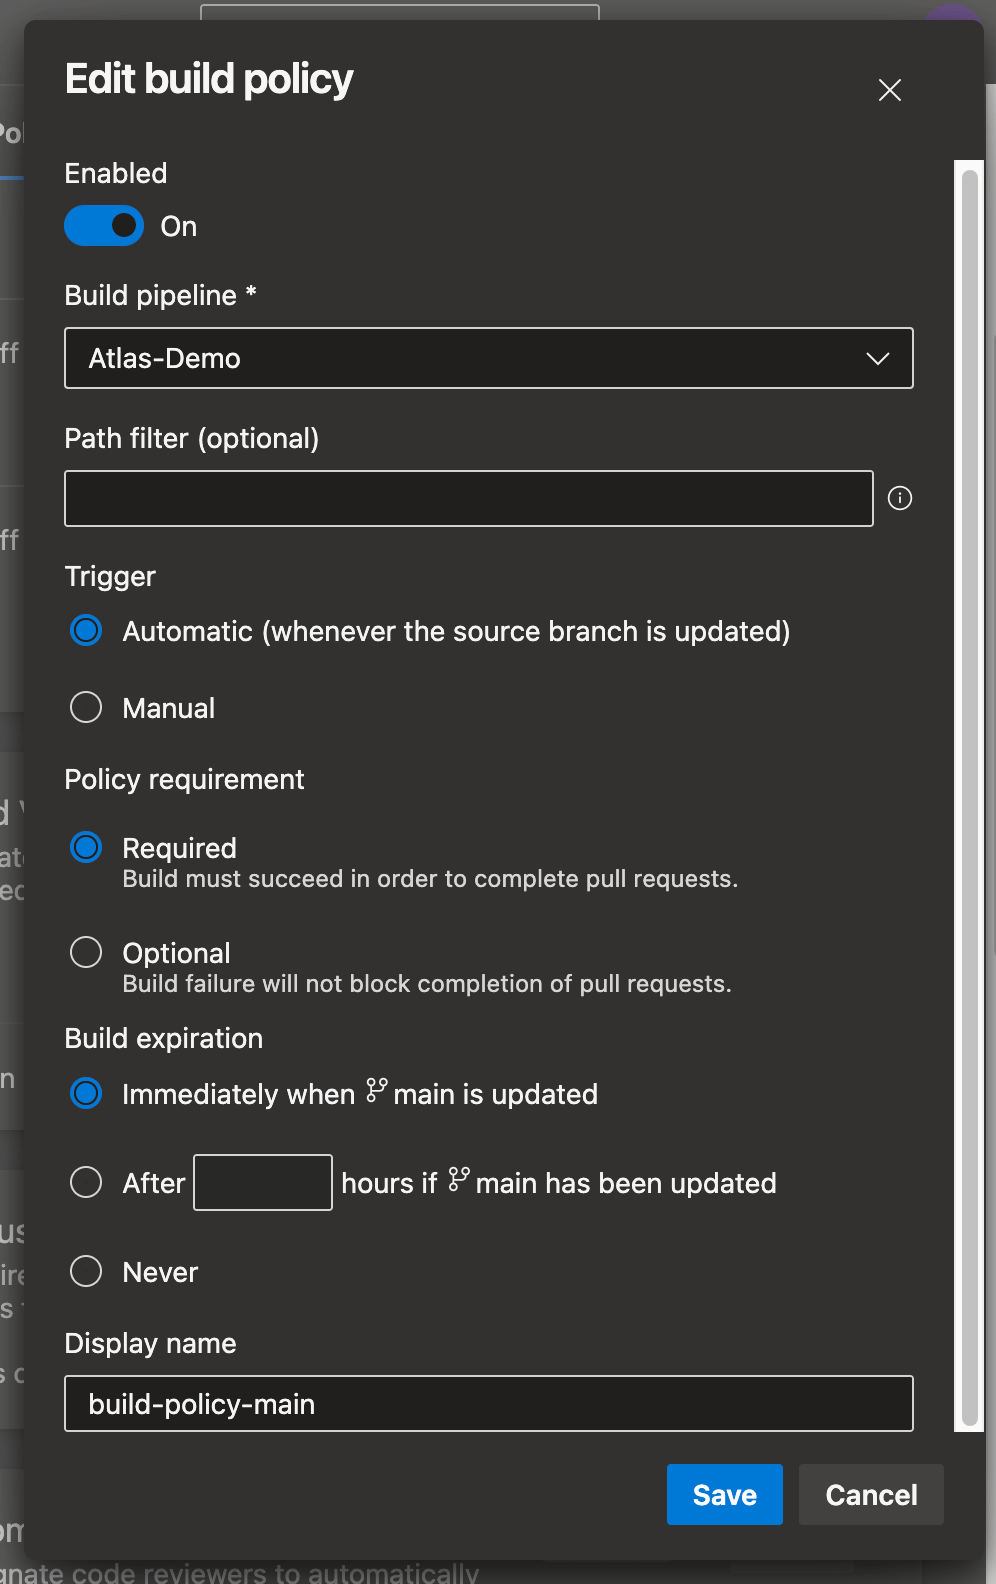
Configuring branch policies
To ensure your pipeline runs on pull requests, you need to configure branch policies:
- In your Azure DevOps project, go to Repos → Branches.
- Find your main branch (usually
mainormaster) and click the three dots (...). - Select Branch policies.
- Under Build validation, click Add build policy.
- Configure the build policy:
- Build pipeline: Select the pipeline you'll create (you can come back to this step after creating the pipeline)
- Trigger: Set to Automatic
- Policy requirement: Set to Required to prevent merging without a successful build
- Build expiration: Set to Immediately or as per your requirements
- Click Save.
Granting pipeline permissions
Azure DevOps requires explicit permissions for pipelines to access repositories and perform certain operations. You need to grant the following permissions:
Repository permissions:
- In your Azure DevOps project, go to Project Settings → Repositories.
- Select your repository and go to the Security tab.
- Find the build service account:
[Project Name] Build Service ([Organization Name]). - Grant the following permissions:
- Contribute: Allow
- Contribute to pull requests: Allow
- Create branch: Allow
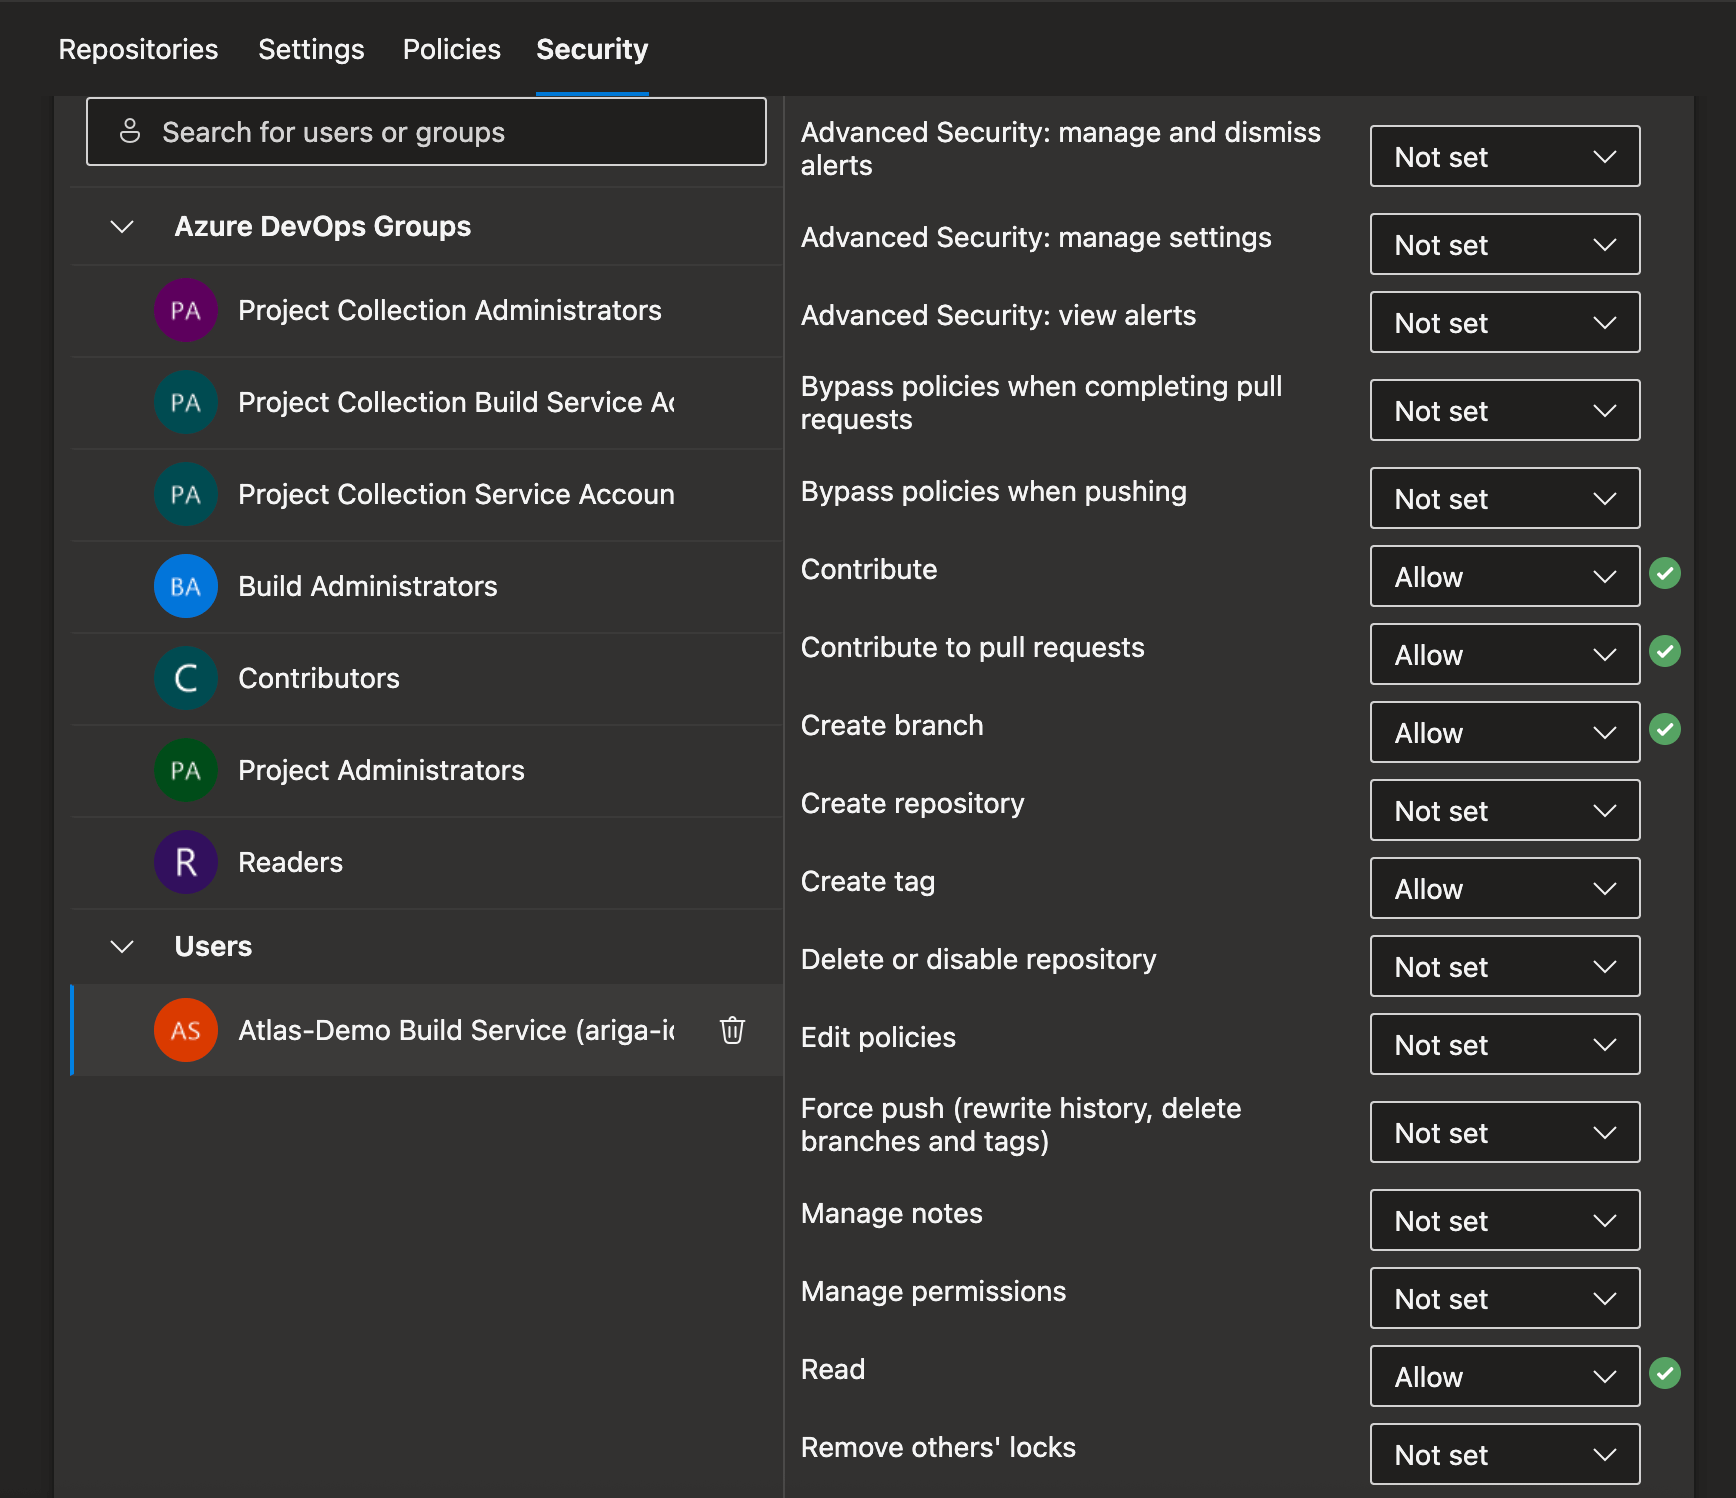
If you encounter permission errors during pipeline execution, check that the build service account has the necessary permissions. Common issues include insufficient repository access or missing project-level permissions.
Choose a workflow
Atlas supports two types of schema management workflows:
- Versioned migrations - Changes to the schema are defined as migrations (SQL scripts) and applied in sequence to reach the desired state.
- Declarative workflow - The desired state of the database is defined as code, and Atlas calculates a plan to reach it.
To learn more about the differences and tradeoffs between these approaches, see Declarative vs Versioned.
Declarative workflow
In the declarative workflow, you define the desired schema state (for example, using Atlas HCL or SQL schema files), and Atlas computes the changes required to reach it.
A typical Azure DevOps pull request (PR) flow looks like this:
- Plan on pull requests: run
atlas schema planand review the planned SQL changes in the job logs (and enforce it via branch policies). - Apply on main: after merge, run
atlas schema applyto deploy changes to the target database.
Prerequisites
In addition to the general prerequisites above, you will need:
- An Atlas Cloud bot token stored as
ATLAS_TOKEN(secret). - A target database connection string stored as
DB_URL(secret). - A dev database URL available to CI for planning (either in
atlas.hclas the environmentdevdatabase, or passed viadev_url).
Declarative project layout
One common layout is:
schema.hcl(or aschema/directory) containing your desired schemaatlas.hcldescribing environments and targetsazure-pipelines.ymlcontaining the PR plan + main apply pipeline
Below is a minimal atlas.hcl example. Replace the URLs with your own values.
env "ci" {
  # Dev database used for planning/analysis.
  # Replace this with a suitable dev database for your project.
  dev = "docker://postgres/16/dev?search_path=public"

  schema {
    src = "file://schema.hcl"
    repo {
      name = "my-atlas-repo"
    }
  }
}
And an example desired schema file:
schema "public" {}

table "users" {
  schema = schema.public
  column "id" {
    type = int
  }
  column "email" {
    type = varchar(255)
    null = false
  }
  primary_key {
    columns = [column.id]
  }
}
Set up Azure DevOps Pipeline
This example uses a single pipeline with tasks. It runs schema plan on pull requests and schema push + schema apply on merges to main.
Create an azure-pipelines.yml file in the repository root.
trigger:
  branches:
    include:
      - main
  paths:
    include:
      - 'schema.*'
      - 'schema/**'
      - 'atlas.hcl'
      - 'azure-pipelines.yml'

pr:
  branches:
    include:
      - main
  paths:
    include:
      - 'schema.*'
      - 'schema/**'
      - 'atlas.hcl'

pool:
  vmImage: ubuntu-latest

variables:
  - group: atlas-vars

steps:
  - checkout: self
    persistCredentials: true
    fetchDepth: 0

  - script: curl -sSf https://atlasgo.sh | sh
    displayName: Install Atlas

  - script: atlas version
    displayName: Atlas Version

  - script: atlas login --token $(ATLAS_TOKEN)
    displayName: Atlas Login

  # Plan schema changes on PRs.
  - task: AtlasAction@1
    condition: eq(variables['Build.Reason'], 'PullRequest')
    env:
      SYSTEM_ACCESSTOKEN: $(System.AccessToken)
    inputs:
      action: 'schema plan'
      env: 'ci'
      from: $(DB_URL)
    displayName: Plan schema changes

  # Push the desired schema to Atlas Registry on merges to main.
  - task: AtlasAction@1
    condition: and(succeeded(), eq(variables['Build.SourceBranchName'], 'main'))
    name: PushSchema
    inputs:
      action: 'schema push'
      env: 'ci'
      latest: true
    displayName: Push schema

  # Apply schema changes on merges to main.
  - task: AtlasAction@1
    condition: and(succeeded(), eq(variables['Build.SourceBranchName'], 'main'))
    inputs:
      action: 'schema apply'
      env: 'ci'
      url: $(DB_URL)
      auto_approve: 'true'
    displayName: Apply schema changes
Expected output
On pull requests, you should see the pipeline run the schema plan action and print the planned SQL changes in the comment section.
On merges to main, you should see the pipeline run the schema push action (to publish the desired schema to Atlas Registry), and then run the schema apply action to apply changes to the target database.
Versioned Migrations Workflow
In the versioned workflow, changes to the schema are represented by a migration directory in your codebase. Each file in this directory represents a transition to a new version of the schema.
Based on our blueprint for Modern CI/CD for Databases, our pipeline will:
- Lint new migration files whenever a pull request is opened.
- Push the migration directory to the Schema Registry when changes are merged to the main branch.
- Apply new migrations to our database.
Pushing a migration directory to Atlas Cloud
Running the following command from the parent directory of your migration directory creates a "migration directory" repo in your Atlas Cloud organization (substitute "app" with the name you want to give the new Atlas repository before running):
atlas migrate push app \
  --dev-url "docker://postgres/16/dev?search_path=public"
Replace docker://postgres/16/dev with the appropriate dev database URL for your database.
For more information on the dev database, see the dev database article.
Atlas will print a URL leading to your migrations on Atlas Cloud. You can visit this URL to view your migrations.
Setting up Azure DevOps Pipeline
Create an azure-pipelines.yml file in the root of your Azure Repos repository with the following content. Remember to replace
"app" with the real name of your repository.
trigger:
  branches:
    include:
      - main
  paths:
    include:
      - 'migrations/*'
      - 'azure-pipelines.yml'

pr:
  branches:
    include:
      - main
  paths:
    include:
      - 'migrations/*'

pool:
  vmImage: ubuntu-latest

variables:
  - group: atlas-vars

steps:
  - checkout: self
    persistCredentials: true
    fetchDepth: 0
    fetchTags: true

  - script: |
      echo "Configuring git user for commits...."
      git config user.email "azure-pipelines[bot]@users.noreply.github.com"
      git config user.name "azure-pipelines[bot]"
    displayName: 'Configure Git User for Commits'

  - script: curl -sSf https://atlasgo.sh | sh
    displayName: Install Atlas

  - script: atlas version
    displayName: Atlas Version

  - script: atlas login --token $(ATLAS_TOKEN)
    displayName: Atlas Login

    # Lint migrations on pull requests
  - task: AtlasAction@1
    condition: eq(variables['Build.Reason'], 'PullRequest')
    env:
      SYSTEM_ACCESSTOKEN: $(System.AccessToken)
    inputs:
      action: 'migrate lint'
      dir: 'file://migrations'
      dir_name: 'app-schema-2'
      config: 'file://atlas.hcl'
      env: 'ci'
    displayName: Lint Migrations

    # Push migrations to Atlas Cloud on main branch
  - task: AtlasAction@1
    condition: and(succeeded(), eq(variables['Build.SourceBranch'], 'refs/heads/main'))
    inputs:
      action: 'migrate push'
      dir: 'file://migrations'
      dir_name: 'app-schema-2'
      latest: true
      env: 'ci'
    displayName: Push Migrations

  # Apply migrations to database on main branch
  - task: AtlasAction@1
    condition: and(succeeded(), eq(variables['Build.SourceBranch'], 'refs/heads/main'))
    inputs:
      action: 'migrate apply'
      dir: 'file://migrations'
      url: $(DB_URL)
    displayName: Apply Migrations
Also, create an atlas.hcl file in the root of your Azure Repos repository with the following content:
env {
    name = atlas.env
    dev = "docker://postgres/16/dev?search_path=public" # Replace if necessary (see "Dev Database" above)
    migration {
      repo {
        name = "app" # Replace with the name of your repository in previous step
      }
    }
}
Let's break down what this pipeline does:
-
Lint on Pull Requests: The
migrate lintstep runs automatically whenever a pull request is opened that modifies themigrations/directory. Atlas analyzes the new migrations for potential issues like destructive changes, backward incompatibility, or syntax errors. Because we configured thegithubConnectionparameter, lint results appear as a comment directly on the GitHub pull request. -
Push to Registry: When changes are merged into the main branch, the
migrate pushstep pushes the migration directory to Atlas Cloud's Schema Registry. This creates a versioned snapshot of your migrations that can be referenced and deployed across environments. -
Apply to Database: The
migrate applystep deploys pending migrations to your database using the connection string stored in theDB_URLsecret.
Testing the workflow
Let's take our new pipeline for a spin. Assume we have an existing migration file in our repository:
CREATE TABLE t1
(
  c1 serial NOT NULL,
  c2 integer NOT NULL,
  c3 integer NOT NULL,

  CONSTRAINT pk PRIMARY KEY (c1)
);
Now let's add a new migration:
- Create a new branch in your Azure Repos repository and add a new migration locally
with
atlas migrate new drop_c3 --edit. Paste the following in the editor:
ALTER TABLE "t1" DROP COLUMN "c3";
-
Commit and push the changes to Azure Repos.
-
Create a pull request in Azure DevOps. This will automatically trigger the pipeline due to the branch policies you configured.
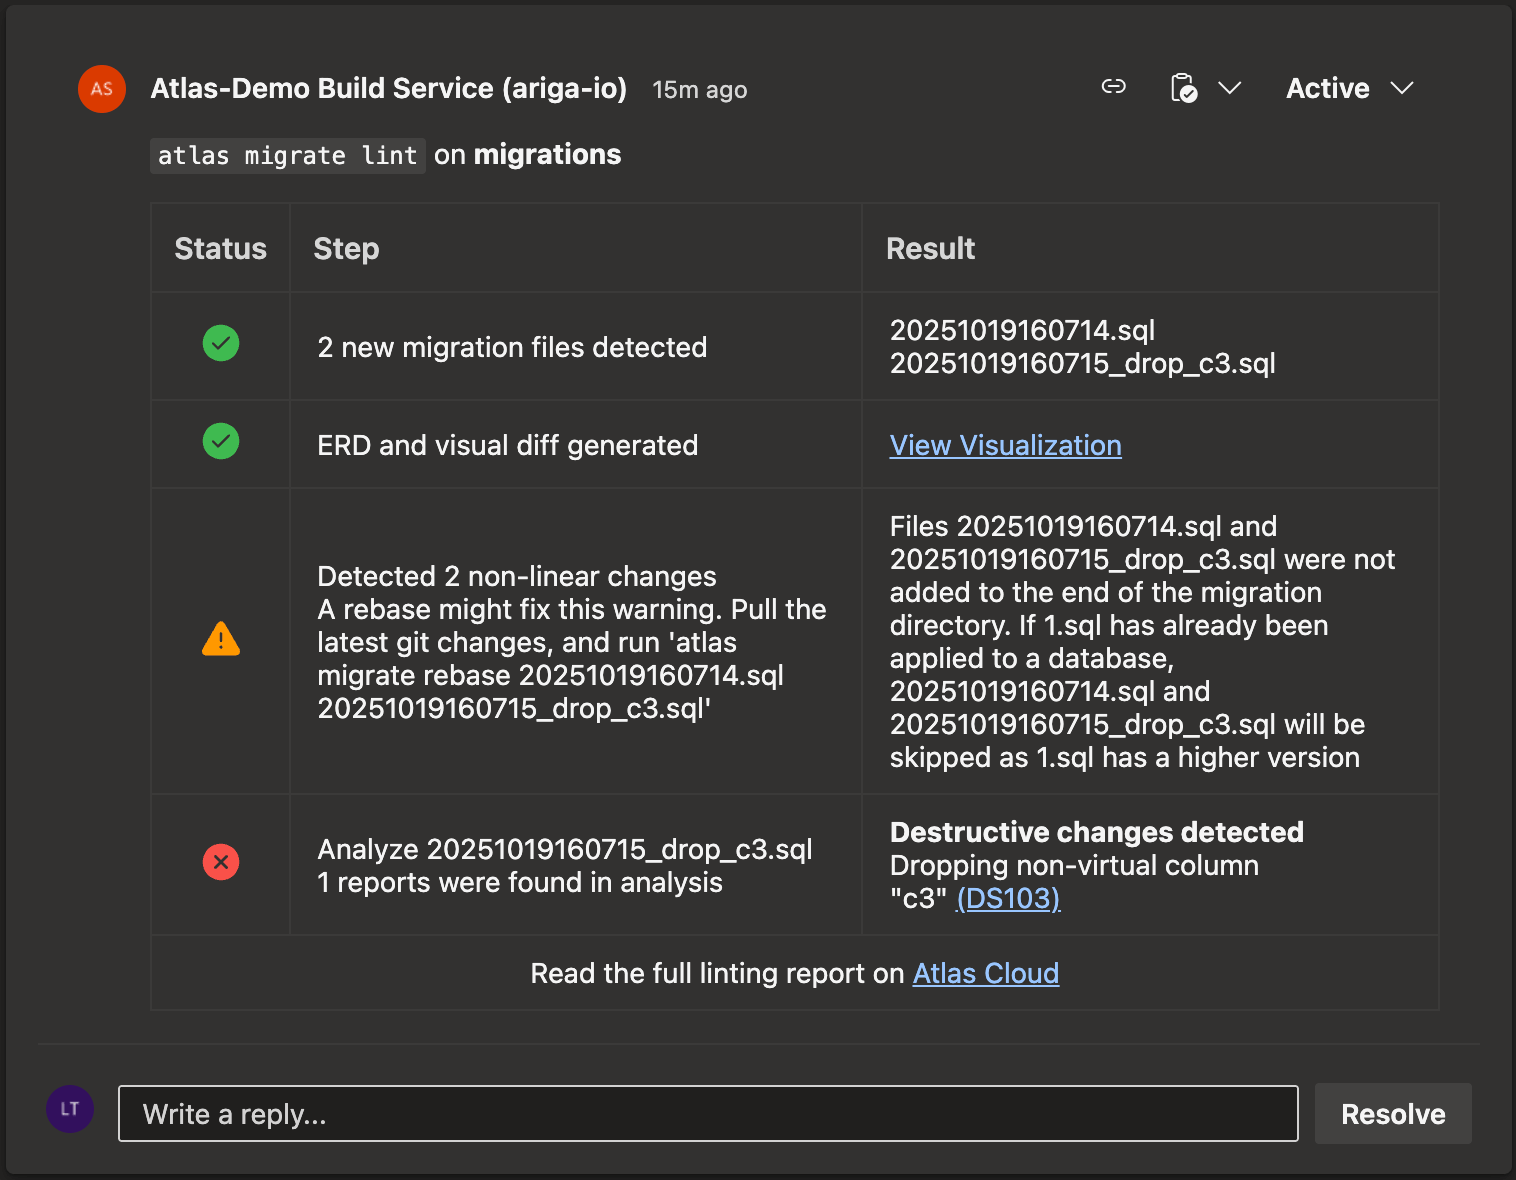
-
Check the lint report. Follow any instructions to fix the issues.
-
Complete the pull request to merge into the main branch. This will trigger the
migrate pushandmigrate applysteps. -
When the pipeline finishes running, check your database to see if the changes were applied.