Using Atlas Terraform Provider with OpenTaco (Digger)
OpenTaco (formerly Digger) is an all-in-one Terraform toolkit that provides PR automation, state management, and drift detection for your Terraform workflows. When combined with the Atlas Terraform Provider, you can automate database schema migrations directly from your pull requests—getting plan previews as PR comments and applying changes on merge.
This guide walks you through setting up Atlas Terraform Provider with OpenTaco to create a complete database migration CI/CD pipeline.
Prerequisites
Before you begin, ensure you have:
- A GitHub repository for your project
- Terraform installed
- Atlas CLI installed
- Access to a target database (we'll use PostgreSQL in this example)
How It Works
OpenTaco integrates with your GitHub repository to:
- Run
terraform planon pull requests and post results as comments - Apply changes when PRs are merged (or via CommentOps)
- Handle locking to prevent concurrent changes
- Manage state securely
When combined with Atlas, this means your database migrations are:
- Reviewed in PRs - See exactly what SQL will run before merging
- Applied automatically - Migrations run on merge without manual intervention
- Version controlled - All changes tracked in Git
Project Setup
Step 1: Define Your Database Schema
Create a schema.sql file that defines your desired database schema:
-- Create users table
CREATE TABLE users (
  id SERIAL PRIMARY KEY,
  email VARCHAR(255) NOT NULL UNIQUE,
  name VARCHAR(255) NOT NULL,
  created_at TIMESTAMP DEFAULT CURRENT_TIMESTAMP
);
Step 2: Create the Terraform Configuration
Now create your Terraform configuration. This consists of several files:
Provider Configuration
Create a main.tf file with the Atlas provider configuration:
terraform {
  required_providers {
    atlas = {
      source  = "ariga/atlas"
      version = "~> 0.10.1"
    }
  }
}

provider "atlas" {
  # The dev database is used by Atlas to normalize schemas and plan migrations.
  # Using docker:// automatically spins up a temporary container.
  dev_url = "docker://postgres/16/dev?search_path=public"
  cloud {
    repo  = "open-taco"
    token = var.atlas_token
  }
}
Variables Configuration
Create a variables.tf file to define input variables:
variable "database_url" {
  description = "The connection URL to the target database"
  type        = string
  sensitive   = true  # Marks this as sensitive to hide in logs
}

variable "atlas_token" {
  description = "Atlas token for authentication"
  type        = string
  sensitive   = true
}
Migration Resources
Create a migrations.tf file to define the Atlas migration resources:
# Data source to read the current state of migrations
# This reads from Atlas Cloud Registry and inspects the target database
data "atlas_migration" "app" {
  # URL to the migration directory in Atlas Cloud Registry
  dir = "atlas://open-taco"
  # Connection URL to the target database
  url = var.database_url
}

# Resource to apply migrations to the target database
resource "atlas_migration" "app" {
  # Reference the migrations directory from the data source
  dir     = data.atlas_migration.app.dir
  # Apply up to the latest migration version
  version = data.atlas_migration.app.latest
  # Target database URL
  url     = data.atlas_migration.app.url
}
The atlas://open-taco URL points to a migration directory stored in the Atlas Cloud Registry.
This ensures that your Terraform configuration always uses the latest approved migrations from your CI/CD pipeline.
Step 3: Generate Your First Migration
With your schema defined, generate the initial migration:
# Generate migration from your schema
atlas migrate diff initial_schema \
  --to "file://schema.sql" \
  --dev-url "docker://postgres/16/dev?search_path=public"
This creates a migration file in the migrations/ directory:
-- Create "users" table
CREATE TABLE "users" (
  "id" serial NOT NULL,
  "email" character varying(255) NOT NULL,
  "name" character varying(255) NOT NULL,
  "created_at" timestamp NULL DEFAULT CURRENT_TIMESTAMP,
  PRIMARY KEY ("id"),
  CONSTRAINT "users_email_key" UNIQUE ("email")
);
Your project structure should now look like:
.
├── main.tf
├── variables.tf
├── migrations.tf
├── outputs.tf
├── schema.sql
└── migrations/
    ├── 20240115120000_initial_schema.sql
    └── atlas.sum
Step 4: Initialize Terraform Locally
Test that your Terraform configuration is valid:
terraform init
You should see output indicating the Atlas provider was installed:
Initializing the backend...

Initializing provider plugins...
- Finding ariga/atlas versions matching "~> 0.10.1"...
- Installing ariga/atlas v0.10.1...
- Installed ariga/atlas v0.10.1

Terraform has been successfully initialized!
Step 5: Set Up OpenTaco in Your Repository
OpenTaco can be set up in two ways: using the hosted service or self-hosting. We'll cover the hosted approach which is quickest to get started.
5.1: Install the OpenTaco GitHub App
- Go to github.com/apps/digger-cloud (or your self-hosted instance)
- Click Install
- Select your repository (or all repositories)
- Authorize the app
The GitHub App needs these permissions:
- Read access to code and metadata
- Read and write access to pull requests and issues
- Read and write access to actions (for workflow triggering)
5.2: Create the OpenTaco Configuration File
Create a digger.yml file in your repository root. This file tells OpenTaco about your Terraform projects:
# Define your Terraform projects
projects:
  - name: database-migrations      # Unique name for this project
    dir: .                         # Directory containing Terraform files
    workflow: default              # Which workflow to use
    terragrunt: false              # Set to true if using Terragrunt
    # Uncomment to auto-apply when PR is merged:
    # apply_on_merge: true

# Define reusable workflows
workflows:
  default:
    # Steps to run on pull request (plan)
    plan:
      steps:
        - init                     # terraform init
        - plan                     # terraform plan
    # Steps to run on apply
    apply:
      steps:
        - init                     # terraform init
        - apply                    # terraform apply
    # Optional: Configure plan behavior
    configuration:
      on_pull_request_pushed: ["digger plan"]
      on_pull_request_closed: ["digger unlock"]
      on_commit_to_default: ["digger apply"]
5.3: Create the GitHub Actions Workflow
Create the workflow file that runs OpenTaco on demand (manual trigger):
mkdir -p .github/workflows
Create .github/workflows/digger.yml:
name: OpenTaco Database Migrations

on:
  workflow_dispatch:
    inputs:
      spec:
        required: true
      run_name:
        required: false

# Limit concurrent runs to prevent state conflicts
concurrency:
  group: digger-${{ github.head_ref || github.ref }}
  cancel-in-progress: false

jobs:
  digger:
    runs-on: ubuntu-latest

    # Required permissions for OpenTaco
    permissions:
      contents: write        # To checkout code
      pull-requests: write   # To post PR comments
      issues: write          # For issue comments (CommentOps)
      id-token: write        # For OIDC authentication (if using)
      statuses: write        # To update commit statuses

    steps:
      # Checkout the repository
      - name: Checkout
        uses: actions/checkout@v4

      # Install Atlas CLI for database migrations
      - name: Setup Atlas
        uses: ariga/setup-atlas@v0
        with:
          cloud-token: ${{ secrets.ATLAS_CLOUD_TOKEN }}

      # Push migrations to Atlas Cloud Registry
      - name: Push Migrations
        uses: ariga/atlas-action/migrate/push@v1
        with:
          dir: 'file://migrations'
          dir-name: 'open-taco'
          dev-url: 'docker://postgres/16/dev?search_path=public'

      # Run OpenTaco
      - name: Run OpenTaco
        uses: diggerhq/digger@vLatest
        with:
          setup-aws: false           # Set to true if using AWS
          setup-terraform: true
          terraform-version: 1.6.0
          disable-locking: false     # Enable PR-level locking
        env:
          # GitHub token for PR comments and API access
          GITHUB_TOKEN: ${{ secrets.GITHUB_TOKEN }}
          GITHUB_CONTEXT: ${{ toJson(github) }}

          # Pass database URL as Terraform variable
          TF_VAR_database_url: ${{ secrets.DATABASE_URL }}
          TF_VAR_atlas_token: ${{ secrets.ATLAS_CLOUD_TOKEN }}

          # Optional: Pass additional Terraform variables
          # TF_VAR_environment: "production"
5.4: Configure State Backend (Recommended)
For production use, configure a remote state backend. Add this to your main.tf:
- AWS S3
- Google Cloud Storage
- OpenTaco Backend
terraform {
  required_providers {
    atlas = {
      source  = "ariga/atlas"
      version = "~> 0.10.1"
    }
  }

  # Store state in S3 with DynamoDB locking
  backend "s3" {
    bucket         = "your-terraform-state-bucket"
    key            = "database-migrations/terraform.tfstate"
    region         = "us-east-1"
    dynamodb_table = "terraform-locks"
    encrypt        = true
  }
}

provider "atlas" {
  dev_url = "docker://postgres/16/dev?search_path=public"
  cloud {
    repo  = "open-taco"
    token = var.atlas_token
  }
}
terraform {
  required_providers {
    atlas = {
      source  = "ariga/atlas"
      version = "~> 0.10.1"
    }
  }

  # Store state in GCS
  backend "gcs" {
    bucket = "your-terraform-state-bucket"
    prefix = "database-migrations"
  }
}

provider "atlas" {
  dev_url = "docker://postgres/16/dev?search_path=public"
  cloud {
    repo  = "open-taco"
    token = var.atlas_token
  }
}
OpenTaco provides its own state management backend. See OpenTaco State Management for setup instructions.
terraform {
  required_providers {
    atlas = {
      source  = "ariga/atlas"
      version = "~> 0.10.1"
    }
  }

  # Use OpenTaco's built-in state backend
  backend "http" {
    # Configured via environment variables by OpenTaco
  }
}

provider "atlas" {
  dev_url = "docker://postgres/16/dev?search_path=public"
  cloud {
    repo  = "open-taco"
    token = var.atlas_token
  }
}
Step 6: Configure GitHub Secrets
Add any required secrets:
- Navigate to your repository on GitHub
- Go to Settings → Secrets and variables → Actions
- Click New repository secret
- Add the following secrets:
| Secret Name | Description | Example Value |
|---|---|---|
ATLAS_CLOUD_TOKEN | Atlas Cloud bot token used by ariga/setup-atlas | Follow these instructions |
DATABASE_URL | Connection URL to your database | postgres://user:pass@host:5432/db?sslmode=require |
AWS_ACCESS_KEY_ID | AWS credentials (if using S3 backend) | AKIA... |
AWS_SECRET_ACCESS_KEY | AWS credentials (if using S3 backend) | secret... |
The database URL format depends on your database type:
- PostgreSQL:
postgres://user:password@host:5432/dbname?sslmode=require - MySQL:
mysql://user:password@host:3306/dbname - MariaDB:
maria://user:password@host:3306/dbname
Step 7: Commit and Push
Commit all files to your repository:
git add .
git commit -m "Set up Atlas migrations with OpenTaco"
git push origin main
Your repository should now have this structure:
.
├── .github/
│   └── workflows/
│       └── digger.yml
├── migrations/
│   ├── 20240115120000_initial_schema.sql
│   └── atlas.sum
├── digger.yml
├── main.tf
├── variables.tf
├── migrations.tf
├── outputs.tf
└── schema.sql
Workflow in Action
Creating a Migration
- Modify your schema - Update
schema.sqlwith your desired changes:
CREATE TABLE users (
  id SERIAL PRIMARY KEY,
  email VARCHAR(255) NOT NULL UNIQUE,
  name VARCHAR(255) NOT NULL,
  created_at TIMESTAMP DEFAULT CURRENT_TIMESTAMP
);

-- Add a new table
CREATE TABLE posts (
  id SERIAL PRIMARY KEY,
  user_id INT REFERENCES users(id),
  title VARCHAR(255) NOT NULL,
  content TEXT,
  created_at TIMESTAMP DEFAULT CURRENT_TIMESTAMP
);
- Generate the migration:
atlas migrate diff add_posts \
  --to "file://schema.sql" \
  --dev-url "docker://postgres/16/dev?search_path=public"
- Push the migration to Atlas Cloud:
atlas migrate push open-taco \
  --dev-url "docker://postgres/16/dev?search_path=public"
- Create a pull request with your changes
PR Preview
When you open a pull request, OpenTaco will automatically:
- Run
terraform initandterraform plan - Post the plan as a PR comment showing exactly what migrations will be applied
You'll see a comment like:
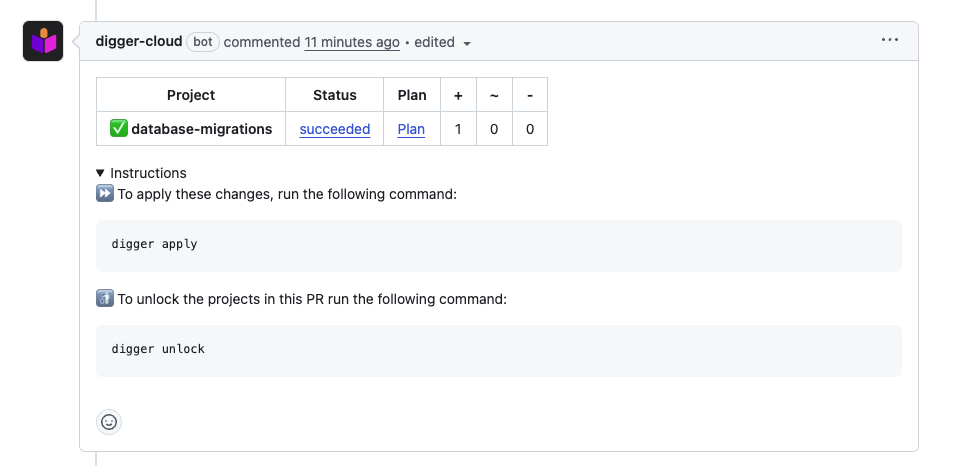
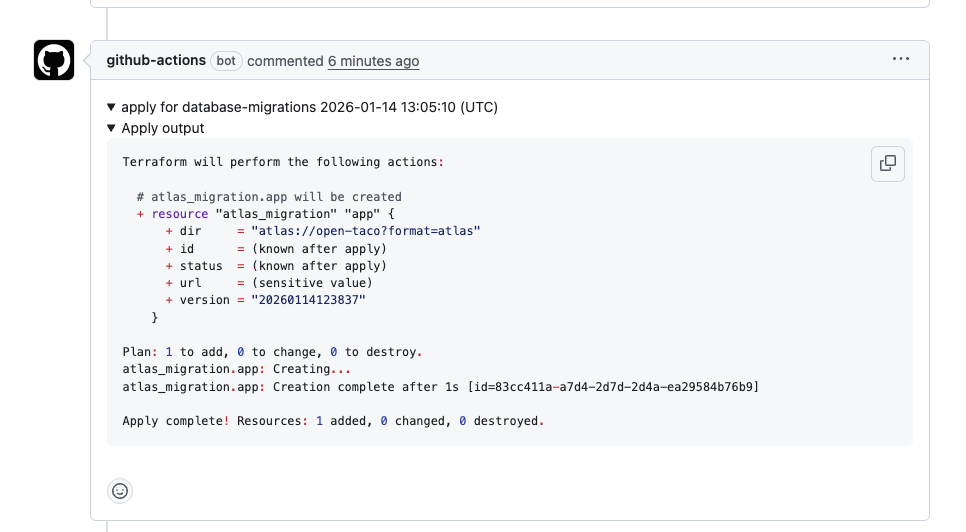
Then, commenting digger apply on the PR will trigger the apply step:
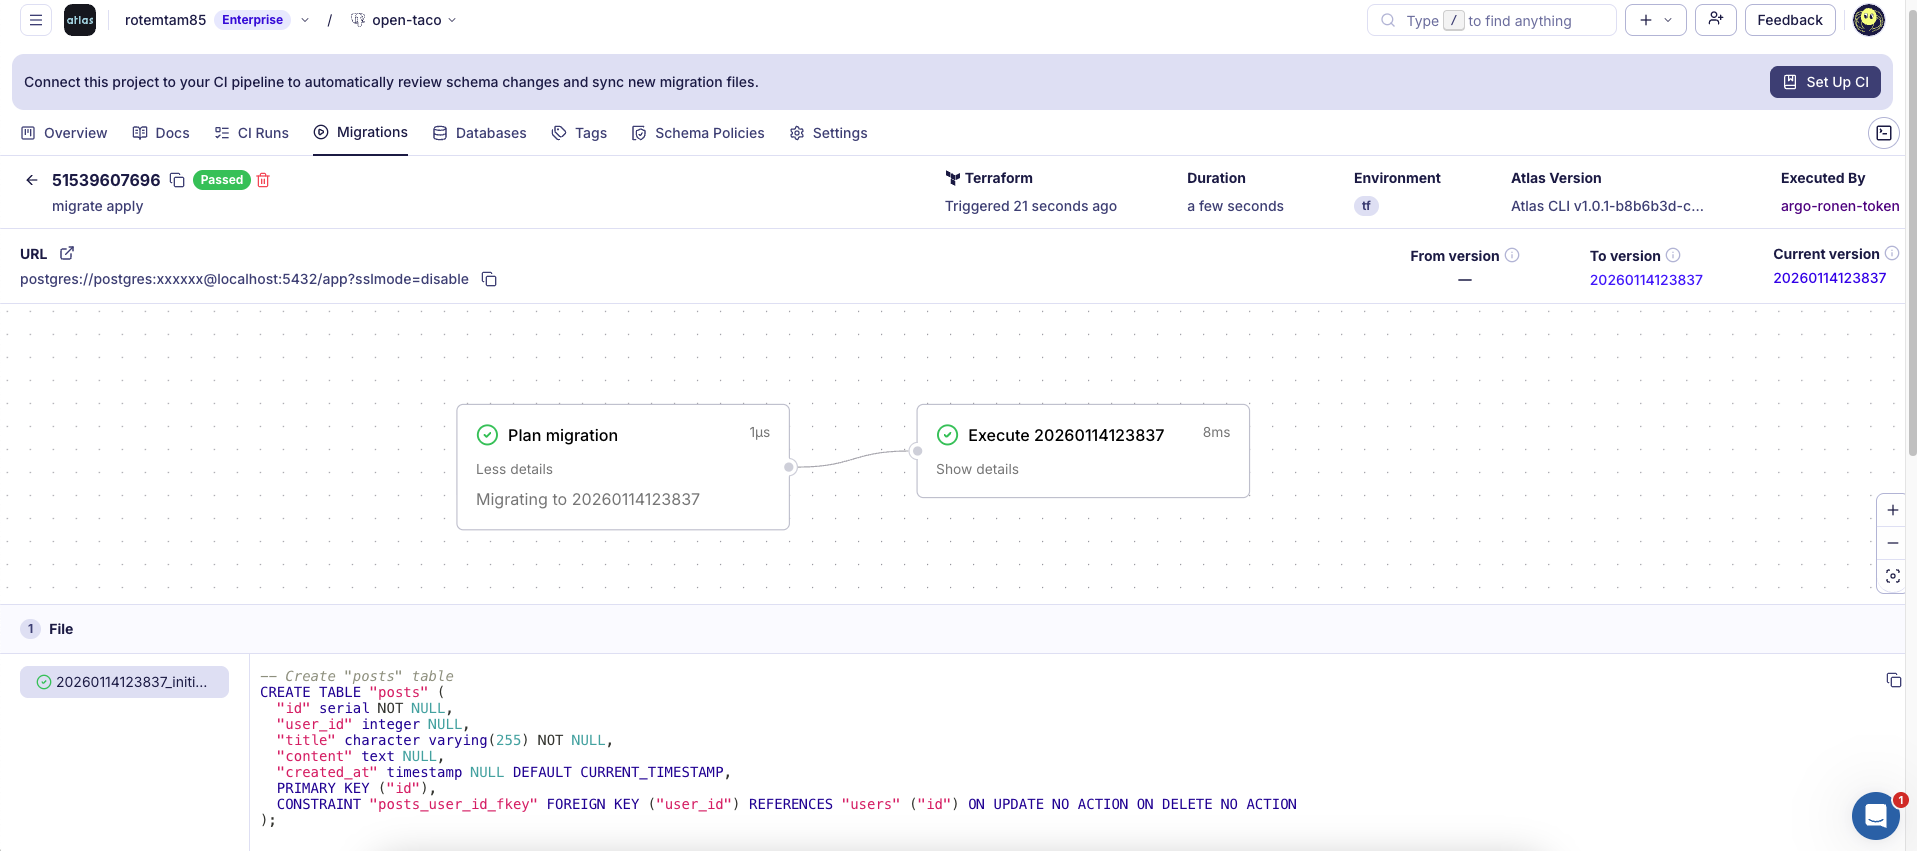
And in atlas cloud you can see the migration run log:
Applying Migrations
Depending on your OpenTaco configuration, migrations are applied either:
- On merge: Automatically when the PR is merged to main
- Via CommentOps: By commenting
digger applyon the PR
Declarative Workflow
The declarative workflow is an alternative to versioned migrations where you define your desired database schema and Atlas automatically calculates and applies the required changes. This approach is simpler for many use cases and doesn't require generating migration files.
Step 1: Define Your Database Schema
Create a schema.sql file that defines your desired database schema:
-- Create users table
CREATE TABLE users (
  id SERIAL PRIMARY KEY,
  email VARCHAR(255) NOT NULL UNIQUE,
  name VARCHAR(255) NOT NULL,
  created_at TIMESTAMP DEFAULT CURRENT_TIMESTAMP
);
Step 2: Create the Terraform Configuration
Provider Configuration
Create a main.tf file with the Atlas provider configuration:
terraform {
  required_providers {
    atlas = {
      source  = "ariga/atlas"
      version = "~> 0.10.1"
    }
  }
}

provider "atlas" {
  # The dev database is used by Atlas to normalize schemas and calculate diffs.
  # Using docker:// automatically spins up a temporary container.
  dev_url = "docker://postgres/16/dev?search_path=public"
  cloud {
    repo  = "open-taco"
    token = var.atlas_token
  }
}
Variables Configuration
Create a variables.tf file to define input variables:
variable "database_url" {
  description = "The connection URL to the target database"
  type        = string
  sensitive   = true  # Marks this as sensitive to hide in logs
}

variable "atlas_token" {
  description = "Atlas token for authentication"
  type        = string
  sensitive   = true
}
Schema Resources
Create a schema.tf file to define the Atlas schema resources:
# Data source to read the schema from Atlas Cloud Registry
data "atlas_schema" "app" {
  # URL to the schema in Atlas Cloud Registry
  src = "atlas://open-taco"
  dev_url = "docker://postgres/16/dev?search_path=public"
}

# Resource to apply the schema to the target database
# Atlas calculates the diff and applies necessary changes
resource "atlas_schema" "app" {
  url = var.database_url
  hcl = data.atlas_schema.app.hcl
}
The atlas://open-taco URL points to a schema stored in the Atlas Cloud Registry.
This ensures that your Terraform configuration always uses the latest approved schema from your CI/CD pipeline.
Outputs Configuration (Optional)
Create an outputs.tf file:
output "schema_applied" {
  description = "Indicates whether schema changes were applied"
  value       = atlas_schema.app.id != ""
}
Your project structure should look like:
.
├── main.tf
├── variables.tf
├── schema.tf
├── outputs.tf
└── schema.sql
Step 3: Initialize Terraform Locally
Test that your Terraform configuration is valid:
terraform init
You should see output indicating the Atlas provider was installed:
Initializing the backend...

Initializing provider plugins...
- Finding ariga/atlas versions matching "~> 0.10.1"...
- Installing ariga/atlas v0.10.1...
- Installed ariga/atlas v0.10.1

Terraform has been successfully initialized!
Step 4: Set Up OpenTaco in Your Repository
4.1: Install the OpenTaco GitHub App
- Go to github.com/apps/digger-cloud (or your self-hosted instance)
- Click Install
- Select your repository (or all repositories)
- Authorize the app
4.2: Create the OpenTaco Configuration File
Create a digger.yml file in your repository root:
# Define your Terraform projects
projects:
  - name: database-schema           # Unique name for this project
    dir: .                          # Directory containing Terraform files
    workflow: default               # Which workflow to use
    terragrunt: false               # Set to true if using Terragrunt
    # Uncomment to auto-apply when PR is merged:
    # apply_on_merge: true

# Define reusable workflows
workflows:
  default:
    # Steps to run on pull request (plan)
    plan:
      steps:
        - init                      # terraform init
        - plan                      # terraform plan
    # Steps to run on apply
    apply:
      steps:
        - init                      # terraform init
        - apply                     # terraform apply
    # Optional: Configure plan behavior
    configuration:
      on_pull_request_pushed: ["digger plan"]
      on_pull_request_closed: ["digger unlock"]
      on_commit_to_default: ["digger apply"]
4.3: Create the GitHub Actions Workflow
Create .github/workflows/digger.yml:
name: OpenTaco Database Schema

on:
  workflow_dispatch:
    inputs:
      spec:
        required: true
      run_name:
        required: false

# Limit concurrent runs to prevent state conflicts
concurrency:
  group: digger-${{ github.head_ref || github.ref }}
  cancel-in-progress: false

jobs:
  digger:
    runs-on: ubuntu-latest

    # Required permissions for OpenTaco
    permissions:
      contents: write        # To checkout code
      pull-requests: write   # To post PR comments
      issues: write          # For issue comments (CommentOps)
      id-token: write        # For OIDC authentication (if using)
      statuses: write        # To update commit statuses

    steps:
      # Checkout the repository
      - name: Checkout
        uses: actions/checkout@v4

      # Install Atlas CLI for database migrations
      - name: Setup Atlas
        uses: ariga/setup-atlas@v0
        with:
          cloud-token: ${{ secrets.ATLAS_CLOUD_TOKEN }}

      # Push schema to Atlas Cloud Registry
      - name: Push Schema
        uses: ariga/atlas-action/schema/push@v1
        with:
          url: 'file://schema.sql'
          schema-name: 'open-taco'
          dev-url: 'docker://postgres/16/dev?search_path=public'

      # Run OpenTaco
      - name: Run OpenTaco
        uses: diggerhq/digger@vLatest
        with:
          setup-aws: false           # Set to true if using AWS
          setup-terraform: true
          terraform-version: 1.6.0
          disable-locking: false     # Enable PR-level locking
        env:
          # GitHub token for PR comments and API access
          GITHUB_TOKEN: ${{ secrets.GITHUB_TOKEN }}
          GITHUB_CONTEXT: ${{ toJson(github) }}

          # Pass database URL as Terraform variable
          TF_VAR_database_url: ${{ secrets.DATABASE_URL }}
          TF_VAR_atlas_token: ${{ secrets.ATLAS_CLOUD_TOKEN }}
Step 5: Configure GitHub Secrets
In your GitHub repository, go to Settings → Secrets and variables → Actions and add:
| Secret Name | Description |
|---|---|
DATABASE_URL | Connection string to your target database (e.g., postgres://user:pass@host:5432/dbname) |
ATLAS_CLOUD_TOKEN | Atlas Cloud token for authentication. Create a bot token. |
Step 6: Commit and Push
git add .
git commit -m "Add Atlas declarative schema with OpenTaco"
git push origin main
Workflow in Action
Making Schema Changes
- Modify your schema - Update
schema.sqlwith your desired changes:
CREATE TABLE users (
  id SERIAL PRIMARY KEY,
  email VARCHAR(255) NOT NULL UNIQUE,
  name VARCHAR(255) NOT NULL,
  created_at TIMESTAMP DEFAULT CURRENT_TIMESTAMP
);

-- Add a new table
CREATE TABLE posts (
  id SERIAL PRIMARY KEY,
  user_id INT REFERENCES users(id),
  title VARCHAR(255) NOT NULL,
  content TEXT,
  created_at TIMESTAMP DEFAULT CURRENT_TIMESTAMP
);
- Create a pull request with your changes
PR Preview
When you open a pull request, OpenTaco will automatically:
- Run
terraform initandterraform plan - Post the plan as a PR comment showing exactly what schema changes will be applied
The plan will show the SQL statements that Atlas will execute to bring your database to the desired state.
Applying Schema Changes
Depending on your OpenTaco configuration, schema changes are applied either:
- On merge: Automatically when the PR is merged to main
- Via CommentOps: By commenting
digger applyon the PR
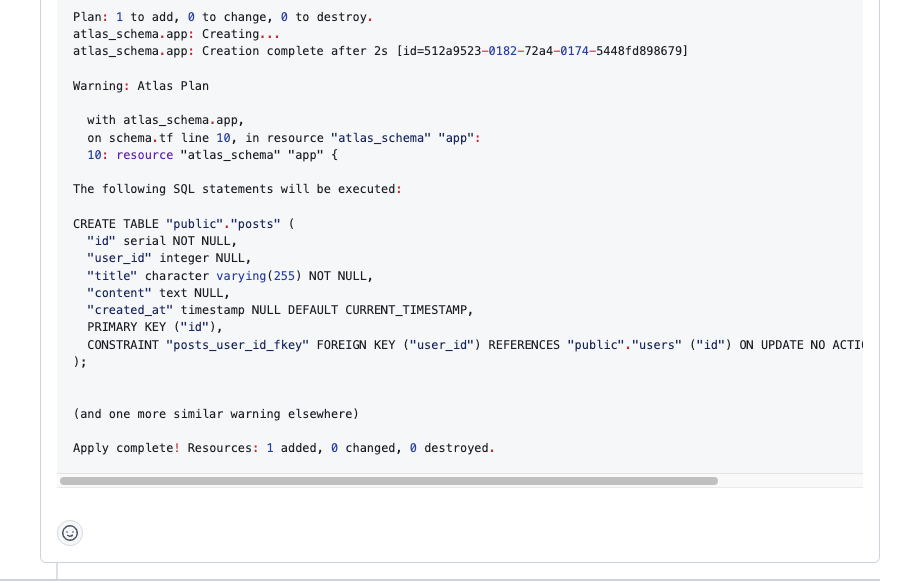
Commenting digger apply on the PR will trigger the apply step:
Advanced Configuration
Multiple Databases
For projects with multiple databases, define separate projects in digger.yml:
projects:
  - name: users-db
    dir: databases/users
    workflow: default

  - name: products-db
    dir: databases/products
    workflow: default

workflows:
  default:
    plan:
      steps:
        - init
        - plan
    apply:
      steps:
        - init
        - apply
Apply on Merge
Configure OpenTaco to automatically apply on merge:
projects:
  - name: database-migrations
    dir: .
    workflow: default
    apply_on_merge: true

workflows:
  default:
    plan:
      steps:
        - init
        - plan
    apply:
      steps:
        - init
        - apply
Best Practices
- Always review migration plans - Check the SQL in PR comments before merging
- Use Atlas Cloud - For additional features like pre-migration checks and migration troubleshooting
- Test locally first - Run migrations against a local database before pushing
- Use environment-specific configs - Separate configurations for staging and production
- Enable drift detection - Use OpenTaco's drift detection to monitor schema drift
Troubleshooting
Docker Not Available
If you get errors about Docker not being available for the dev database, ensure the GitHub runner has Docker access or use an external dev database:
variable "dev_database_url" {
  type = string
}

variable "atlas_token" {
  type = string
}

provider "atlas" {
  dev_url = var.dev_database_url  # Use a dedicated dev database
  cloud {
    repo  = "open-taco"
    token = var.atlas_token
  }
}
State Locking Issues
If you encounter state locking issues, check OpenTaco's PR-level locks documentation for configuration options.
Plan Shows No Changes
If terraform plan shows no changes but you expect migrations:
- Ensure migration files are properly generated with
atlas migrate hash - Check that the
atlas.sumfile is committed - Verify the
dirpath in your Terraform configuration
Conclusion
By combining Atlas Terraform Provider with OpenTaco, you get a powerful database migration pipeline that:
- Provides visibility into changes through PR comments
- Automates migration application on merge
- Handles concurrency and locking
- Integrates seamlessly with your existing Terraform workflow