Deploy Database Schema Migrations in Kubernetes with Flux CD and Atlas Kubernetes Operator
GitOps is a software development and deployment methodology that uses Git as the central repository for both code and infrastructure configurations, enabling automated and auditable deployments.
FluxCD is a Continuous Delivery tool that implements GitOps principles. It uses a declarative approach to keep Kubernetes clusters in sync with sources of configuration (like Git repositories), and automates configuration updates when there is new code to deploy.
Kubernetes Operators are software extensions to Kubernetes that enable the automation and management of complex, application-specific operational tasks and domain-specific knowledge within a Kubernetes cluster.
In this guide, we will demonstrate how to use the Atlas Kubernetes Operator and Flux CD to achieve a GitOps-based deployment workflow for your database schema.
Prerequisites
- A running Kubernetes cluster - For learning purposes, you can use Minikube, which is a tool that runs a single-node Kubernetes cluster inside a VM on your laptop.
- kubectl - a command-line tool for interacting with Kubernetes clusters.
- Helm - a package manager for Kubernetes.
High-level architecture
Before we dive into the details of the deployment flow, let's take a look at the high-level architecture of our application.
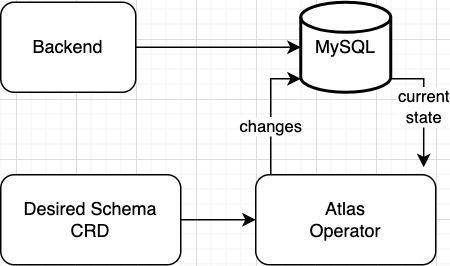
On a high level, our application consists of the following components:
- A backend application - in our example we will use a plain NGINX server as a placeholder for a real backend application.
- A database - in our example we will use a MySQL pod for the database. In a more realistic scenario, you might want to use a managed database service like AWS RDS or GCP Cloud SQL.
- An
AtlasSchemaCustom Resource that defines the database schema and is managed by the Atlas Operator.
In our application architecture, we have a database that is connected to our application and managed using Atlas CR (Custom Resource). The database plays a crucial role in storing and retrieving data for the application, while the Atlas CR provides seamless integration and management of the database schema within our Kubernetes environment.
Incorporating schema changes into a GitOps flow
Databases should be migrated before the application is deployed
Integrating GitOps practices with a database in our application stack poses a unique challenge.
Flux CD provides a declarative approach to GitOps, allowing us to define a Flux CD application and effortlessly handle the synchronization process. When pushing changes to the database schema or application code to the Git repository, Flux CD automatically syncs those changes to the Kubernetes cluster.
However, as we discussed in the introduction, ensuring the proper order of deployments is critical. In our scenario, the database deployment must succeed before rolling out the application to guarantee its functionality. If the database deployment encounters an issue, it is essential to address it before proceeding with the application deployment.
Flux CD Dependencies 101
Flux CD supports Dependencies,
via .spec.dependsOn, a mechanism used to orchestrate multiple deployments in a specific ordered sequence to ensure certain resources
are healthy before subsequent resources are synced/reconciled.
By using .spec.dependsOn, you can define the apply order and thus determine the sequence of manifest
applications. .spec.dependsOn is used to refer to other Kustomization objects that the Kustomization
depends on. If specified, then the Kustomization is only applied after the referred Kustomizations
are ready, i.e. have the Ready condition marked as True. The readiness state of a Kustomization
is determined by its last applied status condition.
For example, let's assume we have a scenario where our application is comprised of two services, a backend
service and a database service. The backend service depends on the database service, and we want
to ensure that the database service is ready before the backend service is applied. We can codify this
dependency in the following way:
---
apiVersion: kustomize.toolkit.fluxcd.io/v1
kind: Kustomization
metadata:
  name: database
  namespace: flux-system
spec:
  interval: 5m
  path: "./kustomize"
  prune: true
  sourceRef:
  kind: GitRepository
  name: flux-system
  healthChecks:
  - apiVersion: apps/v1
    kind: Deployment
    name: mysql
    namespace: default
---
apiVersion: kustomize.toolkit.fluxcd.io/v1
kind: Kustomization
metadata:
  name: backend
  namespace: flux-system
spec:
  dependsOn:
  - name: mysql
  interval: 5m
  path: "./kustomize"
  prune: true
  sourceRef:
  kind: GitRepository
  name: flux-system
In this manifest, .spec.healthChecks is used to refer to resources for which the Flux
controller will perform health checks. This is used to determine the rollout status of
deployed workloads and the Ready status of custom resources.
This is helpful when there is a need to make sure other resources exist before the workloads
defined in a Kustomization are deployed. To ensure that database resources are created and applied
before our application, we will utilize Flux CD dependsOn and health checks feature.
With the theoretical background out of the way, let’s take a look at a practical example of how to deploy an application with Flux CD and the Atlas Operator.
Installation
1. Install the Atlas Operator
To install the Atlas Operator run the following command:
helm install atlas-operator oci://ghcr.io/ariga/charts/atlas-operator
Helm will print something like this:
Pulled: ghcr.io/ariga/charts/atlas-operator:0.3.0
 Digest: sha256:4dfed310f0197827b330d2961794e7fc221aa1da1d1b95736dde65c090e6c714
 NAME: atlas-operator
 LAST DEPLOYED: Tue Jun 27 16:58:30 2023
 NAMESPACE: default
 STATUS: deployed
 REVISION: 1
 TEST SUITE: None
Wait until the atlas-operator pod is running:
kubectl wait --for=condition=ready pod -l app.kubernetes.io/name=atlas-operator -n default
kubectl will print something like this:
pod/atlas-operator-866dfbc56d-qkkkn condition met
2. Install the Flux CLI
The flux command-line interface (CLI) is used to bootstrap and interact with Flux.
To install it on macOS or Linux, run:
curl -s https://fluxcd.io/install.sh | sh
To install the CLI with Chocolatey for Windows, run:
choco install flux
Check you have everything needed to run Flux by running the following command:
flux check --pre
The output is similar to:
► checking prerequisites
✔ kubernetes 1.26.3 >=1.23.0
✔ prerequisites checks passed
3. Create a GitHub Personal Access Token
The GitHub personal access token will be used in place of a password when authenticating to GitHub in the command line or with the API.
- In the upper-right corner of any page, click your profile photo, then click
Settings. - In the left sidebar, click
< > Developer settings. - In the left sidebar, under
Personal access tokens, click `Tokens (classic)``. - Select
Generate new token, then click `Generate new token (classic)``. - In the `"Note"`` field, give your token a descriptive name.
- To give your token an expiration, select
Expiration, then choose a default option or clickCustomto enter a date. - Select the scopes you'd like to grant this token. To use your token to access repositories from the command line, select
repo. A token with no assigned scopes can only access public information. - Click
Generate token. - Copy the new token to your clipboard.
4. Export your GitHub Credentials
Export your GitHub personal access token and username:
export GITHUB_TOKEN=<your-token>
export GITHUB_USER=<your-username>
5. Install Flux onto your Kubernetes Cluster
Run the bootstrap command:
flux bootstrap github \
  --owner=$GITHUB_USER \
  --repository=flux-infrastructure \
  --branch=main \
  --path=./clusters/dev \
  --personal
You will be prompted to enter your GitHub personal access token. The output is similar to:
► connecting to github.com
✔ repository created
✔ repository cloned
✚ generating manifests
✔ components manifests pushed
► installing components in flux-system namespace
deployment "source-controller" successfully rolled out
deployment "kustomize-controller" successfully rolled out
deployment "helm-controller" successfully rolled out
deployment "notification-controller" successfully rolled out
✔ install completed
► configuring deploy key
✔ deploy key configured
► generating sync manifests
✔ sync manifests pushed
► applying sync manifests
◎ waiting for cluster sync
✔ bootstrap finished
Using the flux bootstrap command, you can install Flux on a Kubernetes cluster and configure it to manage itself from a Git repository. The bootstrap command above does the following:
- Creates a git repository flux-infrastructure on your GitHub account.
- Adds Flux component manifests to the repository.
- Deploys Flux Components to your Kubernetes Cluster.
- Configures Flux components to track the path /clusters/dev/ in the repository.
Deploy the Sample Application on your Cluster
In this example, we're using the jmushiri/atlas-flux-demo repository, which contains all of the
Kubernetes manifests necessary to deploy our application.
1. Fork the Sample Application
To get started, you need to fork and then clone the sample application repository to your local machine.
- Open your web browser and go to the rotemtam/atlas-operator-flux-demo repo on GitHub.
- Click on the
"Fork"button in the top-right corner of the GitHub page. This will create a copy of the repository under your GitHub account.
2. Clone the Sample Application
Once the forking process is complete, you will be redirected to your own forked repository. Open your terminal or command prompt and run the following command to clone the forked repository to your local machine:
git clone https://github.com/$GITHUB_USER/atlas-operator-flux-demo.git
Observe this repository's structure:
.
├── LICENSE
├── README.md
└── kustomize
    ├── app.yaml
    ├── db.yaml
    ├── kustomization.yaml
    └── schema.yaml
kustomize/app.yaml- contains theKustomizationmanifest for the application, in our case, a dummy nginx server.kustomize/db.yaml- contains theKustomizationmanifest for the database, in our case, a MySQL pod, a service that exposes it, and a secret that contains the database credentials.kustomize/schema.yaml- contains theAtlasSchemamanifest that defines the database schema.kustomize/kustomization.yaml- contains theKustomizationmanifest that defines the different resources that are managed by thisKustomization.
3. Clone the Infra Repository
Clone the flux-infrastructure repository to your local machine:
git clone https://github.com/$GITHUB_USER/flux-infrastructure

cd flux-infrastructure
4. Add the Repository (atlas-flux-demo repository) to Flux
Create a GitRepository manifest pointing to atlas-flux-demo repository’s main branch:
flux create source git atlas-operator-flux-demo --url=https://github.com/$GITHUB_USER/atlas-operator-flux-demo --branch=main --interval=30s --export > ./clusters/dev/atlas-operator-flux-demo-source.yaml
The output is similar to:
apiVersion: source.toolkit.fluxcd.io/v1
kind: GitRepository
metadata:
  name: atlas-operator-flux-demo
  namespace: flux-system
spec:
  interval: 30s
  ref:
    branch: main
  url: https://github.com/$GITHUB_USER/atlas-operator-flux-demo
Commit and push the atlas-flux-demo-source.yaml file to the flux-infrastructure repository:
git add -A && git commit -m "Add atlas-flux-demo GitRepository"

git push
Implement a Continuous Deployment (CD) Flow
It's time to configure Flux to build and apply the kustomize directory located in the atlas-operator-flux-demo repository.
Use the flux create command to create a Kustomization that applies the atlas-operator-flux-demo deployment.
flux create kustomization atlas-flux-demo \
  --target-namespace=default \
  --source=atlas-operator-flux-demo \
  --path="./kustomize" \
  --prune=true \
  --interval=5m \
  --export > ./clusters/dev/atlas-operator-flux-demo-kustomization.yaml
The output is similar to:
apiVersion: kustomize.toolkit.fluxcd.io/v1
kind: Kustomization
metadata:
  name: atlas-flux-demo
  namespace: flux-system
spec:
  interval: 5m0s
  path: ./kustomize
  prune: true
  sourceRef:
    kind: GitRepository
    name: atlas-operator-flux-demo
  targetNamespace: default
The structure of the flux-infrastructure repo should be similar to:
flux-infrastructure
└── clusters/
    └── dev/
        ├── flux-system/
        │   ├── gotk-components.yaml
        │   ├── gotk-sync.yaml
        │   └── kustomization.yaml
        ├── atlas-flux-demo-kustomization.yaml
        └── atlas-flux-demo-source.yaml
Implement the Deployment Flow
To implement the deployment flow in a specific ordered sequence, we will use Flux CD’s .spec.dependsOn
and .spec.healthChecks features.
Edit the atlas-operator-flux-demo-kustomization.yaml file as follows:
---
apiVersion: kustomize.toolkit.fluxcd.io/v1
kind: Kustomization
metadata:
  name: mysql
  namespace: flux-system
spec:
  interval: 30s
  path: ./kustomize
  prune: true
  sourceRef:
    kind: GitRepository
    name: atlas-operator-flux-demo
  targetNamespace: default
  healthChecks:
    - apiVersion: apps/v1
      kind: Deployment
      name: mysql
      namespace: default
---
apiVersion: kustomize.toolkit.fluxcd.io/v1
kind: Kustomization
metadata:
  name: app-schema
  namespace: flux-system
spec:
  dependsOn:
    - name: mysql
  interval: 30s
  path: ./kustomize
  prune: true
  sourceRef:
    kind: GitRepository
    name: atlas-operator-flux-demo
  targetNamespace: default
  healthChecks:
    - apiVersion: db.atlasgo.io/v1alpha1
      kind: AtlasSchema
      name: app-schema
      namespace: default
---
apiVersion: kustomize.toolkit.fluxcd.io/v1
kind: Kustomization
metadata:
  name: nginx
  namespace: flux-system
spec:
  dependsOn:
    - name: app-schema
  interval: 30s
  path: ./kustomize
  prune: true
  sourceRef:
    kind: GitRepository
    name: atlas-operator-flux-demo
  targetNamespace: default
Notice the highlighted sections in the manifest above:
- We define health checks for the
mysqldeployment and theapp-schemaAtlas CR. This instructs Flux CD explicitly when to consider each of these resources as ready. - We declare the dependency of the
app-schemaAtlas CR on themysqldeployment. This ensures that themysqldeployment is ready before theapp-schemaAtlas CR is applied. In addition, we declare the dependency of thenginxdeployment on theapp-schemaAtlas CR. This ensures that theapp-schemaAtlas CR is ready before thenginxdeployment is applied.
Together, these declarations achieve our requirement of ensuring that the database schema is applied before the application is deployed.
Commit and push the Kustomization manifest to the repository:
git add -A && git commit -m "Add atlas-flux-demo Kustomization"

git push
Watch Flux sync the Application
Use the flux get command to watch the deployment flow.
flux get kustomizations --watch
This command allows you to fetch and observe the status of Kustomize resources managed by Flux in your
Kubernetes cluster, with real-time updates as changes are made.
To check whether the schema migrations have been successfully applied, run:
kubectl exec -it $(kubectl get pods -l app=mysql -o jsonpath='{.items[0].metadata.name}') -- mysql -uroot -ppass -e "describe example.users"
Our schema migrations have been successfully applied:
+-----------+--------------+------+-----+---------+----------------+
| Field     | Type         | Null | Key | Default | Extra          |
+-----------+--------------+------+-----+---------+----------------+
| id        | int          | NO   | PRI | NULL    | auto_increment |
| name      | varchar(255) | NO   |     | NULL    |                |
| email     | varchar(255) | NO   | UNI | NULL    |                |
| short_bio | varchar(255) | NO   |     | NULL    |                |
+-----------+--------------+------+-----+---------+----------------+
Make a change to the Application Database Schema
To show how the continuous deployment flow works, let's make a change to the database schema.
Open the kustomize/schema.yaml file and add a column to the users table in the AtlasSchema manifest:
apiVersion: db.atlasgo.io/v1alpha1
kind: AtlasSchema
metadata:
  name: app-schema
spec:
  url: mysql://root:pass@mysql:3306/example
  schema:
    sql: |
      create table users (
        id int not null auto_increment,
        name varchar(255) not null,
        email varchar(255) unique not null,
        short_bio varchar(255) not null,
        new_col varchar(255) not null,
        primary key (id)
      );
Commit and push the change to the repository:
git add kustomize/schema.yaml
git commit -m "Add new column to users table"
git push
Next, let's wait for Flux to sync the changes, and check that our schema migrations have been successfully applied:
+-----------+--------------+------+-----+---------+----------------+
| Field     | Type         | Null | Key | Default | Extra          |
+-----------+--------------+------+-----+---------+----------------+
| id        | int          | NO   | PRI | NULL    | auto_increment |
| name      | varchar(255) | NO   |     | NULL    |                |
| email     | varchar(255) | NO   | UNI | NULL    |                |
| short_bio | varchar(255) | NO   |     | NULL    |                |
| new_col   | varchar(255) | NO   |     | NULL    |                |
+-----------+--------------+------+-----+---------+----------------+
Amazing, our schema migrations have been successfully applied!
Conclusion
In this guide, we demonstrated how to use Flux CD to deploy an application that uses the Atlas Operator to manage the lifecycle of a database schema. We also showed how to use Flux dependency management to ensure that the schema changes were successfully applied before deploying the application.