
· 9 min read
Dor Avraham
TL;DR

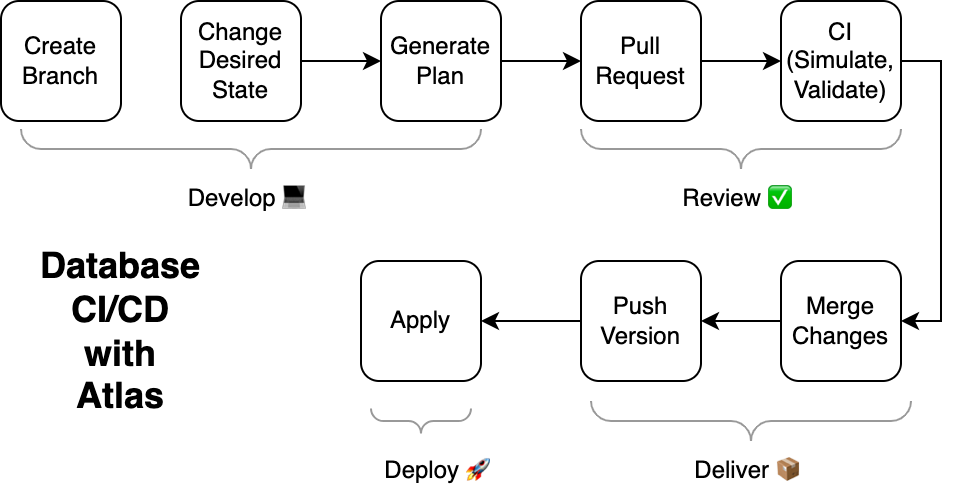
You can now import the desired database schema from your Hibernate project into Atlas, and use it to automatically plan migrations for you.

See an example

Introduction

Hibernate-ORM is one of the most popular ORMs for Java, so much so that parts of it have evolved into the JPA standard and the Jakarta APIs.

Today, we are excited to announce that Atlas now supports loading and managing Hibernate schemas.

Atlas is a modern tool for managing your database schema. It allows you to inspect, plan, lint and apply schema changes to your database. It is designed to be used by developers, DBAs and DevOps engineers alike.

By using Atlas, Hibernate users can now enjoy these benefits:

  • A declarative migration flow - Atlas can operate like a "Terraform for databases", where by running atlas schema apply the application schema is applied on a target database.
  • Automatic schema migration planning - Alternatively, Atlas can operate using a more traditional versioned migration flow. However, contrary to most tools, Atlas will automatically analyze the diff between the migration directory and the current application data model, and will produce correct and safe SQL migration files.
  • CI for schema changes - Atlas can be used during CI to make sure you never merge a pull request that will break your database schema.
  • Modern CD integrations - Atlas integrates seamlessly with modern deployment tools such as Kubernetes, Terraform, Helm, Flux, and ArgoCD. This allows you to deploy changes to your database schema as part of your existing deployment pipelines.
  • Visualization - Atlas users can create beautiful, shareable ERDs of their application data model with a single command.
  • .. and much more (read more about Atlas features).
note

Hibernate support is currently in Beta and we would love to hear your feedback ❤️. Please reach out to us on Discord or by opening an issue.

Integrating Atlas into your Hibernate project

Hibernate ships with an automatic schema management tool called hbm2ddl. Similarly to Atlas, this tool can inspect a target database and automatically migrate the schema to the desired one. However, the Hibernate team has been advising for years not to use this tool in production:

Although the automatic schema generation is very useful for testing and prototyping purposes, in a production environment, it’s much more flexible to manage the schema using incremental migration scripts.

This is where Atlas comes in. Atlas can read Hibernate schema and plan database schema migrations.

How does it work?

Atlas compares two database schema states and plans a migration to get from ones state to the other. The database schema can be read directly from Hibernate, a migration directory, a database connection, or another ORM.

To read the Hibernate schema, Atlas utilizes the concept of an external_schema datasource.

Demo Time

For this demo, we are going to use Gradle, PostgreSQL and this example project.

Installation

If you haven't already, install the latest version of Atlas:

To download and install the latest release of the Atlas CLI, simply run the following in your terminal:

curl -sSf https://atlasgo.sh | sh

Add the hibernate-provider to your project via Gradle or Maven:

plugins {
id("io.atlasgo.hibernate-provider-gradle-plugin") version "0.1"
}

To check the installation, run: ./gradlew help --task schema

Configuration

The plugin adds a configurable Gradle task (or a Maven goal) that prints the Hibernate schema without requiring a database connection. However, the task needs to be configured with the database dialect. We can do this by creating a schema-export.properties file in the resource directory. For example, for MySQL / PostgreSQL:

jakarta.persistence.database-product-name=MySQL
jakarta.persistence.database-major-version=8

Lastly, we need to configure Atlas to use this configuration by creating an atlas.hcl file and adding the definition of the Hibernate schema:

atlas.hcl
data "external_schema" "hibernate" {
program = [
"./gradlew",
"-q",
"schema",
"--properties", "schema-export.properties"
]
}

And the Atlas configuration:

atlas.hcl
env "hibernate" {
src = data.external_schema.hibernate.url
dev = "docker://mysql/8/dev"
migration {
dir = "file://migrations"
}
format {
migrate {
diff = "{{ sql . \" \" }}"
}
}
}

Running Atlas

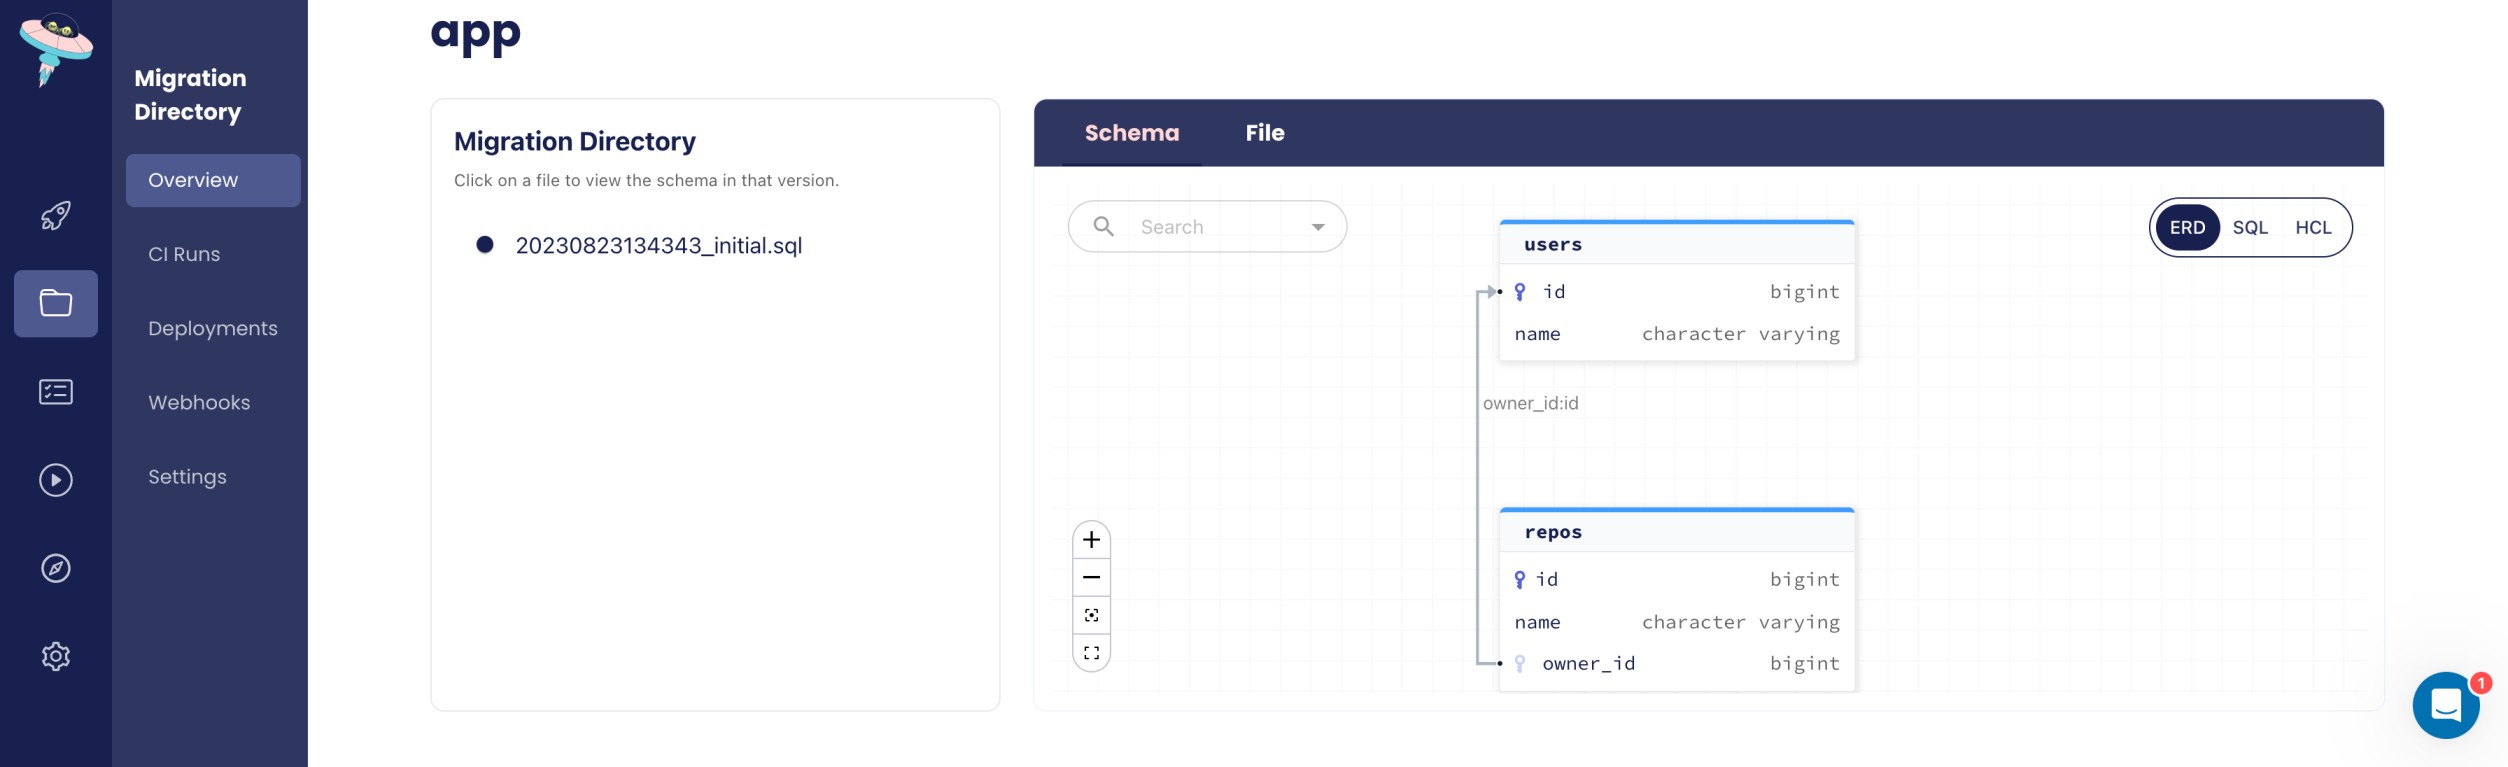
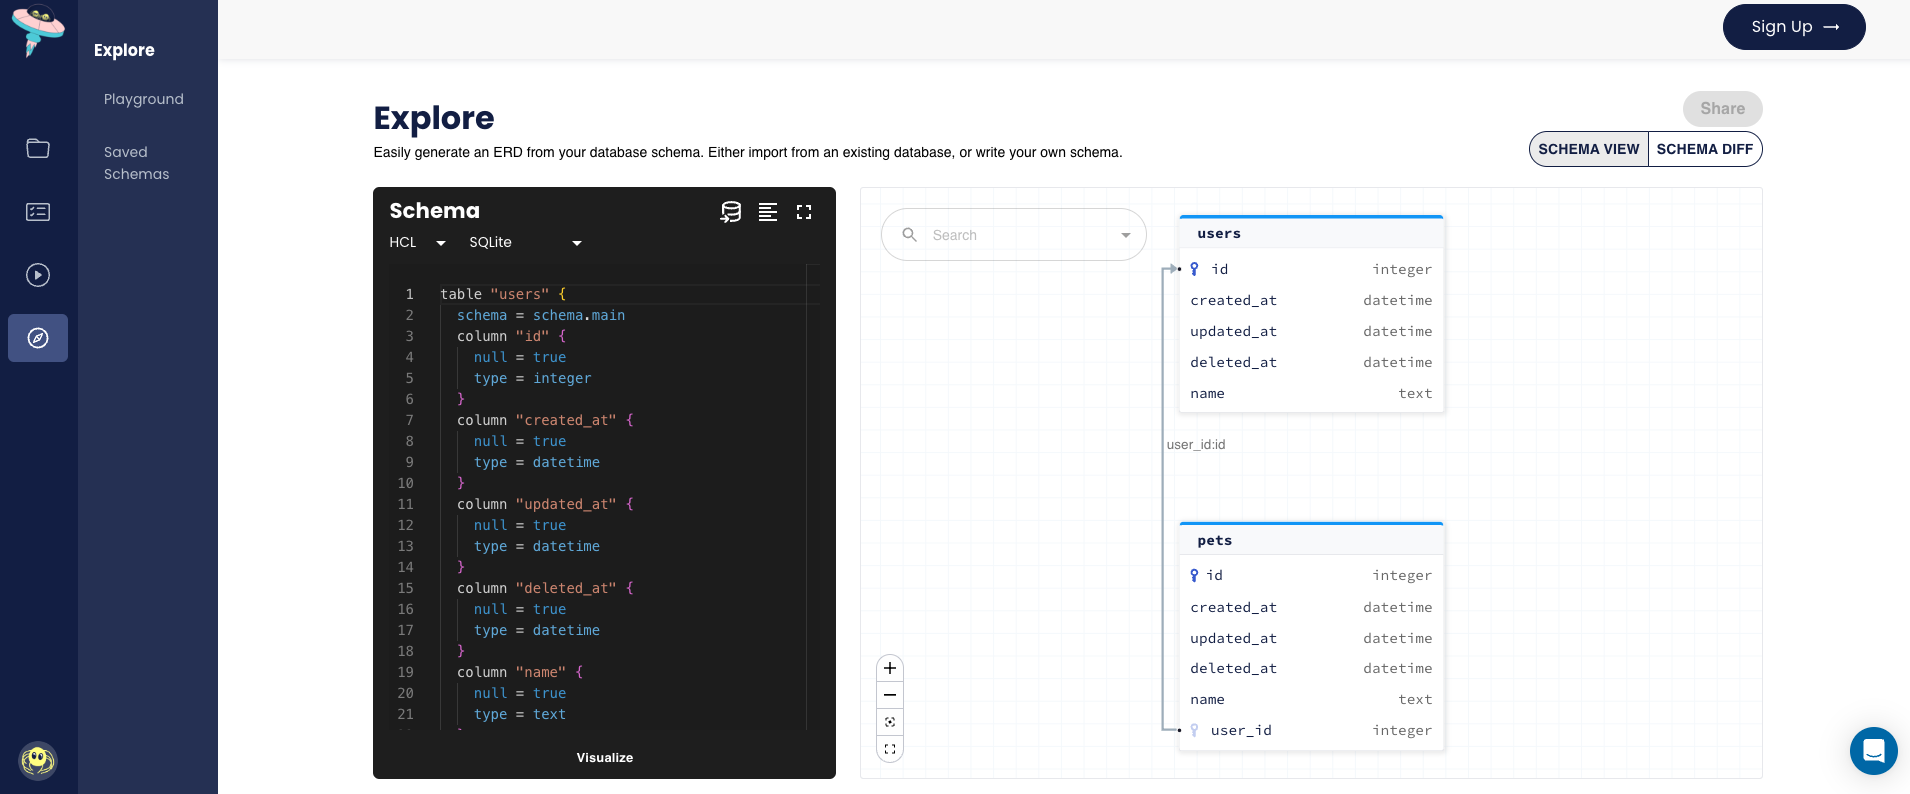
We should now be able to view our schema using Atlas:

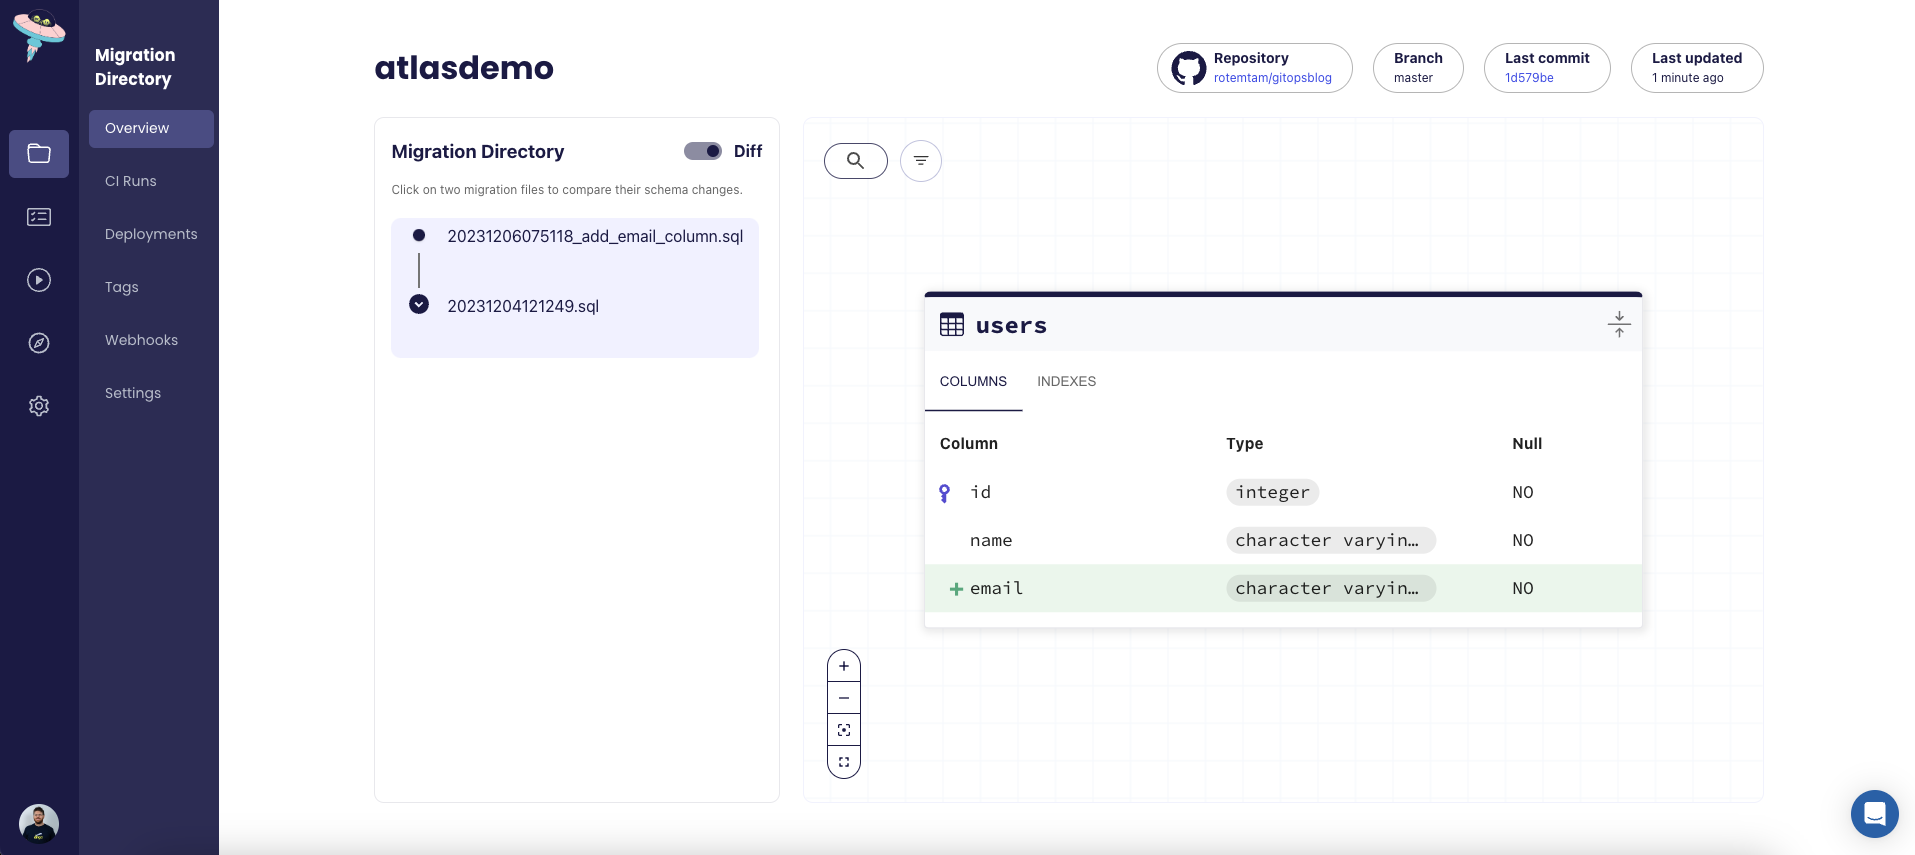
atlas schema inspect -w --env hibernate --url env://src

The -w flag allows us to inspect the schema in atlas cloud:

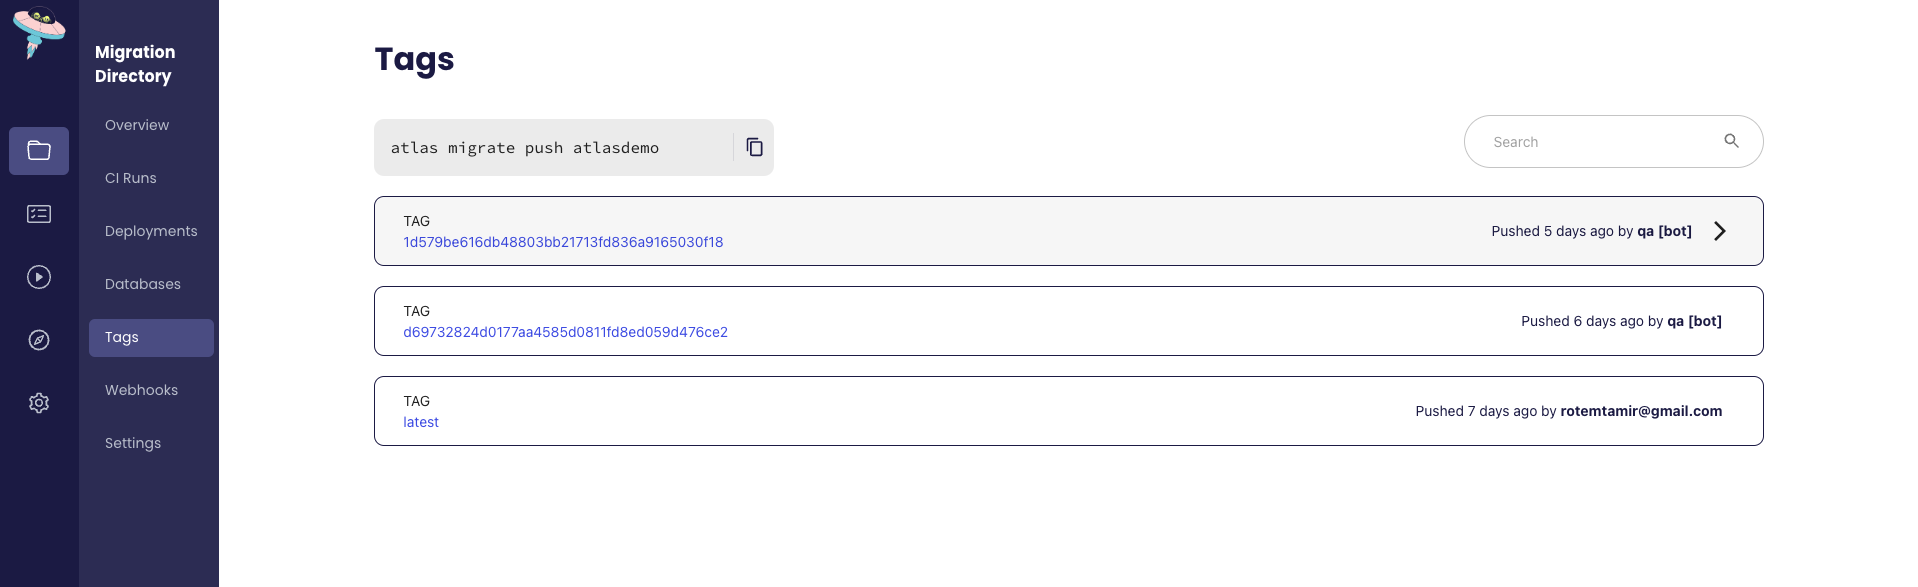
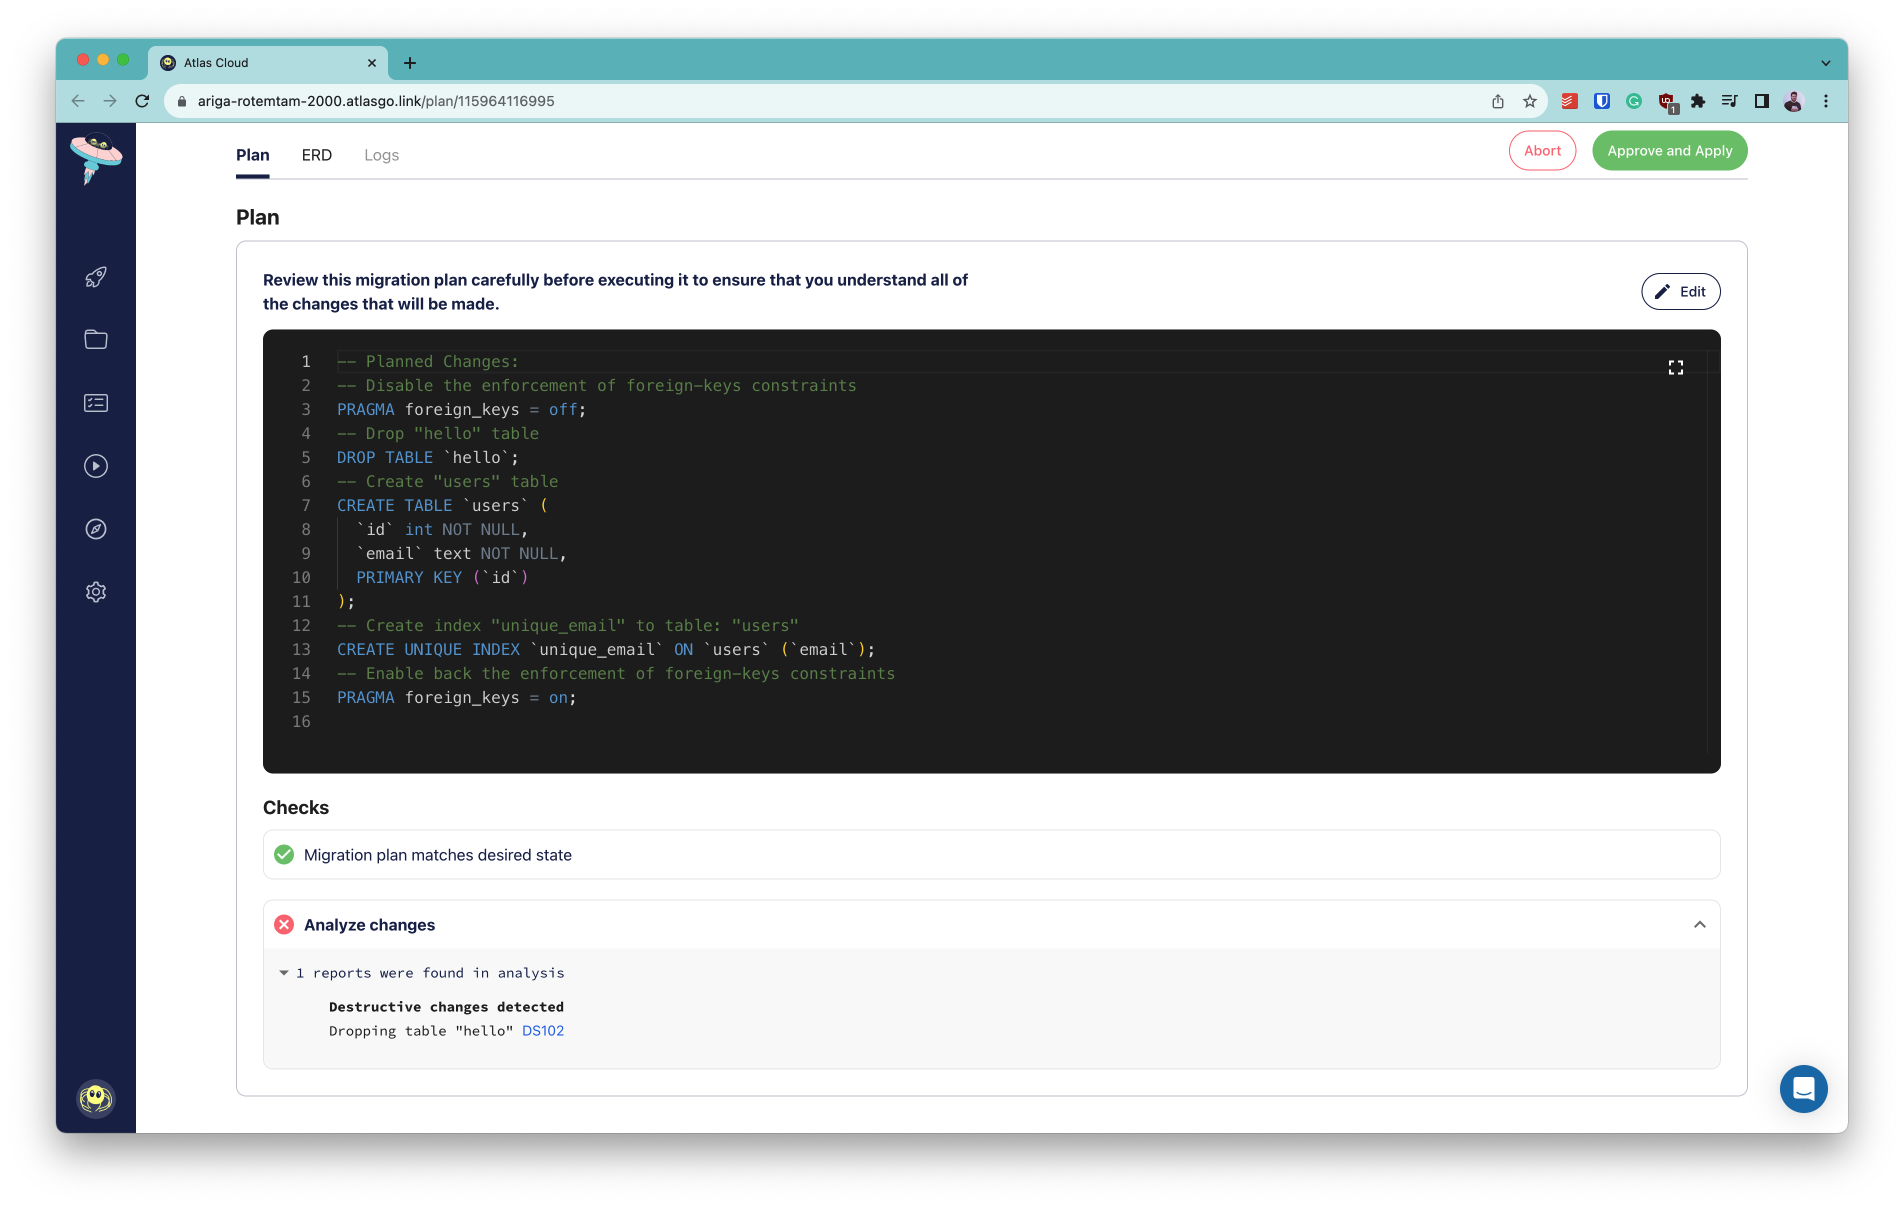
Atlas has many more features we can explore, let's create a migration directory from our schema:

atlas migrate diff --env hibernate

By running atlas migrate diff, Atlas compares the state of our Hibernate schema and the state of the schema in the migration directory. Atlas sees that the migration directory does not exist and initializes it with the current Hibernate schema. Observe the migration directory, it should contain similar files:

-- Create "movies" table
CREATE TABLE "movies" (
"id" bigserial NOT NULL,
"numberinseries" integer NULL,
"title" character varying(255) NULL,
PRIMARY KEY ("id")
);
-- Create "actors" table
CREATE TABLE "actors" (
"name" character varying(255) NOT NULL,
PRIMARY KEY ("name")
);
-- Create "movieparticipation" table
CREATE TABLE "movieparticipation" (
"actorname" character varying(255) NOT NULL,
"movieid" bigint NOT NULL,
PRIMARY KEY ("actorname", "movieid"),
CONSTRAINT "fkaq2kkwvh9870847sm35vtjtiy" FOREIGN KEY ("movieid") REFERENCES "movies" ("id") ON UPDATE NO ACTION ON DELETE NO ACTION,
CONSTRAINT "fktm8fbwa577lnbvwdjegwxvget" FOREIGN KEY ("actorname") REFERENCES "actors" ("name") ON UPDATE NO ACTION ON DELETE NO ACTION
);

Atlas uses the atlas.sum file to protect against conflicting schema changes, you can read about it here.

note

Currently, Atlas does not support using generated fields that require data initialization such as GenerationType.SEQUENCE, GenerationType.TABLE, and Generation.AUTO.

If needed, you can still export the schema using the flag --enable-table-generators (or -Denable-table-generators using Maven). When applying the schema to your database, you will need to make sure to apply the ignored statements (using atlas migrate --env hibernate diff --edit). See more information on manual migrations here

For example, if you are adding GenerationType.SEQUENCE to the Event entity, you will need to add insert statements to your generated migration file:

diff --git a/migrations/20231210140844.sql b/examples/with_local_plugin_repository/migrations/20231210140844.sql
index ad80a64..5955834 100644
--- a/migrations/20231210140844.sql
+++ b/migrations/20231210140844.sql
@@ -4,3 +4,6 @@ CREATE TABLE `Event` (`id` bigint NOT NULL AUTO_INCREMENT, `title` varchar(255)
-- Create "Event_SEQ" table
CREATE TABLE `Event_SEQ` (`next_val` bigint NULL) CHARSET utf8mb4 COLLATE utf8mb4_0900_ai_ci;
+ -- Initialize "Event_SEQ" table
+ insert into Event_SEQ values ( 1 );

Testing these changes can be done by running the application with a local database and creating the entity. To apply the migration directory to the local database, use atlas migrate apply.

Testing the migrations

Now that our migration directory is ready, let's see how to apply it to a target database. Let's start a local PostgreSQL instance:

docker run -it --rm --name mypostgres -p 5432:5432 -e 'POSTGRES_PASSWORD=password' postgres

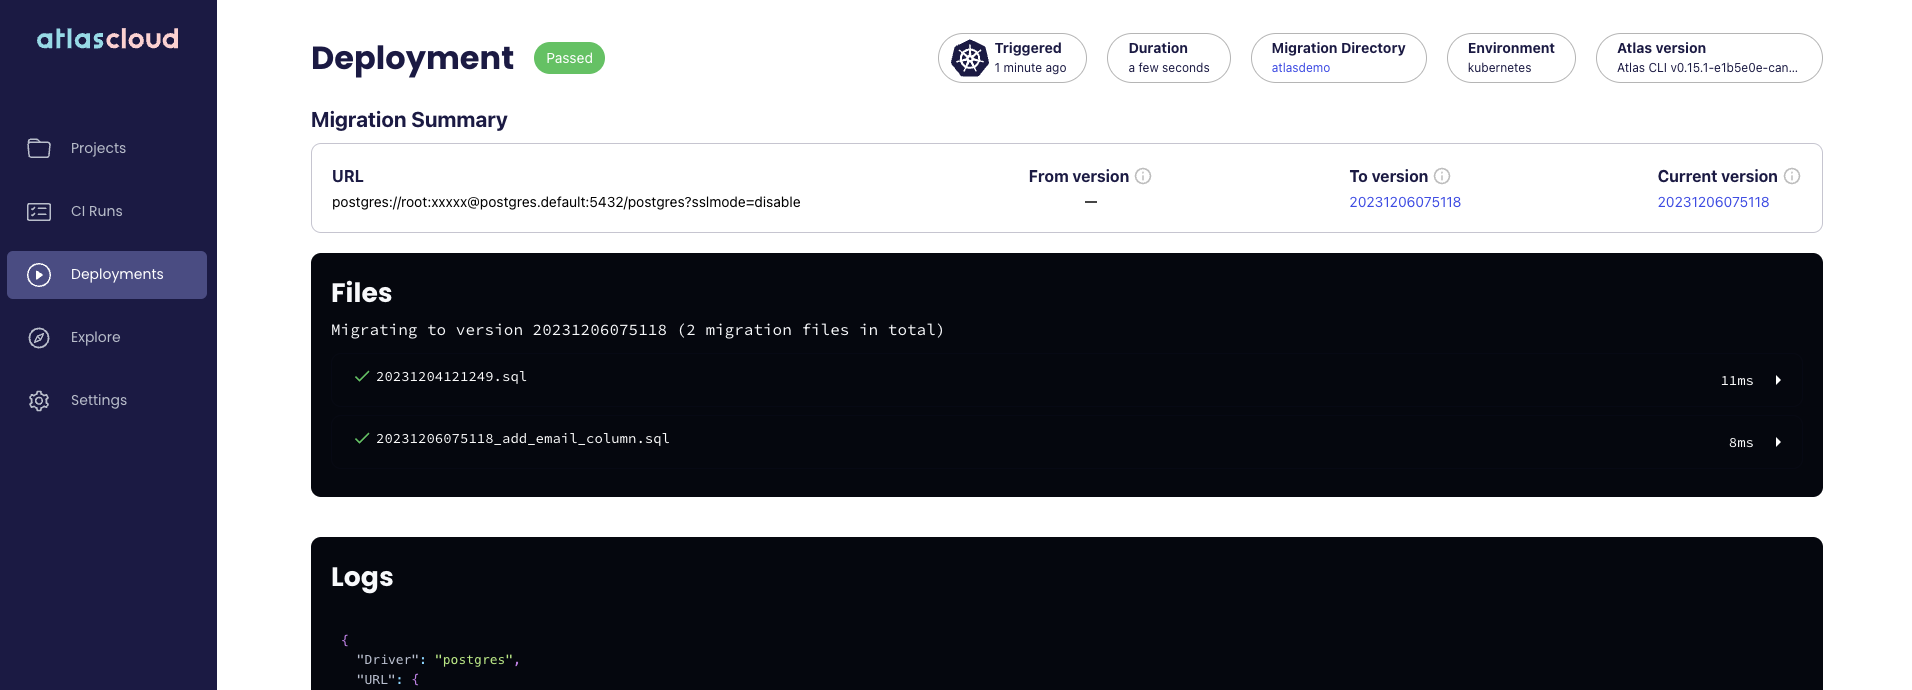
Next, let's apply our migrations to the database:

atlas migrate apply --env hibernate --url 'postgres://postgres:password@0.0.0.0:5432/?search_path=public&sslmode=disable'

Atlas provides details on the applied migrations:

Migrating to version 20231211121102 (1 migrations in total):

-- migrating version 20231211121102
-> CREATE TABLE "movies" (
"id" bigserial NOT NULL,
"numberinseries" integer NULL,
"title" character varying(255) NULL,
PRIMARY KEY ("id")
);
-> CREATE TABLE "actors" (
"name" character varying(255) NOT NULL,
PRIMARY KEY ("name")
);
-> CREATE TABLE "movieparticipation" (
"actorname" character varying(255) NOT NULL,
"movieid" bigint NOT NULL,
PRIMARY KEY ("actorname", "movieid"),
CONSTRAINT "fkaq2kkwvh9870847sm35vtjtiy" FOREIGN KEY ("movieid") REFERENCES "movies" ("id") ON UPDATE NO ACTION ON DELETE NO ACTION,
CONSTRAINT "fktm8fbwa577lnbvwdjegwxvget" FOREIGN KEY ("actorname") REFERENCES "actors" ("name") ON UPDATE NO ACTION ON DELETE NO ACTION
);
-- ok (9.282079ms)

-------------------------
-- 54.100203ms
-- 1 migrations
-- 3 sql statements

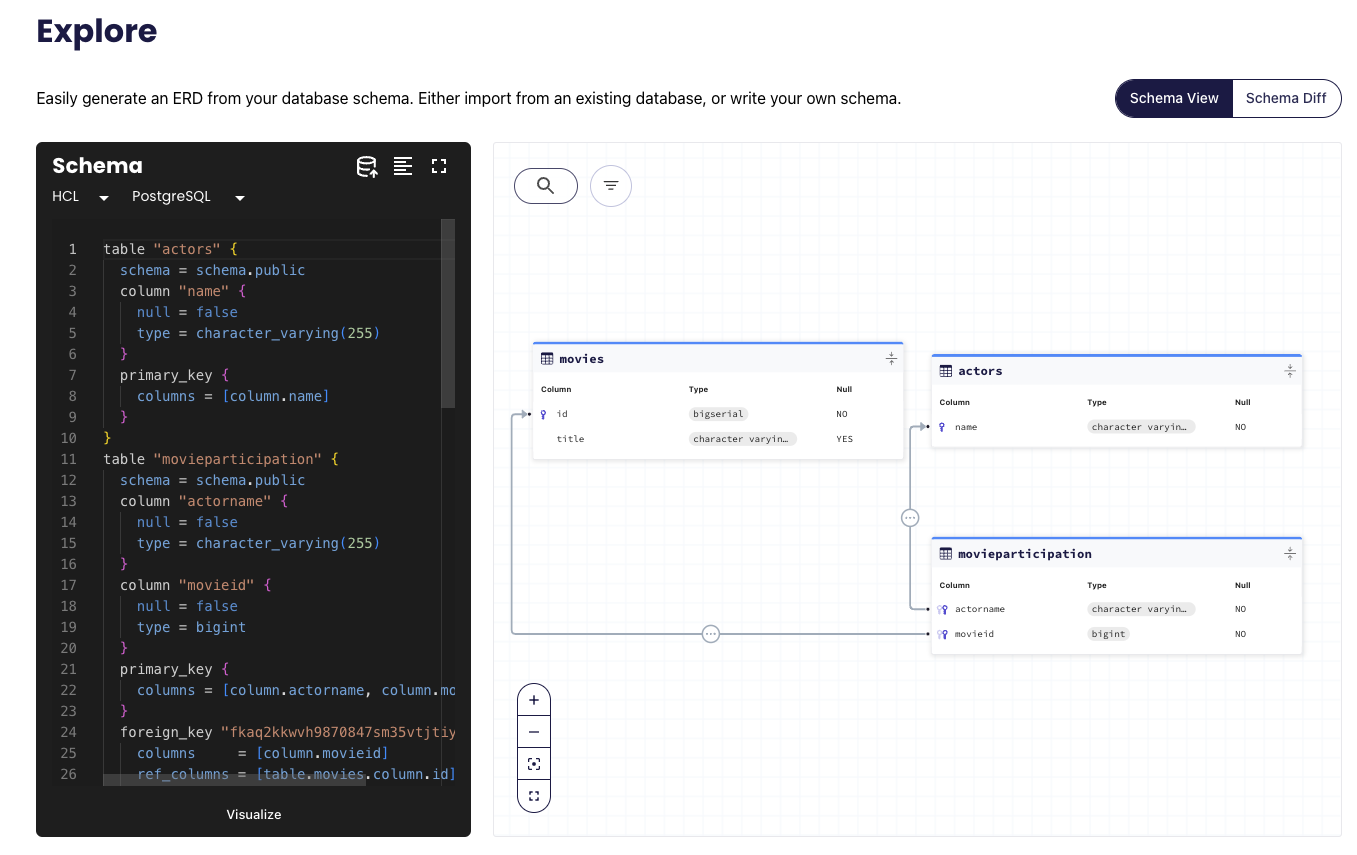
To confirm the migrations were applied, we can use Atlas to inspect the database. Run the following command:

atlas schema inspect -w --env hibernate --url 'postgres://postgres:password@0.0.0.0:5432/?search_path=public&sslmode=disable'

Making changes with confidence

Atlas ships with a static code analysis engine that can detect risky schema changes during development or Continuous Integration. This functionality is exposed to users via the migrate lint command. Let's demonstrate this capability with an example.

Suppose we make the following change:

--- a/src/main/java/org/example/Movie.java
+++ b/src/main/java/org/example/Movie.java
@@ -10,13 +10,10 @@ public class Movie {

Movie(String title, Integer numberInSeries) {
this.title = title;
- this.numberInSeries = numberInSeries;
}
@Id
@GeneratedValue(strategy = GenerationType.IDENTITY)
public Long id;

public String title;
-
- public Integer numberInSeries;
}

By removing an attribute from the Movie model, we are removing a column from the database schema. Let's see how Atlas handles this change. Run atlas migrate diff --env hibernate, and observe the new file in the migration directory:

cat migrations/20231211124321.sql
-- Modify "movies" table
ALTER TABLE "movies" DROP COLUMN "numberinseries";

While this change may be desired, it is an irreversible operation that should be done with caution. Atlas can help us avoid dangerous schema changes by linting the migration directory and not allowing such a change to get merged.

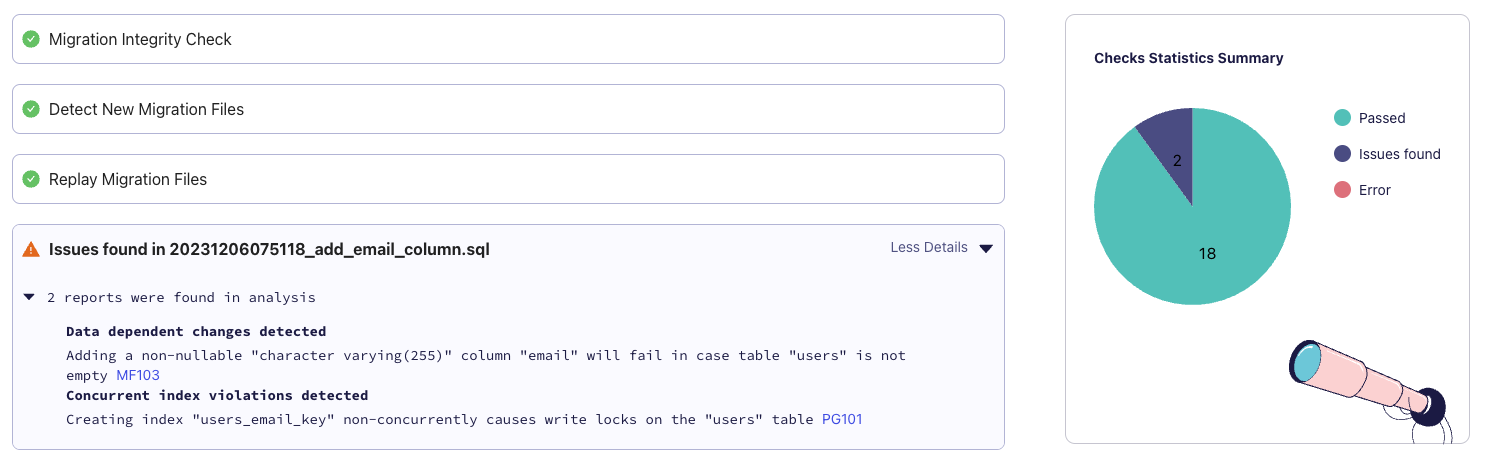
Running the following command, we can see that Atlas will warn us about a destructive change to the database:

atlas migrate lint --env hibernate --latest 1

20231211124321.sql: destructive changes detected:
L2: Dropping non-virtual column "numberinseries"

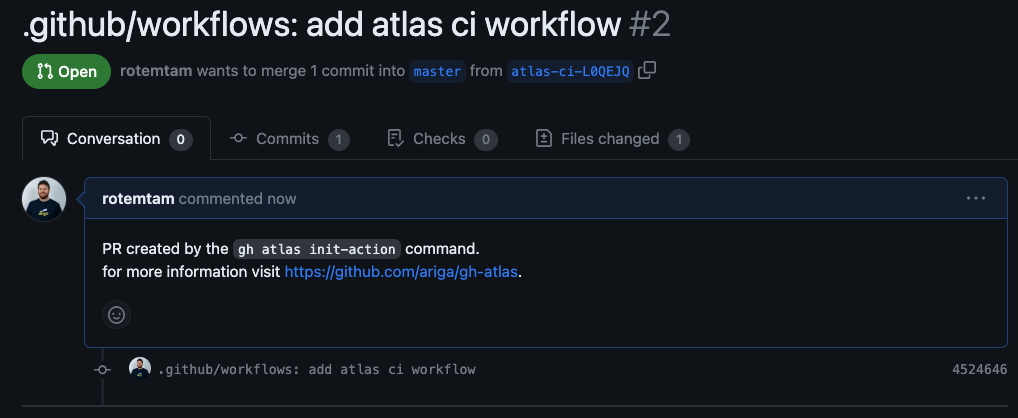
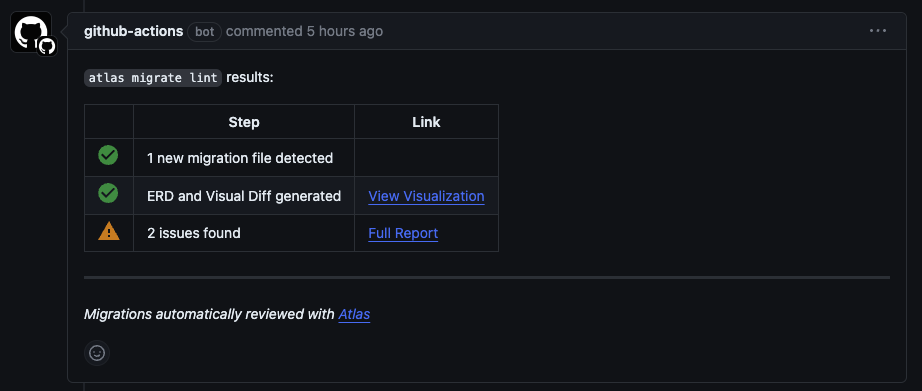
Running migrate lint locally during development can be very useful, but linting becomes much more powerful when you integrate into your Continuous Integration pipeline. Atlas offers a set of Github Actions designed to make setting this up a breeze.

Conclusion

In this post, we have presented how Hibernate projects can use Atlas to automatically plan, lint and apply schema migrations based only on their data model.

If you want to explore more configuration options or dive deeper into how this works, please take a look at this repository.

How can we make Atlas better?

We would love to hear from you on our Discord server ❤️.

· 7 min read
Rotem Tamir
info

This is the second post in a two-part tutorial, which demonstrates how to use the Atlas Operator in tandem with Atlas Cloud and ArgoCD to create a slick, modern GitOps workflow for managing your database migrations natively in Kubernetes.

In part one, we demonstrated how to initialize an Atlas project, and create a CI/CD pipeline that automatically plans, verifies and stores your database migrations in Atlas Cloud using GitHub Actions.

In this part, we will show how to deploy these migrations using the Atlas Operator and ArgoCD to demonstrate a complete GitOps workflow for database migrations.

How to GitOps your Database Migrations on Kubernetes

"We can wrap existing schema management solutions into containers, and run them in Kubernetes as Jobs. But that is SILLY. That is not how we work in Kubernetes."

-Viktor Farcic, DevOps ToolKit

As applications evolve, so do their database schemas. The practice of automating the deployment of database schema changes has evolved hand in hand with modern devops principles into what is known as database migrations. As part of this evolution, hundreds of "migration tools" have been created to help developers manage their database migrations. These tools range from ORM and language specific tools like Alembic for Python, to language agnostic tools like Flyway and Liquibase.

When Kubernetes came along and teams started to containerize their applications, the knee-jerk reaction was to wrap these legacy tools in a container and run them as part of the application deployment process. We discussed some of the shortcomings of this approach in a recent KubeCon talk and earlier Webinar.

Atlas was created from the ground up to be a modern database migration tool that embodies modern DevOps principles and is designed to run natively in Kubernetes. The Atlas Operator enables teams to extend the native Kubernetes API with new resource types that represent database schemas and migrations. By using these capabilities it is possible to natively integrate database migrations into your GitOps workflow.

Prerequisites

  • A running Kubernetes cluster - for learning purposes, you can use Minikube, which is a tool that runs a single-node Kubernetes cluster on your laptop.
  • kubectl - a command-line tool for interacting with Kubernetes clusters.
  • Helm - a package manager for Kubernetes.

Setting up the Atlas Operator and ArgoCD

1. Install ArgoCD

To install ArgoCD run the following commands:

kubectl create namespace argocd
kubectl apply -n argocd -f https://raw.githubusercontent.com/argoproj/argo-cd/stable/manifests/install.yaml

Wait until all the pods in the argocd namespace are running:

kubectl wait --for=condition=ready pod --all -n argocd

kubectl will print something like this:

pod/argocd-application-controller-0 condition met
pod/argocd-applicationset-controller-69dbc8585c-6qbwr condition met
pod/argocd-dex-server-59f89468dc-xl7rg condition met
pod/argocd-notifications-controller-55565589db-gnjdh condition met
pod/argocd-redis-74cb89f466-gzk4f condition met
pod/argocd-repo-server-68444f6479-mn5gl condition met
pod/argocd-server-579f659dd5-5djb5 condition met

For more information or if you run into some errors refer to the Argo CD Documentation.

2. Install the Atlas Operator

helm install atlas-operator oci://ghcr.io/ariga/charts/atlas-operator

Helm will print something like this:

Pulled: ghcr.io/ariga/charts/atlas-operator:0.3.6
Digest: sha256:7e29c15e846fa9c25164f4ad5a7cb7f25e9ead2882082f0352985e58c1976f99
NAME: atlas-operator
LAST DEPLOYED: Mon Dec 11 10:25:11 2023
NAMESPACE: default
STATUS: deployed
REVISION: 1
TEST SUITE: None

Wait until the atlas-operator pod is running:

kubectl wait --for=condition=ready pod -l app.kubernetes.io/name=atlas-operator -n default

kubectl will print something like this:

pod/atlas-operator-866dfbc56d-qkkkn condition met

For more information on the installation process, refer to the Atlas Operator Documentation

Step 2: Set up the Target Database

Start by deploying a simple PostgreSQL database using the following command:

kubectl apply -f https://raw.githubusercontent.com/ariga/atlas-operator/master/config/integration/databases/postgres.yaml

This will create a Deployment which runs a single (non-persistent) PostgreSQL instance and a Service that exposes it on port 5432. In addition, it will create a Secret that contains the database credentials.

Wait until the database pod is running:

kubectl wait --for=condition=ready pod -l app=postgres -n default

Step 3: Create the AtlasMigration resource

In order for the Atlas Operator to know which migrations to apply, we need to create an AtlasMigration resource that points to the Atlas Cloud project we created in part one. Create a new directory called manifests in your GitHub repository. In it, create a file called atlas-migration.yaml with the following contents:

manifests/atlas-migration.yaml
apiVersion: db.atlasgo.io/v1alpha1
kind: AtlasMigration
metadata:
name: migration
spec:
urlFrom:
secretKeyRef:
key: url
name: postgres-credentials
cloud:
project: "atlasdemo" # Atlas Cloud project name
tokenFrom:
secretKeyRef:
name: atlas-credentials
key: token
dir:
remote:
name: "atlasdemo" # Migration directory name in your atlas cloud project
tag: "1d579be616db48803bb21713fd836a9165030f18" # See below on how to obtain this value for your project.

This resource tells the Atlas Operator to apply the migrations in the atlasdemo project in Atlas Cloud to the database specified in the postgres-credentials secret. Notice that the tokenFrom field references a secret called atlas-credentials. This secret will contain the Atlas Cloud API token that we created in part one.

To create it run:

kubectl create secret generic atlas-credentials --from-literal=token=aci_<replace with your token>
Obtaining the tag field

Notice the tag field in the dir section. This field tells the Atlas Operator which version of the migrations to apply. In this case, we are telling it to apply the migrations tagged with the commit hash 1d579be616db48803bb21713fd836a9165030f18 which is the commit hash of the merge commit that merged the pull request we created in part one.

To review which tags are available for your migrations, head over to you Atlas Cloud project and click on the Tags tab. You should see something like this:

Commit and push the changes to your GitHub repository.

Step 4: Create the ArgoCD Application

Now that we have created the AtlasMigration resource, we can create an ArgoCD application that will deploy it. Create a file called Application.yaml in the root of your GitHub repository with the following contents:

Application.yaml
apiVersion: argoproj.io/v1alpha1
kind: Application
metadata:
name: atlas-argocd-demo
namespace: argocd
finalizers:
- resources-finalizer.argocd.argoproj.io
spec:
source:
path: manifests
repoURL: 'https://github.com/<your gh user>/<your repo name>'
targetRevision: master
destination:
namespace: default
server: 'https://kubernetes.default.svc'
project: default
syncPolicy:
automated:
prune: true
selfHeal: true
retry:
limit: 5
backoff:
duration: 5s
maxDuration: 3m0s
factor: 2
syncOptions:
- CreateNamespace=true

Be sure to replace the repoURL field with the URL of your GitHub repository.

info

If your repository is private, you will need to create a GitHub Personal Access Token and tell ArgoCD about it by running the following command:

export CURRENT_NS=$(kubectl config view --minify --output 'jsonpath={..namespace}')
kubectl config set-context --current --namespace=argocd
argocd repo add https://github.com/<user>/<repo> --username <user> --password ghp_<your token>
kubectl config set-context --current --namespace=$CURRENT_NS

5. Step 5: Deploy!

Next, apply the application manifest:

kubectl apply -f Application.yaml

Wait until the application is deployed:

kubectl wait --for=condition=ready atlasmigration/migration

Observe the status of the migration object:

 kubectl get atlasmigration/migration -o jsonpath='{.status}' | jq

The output will look similar to:

{
"conditions": [
{
"lastTransitionTime": "2023-12-11T08:38:35Z",
"message": "",
"reason": "Applied",
"status": "True",
"type": "Ready"
}
],
"lastApplied": 1702283914,
"lastAppliedVersion": "20231206075118",
"observed_hash": "6e4feac15a35d20c38e705428de507835c7c58d487eacc84ed012a17b002981d"
}

You can also observe the status of the migration using the Atlas Cloud UI:

Wrapping Up

Let's review the flow that we have created, from end to end:

  • Developers modify the desired state of their schema and use atlas migrate diff locally to generate a migration plan.
  • Developers commit the migration plan to their GitHub repository and create a pull request.
  • GitHub Actions runs the Atlas Continuous Integration workflow, which verifies the migration plan is correct and safe.
  • Once the pull request is merged, a GitHub Actions workflow pushes the new migration to Atlas Cloud. It is tagged with the commit hash of the merge commit.
  • When we are ready to deploy our changes to production, we change the value of the tag field in the AtlasMigration resource to the most recent tag. We push this change to our GitHub repository.
  • ArgoCD detects the change and updates our AtlasMigration resource.
  • The Atlas Operator detects the change and applies the migrations to the database.
  • The database is now up to date with the desired state of our schema!

To summarize, in this tutorial we demonstrated how to use the Atlas Operator and ArgoCD to create a slick, modern GitOps workflow for managing your database migrations natively in Kubernetes.

As always, we would love to hear your feedback and suggestions on our Discord server.

· 10 min read
Rotem Tamir
info

This is the first post in a two-part tutorial, which demonstrates how to use the Atlas Operator in tandem with Atlas Cloud and ArgoCD to create a slick, modern GitOps workflow for managing your database migrations natively in Kubernetes.

GitOps is a software development and deployment methodology that uses Git as the central repository for both code and infrastructure configuration, enabling automated and auditable deployments.

ArgoCD is a Kubernetes-native continuous delivery tool that implements GitOps principles. It uses a declarative approach to deploy applications to Kubernetes, ensuring that the desired state of the application is always maintained.

Kubernetes Operators are software extensions to Kubernetes that enable the automation and management of complex, application-specific, operational tasks with domain-specific knowledge within a Kubernetes cluster.

In this tutorial, we will use the Atlas Operator in tandem with Atlas Cloud and ArgoCD to create a slick, modern GitOps workflow for managing your database migrations natively in Kubernetes.

For the sake of brevity, we are going to split this guide into two parts:

  1. In part one, we will show how to initialize an Atlas project, and create a CI/CD pipeline that will automatically plan, verify and store your database migrations in Atlas Cloud using GitHub Actions.
  2. In part two, we will show how to deploy these migrations using the Atlas Operator and ArgoCD to demonstrate a complete GitOps workflow for database migrations.

Modern CI/CD for Database Migrations

Atlas was built to support a modern CI/CD workflow for database migrations based on the following principles:

  1. Changes to the database are planned automatically. Given the desired state of the database, the system should automatically generate a plan for how to get from the current state to the desired state.
  2. Changes to the database schema are stored in a versioned migration directory. All planned changes to the database are checked in to a versioned migration directory. This directory contains SQL scripts, which are executed in lexicographic order to apply the changes to the database.
  3. Changes to the database are validated during CI. All changes to the database are tested and evaluated against a set of governing policies.
  4. Changes to the database are deployed via automation. No manual steps are required to deploy changes to the database. All changes are deployed via a CI/CD pipeline.

To learn more about these principles, check out our guide to modern CI/CD for database migrations.

In this tutorial, we will show to apply the fourth principle to your database migrations using the Atlas Operator and ArgoCD.

Local Setup

With the principles of modern CI/CD for database migrations in mind, let's see how we can apply them to a simple application that uses a PostgreSQL database.

Prerequisites (for part one)

  1. A GitHub Account - we are going to be setting up some GitHub Actions workflows, so you will need a GitHub account.

  2. The most recent version of Atlas. To get Atlas on Linux or macOS run:

    curl -sSf https://atlasgo.sh | sh

    For more installation options, see the docs

  3. Docker. To install Docker, follow the instructions here.

  4. The GitHub CLI, gh. To install gh:

    brew install gh

    Follow instructions for other platforms here.

Step 1: Define our desired state

Atlas advocates for the declarative approach in which users start their work by defining the desired state of their database and let the system figure out the implementation details. Atlas supports many different ways to define the desired state of your database, called "schema loaders". In this tutorial, we will use a simple SQL file to define our desired state.

In a fresh Git repo, create a file named schema.sql with the following contents:

schema.sql
create table users (
id int primary key,
name varchar(255) not null unique
);

In this project, whenever we want to change the database schema, we will update this file to reflect the desired state of the database.

Step 2: Plan the initial migration

Now that we have defined our desired state, we can use the Atlas CLI to plan the initial migration. Create the following file named atlas.hcl:

env "local" {
src = "file://schema.sql"
dev = "docker://postgres/15/dev"
migration {
dir = "file://migrations"
}
format {
migrate {
diff = "{{ sql . \" \" }}"
}
}
}

Next, run the following command to plan the initial migration:

atlas migrate diff --env local

Observe two new files that were created in the migrations directory:

.
├── atlas.hcl
├── migrations
│ ├── 20231204121249.sql
│ └── atlas.sum
└── schema.sql

Step 3: Push our migration directory to Atlas Cloud

Atlas Cloud is a hosted service that can serve as a central repository for your database migrations. Similarly to how DockerHub is used to store and distribute Docker images, Atlas Cloud can be used to store and distribute database migration directories. Atlas Cloud has a free tier that is suitable for small teams and personal projects which you can use to follow along with this tutorial.

Log in to Atlas Cloud using the following command:

atlas login

If you do not have an existing Atlas Cloud account, you will be prompted to create one.

Next, push your migration directory to Atlas Cloud using the following command:

atlas migrate push --env local atlasdemo

This will create a new project named atlasdemo on Atlas Cloud and push your migration directory to it. Atlas will print a URL to the project page on Atlas Cloud similar to the following:

https://rotemtam85.atlasgo.cloud/dirs/4294967359

Setup GitHub Actions

In this section, we will set up a GitHub Actions workflow that will add Atlas to your CI/CD pipeline.

Create a Bot Token

To write data to your Atlas Cloud account, you will need to supply your CI/CD pipelines with an API key that has write access to your Atlas Cloud account. To learn how to create a bot token, check out our guide on the topic. Use the instructions in this guide to create a token, and make a note of it. We will use it in the next steps.

Install the Atlas Extension

To streamline this process, we have created a gh command that will create the workflow for you. To install the latest version, run:

gh extension install ariga/gh-atlas

Ensure your gh CLI has sufficient permissions

Make sure you have the necessary permissions to configure your action:

gh auth refresh -s write:packages,workflow

Create a GitHub Actions Workflow

Once installed, let's use this extension to generate our GitHub Actions workflow. Run the following command:

gh atlas init-action --token <your-bot-token>  --dir-name="atlasdemo" --driver=postgres

Atlas will scan your repository (locally) for directories containing Atlas migrations and ask you which one you would like to use for CI. Select the desired directory and press "Enter":

Use the arrow keys to navigate: ↓ ↑ → ←
? choose migration directory:
▸ migrations

Atlas will then ask you which database driver this directory contains migrations for. Select the desired driver and press "Enter".

Next, the GitHub extension will save your bot token to a GitHub secret and create a pull request with the necessary configuration for the GitHub Action.

Screenshot Example

The PR contains a GitHub Actions workflow similar to this:

Code Example
name: Atlas
on:
push:
branches:
- master
paths:
- .github/workflows/ci-atlas.yaml
- 'migrations/*'
pull_request:
paths:
- 'migrations/*'
# Permissions to write comments on the pull request.
permissions:
contents: read
pull-requests: write
jobs:
atlas:
services:
# Spin up a postgres:15 container to be used as the dev-database for analysis.
postgres:
image: postgres:15
env:
POSTGRES_DB: dev
POSTGRES_PASSWORD: pass
ports:
- 5432:5432
options: >-
--health-cmd pg_isready
--health-interval 10s
--health-start-period 10s
--health-timeout 5s
--health-retries 5
runs-on: ubuntu-latest
steps:
- uses: actions/checkout@v3
with:
fetch-depth: 0
- uses: ariga/setup-atlas@v0
with:
cloud-token: ${{ secrets.ATLAS_CLOUD_TOKEN_K6MJMK }}
- uses: ariga/atlas-action/migrate/lint@v1
with:
dir: 'file://migrations'
dir-name: 'atlasdemo'
dev-url: 'postgres://postgres:pass@localhost:5432/dev?search_path=public&sslmode=disable'
env:
GITHUB_TOKEN: ${{ github.token }}
- uses: ariga/atlas-action/migrate/push@v1
if: github.ref == 'refs/heads/master'
with:
dir: 'file://migrations'
dir-name: 'atlasdemo'
dev-url: 'postgres://postgres:pass@localhost:5432/dev?search_path=public&sslmode=disable'

After reviewing the changes, merge the pull request to enable the GitHub Action.

Testing our Pipeline

Now that we have set everything up, let's test our pipeline end-to-end. To do so, we will first plan a new change to our database schema.

Edit the Desired Database Schema

Edit the schema.sql file to add a new column to the users table:

schema.sql
create table users (
id int primary key,
name varchar(255) not null unique,
email varchar(255) not null unique
);

Generate a New Migration

Next, run the following command to automatically generate a new migration:

atlas migrate diff --env local add_email_column

This will create a new file in the migrations directory:

.
├── atlas.hcl
├── migrations
│ ├── 20231204121249.sql
│ ├── 20231206075118_add_email_column.sql
│ └── atlas.sum
└── schema.sql

Create a new Pull Request

Next, create a branch and push the changes to GitHub:

git checkout -b add-email-column
git add .
git commit -m "Add email column"
git push --set-upstream origin add-email

Next, use the gh CLI to create a new pull request:

gh pr create --title "migrations: add email column" --body "adding email column to users table"

Atlas Reviews the Pull Request

Based on the configuration in the GitHub Actions workflow we created, Atlas will automatically review your migration directory whenever a new pull request that affects it is opened. When Atlas is done running, it will comment on your PR with the results of the review:

Interesting! Atlas found some issues with our migration. Let's click on the report to see what they are:

Atlas warns us about two issues. The first is that adding a non-nullable varchar column "email" will fail in case the "users" table is not empty. The second is that creating an index non-concurrently causes write locks on the "users" table. Since we are in the early stages of development, we can safely ignore these issues for now. Let's merge the pull request and see what happens.

gh pr merge --squash

Atlas Pushes the Migrations to Atlas Cloud

Once GitHub Actions detects that a new push to the master branch has been merged, per our configuration, it will run the atlas migrate push command to push the migrations to Atlas Cloud. Once the push is complete, our schema will be updated in the Atlas Cloud schema viewer screen:

Wrapping Up Part One

That's it for part one! In this tutorial, we have shown how to use Atlas Cloud and GitHub Actions to create a slick, modern CI/CD pipeline for your database migrations. In part two, we will show how to deploy these migrations using the Atlas Operator and ArgoCD to demonstrate a complete GitOps workflow for database migrations.

As always, we would love to hear your feedback and suggestions on our Discord server.

· 11 min read
Rotem Tamir

Hi everyone!

It's been a few weeks since our last version announcement and today I'm happy to share with you
v0.15, which includes some very exciting improvements for Atlas:

  • Interactive Declarative Migrations - Atlas supports a Terraform-like workflow for managing your database schema using the schema apply command. In this release we have added a new "Lint and Edit" mode to this command, which will analyze your schema changes for issues and will allow you to edit them interactively before applying them to your database.
  • Functions and Stored Procedures - Atlas now supports creating and managing functions and stored procedures in your database schema.
  • Postgres Domains - In addition, Atlas now supports Postgres Domains . A domain is essentially a data type with optional constraints (restrictions on the allowed set of values).
  • TypeORM Integration - TypeORM is a popular ORM for Node.js. In this release, we are happy to announce the TypeORM integration, which allows you to automatically generate your database schema from your TypeORM entities, create visualizations and more.

Let's dive right in!

Interactive Declarative Migrations

Atlas supports a Terraform-like workflow for managing your database schema using the schema apply command. This workflow, which we call "Declarative Migrations", is a modern alternative to the traditional "versioned migrations" workflow. In declarative migrations, you define your desired schema in one of the formats supported by Atlas and supply a connection string to your database. Atlas compares the current and desired schema of your database and generates a plan to migrate your database to the desired state.

Similar to Terraform, until today, Atlas would prompt you to confirm the migration plan before applying it to your database. This is a great way to ensure that you don't accidentally apply a migration that you didn't intend to. However, this flow suffers from a few drawbacks:

  1. Ensuring Safety - you can count on Atlas to generate a correct migration plan to your desired state, but it's still possible that this migration will have unintended side effects. For example, adding a UNIQUE constraint to a column might fail if there are duplicate values in the column.
  2. Editing - users often want to make changes to their migration plan before applying it. In the current flow, this requires running schema apply with the --dry-run flag, saving the output to a file, editing it, and then manually applying the edited migration plan to the database.

Enter: Interactive Declarative Migrations

In this release, we are introducing a new "Lint and Edit" mode to the schema apply command. This mode is available to logged-in users only, as it uses Atlas Cloud to provide a neat UI and rich analysis capabilities. Let's see it in action.

Start by downloading the latest version of Atlas:

curl -sSf https://atlasgo.sh | sh

For installation instructions on other platforms, see the installation guide.

After installing Atlas, make sure to log in using the atlas login command:

atlas login

Next, create a new file named schema.hcl that will contain your desired schema:

schema.hcl
schema "main" {
}

table "hello" {
schema = schema.main
column "name" {
type = varchar(100)
default = "Anonymous"
}
}

Now, let's apply this schema to a local SQLite database named "sqlite.db":

atlas schema apply -u sqlite://sqlite.db --dev-url sqlite://?mode=memory -f schema.hcl

Atlas will calculate the diff between the current (empty) state of the database and our desired state and prompt us to confirm the migration plan:

-- Planned Changes:
-- Create "hello" table
CREATE TABLE `hello` (`name` varchar NOT NULL DEFAULT 'Anonymous');
Use the arrow keys to navigate: ↓ ↑ → ←
? Are you sure?:
Apply
▸ Lint and edit # <-- Brand new!
Abort

Notice the new "Lint and edit" option. Select it and press Enter. Atlas will now analyze the migration plan and open your browser in the new, interactive migration plan screen. The screen contains three important sections:

  • Migration Plan - the migration plan generated by Atlas. You can click the "Edit" button to make changes to it.
  • Checks - a summary of the checks that Atlas ran against the generated plan. In this case, our plan is completely safe, so all checks passed.
  • ERD - A visual representation of the change we are planning.

Once we are content with the migration plan, let's go ahead and click the "Approve and Apply" button. Atlas will apply the migration plan to the database and scroll down to the execution logs section:

Let's edit our desired state a bit to delete the hello table and add a new users table:

schema.hcl
schema "main" {
}
-table "hello" {
- schema = schema.main
- column "name" {
- type = varchar(100)
- default = "Anonymous"
- }
-}
+table "users" {
+ schema = schema.main
+ column "id" {
+ type = int
+ }
+ column "email" {
+ type = text
+ }
+ primary_key {
+ columns = [column.id]
+ }
+ index "unique_email" {
+ columns = [
+ column.email
+ ]
+ unique = true
+ }
+}

Once again, let's run atlas schema apply to apply the changes to the database and select the "Lint and Edit" option.

This time, Atlas will warn us that the migration plan is not safe:

In this case, we decide to abort the migration in order to not lose the precious data on the hello table. Good thing we have automatic migration linting on our side!

Functions and Stored Procedures

info

Functions and stored procedures are currently in beta and available to logged-in users only. To use this feature run:

atlas login

Over the past few months, we have received numerous requests to support management of functions and stored procedures in popular databases such as PostgreSQL and MySQL. Functions and stored procedures are a way to encapsulate reusable logic in your database and are often used to improve performance by reducing the number of round-trips to the database.

Atlas now supports creating and managing functions and stored procedures in your database schema. Let's see how we can use this feature to create a simple function. In our example, we will implement the leet_speak function for PostgreSQL, which transforms a regular string into its Leet equivalent!

We can define the desired state of our database in either HCL or SQL:

schema.hcl
function "leet_speak" {
schema = schema.public
lang = PLpgSQL
arg "input_text" {
type = character_varying
}
return = character_varying
as = <<-SQL
DECLARE
output_text VARCHAR := '';
i INT := 1;
BEGIN
WHILE i <= LENGTH(input_text) LOOP
output_text := output_text ||
CASE SUBSTRING(input_text, i, 1)
WHEN 'a' THEN '4'
WHEN 'e' THEN '3'
WHEN 'i' THEN '1'
WHEN 'o' THEN '0'
WHEN 's' THEN '5'
WHEN 't' THEN '7'
ELSE SUBSTRING(input_text, i, 1)
END;
i := i + 1;
END LOOP;

RETURN output_text;
END;
SQL
}
schema "public" {
comment = "standard public schema"
}

For the purpose of this demo, we will run a local MySQL Docker container:

docker run --name db -e POSTGRES_PASSWORD=pass -d -p 5432:5432 postgres:16

Now, let's apply our schema to the database:

atlas schema apply -u 'postgres://postgres:pass@localhost:5432/postgres?sslmode=disable&search_path=public' --to file://schema.hcl

Atlas will calculate the diff between the current (empty) state of the database and our desired state and prompt us to confirm the migration plan:

-- Planned Changes:
-- Create "leet_speak" function
CREATE FUNCTION "leet_speak" ("input_text" character varying) RETURNS character varying LANGUAGE PLpgSQL AS $$
DECLARE
output_text VARCHAR := '';
i INT := 1;
BEGIN
WHILE i <= LENGTH(input_text) LOOP
output_text := output_text ||
CASE SUBSTRING(input_text, i, 1)
WHEN 'a' THEN '4'
WHEN 'e' THEN '3'
WHEN 'i' THEN '1'
WHEN 'o' THEN '0'
WHEN 's' THEN '5'
WHEN 't' THEN '7'
ELSE SUBSTRING(input_text, i, 1)
END;
i := i + 1;
END LOOP;

RETURN output_text;
END;
$$;
Use the arrow keys to navigate: ↓ ↑ → ←
? Are you sure?:
▸ Apply
Abort

Let's go ahead and select the "Apply" option. Atlas will apply the migration plan to the database and print the following output:

✔ Apply

We can now verify that the function was created successfully by running:

docker exec -it db psql -U postgres -c "SELECT leet_speak('hello leet world')"

And the result indeed is:

    leet_speak
------------------
h3ll0 l337 w0rld
(1 row)

To learn more about functions and stored procedures in Atlas, check out the documentation.

Postgres Domains

info

Support for domains is currently in beta and available to logged-in users only. To use this feature run:

atlas login

Another highly requested feature was support for Postgres Domains. A domain is essentially a data type with optional constraints (restrictions on the allowed set of values). For example, you might want to define an email_address domain which would be a varchar column with a CHECK constraint to ensure that the value is a valid email address.

Starting with v0.15, Atlas can now manage domains in your database schema, as well as use them as types for table columns. Let's see an example schema that uses domains:

domain "us_postal_code" {
schema = schema.public
type = text
null = true
check "us_postal_code_check" {
expr = "((VALUE ~ '^\\d{5}$'::text) OR (VALUE ~ '^\\d{5}-\\d{4}$'::text))"
}
}

domain "username" {
schema = schema.public
type = text
null = false
default = "anonymous"
check "username_length" {
expr = "(length(VALUE) > 3)"
}
}

table "users" {
schema = schema.public
column "name" {
type = domain.username
}
column "zip" {
type = domain.us_postal_code
}
}

schema "public" {
comment = "standard public schema"
}

The above schema defines two domains: us_postal_code and username. The us_postal_code domain is a text column with a CHECK constraint to ensure that the value is a valid US postal code. The username domain is a text column with a CHECK constraint to ensure that the value is at least 4 characters long. We then define a users table that uses these domains for its columns.

Let's see what happens when we apply this schema to a local Postgres database:

atlas schema apply -u 'postgres://postgres:pass@localhost:5432/postgres?sslmode=disable' -f schema.hcl

Atlas calculates the diff between the current (empty) state of the database and our desired state and prompts us to confirm the migration plan:

-- Planned Changes:
-- Create domain type "us_postal_code"
CREATE DOMAIN "public"."us_postal_code" AS text CONSTRAINT "us_postal_code_check" CHECK ((VALUE ~ '^\d{5}$'::text) OR (VALUE ~ '^\d{5}-\d{4}$'::text));
-- Create domain type "username"
CREATE DOMAIN "public"."username" AS text DEFAULT 'anonymous' NOT NULL CONSTRAINT "username_length" CHECK (length(VALUE) > 3);
-- Create "users" table
CREATE TABLE "public"."users" ("name" "public"."username" NOT NULL, "zip" "public"."us_postal_code" NOT NULL);
Use the arrow keys to navigate: ↓ ↑ → ←
? Are you sure?:
▸ Apply
Abort

After applying, let's re-run the schema apply command to make sure that the schema is up-to-date:

atlas schema apply -u 'postgres://postgres:pass@localhost:5432/postgres?sslmode=disable' --to file://schema.hcl

Indeed, Atlas reports that the schema is up-to-date:

Schema is synced, no changes to be made

Support for TypeORM

TypeORM is a popular ORM for Node.js. In this release, we are happy to announce the TypeORM integration, which allows you to automatically generate your database schema from your TypeORM entities, create visualizations, and more.

The TypeORM Atlas Provider is a Node.js module that can extract the desired schema of your database directly from your TypeORM entities. To use it, first install:

npm i @ariga/atlas-provider-typeorm

Next, add the TypeORM schema as a data source in your atlas.hcl file:

data "external_schema" "typeorm" {
program = [
"npx",
"@ariga/atlas-provider-typeorm",
"load",
"--path", "./path/to/entities",
"--dialect", "mysql", // mariadb | postgres | sqlite | mssql
]
}

env "typeorm" {
src = data.external_schema.typeorm.url
dev = "docker://mysql/8/dev"
migration {
dir = "file://migrations"
}
format {
migrate {
diff = "{{ sql . \" \" }}"
}
}
}

Finally, run atlas schema apply to apply the schema to your database:

atlas schema apply -u mysql://<db credentials> --env typeorm

To learn more about the TypeORM integration, check out the documentation.

Wrapping up

That's it! I hope you try out (and enjoy) all of these new features and find them useful. As always, we would love to hear your feedback and suggestions on our Discord server.

· 6 min read
Rotem Tamir
TL;DR

In this guide we will demonstrate how to use Atlas to automatically generate migrations for Microsoft SQL Server databases.

To skip the intro and go straight to the demo, click here.

Introduction

As your application's data model evolves, you will need to make changes to your database schema. In today's world, where teams are expected to own their infrastructure and ship code faster than ever, it is important to have a reliable and repeatable process for managing database schema changes.

Atlas lets you manage your database schema as code. It is a modern schema management tool that applies concepts from modern DevOps tools to database schema management. Using Atlas, teams can automatically plan, verify, deploy and monitor database schema changes.

Microsoft SQL Server, one of the longest-standing database engines in our business, was first released by Microsoft in 1989. MS-SQL is the go-to database for Windows environments in many industries.

In this guide, we will demonstrate how to use Atlas to automatically generate migrations for your Microsoft SQL Server databases.

Setting up

  1. Start by installing the Atlas CLI, if you haven't already. On macOS and Linux simply run:

    curl -sSf https://atlasgo.sh | sh

    For other platforms, see the installation instructions.

  2. The SQL Server driver is currently available to users of Atlas Cloud Beta Program. To join the program (for free), first sign up for an Atlas Cloud account.

  3. Once your inside your Atlas account, go to the account settings by clicking your avatar. Then, select the "Microsoft SQL Server" and click the "Save" button.

  4. After you have opted-in to the Beta Program, log in to your Atlas account using the CLI:

    $ atlas login
    You are now connected to "a8m" on Atlas Cloud.

Demo time!

In this guide, we will demonstrate some of the basic capabilities of Atlas by working against a local Microsoft SQL Server database.

To spin up a local SQL Server instance using docker run:

docker run --rm -e 'ACCEPT_EULA=Y' -e 'MSSQL_SA_PASSWORD=P@ssw0rd0995' -p 1433:1433 -d mcr.microsoft.com/mssql/server:latest

Notice that by passing the ACCEPT_EULA environment variable, we are accepting the terms of Microsoft's EULA.

Managing your database schema as code

Atlas supports a workflow called declarative schema migrations. In this workflow, you first define the desired state of your database schema (in one of many supported formats and languages) and then let Atlas calculate the diff between the desired state and the actual state of your database. Atlas then generates the needed SQL commands that will bring your database to the desired state.

Let's see this in action. First, create a new file name schema.sql. This file will contain the desired state of our database in plain SQL.

schema.sql
-- Create the users table
CREATE TABLE users (
id INT PRIMARY KEY,
email NVARCHAR(255) UNIQUE,
display_name NVARCHAR(255)
);

-- Create the posts table with a custom name for the FK constraint
CREATE TABLE posts (
id INT PRIMARY KEY,
title NVARCHAR(255),
body TEXT,
author_id INT,
CONSTRAINT author_fk FOREIGN KEY (author_id) REFERENCES users(id)
);

Applying our schema

Next, let's apply this schema to our database. To do so, we will use the atlas schema apply command.

atlas schema apply -u "sqlserver://sa:P@ssw0rd0995@localhost:1433?database=master" \
--to file://schema.sql \
--dev-url "docker://sqlserver"

Atlas will connect to our target database to inspect it's current state. Next, it will use the dev-database to normalize our schema and finally, it will generate the SQL commands that will bring our database to the desired state:

-- Planned Changes:
-- Create "users" table
CREATE TABLE [users] ([id] int NOT NULL, [email] nvarchar(255) COLLATE SQL_Latin1_General_CP1_CI_AS NULL, [display_name] nvarchar(255) COLLATE SQL_Latin1_General_CP1_CI_AS NULL, CONSTRAINT [PK_users] PRIMARY KEY CLUSTERED ([id] ASC));
-- Create index "UQ__users__AB6E61643C9DEB30" to table: "users"
CREATE UNIQUE NONCLUSTERED INDEX [UQ__users__AB6E61643C9DEB30] ON [users] ([email] ASC);
-- Create "posts" table
CREATE TABLE [posts] ([id] int NOT NULL, [title] nvarchar(255) COLLATE SQL_Latin1_General_CP1_CI_AS NULL, [body] text COLLATE SQL_Latin1_General_CP1_CI_AS NULL, [author_id] int NULL, CONSTRAINT [PK_posts] PRIMARY KEY CLUSTERED ([id] ASC), CONSTRAINT [post_author_fk] FOREIGN KEY ([author_id]) REFERENCES [users] ([id]) ON UPDATE NO ACTION ON DELETE NO ACTION);

Atlas prompts us to approve the changes before applying them to the database:

Use the arrow keys to navigate: ↓ ↑ → ←
? Are you sure?:
▸ Apply
Abort

After applying the schema, Atlas confirms that the changes were applied:

✔ Apply

Next, let's re-run the atlas schema apply command. This time, Atlas will detect that the database is already in the desired state and will not generate any changes:

Schema is synced, no changes to be made.

Altering our schema

Now, let's make some changes to our schema. Open the schema.sql file and add a new column to the users table:

schema.sql
CREATE TABLE users (
id INT PRIMARY KEY,
email NVARCHAR(255) UNIQUE,
display_name NVARCHAR(255),
+ bio text
);

Next, let's re-run the atlas schema apply command. This time, Atlas will detect that the schema has changed and will generate the needed SQL commands to bring the database to the desired state:

-- Planned Changes:
-- Modify "users" table
ALTER TABLE [users] ADD [bio] text COLLATE SQL_Latin1_General_CP1_CI_AS NULL;

After applying the changes, Atlas confirms once again that the changes were applied:

✔ Apply

Visualizing our schema

One of the most useful features of Atlas is the ability to visualize your database schema. To do so, run the atlas schema inspect command with the -w (web) flag:

atlas schema inspect -u "sqlserver://sa:P@ssw0rd0995@localhost:1433?database=master" -w

Atlas will ask whether you would like to create your visualization publicly (in a publicly accessible URL) or privately (in your Atlas Cloud account):

Use the arrow keys to navigate: ↓ ↑ → ←
? Where would you like to share your schema visualization?:
▸ Publicly (gh.atlasgo.cloud)
Privately (rotemtam85.atlasgo.cloud)

For this demo, let's choose the public option. Atlas will create the visualization and open it in your default browser:

See it for yourself at: https://gh.atlasgo.cloud/explore/5e15289a

Wrapping up

In this guide we have demonstrated how to set up Atlas to manage your Microsoft SQL Server database schema. We have also demonstrated some of the basic capabilities of Atlas, such as declarative schema migrations, and schema visualization. These two features are just the tip of the iceberg. Atlas has many more features that can help you better manage your database! To learn more, check out the Atlas documentation.

As always, we would love to hear your feedback and suggestions on our Discord server.

· 5 min read
Rotem Tamir

Hi everyone!

I'm very happy to share with you some of the recent improvements to Atlas, specifcially around GitHub Actions. In August of last year, we released our first version of the GitHub Actions experience for Atlas. It was a modest start, which included the ability to verify the safety and correctness of schema migrations during the CI process.

Over the past year, we have slowly added more features to the GitHub Actions experience, including the ability to sync migration directories to Atlas Cloud, deploy migrations, and even install Atlas. As often happens with quickly evolving systems, we felt that the API became complex, carrying over use cases and experiences that have become obsolete or superseded by better ones since the initial release.

At Ariga, the team developing Atlas, we have written a document named the "R&D Manifesto", which lists some the principles that we commit to as individuals and as an organization. One of them is "Obsess over APIs and DevEx" - we believe that the key to building a successful product is to provide the best possible experience to our users, and that starts with clear, consistent and composable APIs that empower our users to achieve amazing feats of engineering.

With that in mind, our team has been working hard in the past few weeks to revamp the GitHub Actions experience for Atlas. Here's a quick summary of the changes:

  1. We've moved all actions into a single repo - ariga/atlas-action. (With the exception of ariga/setup-atlas.)
  2. The API has been reviewed and updated to make sure it is consistent among the different actions and with the rest of the Atlas ecosystem.
  3. We've rewritten the code in Go, which is the language we use for all of our internal tools. This allows us to share code between the CLI and the GitHub Actions, and to provide a more consistent experience between the two. In addition, looking forward we have greatly simplified the process of adding new GitHub Actions as needed.

Deprecation Notice

As part of this change we are deprecating the previous generation of GitHub Actions, and we encourage you to migrate to the new ones as soon as possible. The old actions will continue to work for the time being, but we will not be receiving any updates. These actions are:

Introducing to the New Actions

Without further ado, I'm happy to present the new generation of GitHub Actions for Atlas. The new actions follow the design principle of building actions as small, composable units that can be combined to achieve different outcomes. All of the actions rely on Atlas being installed on the GitHub Actions runner, which is done using the ariga/setup-atlas action. The rest of the actions essentially map to CLI commands, and can be used to build more complex workflows.

The actions are:

ActionUse Case
ariga/setup-atlasInstall Atlas from a GitHub Actions workflow
ariga/atlas-action/migrate/lintCI for schema changes
ariga/atlas-action/migrate/pushPush your migration directory to Atlas Cloud (atlasgo.cloud)
ariga/atlas-action/migrate/applyDeploy versioned migrations from GitHub Actions

Example Workflows

Consider the following GitHub Actions workflow, which can be used to implement a CI/CD pipeline for your database schema changes.

name: Atlas CI/CD
on:
push:
branches:
- master # Use your main branch here.
pull_request:
paths:
- 'migrations/*' # Use the path to your migration directory here.
# Permissions to write comments on the pull request.
permissions:
contents: read
pull-requests: write
jobs:
atlas:
services:
# Spin up a mysql:8 container to be used as the dev-database for analysis.
mysql:
image: mysql:8
env:
MYSQL_DATABASE: dev
MYSQL_ROOT_PASSWORD: pass
ports:
- 3306:3306
options: >-
--health-cmd "mysqladmin ping -ppass"
--health-interval 10s
--health-start-period 10s
--health-timeout 5s
--health-retries 10
runs-on: ubuntu-latest
env:
GITHUB_TOKEN: ${{ github.token }}
steps:
- uses: actions/checkout@v3
with:
fetch-depth: 0
- uses: ariga/setup-atlas@v0
with:
cloud-token: ${{ secrets.ATLAS_CLOUD_TOKEN }}
- uses: ariga/atlas-action/migrate/lint@v1
with:
dir: 'file://migrations'
dir-name: 'my-project' # The name of the project in Atlas Cloud
dev-url: "mysql://root:pass@localhost:3306/dev"
- uses: ariga/atlas-action/migrate/push@v1
if: github.ref == 'refs/heads/master'
with:
dir: 'file://migrations'
dir-name: 'my-project'
dev-url: 'mysql://root:pass@localhost:3306/dev' # Use the service name "mysql" as the hostname

This workflow uses 3 different actions to achieve the following:

  • ariga/setup-atlas - Installs Atlas on the GitHub Actions runner and logs in using the provided token.
  • ariga/atlas-action/migrate/lint - Lints the migration directory and verifies that it is safe to apply. This is run on every pull request that modifies the migration directory. If issues are found, the action will fail and a comment will be posted on the pull request with the details.
  • ariga/atlas-action/migrate/push - Pushes the migration directory to Atlas Cloud. This is run on every push to the main branch, so it can be used to deploy the migrations to production.

Tagging v1

With the release of the new actions, we are also tagging the v1 release of the actions to mark the maturity and stability of the API. We hope you will find the new actions useful, and we look forward to seeing what you build with them!

How can we make Atlas better?

We would love to hear from you on our Discord server ❤️.

· 8 min read
Ronen Lubin
TL;DR

You can now import the desired database schema from your Sequelize project into Atlas, and use it to automatically plan migrations for you.

See an example

Introduction

Sequelize is one of the most popular ORMs for Node.js. It supports a variety of databases, including MySQL, PostgreSQL, SQLite, and Microsoft SQL Server.

Atlas is a modern tool for managing your database schema. It allows you to inspect, plan, lint and execute schema changes to your database. It is designed to be used by developers, DBAs and DevOps engineers alike.

Atlas supports many ways to describe database schemas: Using Schema Loaders, plain SQL, a connection to another database or using Atlas HCL.

Today, I'm happy to announce that Atlas supports loading the desired schema from Sequelize projects. This means that Sequelize users can now use Atlas instead of the existing Sequelize CLI to manage their database schema.

By using Atlas, Sequelize users can now enjoy these benefits:

  • A declarative migration flow - Atlas can operate like a "Terraform for databases", where by running atlas schema apply the application schema is applied on a target database.
  • Automatic schema migration planning - Alternatively, Atlas can operate using a more traditional versioned migration flow. However, contrary to most tools, Atlas will automatically analyze the diff between the migration directory and the current application data model, and will produce correct and safe SQL migration files.
  • CI for schema changes - Atlas can be used during CI to make sure you never merge a pull request that will break your database schema.
  • Modern CD integrations - Atlas integrates seamlessly with modern deployment tools such as Kubernetes, Terraform, Helm, Flux, and ArgoCD. This allows you to deploy changes to your database schema as part of your existing deployment pipelines.
  • Visualization - Atlas users can create beautiful, shareable ERDs of their application data model with a single command.
  • .. and much more (read more about Atlas features)

Evolving beyond Sequelize's native migration support

Sequelize allows users to manage their database schemas using its sync feature, which is usually sufficient during development and in many simple cases:

await sequelize.sync({ force: true });
console.log("All models were synchronized successfully.");

However, at some point, teams need more control and decide to employ the migrations methodology, which is a more robust way to manage your database schema. The problem with creating migrations in Sequelize is that they are usually written by hand in a very specific DSL, which is error-prone and time consuming:

module.exports = {
up: (queryInterface, Sequelize) => {
return queryInterface.createTable('Person', {
name: Sequelize.DataTypes.STRING,
isBetaMember: {
type: Sequelize.DataTypes.BOOLEAN,
defaultValue: false,
allowNull: false
}
});
},
down: (queryInterface, Sequelize) => {
return queryInterface.dropTable('Person');
}
};

Atlas can automatically plan database schema migrations for developers using Sequelize by calculating the diff between the current state of the migration directory and its desired state defined by the Sequelize schema.

Demo time

Let's demonstrate how to set up Atlas to manage your Sequelize schema.

Installation

If you haven't already, install Atlas from macOS or Linux by running:

curl -sSf https://atlasgo.sh | sh

See the documentation for more installation options.

Install the Atlas Sequelize Provider by running:

npm install @ariga/atlas-provider-sequelize

Make sure all your Node dependencies are installed by running:

npm install

Standalone vs Script mode

The provider can be used in two modes:

  • Standalone - If all of your Sequelize models exist in a single Node.js module, you can use the provider directly to load your Sequelize schema into Atlas.
  • Script - In other cases, you can use the provider as an npm package to write a script that loads your Sequelize schema into Atlas.

Standalone mode

In your project directory, create a new file named atlas.hcl with the following contents:

data "external_schema" "sequelize" {
program = [
"npx",
"@ariga/atlas-provider-sequelize",
"load",
"--path", "./path/to/models",
"--dialect", "mysql", // mariadb | postgres | sqlite | mssql
]
}

env "sequelize" {
src = data.external_schema.sequelize.url
dev = "docker://mysql/8/dev"
migration {
dir = "file://migrations"
}
format {
migrate {
diff = "{{ sql . \" \" }}"
}
}
}

For the sake of brevity, we will not review the Script mode in this post, but you can find more information about it in the Sequelize Guide.

Load Sequelize Schema in action

Atlas supports a versioned migrations workflow, where each change to the database is versioned and recorded in a migration file. You can use the atlas migrate diff command to automatically generate a migration file that will migrate the database from its latest revision to the current Sequelize schema.

Suppose we have the following Sequelize models directory, with two models task and user:

'use strict';
module.exports = (sequelize, DataTypes) => {
const Task = sequelize.define('Task', {
complete: {
type: DataTypes.BOOLEAN,
defaultValue: false,
}
});

Task.associate = (models) => {
Task.belongsTo(models.User, {
foreignKey: {
name: 'userID',
allowNull: false
},
as: 'tasks'
});
};

return Task;
};

We can now generate a migration file by running this command:

atlas migrate diff --env sequelize

Running this command will generate files similar to this in the migrations directory:

migrations
|-- 20230918143104.sql
`-- atlas.sum

0 directories, 2 files

Examining the contents of 20230918143104.sql:

-- Create "Users" table
CREATE TABLE `Users` (
`id` int NOT NULL AUTO_INCREMENT,
`name` varchar(255) NOT NULL,
`email` varchar(255) NOT NULL,
`createdAt` datetime NOT NULL,
`updatedAt` datetime NOT NULL,
PRIMARY KEY (`id`)
) CHARSET utf8mb4 COLLATE utf8mb4_0900_ai_ci;
-- Create "Tasks" table
CREATE TABLE `Tasks` (
`id` int NOT NULL AUTO_INCREMENT,
`complete` bool NULL DEFAULT 0,
`createdAt` datetime NOT NULL,
`updatedAt` datetime NOT NULL,
`userID` int NOT NULL,
PRIMARY KEY (`id`),
INDEX `userID` (`userID`),
CONSTRAINT `Tasks_ibfk_1` FOREIGN KEY (`userID`) REFERENCES `Users` (`id`) ON UPDATE CASCADE ON DELETE NO ACTION
) CHARSET utf8mb4 COLLATE utf8mb4_0900_ai_ci;

Amazing! Atlas automatically generated a migration file that will create the Users and Tasks tables in our database!

Next, alter the User model to add a new age field:

    name: {
type: DataTypes.STRING,
allowNull: false
},
+ age: {
+ type: DataTypes.INTEGER,
+ allowNull: false
+ },

Re-run this command:

atlas migrate diff --env sequelize

Observe a new migration file is generated:

-- Modify "Users" table
ALTER TABLE `Users` ADD COLUMN `age` int NOT NULL;

Conclusion

In this post, we have presented how Sequelize projects can use Atlas to automatically plan schema migrations based only on their data model.

How can we make Atlas better?

We would love to hear from you on our Discord server ❤️.

· 6 min read
Rotem Tamir

Hi everyone!

It's been a few weeks since our last version announcement and today I'm happy to share with you
v0.14, which includes some very exciting improvements for Atlas:

  • Checkpoints - as your migration directory grows, replaying it from scratch can become annoyingly slow. Checkpoints allow you to save the state of your database at a specific point in time and replay migrations from that point forward.
  • Push to the Cloud - you can now push your migration directory to Atlas Cloud directly from the CLI. Think of it like docker push for your database migrations.
  • JetBrains Editor Support - After launching our VSCode Extension a few months ago, our team has been hard at work to bring the same experience to JetBrains IDEs. Starting today, you can use Atlas directly from your favorite JetBrains IDEs (IntelliJ, PyCharm, GoLand, etc.) using the new Atlas plugin.

Let's dive right in!

Checkpoints

Suppose your project has been going on for a while, and you have a migration directory with 100 migrations. Whenever you need to install your application from scratch (such as during development or testing), you need to replay all migrations from start to finish to set up your database. Depending on your setup, this may take a few seconds or more. If you have a checkpoint, you can replay only the migrations that were added since the latest checkpoint, which can be much faster.

Here's a short example. Let's say we have a migration directory with 2 migration files, managing a SQLite database. The first one creates a table named t1:

migrations/20230830122359_start.sql
create table t1 ( c1 int );

And the second adds a table named t2 and adds a column named c2 to t1:

migrations/20230830122414_t2.sql.sql
create table t2 ( c1 int, c2 int );

alter table t1 add column c2 int;

To create a checkpoint, we can run the following command:

atlas migrate checkpoint --dev-url "sqlite://file?mode=memory&_fk=1"

This will create a SQL file, which is our checkpoint:

20230830123813_checkpoint.sql
-- atlas:checkpoint

-- Create "t1" table
CREATE TABLE `t1` (`c1` int NULL, `c2` int NULL);
-- Create "t2" table
CREATE TABLE `t2` (`c1` int NULL, `c2` int NULL);

Notice two things:

  1. The atlas:checkpoint directive which indicates that this file is a checkpoint.
  2. The SQL statement to create the t1 table included both the c1 and c2 columns and does not contain the alter table statement. This is because the checkpoint includes the state of the database at the time it was created, which can be thought of as the sum of all migrations that were applied up to that point.

Next, let's apply these migrations on a local SQLite database:

atlas migrate apply --url sqlite://local.db

Atlas prints:

Migrating to version 20230830123813 (1 migrations in total):

-- migrating version 20230830123813
-> CREATE TABLE `t1` (`c1` int NULL, `c2` int NULL);
-> CREATE TABLE `t2` (`c1` int NULL, `c2` int NULL);
-- ok (960.465µs)

-------------------------
-- 6.895124ms
-- 1 migrations
-- 2 sql statements

As expected, Atlas skipped all of the migrations up to the checkpoint and only applied the last one!

Push to Cloud

As we demonstrated above, once we have a migration directory, we can apply it to a database. If your database is running locally this is easy enough, but building deployment pipelines to production databases is more involved. There are multiple ways to accomplish this, such as building custom Docker images, as shown in most methods covered in the guides section.

In this release, we simplified the process of pushing migration directories to Atlas Cloud by adding a new atlas migrate push command. You can think of it as docker push for your database migrations.

atlas migrate push

Migration Directory created with atlas migrate push

Continuing with our example from above, let's push our migration directory to Atlas Cloud.

To start, you'll need to log in to Atlas. If it's your first time, you'll be prompted to create both an account and a workspace.

atlas login

After logging in, let's name our new migration project pushdemo and run:

atlas migrate push pushdemo --dev-url "sqlite://file?mode=memory&_fk=1"

After our migration directory is pushed, Atlas prints a URL to the created directory, similar to the one shown in the image above.

Once your migration directory is pushed, you can use it to apply migrations to your database directly from the cloud, just as you would execute docker run to run a container image that is stored in a Docker container registry.

To apply a migration directory directly from the cloud, run:

atlas migrate apply --dir atlas://pushdemo --url sqlite://local.db

Notice two flags that we used here:

  • --dir - specifies the URL of the migration directory. We used atlas://pushdemo to indicate that we want to use the migration directory named pushdemo that we pushed earlier. This directory is accessible to us because we used atlas login in a previous step.
  • --url - specifies the URL of the database we want to apply the migrations to. In this case, we used the same SQLite database that we used earlier.

JetBrains Editor Support

JetBrains makes some of the most popular IDEs for software developers, including IntelliJ, PyCharm, GoLand, and more. We are happy to announce that following our recent release of the VSCode Extension, we now have a plugin for JetBrains IDEs as well!

The plugin is built to make editing Atlas HCL files much easier by providing developers with syntax highlighting, code completion, and warnings. It supports both atlas.hcl project configuration files as well as schema definition files (.my.hcl, .pg.hcl, and .lt.hcl).

The plugin is available for download from the JetBrains Marketplace.

  1. To install the plugin, open your IDE and go to Preferences > Plugins > Marketplace and search for Atlas:

  2. Click on the Install button to install the plugin.

  3. Create a new file named schema.my.hcl (the .my.hcl suffix signifies to the plugin that this file is a MySQL schema (you can use .pg.hcl for Postgres or .lt.hcl for SQLite)

  4. Edit away!

Wrapping up

That's it! I hope you try out (and enjoy) all of these new features and find them useful. As always, we would love to hear your feedback and suggestions on our Discord server.

· 6 min read
Rotem Tamir

TL;DR

Atlas now supports AWS IAM authentication, which enables you to perform passwordless schema migrations on your RDS databases. To use it with Atlas, add the aws_rds_token data source to your atlas.hcl configuration file:

data "aws_rds_token" "mydb" {
endpoint = "mydb.123456789012.us-east-1.rds.amazonaws.com:3306"
username = "atlas"
}

To skip the intro and jump straight to the tutorial, click here.

Introduction

Passwords have long been the default mechanism for authentication, but they come with a set of known vulnerabilities. In recent years, our industry has shifted towards alternative authentication methods due to these weaknesses. For databases, which store critical data, this security concern is even more important.

Schema migrations require elevated permissions, making it even more essential to approach them with utmost care in order to prevent security breaches. In this post, we'll show how to use Atlas to perform passwordless schema migrations on databases hosted in AWS's RDS service.

The Problem with Passwords

Passwords are considered a weak authentication mechanism for humans logging in to systems since they can be leaked or guessed. For this reason, many services offer more robust authentication methods, such as multi-factor authentication or single sign-on.

In this post, we'll focus on the security concerns of passwords (or API Tokens) for automated systems (such as CI/CD pipelines), which are used to perform schema migrations. Such tokens pose a challenge to securing systems in a few ways:

  • Leaks. When stored in configuration files, passwords are typically in plain text, increasing the risk of leaks.
  • Granularity. When passwords are shared among multiple users, it becomes challenging to grant and revoke access for individual users based on role changes or emerging security concerns.
  • Visibility. Because passwords are usually visible to operators and are shared by multiple users, it's hard to track who performed which operation once authenticated.
  • Rotation. Because passwords tend to be long-lived, their rotation becomes a cumbersome task.

IAM Authentication

IAM, short for Identity and Access Management, is a framework that has been adopted by virtually all cloud providers for managing digital identities and their permissions. Unlike traditional password-based systems where credentials are stored and checked, IAM verifies who (or what) is making a request and then checks the permissions associated with that identity.

IAM services supply mechanisms for generating short-lived tokens based on the identity of the caller. In addition, these services provide a centralized way to manage permissions (by creating granular access policies and grouping them into roles) and auditing capabilities to track how subjects (users or services) use the system.

Configured correctly, under IAM, every subject can access exactly what it needs and nothing more, without ever having to use a password or some other token that might be leaked or stolen. When a person leaves your organization (or no longer needs access to a particular resource), you can revoke their access by updating their IAM role.

IAM authentication for Databases

Most databases in use today predate IAM and have developed their own internal mechanisms for authentication and authorization. In recent years, cloud vendors have worked to create a bridge between IAM and databases, allowing users to authenticate their identity to databases using IAM credentials. In this post, we'll focus on AWS's implementation of IAM authentication for RDS databases.

How does it work?

First, enable IAM authentication on your RDS instance. This installs a plugin on the database that allows it to authenticate users with IAM credentials instead of passwords. Read how to do this in the AWS documentation

Next, create a database user and grant it permission to authenticate using IAM.

In MySQL, execute a statement like this:

CREATE USER 'atlas' IDENTIFIED WITH AWSAuthenticationPlugin as 'RDS';

In PostgreSQL, execute a statement like this:

CREATE USER atlas; 
GRANT rds_iam TO atlas;

Finally, create an IAM policy that allows subjects to create RDS connection tokens. This policy can then be attached to roles for developers or services that need to connect to the database. Read how to do this in the AWS documentation.

IAM Authentication with Atlas

Tools that perform schema migrations such as Atlas require elevated permissions to perform their tasks. For example, they need to be able to inspect the database's information schema tables as well as create and drop resources. For this reason, any mechanism that can further protect the security of their credentials is essential, making IAM authentication a great fit. To support this use case, we have recently added support for AWS IAM authentication to Atlas.

Demo Time!

Let's see how to use Atlas to perform passwordless schema migrations on an RDS database.

For the purpose of this demo, we assume that we have a PostgreSQL database running in RDS with IAM authentication enabled. We also assume that we have a user named atlas that has been granted the rds_iam permission and that we have created an IAM policy that allows us to generate RDS tokens.

Start by creating a new file named atlas.hcl to store our project configuration and add the following content:

// Define local variables for the database endpoint and username.
locals {
endpoint = "atlas-demo.xyzxyz.us-east-1.rds.amazonaws.com:5432"
username = "atlas"
}

// Use the "aws_rds_token" data source to generate a token for the database.
data "aws_rds_token" "db" {
endpoint = local.endpoint
username = local.username
region = "us-east-1"
}

// Define an environment named "rds" that uses the generated token.
env "rds" {
url = "postgres://${local.username}:${urlescape(data.aws_rds_token.db)}@${local.endpoint}/postgres"
}

Lets break this example down:

  • The locals block defines two variables – endpoint and username – that we use to store the database endpoint and the username of the user created in the database.
  • Next, we define an aws_rds_token data source to generate a token for the database. To read more about this data source, see the documentation.
  • Finally, we define an environment named rds that uses the generated token. The url property defines the connection URL that Atlas will use to connect to the database. Notice that we use the urlescape function to escape the token before embedding it in the URL.

Now that we have our project configuration, let's use Atlas to inspect the database schema. Run the following command:

atlas schema inspect -c "file://atlas.hcl" --env rds

You should see output similar to the following:

schema "public" {
}

Amazing! This output indicates that Atlas was able to both connect to the database and inspect the schema without us having to provide it with any credentials!

Wrapping up

In this post, we discussed the security concerns around passwords and how IAM authentication can help mitigate them. We also demonstrated how to use Atlas to perform passwordless schema migrations on an RDS database using IAM authentication. If you use Atlas to perform schema migrations on RDS databases, we encourage you to give IAM authentication a try!

How can we make Atlas better?

We would love to hear from you on our Discord server ❤️.

· 5 min read
Rotem Tamir

We recently shipped a new feature in Atlas that enables developers to quickly create ERD (Entity Relationship Diagram) visualizations of their database schemas. Today, I want to show how this feature can be used in tandem with one of Atlas's core capabilities - "Schema Loaders" - to produce visualizations of GORM models.

But first, let's introduce the different characters in this story:

  • Atlas - an open-source tool for managing database schemas.
  • GORM - one of the most popular ORMs for Go.
  • ERD - a diagram that shows the relationships between entities in a database. (we'll see an example in a minute)
  • Schema Loaders - a feature in Atlas that allows users to load their database schemas from different sources.

In this blog post, we will create a toy GORM application, and show how you can use Atlas to visualize the database schema that GORM generates for you.

Step 1: Bootstrap the GORM application

Start by creating a new directory for our project. Then, initialize a new Go module:

mkdir gormviz
cd gormviz
go mod init example.io/gormviz

Next, we will install the GORM package and the SQLite driver:

go get -u gorm.io/gorm
go get -u gorm.io/driver/sqlite

Now, let's create a file that will contain our database models. We will call it models/models.go:

models/models.go
package models

import "gorm.io/gorm"

type User struct {
gorm.Model
Name string
Pets []Pet
}

type Pet struct {
gorm.Model
Name string
User User
UserID uint
}

Step 2: Setup Atlas

Now that we have a GORM application, let's set up Atlas. First, we will install the Atlas CLI:

curl -sSf https://atlasgo.sh | sh

For more installation options, see these instructions.

Next, let's install the GORM Atlas provider which will allow us to load our GORM models into Atlas:

go get ariga.io/atlas-provider-gorm@v0.1.0

Next, to prevent the Go Modules system from dropping this dependency from our go.mod file, let's follow the Go Module's official recommendation for tracking dependencies of tools and add a file named tools.go with the following contents:

tools.go
//go:build tools
package main

import _ "ariga.io/atlas-provider-gorm/gormschema"

Alternatively, you can simply add a blank import to the models.go file we created above.

Finally, to tidy things up, run:

go mod tidy

After the provider is installed, let's create an Atlas project file to glue everything together.

Create a new file named atlas.hcl with the following contents:

atlas.hcl
data "external_schema" "gorm" {
program = [
"go",
"run",
"-mod=mod",
"ariga.io/atlas-provider-gorm",
"load",
"--path", "./models",
"--dialect", "sqlite",
]
}

env "gorm" {
src = data.external_schema.gorm.url
dev = "sqlite://file?mode=memory&_fk=1"
}

This file defines two things:

  • An External Schema Loader named gorm that will load our GORM models into Atlas by executing the ariga.io/atlas-provider-gorm program on our models package.
  • An Environment named gorm that will use the gorm schema loader to load the models into a SQLite database in memory.

Step 3: Visualize the GORM models

Now that we have everything set up, let's run Atlas and see what we get:

atlas schema inspect -w --env gorm --url 'env://src'

Let's break down this command:

  • The schema inspect command is used to inspect a database schema and produce a representation of it.
  • The -w flag tells Atlas to open a web browser and display the visualization.
  • The --env gorm flag tells Atlas to use the gorm environment we defined in the atlas.hcl file.
  • The --url 'env://src' flag tells Atlas to use schema defined in the src attribute of the gorm env.

When we run this command,

Atlas will prompt us to ask if we want this visualization to be shared on the Public Atlas Playground or if we want to keep it private:

? Where would you like to share your schema visualization?:
▸ Publicly (gh.atlasgo.cloud)
Your personal workspace (requires 'atlas login')

As this is just a toy example, let's publish it to the public playground by pressing Enter.

Once we do this, Atlas will extract the database schema from our GORM models, and publish it to the playground, printing the URL of the visualization:

https://gh.atlasgo.cloud/explore/60d94de7

Privately sharing visualizations

By publishing visualizations to the public playground, you can easily share them with others by simply sending them the URL. However, if you want to keep your visualizations private, such that they are only accessible to you and your team, you can do so by first logging in to Atlas Cloud:

atlas login

Your browser should open and prompt you to either login or create a free account if you don't already have one. Upon completion, you should see a message in your terminal that looks like this:

You are now connected to rotemtam85 on Atlas Cloud.

Once you are logged in, you can re-run the atlas schema inspect --env gorm --web command and Atlas will prompt you to ask if you want to share the visualization in your personal workspace:

? Where would you like to share your schema visualization?:
Publicly (gh.atlasgo.cloud)
▸ Privately (rotemtam85.atlasgo.cloud)

Select the Privately option and press Enter. Atlas will then publish the visualization to your personal workspace and print the URL of the visualization:

https://rotemtam85.atlasgo.cloud/explore/2da80ffx

Wrapping up

In this post, we have shown how to use Atlas to visualize the database schema that GORM generates for your application. ERD visualizations are just one of the many features that Atlas provides for working with your database schema. To learn more about what you can do with the Atlas GORM provider, check out the relevant guide.

How can we make Atlas better?

We would love to hear from you on our Discord server ❤️.